This page will contain a journal of my experiences with CCD imaging (newest entries will appear at the top of the page). I purchased a Meade Pictor 216XT CCD Imaging system in the spring of 1998. CCD imaging is a completely new experience for me; thus this page will be developing as I learn.
Tonight I had a CCD imaging session from Wilbraham, MA. Tonight my plan was to try some CCD imaging with a different telescope than I had used in past sessions: The Celestron 500 Maksutov spotting scope. This scope is a 90mm F5.6 unit. I have the necessary adapters to allow coupling of the flip mirror and the actual CCD camera. Tonight was quite clear except for a 2 hour period between midnight and 2am, when it totally clouded over.
I find that the focusing feature of the Meade Pictor software is a bit erratic at times. Sometimes an image will appear as total white even when no changes have been made from the previous image. I'm not sure what's up with this; it is annoying and I may e-mail Meade about it. Focusing still is the longest thing to get right; it took me maybe a half hour to get a goof focus with the Mak 500 scope. I wanted to try the Mak 500 scope tonight because it would offer a larger field of view, and I wanted to see how it would work out.
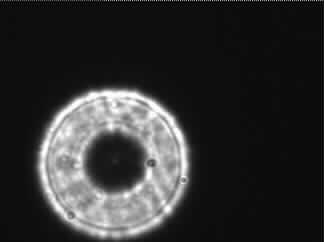
I took quite a few images tonight, but only about 4 or 5 of the finals are worth keeping at this time. I found that the Mak 500 did not do so well on globular clusters or the Ring Nebula (this object is too small for the Mak 500's focal length). The Mak 500 did quite well on some of the open clusters I tried; I got a nice image of M52 using it. I did get an image of M11 which was nicely framed, but the image suffered from drifting stars (the single bolt holding the Mak 500 on the CG-11 scope slipped a slight amount). I found that clusters like M39 are way too large for this scope.
I tried using the Celestron F6.3 focal reducer on the Mak 500 scope... but unfortunately I could not bring the unit to focus with the reducer in place. It may have been able to focus if I removed the flip mirror unit from the light path, but I did not want to even try. Locating objects on the CCD chip without the flip mirror is next to impossible without precisely aligning the scope with the main scope, something I did not feel like doing. The fact that I could not use the F6.3 reducer was a disappointment, because I was hoping to enlarge the field of view enough to frame up some more of the larger open clusters.
Overall the session went well except for the cloud bank that covered the sky for 2 hours. During this time I worked on processing some of the images I had taken up to that point. I stayed out until the sky started to brighten from the oncoming twilight; the sky starts to become noticeably brighter by around 3:45am this time of year.
Most of the images I took tonight were one minute and 5 minute exposures. I took many more dark frames tonight so I'd have them available for averaging during processing.
Tonight I had a CCD imaging session from my house in Oakdale CT. It looked as if it was going to be one of the "10 best nights of the year" as far as clear dark skies were concerned. This was basically true until a fog bank rolled in at just after midnight and ruined everything.
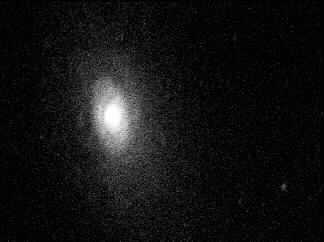
Tonight I started with the bright galaxies M81 and M82. I got a remarkable image of M82 with only a 30 second exposure! This image (and others I took tonight) can be seen in the CCD Image Gallery.
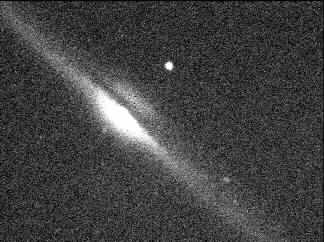
Tonight I was hampered by a few problems. When I set up the telescope I inadvertently placed it in what I thought was a spot with a wide open view of Polaris. Naturally, when it got dark enough to polar align, one of the critical stars I needed for alignment was placed behind a tree branch (and being so near the pole it would be hours before it moved enough to see it). When I began my initial focus attempt (it was still heavy twilight) I noticed some aberrations in the image from dust on the glass in front of the CCD chip. I took the CCD unit out of its holder and blew on the glass to clear it. Dumb move. The glass promptly fogged over because it is significantly cooler than the surrounding objects. I then had to shut down the camera so I could bring it in the house, dry it off (with a hair dryer), and dust it properly (I need to get a can of compressed air!). This detour took about ten minutes before I up and running again. Then later in the night, the camera software crashed and then I could not re establish communications with the camera. I had to power down the computer and reboot it (which is rather slow with this less then great AST laptop I use). This is the first time the camera has crashed the computer; I was trying the "shift and combine" feature of the camera for the first time. As a result of the crash I lost my image of NGC 4565, which took about 10 minutes to get. What a pain. Then, as the night went on, a lot more dew formed that I was planning on, and I had not bothered with the dew heater on the telescope. Sure enough, the telescope was starting to dew over. So, I had to bring the rather loud hair dryer into the backyard (I'm sure the neighbors were wondering what in the world I was doing!). Then, to top off the night (which was forecast to be CLEAR all night) a fog bank rolled in and covered the sky completely. I took this as a sign to call it quits. The fog did not burn off until around 10am the following morning.
Despite all of the problems throughout the evening, I did manage to get about a half dozen images worth saving, with one very nice image of M82 (what was most amazing to me was the amount of detail recorded in only 30 seconds).
I am writing this up well more than a week after the actual sessions. The session of 3 June went OK, but there were weather problems. The sky was covered with various amounts of clouds until the Moon rose (typically) at which time things cleared up nicely. By this time I was tired and decided to call it a night.
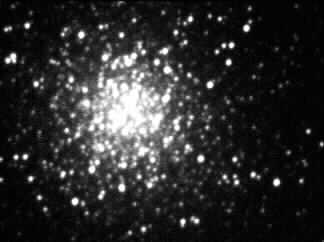
The session of 4 June went better. The skies were quite clear, and the Moon did not brighten the sky (more than the light pollution that is) until around 12:30am. I managed to get some nice images of M13, M57, M56, and some galaxies in the Draco area. A number of these images are posted in the CCD Image Gallery.
One thing is sure: precise focusing of the CCD (which is critical for optimum images) is a tricky and still somewhat time consuming task. Plus, I find that refocusing needs to be done periodically during the session (I suspect that the thermal contraction of the telescope may be shifting the optimum focus point). Plus, with an SCT (which has some inherent movement of the primary mirror), I find that refocusing the unit is required if I point the telescope to a significantly different portion of the sky from where I was working previously. For example, moving from Draco to Serpens Caput is far enough to require refocusing of the unit.
I find that a significant portion of the time required for a CCD imaging session goes to downloading the image from the camera (which must be done immediately after each exposure). The Pictor 216XT requires about a minute of so to download in image at 56kbps connection speed (the maximum speed which the camera supports).
I am at the point now where I am starting to be more attentive to taking calibration frames ("dark" frames). These frames are required for processing of the raw image, and if they are not taken properly at various intervals during the session the final image quality will suffer.
I've noticed that images of galaxies tend to have a fair amount of "noise" in them as compared to some of the brighter objects (like the bright globular cluster M13 for example). I believe the solution to this noise problem is to take multiple images and also to take multiple dark frames and average them together. I'll have to investigate this further.
Several weeks ago I broke down and finally ordered a flip mirror accessory for my CCD unit. Meade had recently come out with two new flip mirror accessories; I ordered the Model 647 unit from Astronomics, it arrived on schedule. I found that the unit is of exceptional quality; it is fabricated of 100% machined metal components.
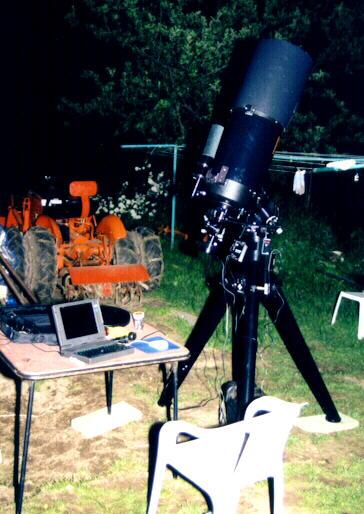
On the evening of 29 May I set up the CG-11 scope in the backyard and prepared it for CCD imaging. The night was not going to be too good for any kind of astronomy, being that the Moon was nearly full and the skies were a bit hazy. I was anxious to set up and try the CCD camera with the flip mirror unit however. I found that the "calibration" (initial alignment) of the flip mirror unit was rather straightforward. It took me about an hour to get the unit lined up to a decent accuracy; I was now able to routinely place an object near the center of the CCD chip. Focusing was also much easier; although I calibrated the flip mirror for focus I found that some final touch up was necessary once the image was on the CCD chip (this process was made much easier with the initial focus provided by the flip mirror unit).
One mistake I made fairly often was forgetting to "flip" the mirror to the "up" position after lining up on an object! I found this out by getting a blank screen on the computer monitor after making an exposure. By the end of the night I was making this mistake less often, but I still find myself forgetting from time to time.
On the evening of 29 May the conditions were deplorable for deep sky viewing; I was not able to see M63 (visually) in an 11" telescope! This object is normally an easy pick in a 2.4" scope under good conditions, so it gives some idea of just how bad conditions were as far as visibility was concerned. Despite the horrible conditions, I proceeded to image objects for several hours because of the excitement of the results I was obtaining. I took a set of "dark frames" and used them (for the first time) to negate the thermal effects of the CCD chip. I did not have a chance to take a flat field, and as a result, some dust specs were obvious on my images. I stayed out until 3:30am taking images...
On the evening of 31 May I set up the scope for another round of CCD images. This time the images I obtained were significantly better than those obtained on 29 May. I took a flat field early in the evening, but I found that this seemed to improve the image only slightly upon processing. The dark frame processing by far improves the image most significantly.
What I found most impressive was the quality of the images I was able to obtain despite the hideous conditions! Because I am very much in the learning stage, I kept my deep sky exposures to one minute or so (to save time). Despite these rather short exposures, I was able to capture some remarkable images even though the sky conditions were horrible! For many of the objects, the biggest problem was seeing the objects in the scope (visually) to line them up in the flip mirror! And I wasn't working particularly difficult objects. The images of deep sky objects I obtained match or exceed the best I have been able to do on conventional film to date, and I am at the very early stages of CCD work. Below is a sampling of images I obtained for some famous deep sky objects. All images are at the same scale and all are one minute exposures. All images were taken with the Meade Pictor 216XT CCD unit through a Celestron CG-11 scope with an F6.3 focal reducer in the light path. Image processing consisted only of subtraction of dark frame and some "histogram equalization".

One thing is for sure: the CCD camera is a PLEASURE to use when used in conjunction with a flip mirror accessory. Without one, the frustration and difficulty is immense. I am very anxious to try the CCD unit under some decent sky conditions. If I am able to obtain images like those above in what most astronomers would consider hideous conditions, the potential of the unit in dark skies will be truly remarkable...
My third CCD attempt was during the event Connecticut Star Party 8, held in Colebrook CT from 18 - 20 September. The weather cleared up very nicely for Saturday night. I had the Celestron CG-11 scope set up for CCD imaging (the F6.3 focal reducer was in place). Tonight was a "no Moon" night, so deep sky objects would be the targets.
I was able to locate the star Altair on the CCD chip, but it took a number of attempts using a 311x crosshair eyepiece. Even at this magnification the best centering job I could do only barely placed the star image on the chip. I proceeded to go to focus mode. Focusing seemed more difficult than I remember it being back in July. The focus proceeded in an abnormal fashion at times, meaning that I was getting inconsistent results. One problem I have noticed: as you start to come to focus, the star image starts to bloom severely, and then you cannot tell if focusing is getting better or worse. To counteract this, the exposure must be decreased. Overall the focusing of the Pictor 216XT is clumsy and difficult at best. The wait between successive images as too long (15 seconds or so). I cannot seem to get this to happen any faster regardless of the settings in the software. Eventually I got Altair to focus as best I could, but the focus seemed less than ideal.
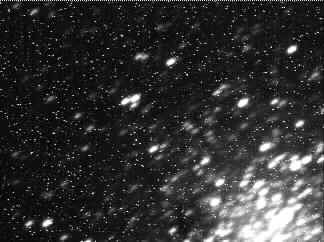
I proceeded to aim the camera at the Cygnus Milky Way; this way I would be sure to get at least a few stars in the field of view. I took several one minute exposures (these actually take about 3 minutes each by the time you are able to see them on the computer screen. When the "raw" images are displayed on the screen initially, nothing is visible. Some processing must be done (I think I used "histogram equalization" in order to see something). Even though I was in the heart of the Milky Way, I only saw 3 or 4 stars in the CCD image with a one minute exposure (this did not seem correct to me).
I proceeded to try to get a "real" target. I decided to try for globular cluster M2, because it was at a decent altitude, it is a bright object, and it was (relatively) easy to aim the scope in that direction. Long story short: I had extreme difficulty getting M2 to fall on the CCD chip, even when using a crosshair eyepiece at 470x magnification! At best I was able to get M2 only partially centered in the image. I took a one minute exposure. After some processing, I was able to see that M2 was resolving, but the focus seemed poor at best. I spent about one hour on M2, most of the time was just trying to get the image onto the CCD chip. I was becoming very frustrated. Part of the problem is that with a one minute exposure, you have to wait about 3 minutes to see the image on the screen (and then only after some processing). So, if you move the scope to try to better center the image, you have to wait a long time to see the results of your action. And, if the image moved off the CCD altogether, you have no idea of where it went.
As a result of the frustration I experienced with this CCD unit, I decided to put it away before I wasted the whole night ( I wanted to get something useful done on what was a very nice night for observing). I have also decided to shelve the CCD unit until I can afford to buy a "flip mirror" accessory. Since this will cost around $400, I do not expect to do any CCD work until after the new year (except maybe for lunar work). Without a flip mirror accessory, a CCD unit is for all practical purposes impossible to use. Locating objects in the field of view of the CCD without the aid of specialized accessories is an extremely challenging and very time consuming task. Bottom line: if you are planning to get into CCD work, buy a flip mirror accessory at the same time you buy the CCD unit.
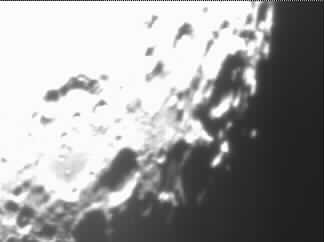
The weather was predicted to be "clear" for the overnight (unlike my last session this time it actually was clear)! I set up the Celestron CG-11 for CCD imaging. My primary target: the waxing gibbous Moon (located in eastern Virgo).
As before, the setup of the equipment for CCD imaging went smoothly (but there is a lot of stuff to prepare and hook up). Meade's Pictor software ran smoothly for the most part. With darkness increasing, I began attempting to image the Moon. I used the "tape" method once again to acquire a rough focus. I took an image of the Moon, but as in my previous session the image I got was completely saturated white. I used the "find and focus" mode to try to improve the focus (and change the exposure time). Long story short: some 2 hours later I still could not get a focus on the Moon! I was seeing some erratic behavior that told me that something was not right. On one image I'd get a saturated white image. Then, the very next image (with nothing changed), the image was dark! I could not tell if I was moving the focus in the proper direction. It does take a bit of time to take an image. On the Moon (with exposure of 50 to 100 milliseconds or so), the elapsed time from "take image now" to the time you actually see the image is about 75 seconds. Anyway, I was becoming frustrated with the Moon. I knew I was "on" the Moon due to the white images, but I could not get a focus! Since that was going nowhere, I decided to try and focus on a star (despite the fact that I knew locating a star on the CCD chip was going to be a job). As it turned out, focusing on a star proved much easier for me!
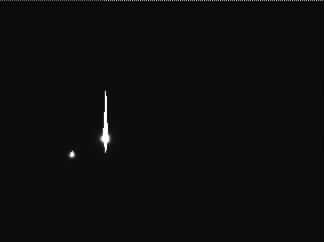
I removed the CCD camera from the scope temporarily and put in my guiding eyepiece (provides about 200x magnification). I figured if I centered a star on the crosshairs at this power, it ought to be at least somewhere on the CCD chip. I chose 2.3 magnitude gamma Cygnus mainly because it was in a convenient position. After centering the star, I did another "rough" focus using the "tape" method, and then put the CCD camera back into the eyepiece holder. I took an image and to my amazement got an image of an unfocused star! The image I got appears below (this is the first image I obtained from the camera that was something I could recognize as "real"):
FINALLY I had something to work with! My frustration with the Moon faded and my excitement grew. Now that I had a star on the CCD, I could do a fine focus. I used the "focus mode" of the software to do just that. I was surprised to find just how far off the true focus really was from the "rough" focus provided by the "tape" method. And, I found that the adjustments to focus that I was making with the JMI focuser were way too small. I had to turn the scope's main focus knob to bring the star to focus (and I must admit that the "image shift" associated with all SCT's was not too bad). As I focused the star to a finer point, the image started to bloom noticeably. I decreased the exposure from 5 seconds to about one second and further still to about 20 milliseconds as the star became a point. AT LAST I had the CCD focused! This took me nearly 3 hours to accomplish! Now I decided to point the scope back over to the Moon. But, the amount of time that I had spent focusing the CCD resulted in the Moon fast approaching the point where it would pass behind numerous trees, so I had to work fast. I knew that moving the scope would result in small focus shifts, but I figured that I could do the touch up work once I got to the Moon. I took about 6 or 7 exposures before the Moon went out of view behind the trees. One of the images appears below:
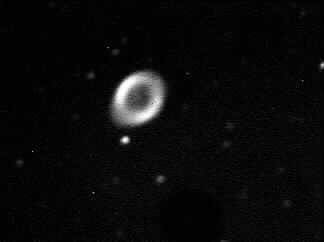
Now that the Moon was gone, I decided (for the heck of it) to try some deep sky objects. I knew my results would be far from perfect because I did not have any of the special frames (bias, thermal, dark, etc.) taken or prepared. I was anxious to see what I could get anyway. I knew that the challenge was once again locating the objects to be imaged on the CCD chip. The sky condition was marginal; the Moon was still bright and I could barely see the Milky Way in Cygnus, now quite high in the sky. I managed to take images of M57 and M13 (they appear below):
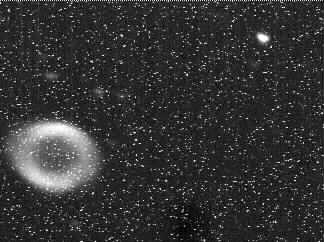
These "raw" images illustrate a number of things. First, despite my very careful attempts to center the objects on the CCD chip (using a 200x crosshair eyepiece), I was off the mark by a fair amount. Conclusion? I have come to the realization that I am going to have to invest in a "flip mirror" accessory. Also: deep sky images from CCD cameras require much more than one shot. To cancel out the anomalies inherent to the CDD (showing up as false "stars" in the image) a number of other "frames" must be taken and then use to process the image. Polar alignment? You bet. An accurate polar alignment will be mandatory for deep sky CCD imaging. On the Moon you could get away with a less precise alignment (but you will have to spend more time adjusting the controls of the scope to prevent the scope from drifting off of the Moon). Below is another image I took for the heck of it: the famous double star beta Cygnus (often called Albiero):
This image shows some other facets of CCD imaging. Note that the primary star is bloomed; this will happen to some degree on all CCD imagers if the exposure is too long. In this case the exposure was 3 seconds. This image also shows why it is so difficult to place an object on the CCD chip... this is a full field shot using the Meade Pictor 216XT imager on a Celestron CG-11 scope with an F6.3 focal reducer! The pair is separated by some 40 arc seconds. The field of view of the imager (in this configuration) is small! The image of the Moon (above) also communicates this point.
So, after a long night of mostly frustration, I was able to finally get my first "real" CCD images! The images will certainly not win any awards, but they do show the great potential for CCD imaging. Consider this: the images of M57 and M13 are one minute exposures, and they are showing stars to around 15th magnitude! Because CCDs are "linear", they do not suffer from reciprocity loss that conventional film astrophotography does. If 15th magnitude stars can be recorded in one minute, a 30 minute exposure could theoretically reach several magnitudes fainter!
The Pictor CCD camera manual does state that the biggest challenge awaiting first time imagers is "finding a focusing". For me focusing was far more difficult than finding (at least for the first time anyway). I believe that the difficulty was caused by trying to focus on the Moon; it is too large and does not show any sharp discontinuities when out of focus. Now that I know roughly where the focus is it will be much easier the next time. But I must say that the manual tends to understate the difficulty involved on your first attempt.
To sum up, I am excited about the potential that the CCD camera holds. I do realize however that I still have a lot to learn and it will take me a while before I can routinely get good images. One thing that the "ads" don't mention is the fact that you will almost certainly need a "flip mirror" accessory in order to make finding and focusing objects a reasonably fast task (these flip mirror accessories are not cheap... in the range of $300 - $400). You could get along without it, but the amount of "trial and error" that is necessary is more than I feel I want to deal with (I'd rather spend my observing time imaging objects, not finding and focusing them). If you are new to CCD imaging (as I am), perhaps you can relate to my experiences thus far?
My first CCD imaging attempt did not go very well at all, but I was sort of expecting that it would be that way. Part of the problem was due to weather, part was due to not having a critical piece of equipment, and part was because I am new to CCD imaging. Here's the account of what happened...
I had originally planned to do some CCD imaging for the first time on Friday night (5 June), but the weather was cloudy (despite a forecast for "clear" skies... typical). Saturday during the morning it was completely clear, but fair weather clouds came in later in the day. I had set up the telescope and equipment in the backyard to try to take some daytime CCD images as is recommended in the Meade owner's manual. I connected up all of the equipment, booted the laptop, and started the Meade Pictor software. The program came up and ran fine; I was able to connect to the camera without any trouble. I aimed the telescope at some leaves in a tree about 100 feet away, and used a piece of tape (as described in the Meade owner's manual) to get a rough focus. I then made a stop down mask (a one inch hole in a piece of cardboard) for the telescope to cut down on the amount of light. I took my first image with the Pictor 216XT. However, the resulting image was an unfocused frame of mostly dark light. I tried to improve the focus, but to no avail. I'd say I took about a dozen images total, however I could see nothing in the images that resembled leaves of a tree. I believe that the problem was that I was imaging only a small portion of one leaf, and was not able to recognize it as such. Meade recommends using a large object that is 200 or more feet away. In the backyard at Wilbraham, there is no such object; too many trees nearby. The best I could do was look at leaves in tall trees. Despite not getting any recognizable images, the 216XT appeared to operate just fine; images downloaded without problems (although the downloads are not exactly speedy), and the software never crashed or did anything abnormal. I decided to wait for nightfall to try imaging the Moon.
As it became late afternoon, the sky clouded up to nearly 100%. Then, it started to clear again, and things began to look quite promising. I located the Moon coming up in the eastern sky... however I also noticed that the southerly declination of the Moon meant that I was going to have to move all of the equipment about 100 feet away in order to see it. So, I proceeded to disconnect everything and move it to the new location. The problem with this new location was that now I could not see the North Star, necessary for proper polar alignment (which is essential for CCD imaging). I reconnected everything back up (what a pain!). With CCD imaging there is a lot of gear to move around! I took a number of photos to document the setup (which I will post among these pages when I get them processed and scanned in about a week). Finally, it was dark enough to do some CCD imaging. But can you guess? The clouds started covering the sky again! This despite a forecast for "clear" skies! I once again focused the telescope on the Moon using the "tape" method as described in the Meade manual (this provides a rough focus). I then placed the camera back on the scope, placed the Moon on the finderscope crosshairs, and took an image. The result was a totally saturated white image! At least I knew I was on the Moon. I tried a number of other images, all with more or less the same result. I tried decreasing the exposure time, but this did not seem to help. I did notice that some of the images were different, but this was apparently due to the telescope drifting off of the Moon (because the view of Polaris was blocked I could do only a very crude polar alignment). I put the camera in the focus mode and tried that method. Every so often an image would appear that looked like some very unfocused craters. Some of the images did not look correct at all... lines of random very black and very white pixels... almost like "garbage"... not sure what was causing this. And then of course, the clouds became very thick. Long story short: the clouds completely enveloped the sky, putting an end to my imaging attempts. I never did get an image that looked anything like the Moon...
I was somewhat irritated with the way things went; not so much with the 216XT, but with the weather. The damn forecast was for clear skies both last night and tonight. So what was the actual weather? Cloudy on Friday night and mostly cloudy on Saturday night! And because I had to wait so long, the Moon moved to a southerly declination that caused me to have to move all the equipment (and then it clouded up completely and ended everything). Figures!
Thus far I can say this: CCD imaging is a very challenging field. One thing I can foresee: use of a "flip mirror" accessory is going to be an absolute necessity in order to locate objects such that they fall on the CCD chip. The CDD chip is small! Also: the telescope polar alignment is going to have to be rather precise. "Eyeballing" it is not going to cut it. I can see that focusing the CCD camera is going to be a major task. The reason is that you don't have a "real time" image with which to focus. With the 216XT, there is about a 10 to 15 second delay between images in the "focus" mode. So, in my opinion, the real challenge with CCD imaging is "finding" and "focusing". I can see that to find objects I am going to have to spend more money to get a flip mirror viewer. I already took care of the focusing issue; several years ago I purchased a JMI motorized focuser in preparation for CCD imaging. I can see that getting decent CCD images is going to be a slow process requiring lots of time and patience. Anyone who is under the impression that good images are just a "few mouse clicks away" is mistaken! It's going to take good equipment with several specialized (and rather expensive) accessories, plus a lot of time and a lot of patience. My "first attempt" was a bust. I am frustrated more with the weatherman. Don't they ever look out the window? I am frustrated but not discouraged. I now know that this CCD imaging thing I've gotten into is not simple and easy, and it's going to take some time to work out the problems.
Below are a few things I have learned about CCD imaging thus far...
Thus far, I have learned that CCD imaging is an advanced topic in amateur astronomy; I believe CCD imaging is in its infancy (as far as amateurs are concerned) at this time. In about 5 years, I expect the entry level CCD imagers available today will be as outmoded as a 286 computer is today.
Although I have yet to do any actual imaging with my CCD imager, it appears that one of the most difficult tasks awaiting me is finding and centering objects on the CCD chip. I have a feeling it will be like searching for a faint star using a 1000x narrow field eyepiece! Hopefully it will not be that bad. Focusing the CCD appears to be another challenge according to the reading I've done thus far.
I'll write more here concerning my experience with the Pictor 216XT as things develop...