
This page updated 16 October 2009
This page is intended for those who are just starting out in astronomical CCD imaging. Here we cover (at a high level) the basics of what CCD imaging is, how CCDs work, and we'll also cover some of the steps necessary to get a decent quality CCD image. This article is not a step by step "how to" article, rather it is intended to provide the reader with some idea of the processes involved in doing CCD imaging in astronomy.
In this section we cover some high level basics about CCD imagers. Compared to imaging with film, CCD imaging offers some tremendous advantages (there are some drawbacks too, we'll go into those). Possibly the most important advantage of CCD imaging over film is the great sensitivity of the CCD chip to light and the lack of "reciprocity failure". With CCD imaging, if you expose for twice as long you get twice the light. With film, if you expose twice as long you might only get 1.5 times the light (and this reduction gets worse with longer exposures)! CCD imagers also have considerably more dynamic range (ability to record very faint and very bright objects at the same time and still preserve detail) compared to film. With CCDs, there is no need to process any film (a chemical process that can yield variable results if not done properly); with CCD imaging there are no messy darkroom chemicals to deal with. There are a wide variety of CCD imagers on the market today (ranging from a few hundred dollars to well into the thousands), however they all are similar in their concept of operation. Below is a photo of an Orion CCD imager:
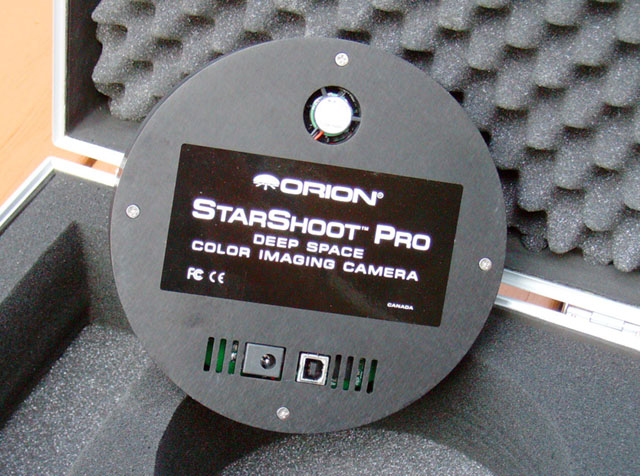
The Orion Starshoot Deep Space Imager.
All CCD imagers have a semiconductor component called a Charged Coupled Device (CCD); there are various technologies in use (not important for our discussion at this time). The CCD is the actual part of the camera that captures the light from the telescope. The photo below shows a close up photo of the CCD device in the Orion imager:
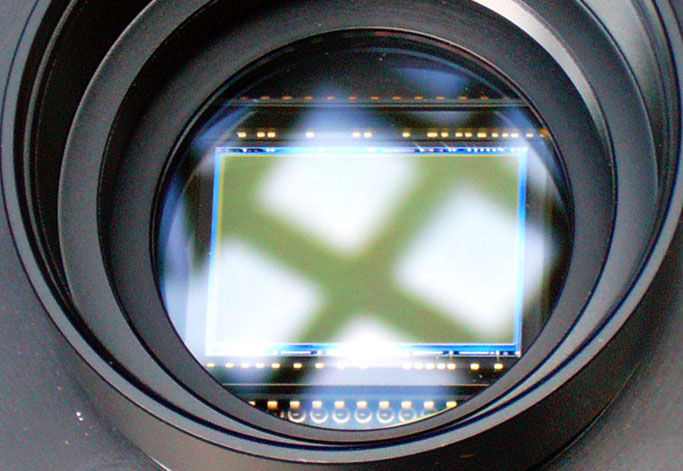
The CCD sensor of the Orion Starshoot Deep Space Imager.
Although not discernible to the naked eye, the CCD chip is basically an array of small sensors (each one is called a pixel). In this particular imager there are over 6 million such sensors! The diagram below shows a close up of the CCD:
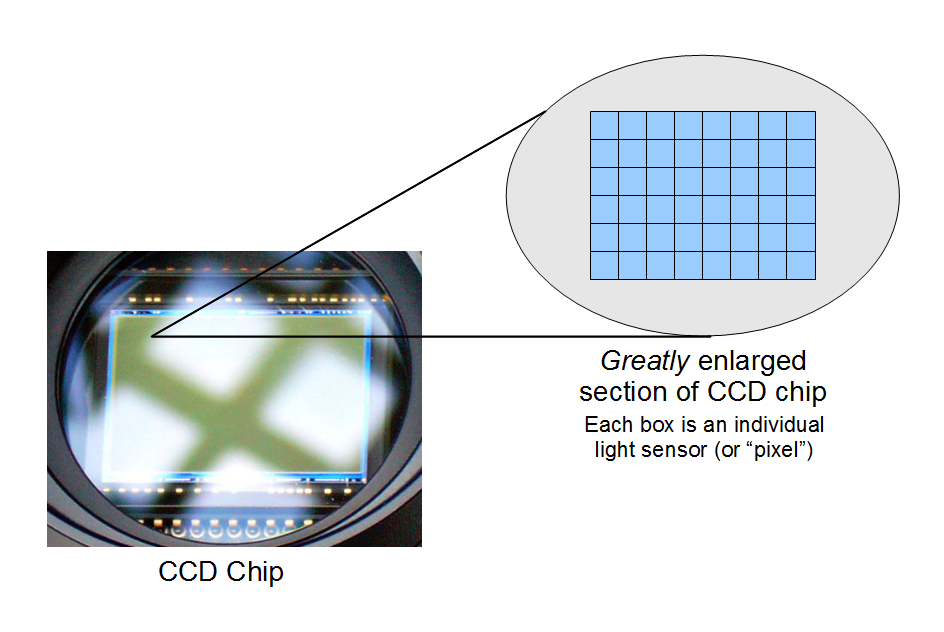
Close up concept diagram of CCD Sensor.
So what exactly does each sensor (pixel) do in a CCD imager? You can think of it like a "bucket" that collects light. The bucket collects light (like rain collects in a rain gauge) for the time the sensor is exposed to the light. However, like a rain gauge can overflow if too much rain falls, so can the sensor overflow in a CCD imager should the bucket be exposed to light for too long (more on this later). When the CCD imager is connected to a telescope, the image of the object being looked at is projected onto the CCD chip. As will be the case with most images, there will be bright areas (stars, nebulae) and dark areas (barren sky); the sensors will collect light in proportion to how much light is falling on them. At the end of the exposure some buckets will be quite full while others may be nearly empty.
During an exposure, the light falling onto the CCD chip makes its way into the thousands or millions of pixels (buckets) on the chip. The buckets keep filling up with light until the exposure ends. The next step is to take the contents of the buckets and convert it to a digital word so that the computer can work with it (the initial signal in the pixel is an analog signal). The exact process varies from camera to camera, but the basic process is as follows: The signal in each pixel of the camera is applied (one by one) to a circuit called an Analog-to-Digital Converter. This device converts the analog signal into a digital value (number) that represents the level of the signal in a particular pixel. Then, each pixel value (again this could be millions of them) are then typically read out of the camera and sent to a computer where they are arranged in an image format and saved off as a file. The figure below shows a high level block diagram of a typical CCD imager:
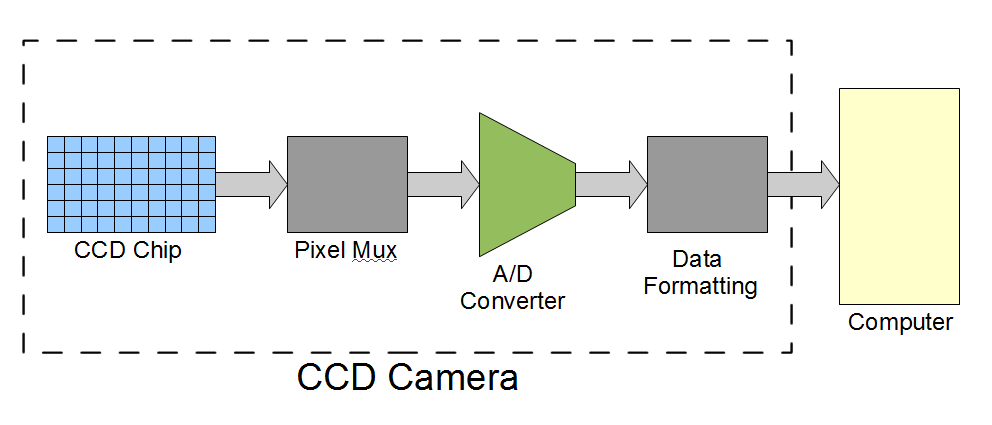
High Level Block Diagram of a Typical CCD Imager.
In the diagram above, the Pixel Mux is the device that basically arranges for each "bucket" on the CCD chip to have its signal (amount of light gathered) applied to the A/D Converter. The A/D Converter takes the signal from the Pixel Mux and converts it into a digital value. This value is then passed on to the Data Formatting function. In this function the data may be arranged into a file and held in memory while it awaits download to the host computer. Note that with most modern CCD cameras a computer is required. All cameras come with software that has to be installed on the computer, this software is used to control the camera and it also usually handles other things like downloading the images, basic processing, etc.
Up to this point the discussion has been at a very high level. At this time we need to go into a little more detail in order to understand some of the factors that are required in order to get a good final image. As you may already know, CCD imaging is not (and probably won't be anytime soon) a "point and shoot" operation. Getting quality images has never been easier but it still requires a lot of steps and attention to detail. One of the first things we want to discuss is dynamic range.
As mentioned earlier, dynamic range is a specification that basically states how much detail (in terms of brightness levels) the sensor can provide. There are two facets: one is called "well depth" and the other is "number of bits". Well depth (or "bucket depth") basically is a specification that states how much light a bucket can acquire and hold before overflowing. Number of bits refers to the resolution of the A/D Converter in the camera. Ideally you want a camera with "deep wells" and a "lot of bits". We will not discuss well depth further here (on most modern cameras it is not a major problem). However, we will further discuss the topic of bit resolution.
Bit resolution is very important in CCD imaging. What exactly are we talking about? Looking back at the diagram above we see the A/D Converter; this is the device that takes the analog signal from the CCD chip and converts it to a digital number. All A/D Converters output values with a particular number of bits; for most images this will be at least 12 bits, but 16 bits is a much more desirable number. An A/D Converter takes an analog signal and converts it to a digital number, but it cannot convert it to exactly the proper level. The more bits an A/D Converter has, the less error in conversion (the conversion error is known as "quantization error"). For CCD imaging we want the quantization error to be as small as possible. Why? CCD imaging often requires a tremendous amount of digital processing to bring out fine detail in images; if the quantization error is large (due to not having an adequate number of bits) the fine detail will be lost! If none of this makes sense do not worry too much. Most all of the CCD imagers today (ones for deep sky work) have A/D converters with 16 bits. A 16 bit A/D converter can provide a total of 65,536 unique output values. Each of these output values represents a slightly different brightness level from the previous value. The human eye cannot even begin to distinguish between such fine brightness levels, however we MUST carry this level of detail in order to have the final images look good (after processing)!
At the beginning of this article we mentioned some of the tremendous advantages of CCD imaging as compared to film. However, CCD imagers do have their own unique undesirable characteristics. The good news is that many of these inherent problems can be dealt with by use of various processing techniques! Issues that we will cover are noise, "hot and cold" pixels, and vignetting (vignetting is not a problem with the CCD imager, it is an undesirable effect caused by uneven distribution of light on the CCD chip from the telescope).
Noise: Noise is the probably the biggest inherent problem with CCD imagers. What do we mean by "noise" anyway? In general noise is an unwanted signal that contaminates the signal we really want (noise in an audio recording may be heard as hissing during a quiet passage of music, or "snow" in an analog TV picture). So what causes noise in CCD imagers? Basically all electronic devices have some amount of inherent noise that is generated as a result of random motion of electrons in the device. This noise tends to be random in nature (meaning there is no way to predict exactly what it will be but we can predict that there will be noise). The good news comes into play in that the noise tends to be random, and it can be reduced by cooling the CCD chip to a low temperature. By subsequent use of special processing with what are called "dark frames", a good amount (most but never all) of the noise can be eliminated from a CCD image!
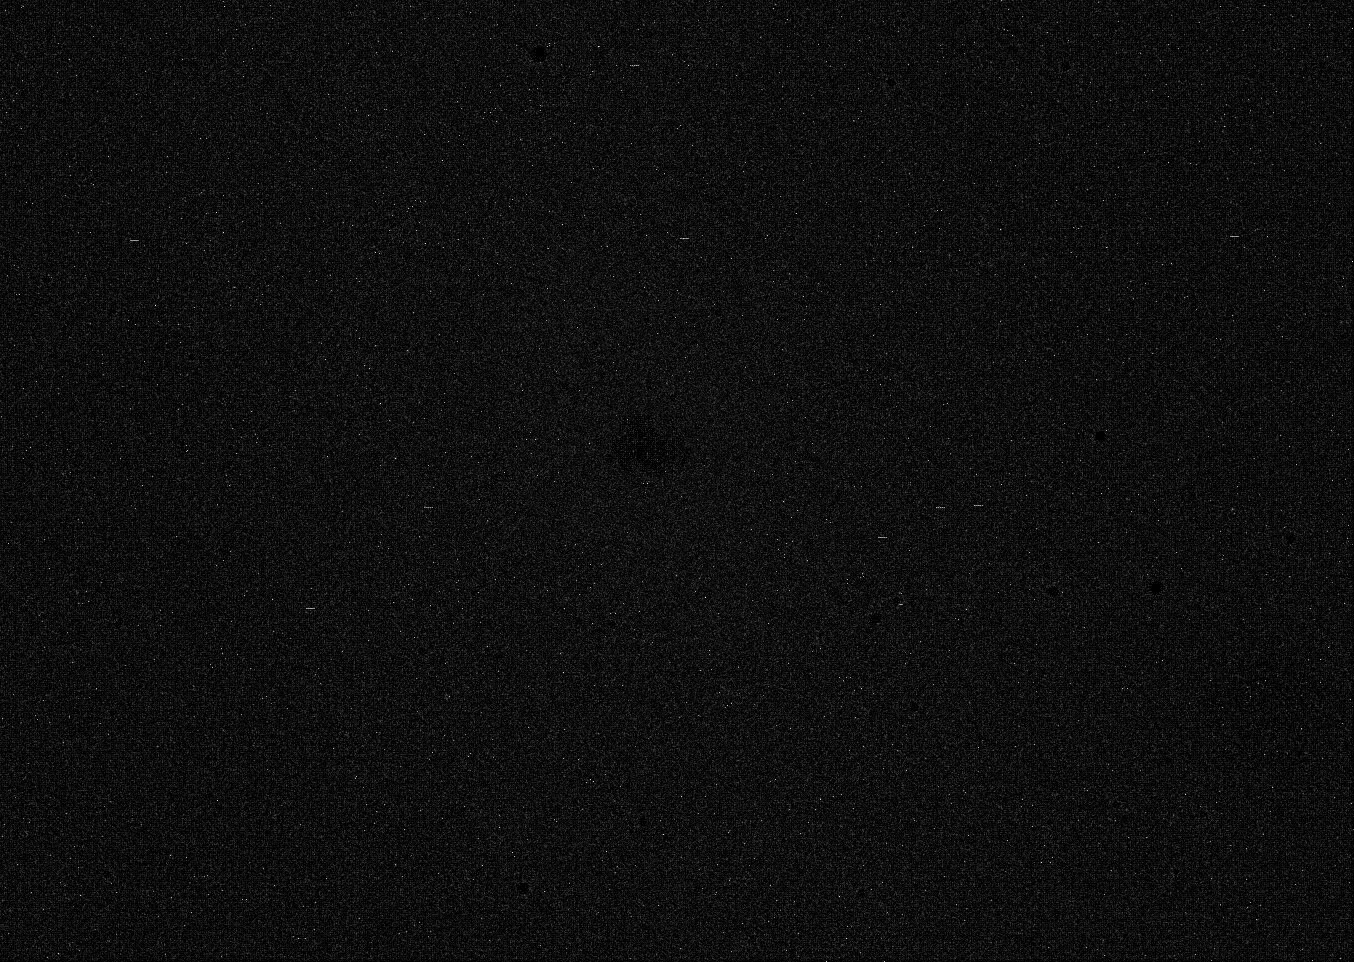
So how does noise manifest itself in a CCD image? Let's go back to the bucket analogy. During an exposure, light from the object being imaged falls onto the CCD chip and the thousands or millions of buckets are gathering up the light that falls into them. However, at the same time, additional (and unwanted) signals are accumulating in the buckets due to the random movement of electrons in the circuits! Once in the bucket, there is no way to distinguish what part of the signal was from the object being imaged (a galaxy for example) or from the random noise inherent to the chip!. If in fact one were to expose a CCD chip to complete darkness, the buckets would still accumulate signal. If the resulting image were then displayed on a computer monitor one would see that the image would be a "salt and pepper" looking image (see the photo below), it would NOT be totally black as one might initially expect!

CCD Image of "darkness".
The noise depicted in the image above is random noise (note that there is no pattern to the noise). Unfortunately there are other types of noise that can creep into CCD images. As mentioned earlier, cooling the CCD chip significantly reduces the noise that is generated within it. However if the cooling is not uniformly applied some parts of the image may be impacted (fortunately this kind of noise can usually be removed by processing, more on this later). Other kinds of noise may be more problematic. If there is a source of electrical interference nearby it can cause erratic noise to be induced into the image. This kind of noise is not inherent to the imager (it is caused by outside factors), the bad new is that it is a lot more difficult to remove. Fortunately such noise is not usually a problem.
Hot and Cold Pixels: Most CCD imagers contain thousands to millions of individual pixels. During the manufacturing process it is nearly impossible to have every last one of them be perfect. Most of the time a CCD imager will have some pixels that are dead ("cold" pixels) and some that are always "lit" to some degree ("hot" pixels). Hot and cold pixels are easy to spot as their values never change (they are always the same value no matter how bright or dim an object being imaged is). Fortunately, hot and cold pixels are usually few in numbers and their effects can be readily removed during the course of normal processing.
Although digital imaging has never been easier than it is today, it is still not "easy". You will need a fair amount of equipment and a lot of patience! At minimum you will need a good quality telescope on a mount that can accurately track the stars (equatorially mounted is recommended but I have heard of people having some success with tracking Alt-Az mounts). In addition, of course you will need a CCD camera, as well as a computer (laptop or desktop) to control it. As for software, the camera you are using will come with its own software; ideally you will also need software such as Maxim DL and Adobe PhotoShop is also great to have for additional post processing. If you do not have a permanent setup, it might take an hour or more to set up all of the equipment (to get it to the point where you are ready to start working your chosen target)! Your scope will need an accurate polar alignment, and for guiding an autoguider is highly desirable (but not absolutely required for starting out). There are a number of other accessories that are "nice to have" in making your imaging sessions easier, however they are not mandatory for starting out.
Taking quality images of faint objects in the sky is very different than taking photos of the family using a digital camera. Aside from the Moon, there is no such thing as "point and shoot" imaging in astronomy! The main problem is that the objects being imaged are very faint. As such, they require long time exposures, and this is greatly complicated by the fact that the object is moving as you are trying to image it! In order to have a clear final image, the telescope must very accurately track the object being imaged. The demands on tracking accuracy are directly related to the focal length of the telescope (larger image scale = more tracking accuracy required). Another task that can be quite tricky is getting (and keeping) an accurate focus. Images that are even a little out of focus will not look nearly as good as ones that are in sharp focus. It can be tricky to get an ideal focus, and possibly worse focus can drift if the outside temperature changes! Schmidt Cassegrain type telescopes are especially sensitive to focus drift. During the course of taking your images it is advisable to check them (as they download from the camera) to be sure focus is still satisfactory.
Once you have all of your equipment set up, the next task is to set up for the object you will be imaging. I find that this can take about 15-20 minutes to get to the point where I can actually start imaging! First, one has to aim the telescope so that the desired object appears on the CCD chip. If you have a camera with a smaller chip (and/or a telescope of longer focal length) this can be tricky to do. You may also need to rotate the camera to get the framing you want (many CCD cameras have rectangular profiles and you may have to orient the camera a certain way to get a pleasing frame on the desired object). Focusing is another task that can take time. I normally take a 30 second "test shot" to be sure focus and the object framing is good before starting the "official" imaging. If you do not have an autoguider you may find that you can only do exposures of a minute or less (to keep star images nice and round). If you plan to do manual guiding you will need to locate and set up on a suitable guide star. All in all it takes time to set up for a particular shot. Don't expect to be able to shoot a dozen objects in one night (unless they are very "quick and dirty" shots). If you want a 2 hour exposure of an object, figure about 1/2 hour to set up for it, then 2 or more hours for the raw frames, plus additional time for dark frames (and flat frames if you plan to use them also). This can easily add up to more than 3 hours of time for a 2 hour exposure! Processing of your data will also take time, so it it is not out of the question to spend 4 to 5 total hours on a single 2 hour exposure of an object! If all goes well however the results will be worth it (and if not you will likely learn what went wrong and be able to correct it the next time around).
So, how does one take a CCD image once all of the above steps are completed? There are several steps to the process. Getting a good image of an object is a lot more complicated than simply taking an hour long exposure of an object. In general, one has to take a number of shorter exposures of the object (for example, one might take twelve 5 minute exposures of an object to get a total of one hour exposure). However, because of the inherent characteristics of CCD cameras, one must also take additional exposures called dark frames and flat frames (these are required in processing of the raw images in order to get a quality final image). For just starting out, you can skip taking flat frames, however dark frames really are required to get a decent image.
What is the purpose of a dark frame? Dark frames allow you to cancel out much of the noise inherent to the CCD imager, and they also eliminate hot pixels that may be present in the camera. Flat frames are useful for canceling out dust spots that might be present in the image, and they also can eliminate or reduce vignetting. These two issues are not the fault of the CCD imager, rather they are effects that can be caused by less than perfectly clean optical surfaces and also effects caused by uneven illumination of the CCD chip due to the characteristics of the telescope you are using. Flat frames are not require for starting out, but as you progress you will definitely want to work them into your images. Dark frames really are required as they correct for the majority of aberrations inherent to CCD images. Because noise in CCD cameras increase as temperature increases (and vice versa), it is important to take dark frames at the same temperature as your raw frames. If you are taking raw exposures over a long period of time (and the temperature is changing during that time), it is best to intermix dark frames with raw frames. In other words, take (for example) 10 raw frames, then 5 dark frames, ten raw frames, etc).
When you take your first image, you will take (for example) ten 3 minute exposures of the actual object (these will be called "raw" images), and also 4 or 5 dark frames (dark frames are exposures of the same length as the object being imaged except that the telescope lens will be covered so that no light from the object can enter the imager). After you have your raw images the next step is to process them! This will be done via the software that (likely) came with your camera. Basically the software will take your dark frames and average them. Then, the software will take each raw frame and subtract out the averaged dark frame (this will eliminate much of the noise in the raw frames). Once all of the raw frames have been processed with dark frames, you are ready to combine or "stack" the images. This will allow even more noise to be reduced. The process of stacking is done via the software you are using (Maxim DL is one of the best). You will end up with one final image (the product of the roughly 15 individual images you took originally)! If all went well the final image will look much better than any of the raw frames. More than likely your image will need additional processing in order to bring out fine details that are "buried" within the data. Getting the best final image will take some tinkering and practice.
This section will show some sample images to give an idea of what some of the various images look like. Don't be too disappointed as your first raw image downloads from the camera. Chances are it won't look to good (full of noise, hot pixels, etc)! Remember, much of this can be removed by processing with the other images you will be taking.
Below is an example of a typical raw frame. This particular image is a 4 minute exposure of the galaxy M33 (taken with an
Orion StarShoot Pro Deep Space CCD Color Imaging Camera through a 4"
refractor). Note that the galaxy can easily be seen, however the image contains a fair amount of noise. While impressive compared to the days of film there is a lot of room for improvement in this image. Also note that this image is monochrome (despite the camera being a color camera), conversion to color comes later.

Four minute "raw" frame of M33 through a 4" telescope.
Next is a typical dark frame. This is an exposure of 4 minutes duration, but with the telescope lens covered. Note the area in the upper left hand corner is slightly brightened compared to the rest of the image. This is not a defect of the CCD, rather it is the CCD "picking up" the heat from a component located close to the camera circuitry. Dark frame processing can remove the vast majority of this undesirable aberration.

Four minute "dark" frame of M33 through a 4" telescope.
The image below shows the raw image after "calibration" with 5 dark frames. Basically, 5 dark frames are averaged and then that result is subtracted from the raw frame. The result is that some noise and most of the hot pixels are removed. Note that this processing helped the image, but there is still a lot of noise. This is where the beauty of mathematics comes in... by averaging a number of calibrated raw frames, we can eliminate a LOT more of the noise (see images further below).
Calibrated "raw" frame of M33 through a 4" telescope.
Below we show an image that is not normally a part of CCD imaging. This image is one I created in PhotoShop to help show a point about what dark frame processing does. You may have looked at the raw and calibrated images (above) and said "I don't see much difference". The image below shows what the dark frame processing did: all of the content of the image below is what was removed from the original raw image. It might not look like much, but it really does help in the final image.
"Noise" that was removed by dark frame processing of a raw image.
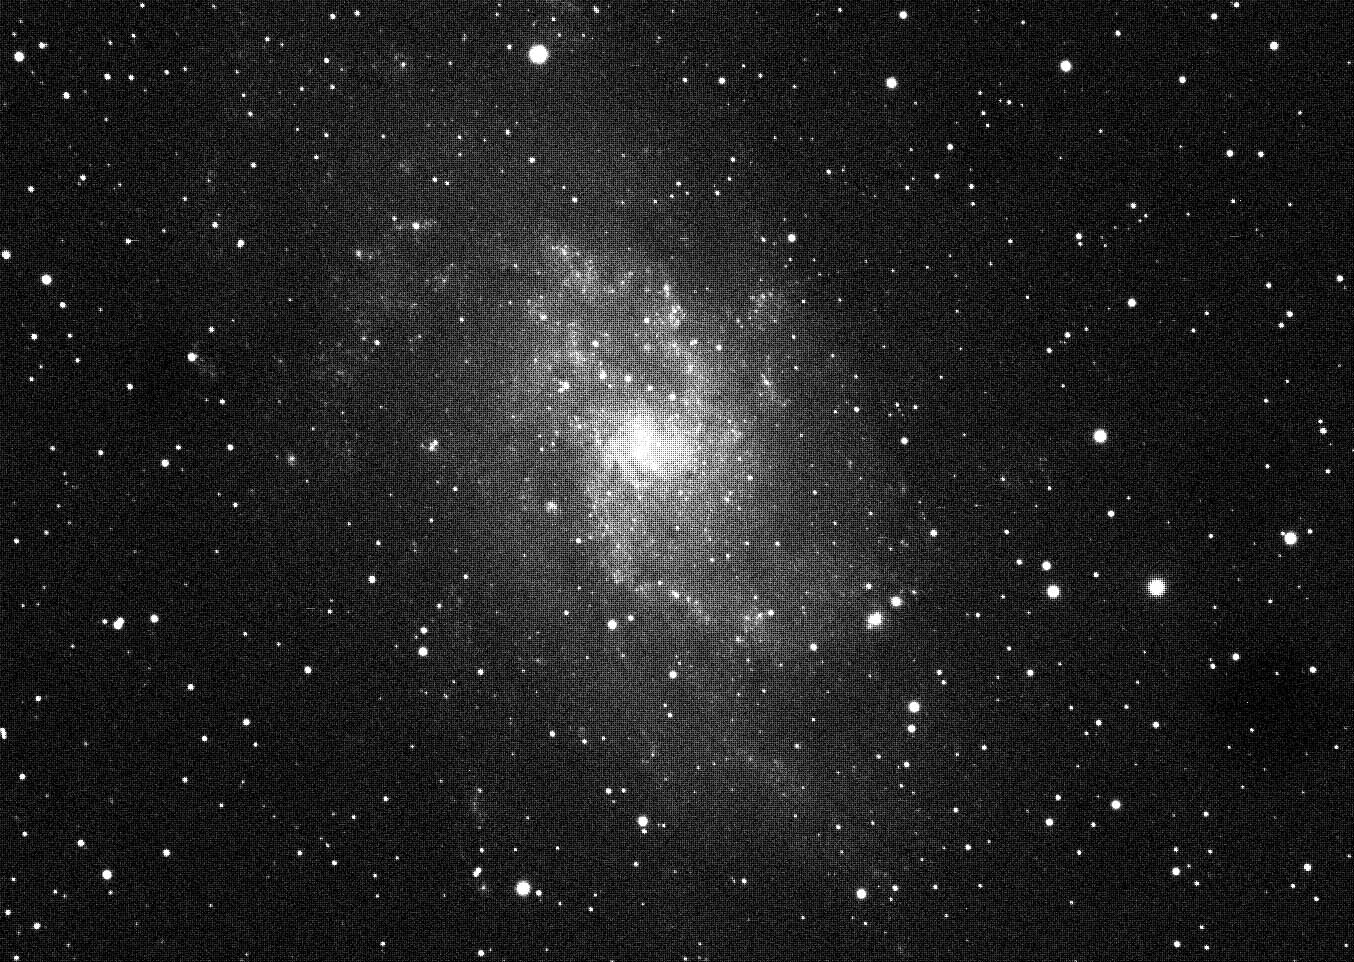
The image below shows the vast improvement that is achieved by stacking a number of images. In this case, the image is a result of stacking thirty 4 minute exposures (total exposure is 2 hours). Compare this image to the first "raw" image above and the difference is obvious. Stacking images increases the signal to noise ratio (meaning that the noise is reduced compared to the object we are trying to image). Note that the sky background is a lot smoother and the galaxy shows a lot more detail as compared to the raw image!
Result of stacking thirty 4 minute exposures of M33.
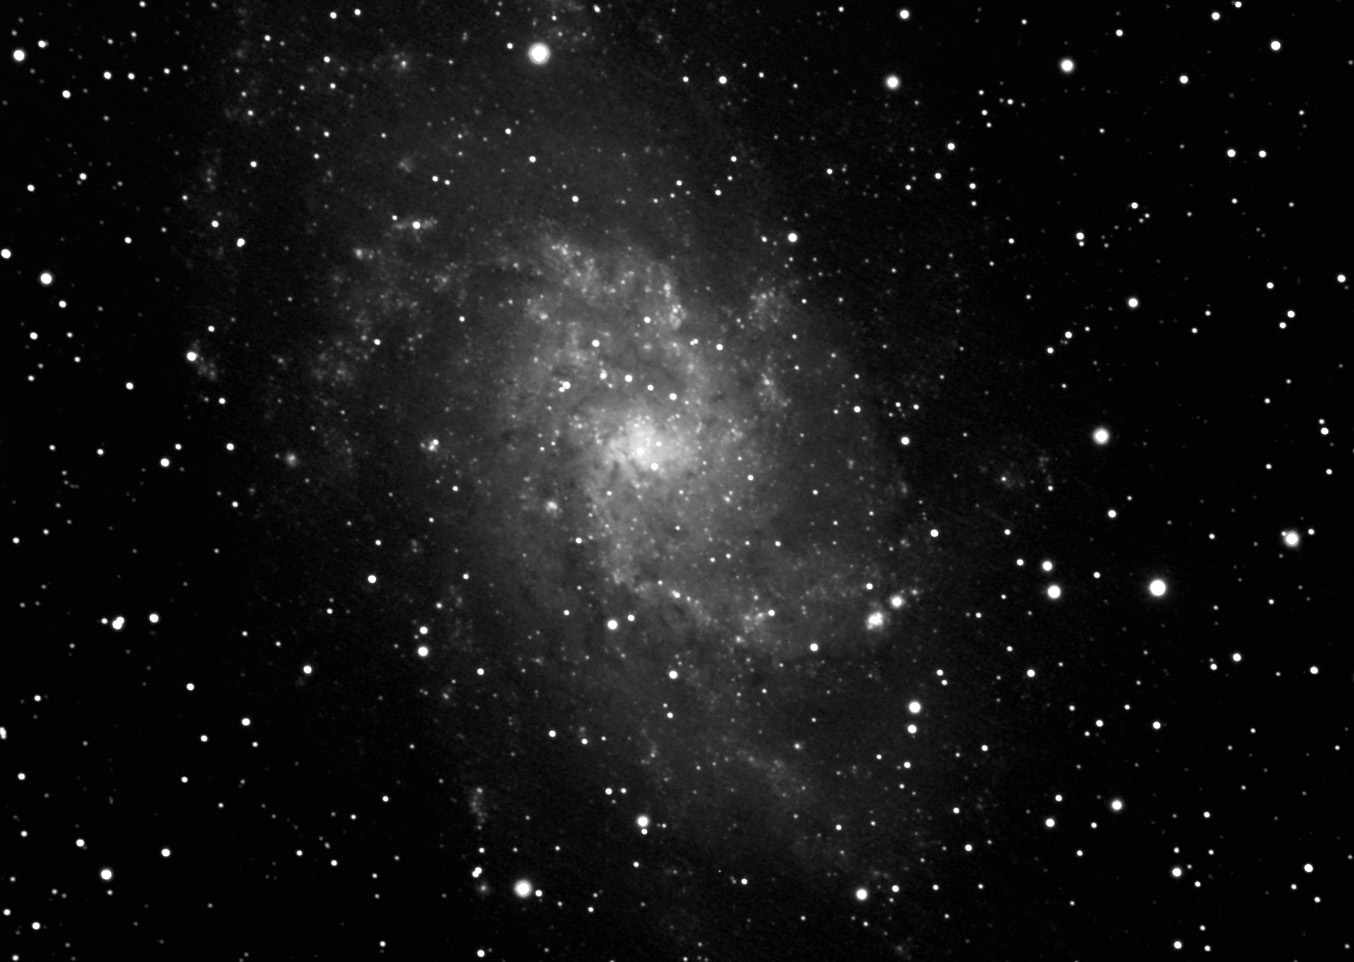
Here we show the final result. This image was taken with a single shot color CCD camera (
Orion StarShoot Pro Deep Space CCD Color Imaging Camera). If you have a monochrome camera you can take color images,
however the process is a LOT more complicated and beyond the scope of this introductory article. For starting out it is recommended to start with the basics and work your way up. There will be a lot to learn along the
way and trying to do complicated tri-color imaging will be a tasks for later on when you have more experience!

Final color image of M33 through a 4" telescope.
This article has covered the high level basics of CCD imaging in astronomy (with focus on deep sky objects). CCD imaging is challenging and not inexpensive, however the results can be very rewarding. With some practice, you will likely be able to take a photo that rivals the capabilities that professional observatories were able to obtain only 30 years ago! The best recommendation is to start with the basics (entry level cameras can be had for around $300) and work up from there. Start with an easy object (something like the Orion Nebula, the Andromeda Galaxy, M13, etc), by doing this your chances of early success are much better. There are also many resources both on the web and in book form to help you along the way.
Use your browser's "back" button, or use links below if you arrived here via some other path:
This page is part of the site Amateur Astronomer's Notebook.
E-mail to Joe Roberts
Images and HTML text © Copyright 2009 by Joe Roberts. Please request permission to use photos for purposes other than "personal use".