Have you seen some of the amazing photos that amateurs have taken and wish you could do the same? This article will help to get you started. In truth, astrophotography is a very specialized and demanding form of photography that can take years to master. The good news is that astrophotography has never been easier (mainly due to the availability of digital cameras today). Even a beginner can get a shot today that would have been the envy of seasoned astrophotographers from the 1970's! Basic astrophotography takes only a minimum of special equipment, so you can get started with only a small investment. For the most basic form of astrophotography you don't even need a telescope!
This page now contains information on the following two types of astrophotography:
Additional articles will be added as time allows...
Check out what nine year old Meredith Lorenz did on her first attempt by clicking here. Meredith's photos were done with film, results like hers are even easier if you have a Digital Single Lens Reflex (DSLR) camera!
Wide Field Fixed Tripod Astrophotography is the simplest form of astrophotography. It is the ideal starting point because it takes only basic equipment, and even "first timers" can get very nice results!
The Camera: To do astrophotography, it should be obvious that you will need a camera. What is not necessarily so obvious is the type of camera that is best suited to astrophotography. In short, the more "idiot proof" a camera is, the more the likelihood that it is not well suited to astrophotography! "Point and Shoot automatic do everything" cameras are not suitable for astrophotography. The best camera to use is a Digital Single Lens Reflex (DSLR) camera. Most any DSLR will work for astrophotography, below is a listing of the important features required for astrophotos:
There are many cameras available that meet the above criteria. Brand names that come to mind include Canon, Nikon, Pentax, Olympus, etc (there are many others too). Entry level DSLRs (including a basic lens) start at around $500 US through places like Amazon.
The Lens: For basic astrophotography, the basic lens that comes "standard" with most camera packages will work fine. Typically this lens will be something like a 18-55mm zoom lens. When it comes to astrophotos, having a fast lens is better (fast meaning smaller "F" number). For example, F8 is kind of slow, whereas F2 would be considered "fast". Most entry level DSLR zoom lenses (like the one I mention above) have an F-ratio of around F4, this is fine for starting out.
The Tripod: The tripod should be sturdy enough to hold the camera securely. Some DSLR cameras might be a bit heavy for very small tripods (the last thing you want is for the tripod to fall over). Most any medium duty (or better) tripod should work. The tripod ideally will allow several degrees of adjustment to allow you to easily aim the camera where you want.
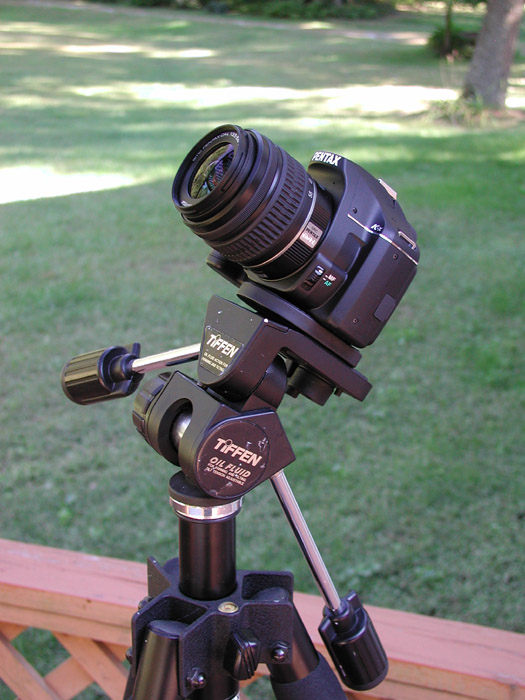
The photo below shows the basic setup you'll need to do your first astrophotos. The camera shown is a Pentax K-x Digital SLR with an 18-55mm f/3.5-5.6 AL Lens.
The exact instructions will vary from camera to camera, but these are the basic high level steps:
Once all of the above items are set, try taking several exposures. Do experiment! This is how you will
learn what works best for your camera. Try changing the ISO speed (400 is probably the lowest value you'll want
to try on stars), try shorter and longer exposures, etc. Try some shots with trees in the background, this can
add a nice effect. Once you have a few shots, bring the camera in and download them to your computer (the
camera's LCD screen will only give a rough idea of what your true results are). Keep notes as to what worked
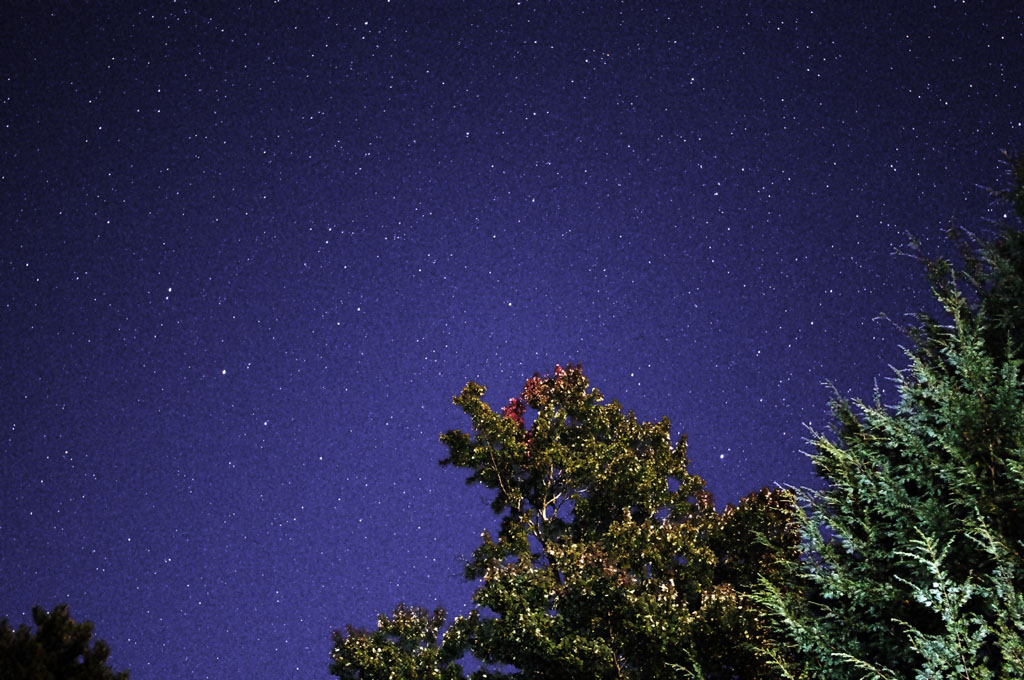
and what didn't. Chances are you'll have at least a couple of decent shots for your efforts! The photo below is a shot of the north star region from my backyard taken with a Pentax K-x camera. This is a 20 second exposure with the ISO set
to 1600. A very bright Moon was in the sky (the reason the sky is blue and also why the trees are lit up fairly well.
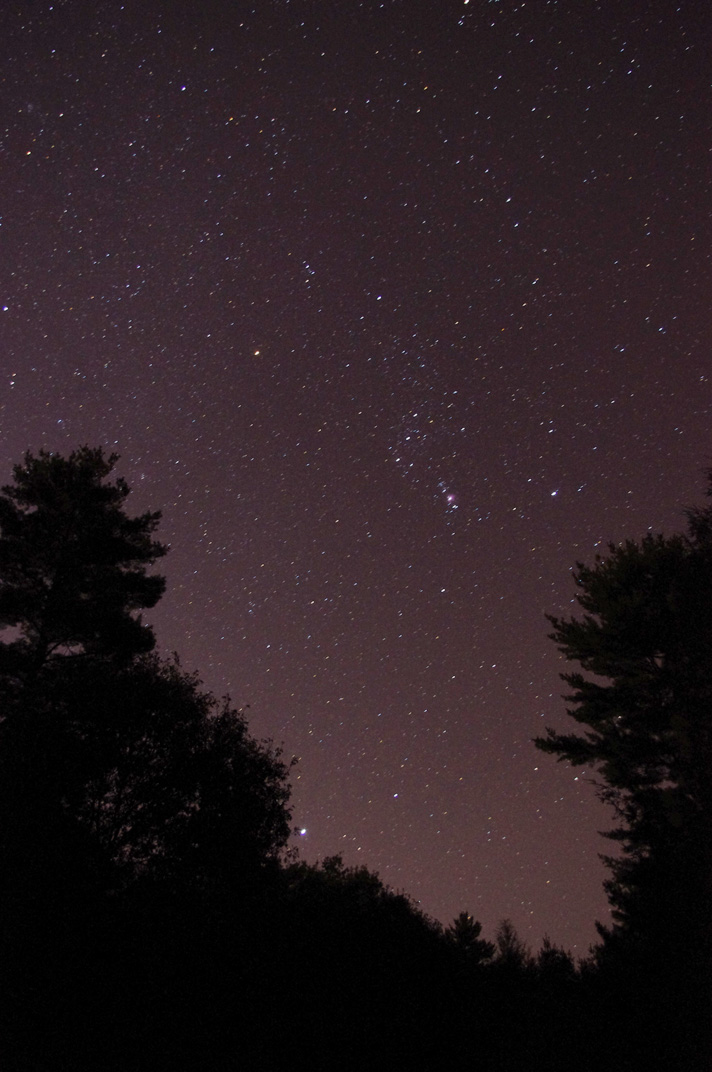
Assessing the results... Your first shots may not be perfect, but chances are you will have at least several good shots! Do you notice that the stars appear as tiny streaks even on the short exposures? Although it does not seem to, the Earth really does rotate enough to leave a short star trail even on a 30 second exposure! Notice also that the longer exposures may have recorded more stars (especially if the camera was aimed at the polar region and/or your sky is very dark). Do you see unexplained "ghosts" in your images? If so, this can be caused by stray light (from nearby streetlights or floodlights) that is scattered by the camera lens. The remedy for this? Be sure that your camera is completely shielded from stray light sources. Are your photos washed out to the point where it looks like they were taken in twilight? If so, the light pollution in your area may be the problem (you'll have to get to a dark sky area to eliminate this problem). Do you see the various colors of the stars? If you took a photo of the constellation Orion you should see both red and blue stars (cameras are great for capturing star colors as compared with the human eye).
Experiment! As mentioned, cameras are great for picking up colors that the human eye cannot see well. The photo below is of the winter constellation Orion, but the lens was intentionally defocused. This will enlarge the stars considerably and allow them to really show their colors (the downside is that you will record less stars the more the image is defocused).
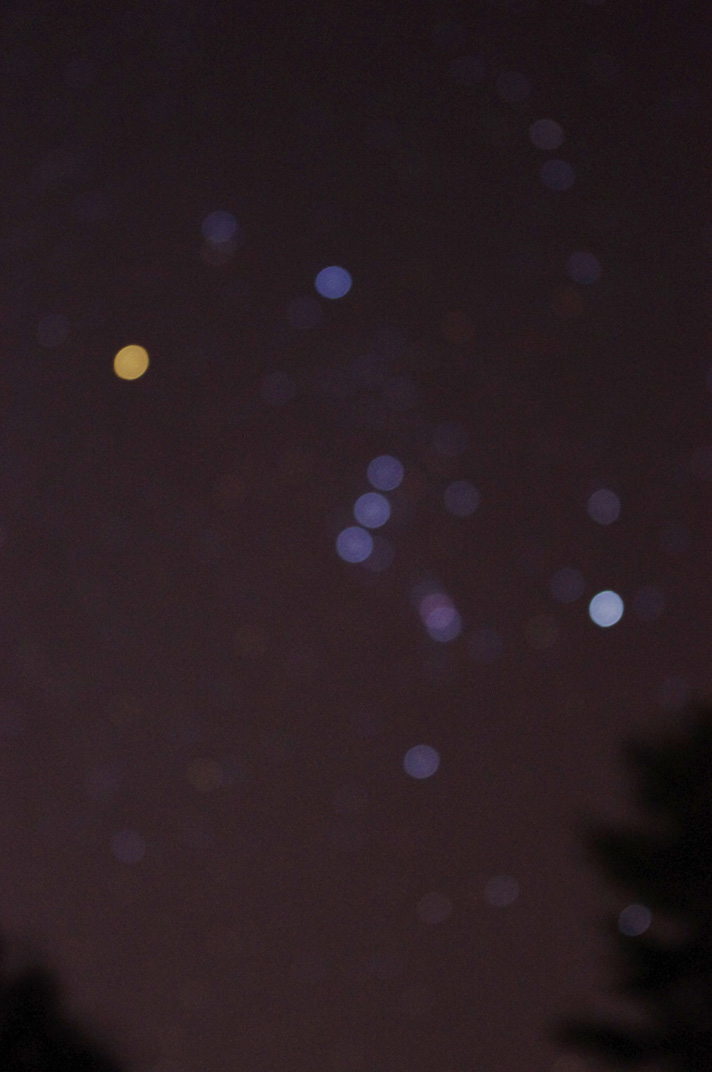
Notice how well the colors stand out in the above photo! Finally, below is a shot of the Orion area with stars focused nromally. Results like this are easily within the reach of just about anyone with a DSLR camera!
Piggyback astrophotography is the next logical step in your astrophotography activities. It is basically the same as above, however instead of the camera being mounted on a tripod it instead will be mounted to the telescope's tube. Note that the camera is not taking a photo through the telescope; it is still taking a wide angle shot of the sky. The difference is that you will be able to take much longer exposures and not have stars show up as streaks on the image. This will allow you to record fainter stars and more detail overall.
Piggyback Astrophotography: What you'll need: To do basic piggyback astrophotography, you'll need the following:
Items 3 and 4 require more elaboration. The telescope you will need must have an equatorial mount and it must have a motor drive. In order for the telescope to act as an accurate tracking platform, you must be able to do a fairly accurate polar alignment; the degree of accuracy depends upon the focal length of the lens you intend to shoot with and the length of the exposures you plan to try. In general, short lenses and short exposures are less demanding on the degree of polar alignment accuracy.
Item 4, the camera mount bracket, is required to mount the camera to the telescope's optical tube. For many telescopes, mounts are commercially available. You can also make one yourself; it does not have to look "pretty", it just needs to be stable and have the ability to hold the camera securely such that it does not allow the camera to move with respect to the telescope's tube assembly.
Piggyback Astrophotography: Your first attempt The following steps will outline the procedure for doing piggyback astrophotography:
How long of an exposure can be made? That depends upon how accurate your polar alignment is, how good your telescope's drive is, and the ambient sky conditions in your area. In addition, you have to take into consideration the focal length of the camera lens you are using. If it is a wide angle lens, you can probably expose for up to 15 or 20 minutes if your polar alignment is good, your drive is of high quality, and your sky is reasonably dark. Longer lenses will "magnify" the errors in your alignment and your telescope's drive. Each telescope will be different in this regard... experimentation is probably the best way to become familiar with what "works" and what doesn't with your particular setup (remember, this is astrophotography, an activity where trial and error is a fact of life).
Assess you photos as above. If all went well you should have stars that appear as nice round "dots". You may see some "drifting" as exposures get longer, this is usually a sign of plar alignment being off. Remember, start with a wider angle shot and this will minimize tracking errors. Chances are you'll have at least a few really nice shots!
I will at some point extend this article to cover more types of beginning astrophotography. Topics to be included: Advanced "Piggyback" astrophotography, "Afocal" astrophotography, Lunar "though a telescope" astrophotography, and "Deep Sky" photography. Articles will appear as soon as I have time to write them! In the meantime, feel free to submit questions. If I am qualified to answer, I will!
Use your browser's "back" button, or use links below if you arrived here via some other path:
This page is part of the site Amateur Astronomer's Notebook.
E-mail to Joe
Roberts
Images and HTML text © Copyright 2010 by Joe Roberts. Please request
permission to use photos for purposes other than "personal use".