
Updated 06 July 2012
This page chronicles my experiences with the
Orion StarShoot Pro Deep Space CCD Color Imaging Camera. I ordered
the camera from Orion on 19 August 2008 and it
arrived on 27 August (I am clear across the country from Orion so delivery takes 6 business days). This imager
is the second CCD imager I have owned; my first was a Meade Pictor 216XT (I worked with that unit in 1998). Overall
my experience with the Meade unit was pretty frustrating; the unit was very difficult to use and the software was
very buggy, I think that in looking back they released that product before it was really ready for market). In
any event, I was expecting a lot more from the Orion unit (being that it is 10 years newer than the Meade unit
and many improvements have been made to CCD imaging in that time). Overall my first impressions of the Orion
unit are very good. On the very first night I was able to get a nice looking image of M13 (see below)!
The photos below will contain descriptions and information that other imagers may find useful. To see the full size image, click on the small image and the full size image will open in a new window.
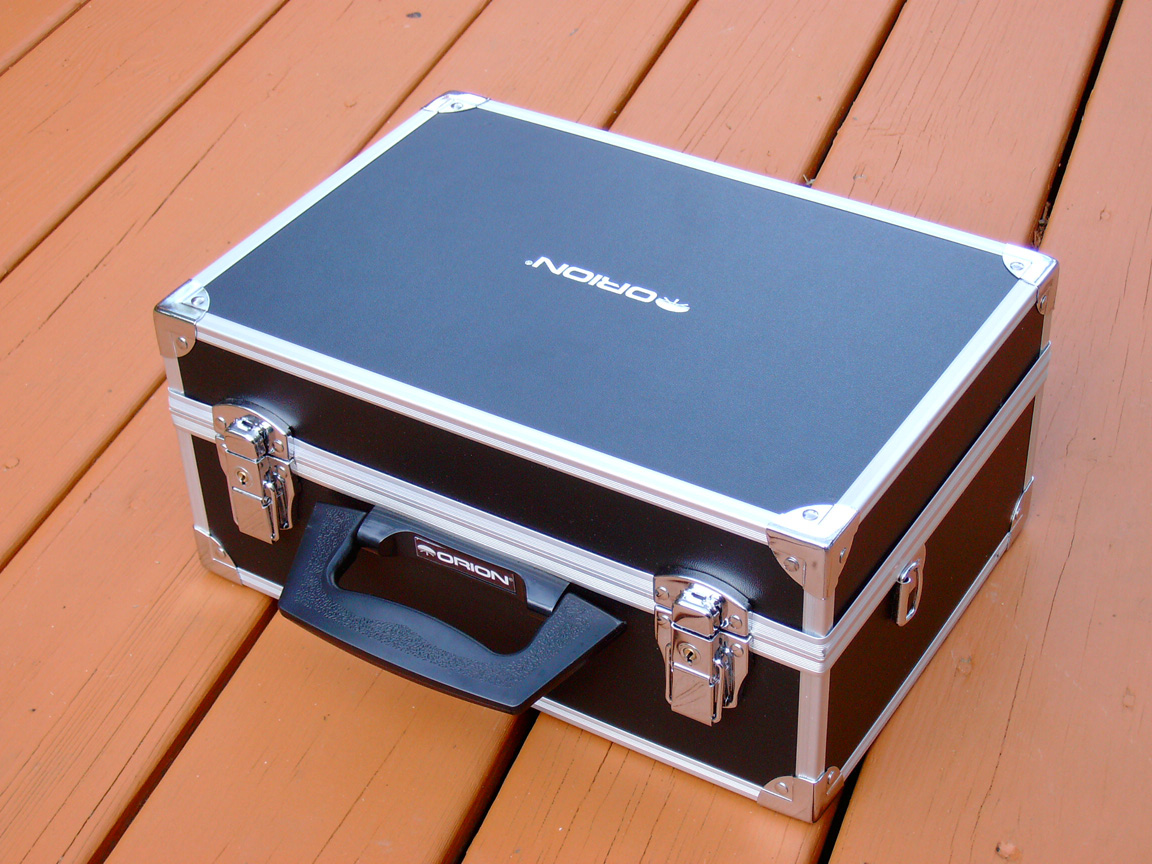 Storage Case The Orion StarShoot Pro Deep Space CCD Color Imaging Camera (SSDSI for short) comes in a very handsome and well made
carrying/storage case. When the unit
arrived the outer carton was a bit beat up. The packing was pretty decent, there were air pillows all around the
inner box. The SSDSI is well protected inside the case by a thick foam padding (see next image). Despite the
outer box being a bit beat up my unit arrived in perfect condition.
Storage Case The Orion StarShoot Pro Deep Space CCD Color Imaging Camera (SSDSI for short) comes in a very handsome and well made
carrying/storage case. When the unit
arrived the outer carton was a bit beat up. The packing was pretty decent, there were air pillows all around the
inner box. The SSDSI is well protected inside the case by a thick foam padding (see next image). Despite the
outer box being a bit beat up my unit arrived in perfect condition.
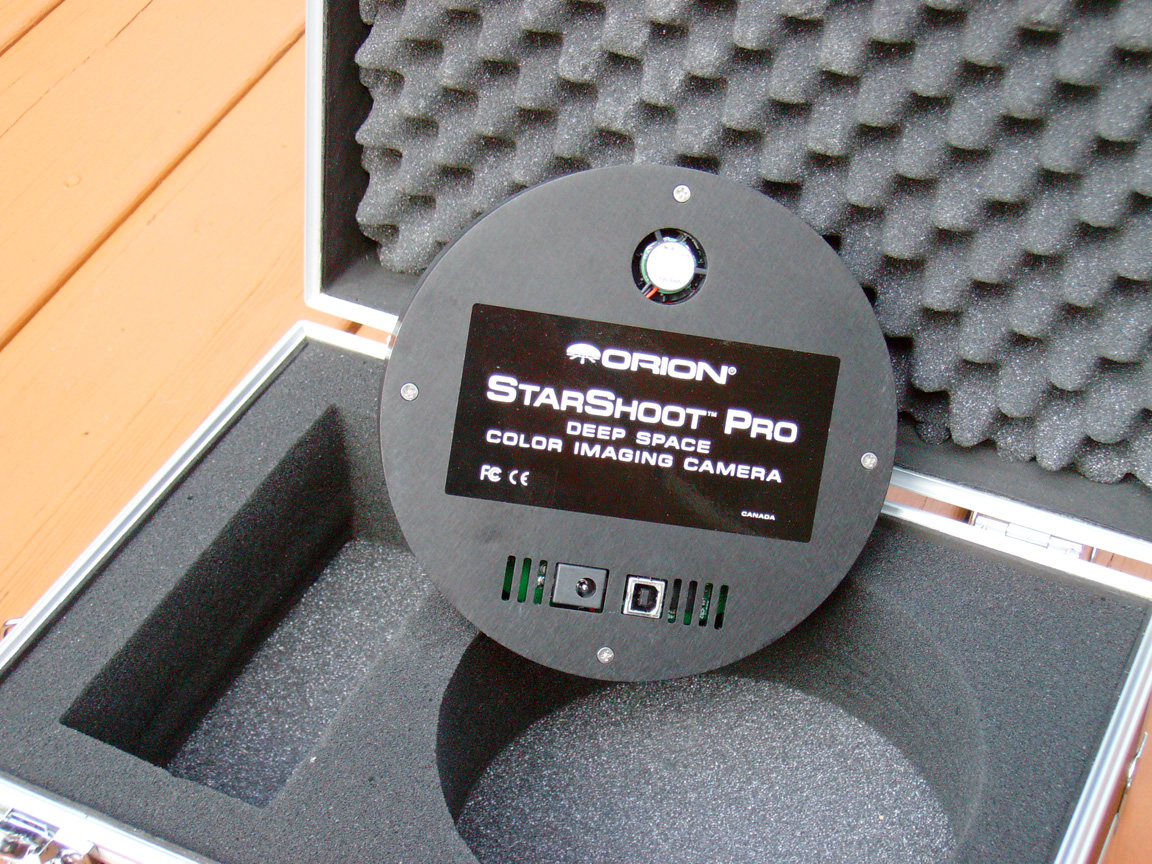 Orion StarShoot Pro Deep Space CCD Color Imaging Camera Here's a view of the SSDSI sitting in its case.
The unit comes with a USB cable and a power cable (not shown here). The unit is fairly large, bigger than what
I was expecting, however I am used to my old Meade Pictor 216XT and that unit is fairly small. The Orion SSDSI has the word "Canada" on it, if this is
the country of manufacture it is a refreshing change (so many things are from China today).
Orion StarShoot Pro Deep Space CCD Color Imaging Camera Here's a view of the SSDSI sitting in its case.
The unit comes with a USB cable and a power cable (not shown here). The unit is fairly large, bigger than what
I was expecting, however I am used to my old Meade Pictor 216XT and that unit is fairly small. The Orion SSDSI has the word "Canada" on it, if this is
the country of manufacture it is a refreshing change (so many things are from China today).
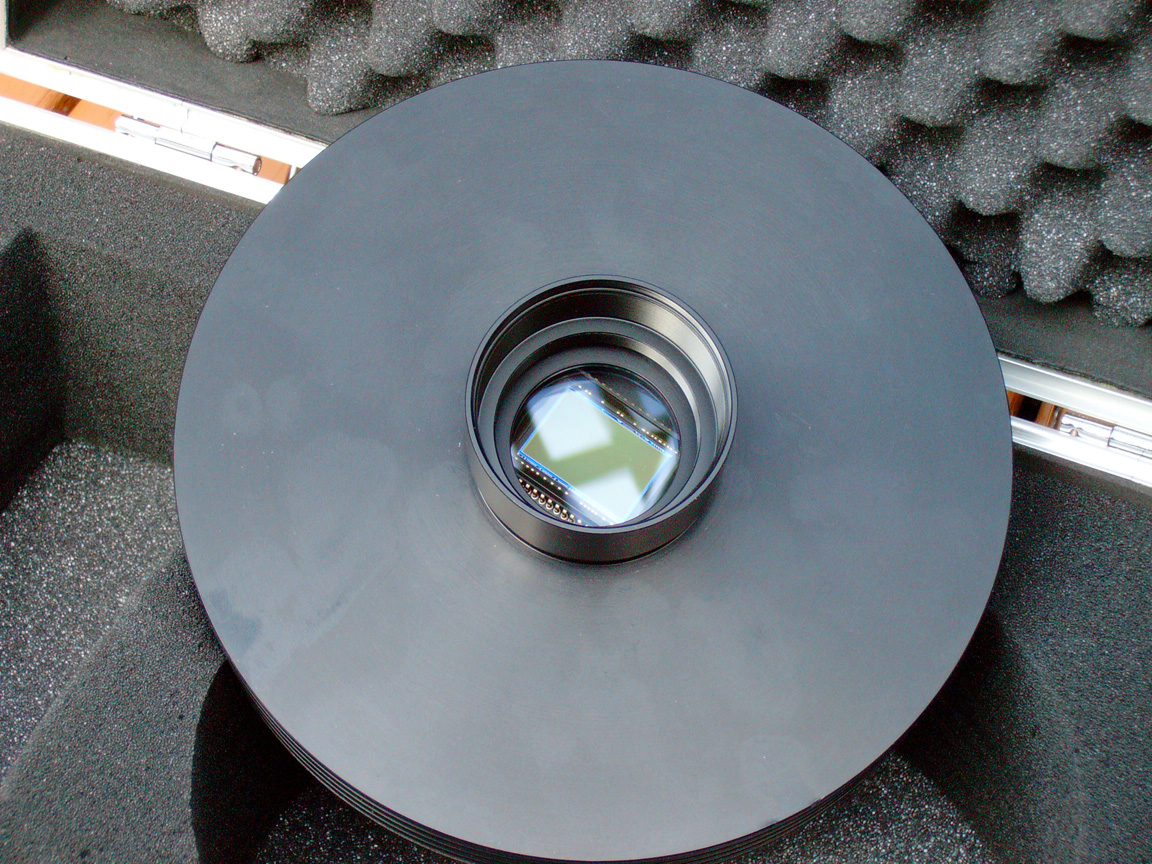 Orion StarShoot Pro Deep Space CCD Color Imaging Camera Here's a view of the CCD side of the SSDSI.
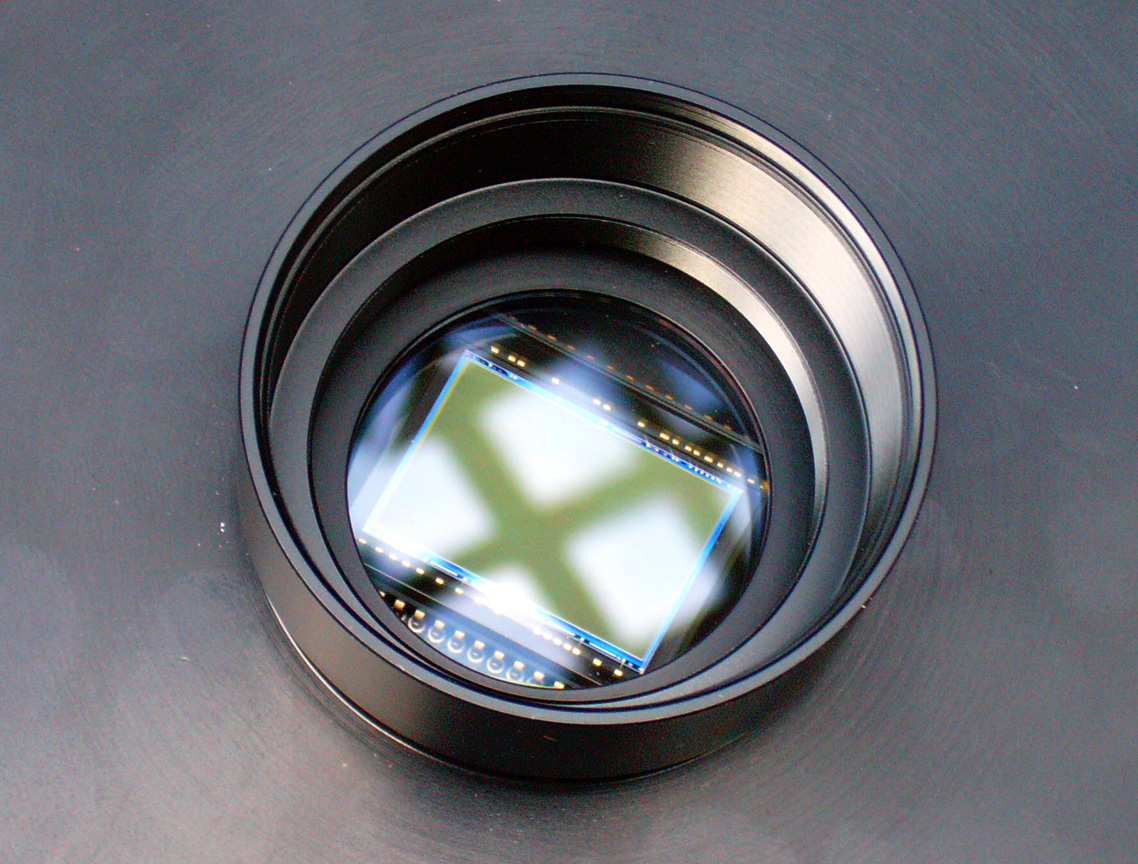 Orion StarShoot Pro Deep Space CCD Color Imaging Camera Here's a close up view of the CCD inside the
SSDSI. This CCD is 3032x2016 pixels (about 6.1MP), far larger than the one I was used to using in the Meade Pictor 216XT! The Meade CCD
was 336x242,or about .081MP (roughly 75 times smaller than the CCD in the Orion SSDSI).
Orion StarShoot Pro Deep Space CCD Color Imaging Camera Here's a close up view of the CCD inside the
SSDSI. This CCD is 3032x2016 pixels (about 6.1MP), far larger than the one I was used to using in the Meade Pictor 216XT! The Meade CCD
was 336x242,or about .081MP (roughly 75 times smaller than the CCD in the Orion SSDSI).
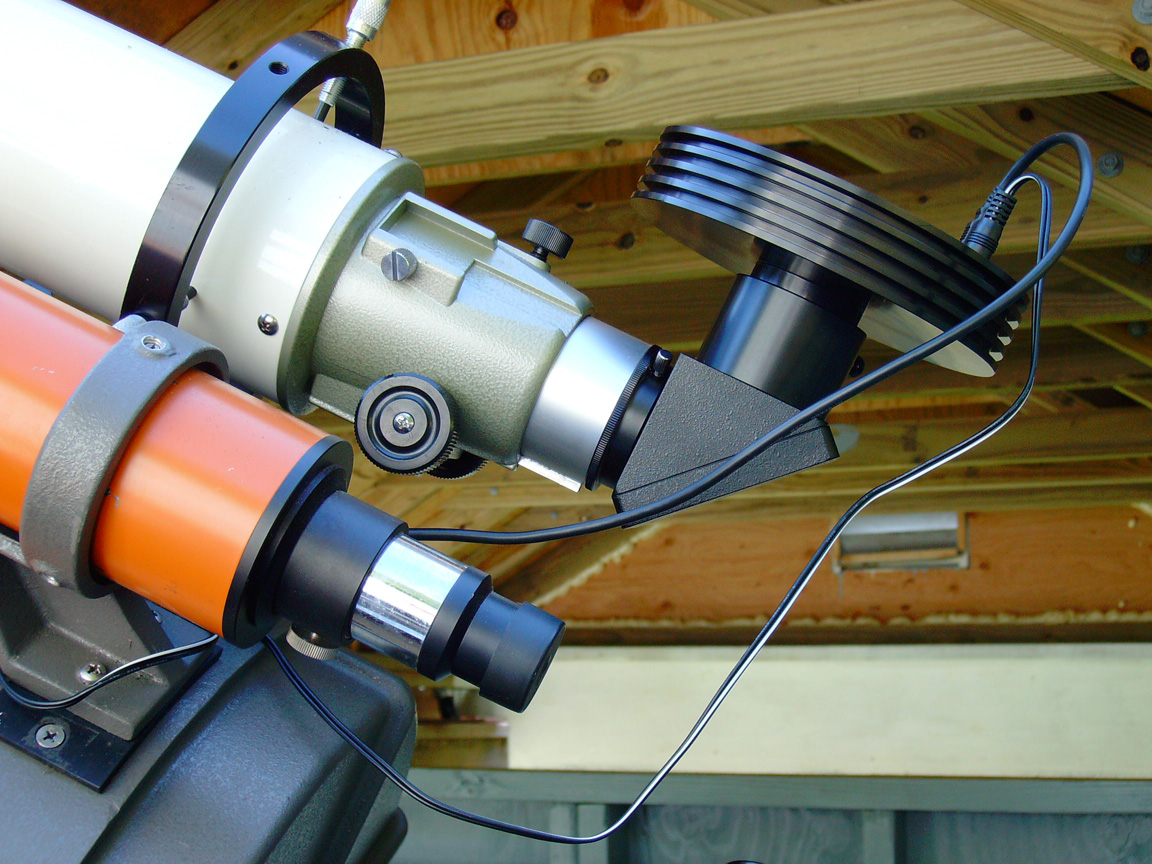
 Day 1: Attaching the Orion SSDSI to the Scope for Daytime Images I am very fortunate to have a Backyard
Observatory that greatly reduces the need for setup of equipment (for visual observing no more than 2-3 minutes is
required to have a 14" SCT and 4" refractor ready to go). For my first attempt at imaging using the SSDSI I wanted to start with the basics
and work up (based on the difficulty I had with the Meade Pictor 216XT years ago). I mounted the SSDSI on my
102mm (4") Vixen refractor. This image shows it mounted via a 2" star diagonal (I found I needed to use the
diagonal to get the extra focusing range). I made very certain that all locking screws were secure. Eventually I will obtain an extension tube so
I can eliminate the star diagonal (more optics in the way of the light path can only mean more dust particles and slight loss of image quality). This
image shows the SSDSI mounted on the refractor (the refractor is piggyback mounted on a Celestron 14 SCT scope) with
both the USB and 12 VDC power cables plugged in.
Day 1: Attaching the Orion SSDSI to the Scope for Daytime Images I am very fortunate to have a Backyard
Observatory that greatly reduces the need for setup of equipment (for visual observing no more than 2-3 minutes is
required to have a 14" SCT and 4" refractor ready to go). For my first attempt at imaging using the SSDSI I wanted to start with the basics
and work up (based on the difficulty I had with the Meade Pictor 216XT years ago). I mounted the SSDSI on my
102mm (4") Vixen refractor. This image shows it mounted via a 2" star diagonal (I found I needed to use the
diagonal to get the extra focusing range). I made very certain that all locking screws were secure. Eventually I will obtain an extension tube so
I can eliminate the star diagonal (more optics in the way of the light path can only mean more dust particles and slight loss of image quality). This
image shows the SSDSI mounted on the refractor (the refractor is piggyback mounted on a Celestron 14 SCT scope) with
both the USB and 12 VDC power cables plugged in.
 Another view of the Orion SSDSI mounted on the scope for "first light" This view (from the other side of
the scope) shows another angle of what the initial installation looks like.
Another view of the Orion SSDSI mounted on the scope for "first light" This view (from the other side of
the scope) shows another angle of what the initial installation looks like.
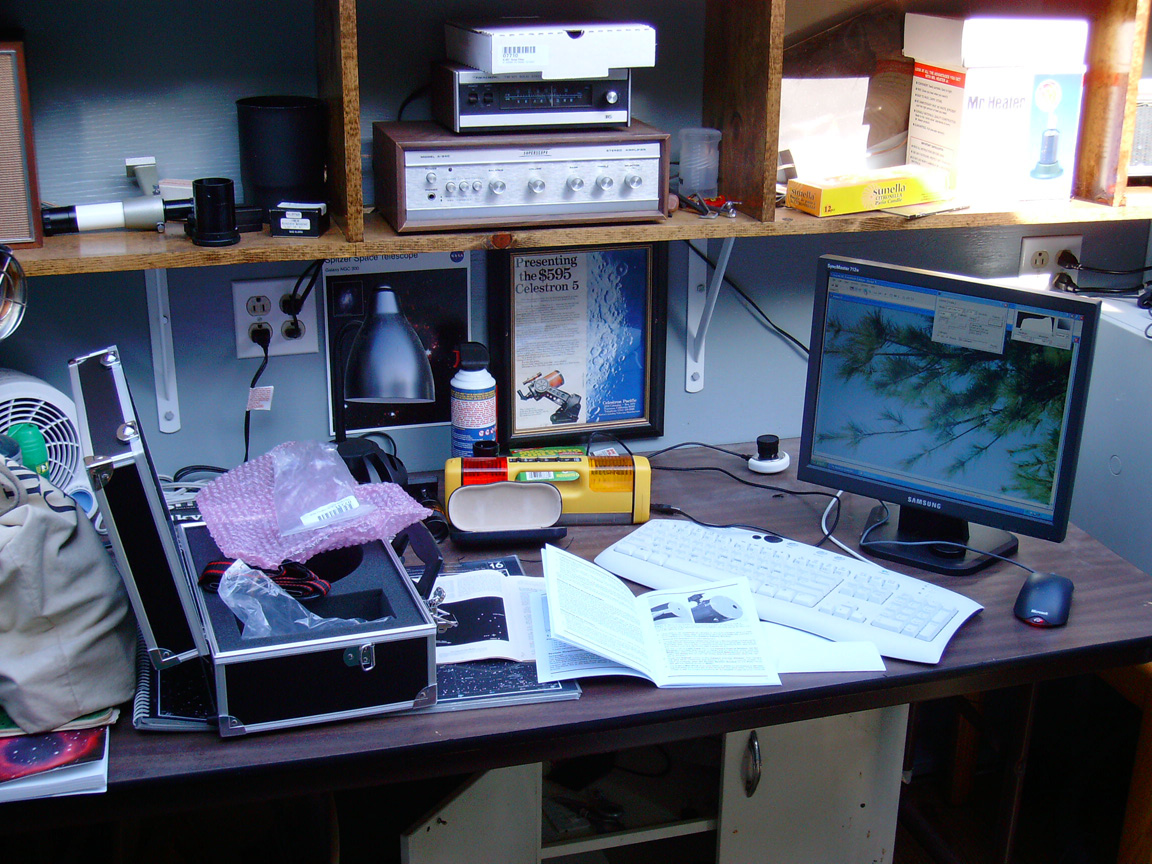 Installing the Maxim DL Essentials Software I had a few problems installing the software however this may
have been due to me having a previous version of Maxim DL Essentials installed (I had this software installed as
I also have the Orion StarShoot Solar System Color Imager, this unit can be seen just to the left of the computer monitor).
After initial problems I then uninstalled all
versions of Maxim DL Essentials and then tried re-installing the newer version. This time things worked without
issue. I followed the Orion SSDSI instruction booklet to obtain my first image during daylight (this is strongly
recommended in order to get some familiarity with the unit before fumbling around in the dark). My first
target attempt was a pine tree branch in a large tree on the far side of the yard. Initially it took some time
(a few minutes) to get to a good focus, but compared to what it used to take with the Meade Pictor 216XT the Orion
unit was a dream! This photo shows my observatory workbench on the first day using the Orion SSDSI.
Installing the Maxim DL Essentials Software I had a few problems installing the software however this may
have been due to me having a previous version of Maxim DL Essentials installed (I had this software installed as
I also have the Orion StarShoot Solar System Color Imager, this unit can be seen just to the left of the computer monitor).
After initial problems I then uninstalled all
versions of Maxim DL Essentials and then tried re-installing the newer version. This time things worked without
issue. I followed the Orion SSDSI instruction booklet to obtain my first image during daylight (this is strongly
recommended in order to get some familiarity with the unit before fumbling around in the dark). My first
target attempt was a pine tree branch in a large tree on the far side of the yard. Initially it took some time
(a few minutes) to get to a good focus, but compared to what it used to take with the Meade Pictor 216XT the Orion
unit was a dream! This photo shows my observatory workbench on the first day using the Orion SSDSI.
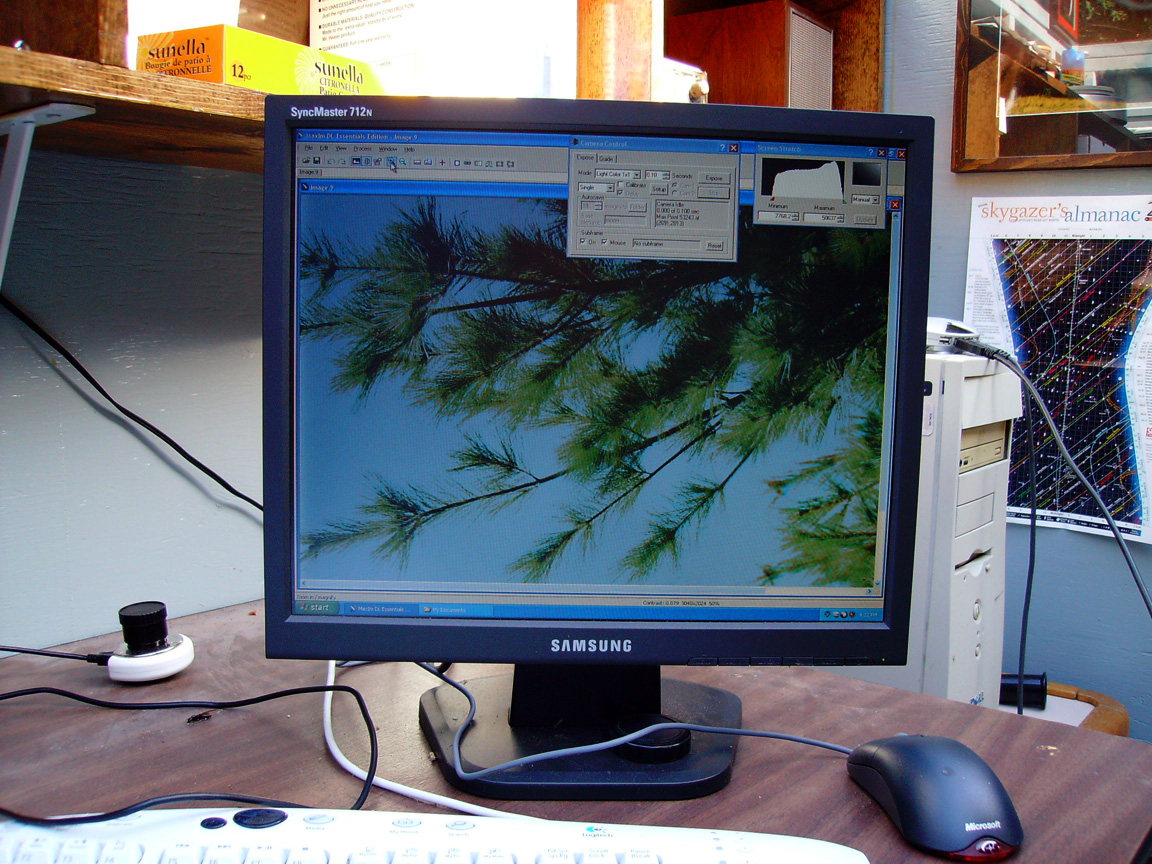 Orion StarShoot Pro Deep Space CCD Color Imaging Camera "First Light" This photo shows the computer screen
with my first image displayed! I was using a 4" refractor for this image, I had it stopped down to around 1.5"
diameter for this shot. I found that setting the "stretch" function was fairly important to getting a proper
image. If this is not set properly the image can be too dark or too light. Overall I had this image within an
hour of starting from scratch. So far I was very happy with the Orion SSDSI as with the old Meade Pictor 216XT it required a MAJOR
amount of time and effort simply to get any image at all (even of an easy daylight target)!
Orion StarShoot Pro Deep Space CCD Color Imaging Camera "First Light" This photo shows the computer screen
with my first image displayed! I was using a 4" refractor for this image, I had it stopped down to around 1.5"
diameter for this shot. I found that setting the "stretch" function was fairly important to getting a proper
image. If this is not set properly the image can be too dark or too light. Overall I had this image within an
hour of starting from scratch. So far I was very happy with the Orion SSDSI as with the old Meade Pictor 216XT it required a MAJOR
amount of time and effort simply to get any image at all (even of an easy daylight target)!
 Orion StarShoot Pro Deep Space CCD Color Imaging Camera First Star Focusing Attempt After successfully testing the SSDSI in daylight I waited
several hours for darkness. Tonight's sky conditions were not great (had it not been for the arrival of the SSDSI I would not be out observing under
such conditions). However the excitement of getting my first astronomical image with the SSDSI was significant so I was
not too concerned with the conditions. This is a raw image
(no dark frame processing or any processing at all) of my first stellar target. To try my first star focus
attempt I chose Altair as it was at a nice altitude and nice and bright (this would make it easier to see if it
were badly out of focus). With the observatory I have a major luxury: the 4" refractor is piggyback mounted to
the 14" SCT and it is also precisely aligned with the SCT (in other words if you center an object in the large
scope it will be centered in the small scope and vice versa). Due to this setup I did not have to first remove
the SSDSI from the scope to visually center the target. Overall I found the focusing of a star with the SSDSI
very easy (again I am coming from the "old days" of using a Meade Pictor 216XT and focusing that unit was very
time consuming mainly because it had a very slow serial interface). I used the features of Maxim DL Essentials to
get the best possible focus. Actually, Altair is so bright that it is not a good choice for a fine focus (the
exposure time has to be set very short to avoid saturating the CCD). Later I moved to a dimmer star and got
another focus. In any event, I found the task of focusing to be quite easy with the Orion SSDSI. The image
shown here is totally raw (aside from converting the FITS format image to JPG for web display). The image of
Altair is a 60 second image, this obviously is way too long for a star of this magnitude. I wanted to see if
there was any tracking error on my scope over a 60 second exposure (the dimmer stars would reveal this). Note
that there is a lot of noise in this image (to be expected being that it is a totally raw image) and other artifacts. These can largely be removed by
subsequent processing (I did not do any processing on this image as it was for test purposes only). For this
image I started out with basics: I had the SSDSI set for 2x2 binning, this produces a monochrome image. This results in a smaller (but still
substantial size) image and faster downloads.
Orion StarShoot Pro Deep Space CCD Color Imaging Camera First Star Focusing Attempt After successfully testing the SSDSI in daylight I waited
several hours for darkness. Tonight's sky conditions were not great (had it not been for the arrival of the SSDSI I would not be out observing under
such conditions). However the excitement of getting my first astronomical image with the SSDSI was significant so I was
not too concerned with the conditions. This is a raw image
(no dark frame processing or any processing at all) of my first stellar target. To try my first star focus
attempt I chose Altair as it was at a nice altitude and nice and bright (this would make it easier to see if it
were badly out of focus). With the observatory I have a major luxury: the 4" refractor is piggyback mounted to
the 14" SCT and it is also precisely aligned with the SCT (in other words if you center an object in the large
scope it will be centered in the small scope and vice versa). Due to this setup I did not have to first remove
the SSDSI from the scope to visually center the target. Overall I found the focusing of a star with the SSDSI
very easy (again I am coming from the "old days" of using a Meade Pictor 216XT and focusing that unit was very
time consuming mainly because it had a very slow serial interface). I used the features of Maxim DL Essentials to
get the best possible focus. Actually, Altair is so bright that it is not a good choice for a fine focus (the
exposure time has to be set very short to avoid saturating the CCD). Later I moved to a dimmer star and got
another focus. In any event, I found the task of focusing to be quite easy with the Orion SSDSI. The image
shown here is totally raw (aside from converting the FITS format image to JPG for web display). The image of
Altair is a 60 second image, this obviously is way too long for a star of this magnitude. I wanted to see if
there was any tracking error on my scope over a 60 second exposure (the dimmer stars would reveal this). Note
that there is a lot of noise in this image (to be expected being that it is a totally raw image) and other artifacts. These can largely be removed by
subsequent processing (I did not do any processing on this image as it was for test purposes only). For this
image I started out with basics: I had the SSDSI set for 2x2 binning, this produces a monochrome image. This results in a smaller (but still
substantial size) image and faster downloads.
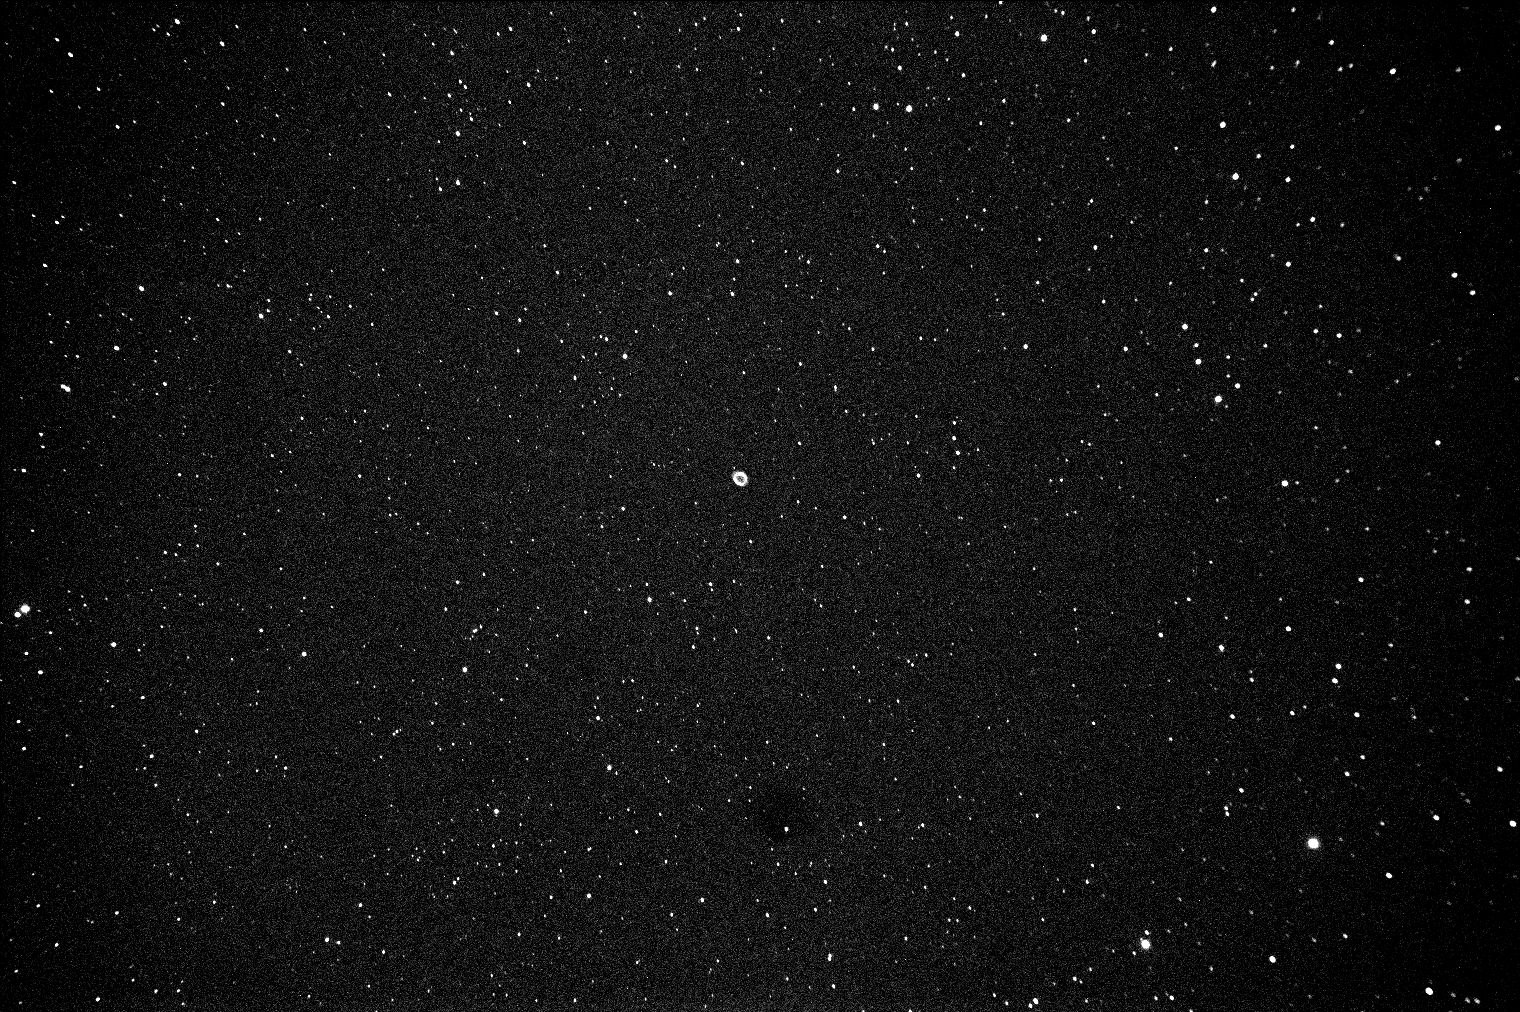 M57 (Ring Nebula) Raw Image Here�s my very first image of M57 using the Orion SSDSI! Note that this is
only one raw image (no processing at all). For tonight's work I kept the imager in 2x2 bin mode, meaning all
images will be 1/4 the area of the full color mode and all images will be monochrome. This makes the images
download faster and the computer is less bogged down (my machine in the observatory is a 1 GHz Pentium with 512MB
of RAM, near the lower limits of what is recommended for operating the SSDSI). This image of M57 is through a
Vixen 102 ED refractor (4"); the scope has a focal length of 665mm (F6.5). As such, the image of M57 is on the
small side (to be expected). In any case, even this raw image easily shows the nebula�s shape along with a
multitude of faint stars!
M57 (Ring Nebula) Raw Image Here�s my very first image of M57 using the Orion SSDSI! Note that this is
only one raw image (no processing at all). For tonight's work I kept the imager in 2x2 bin mode, meaning all
images will be 1/4 the area of the full color mode and all images will be monochrome. This makes the images
download faster and the computer is less bogged down (my machine in the observatory is a 1 GHz Pentium with 512MB
of RAM, near the lower limits of what is recommended for operating the SSDSI). This image of M57 is through a
Vixen 102 ED refractor (4"); the scope has a focal length of 665mm (F6.5). As such, the image of M57 is on the
small side (to be expected). In any case, even this raw image easily shows the nebula�s shape along with a
multitude of faint stars!
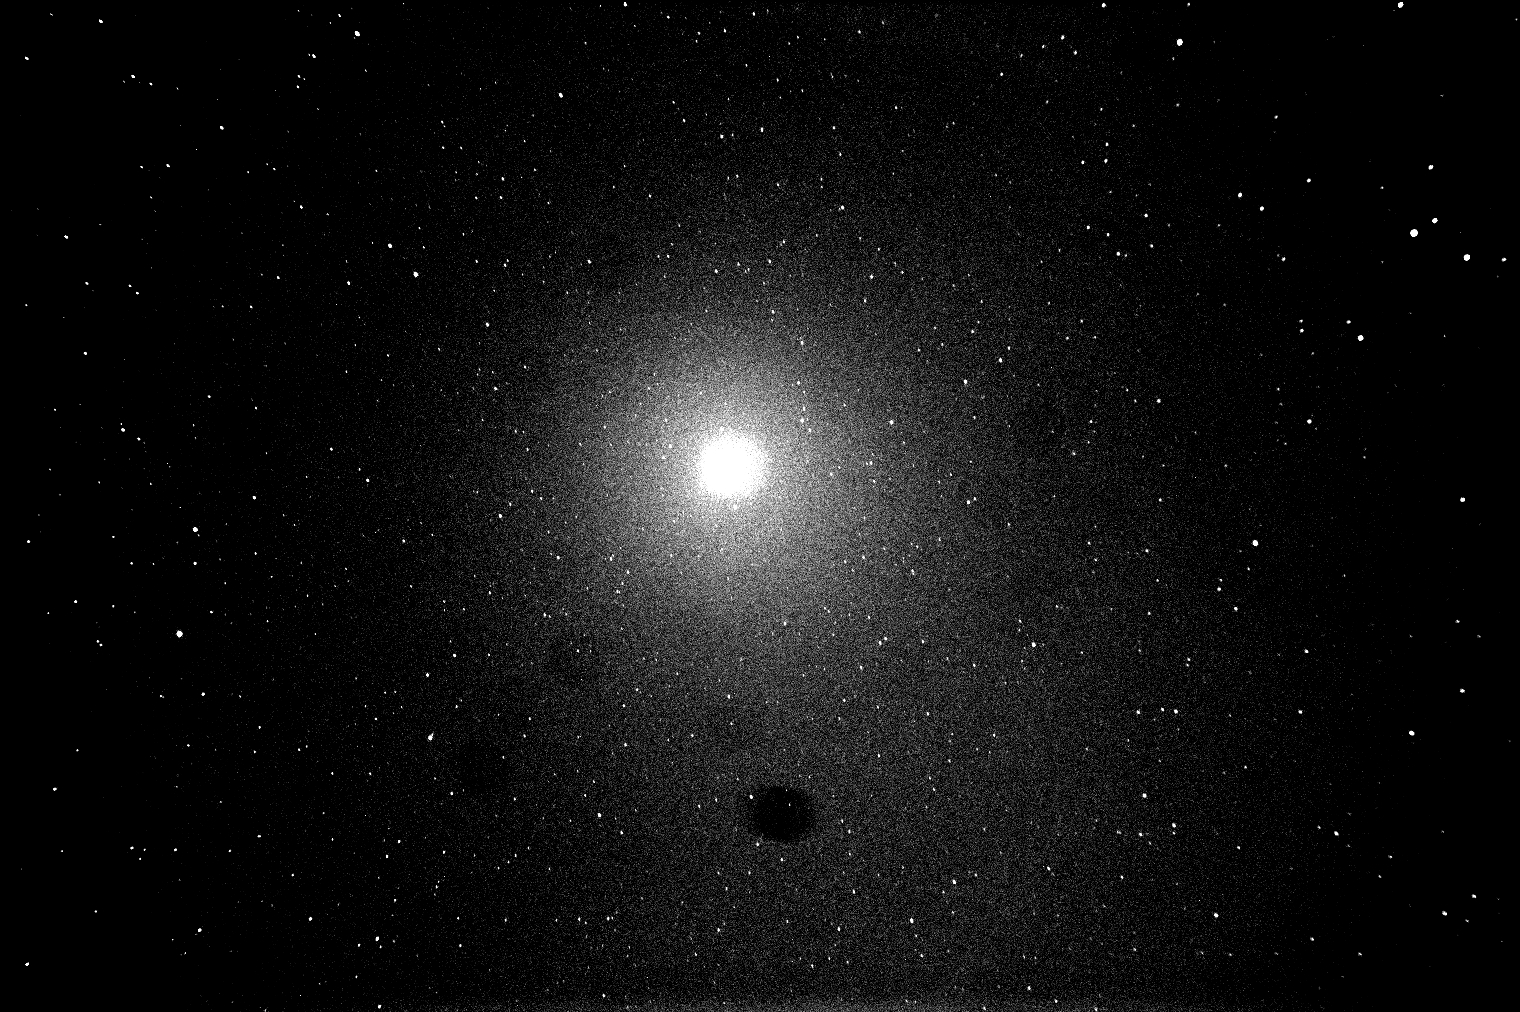
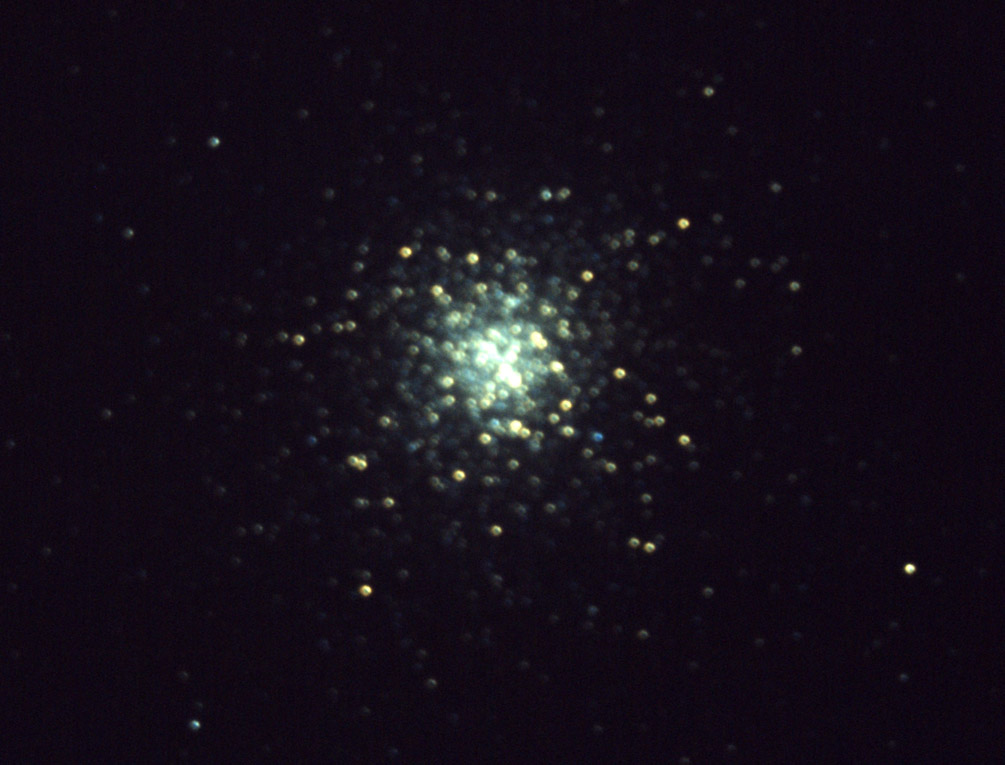
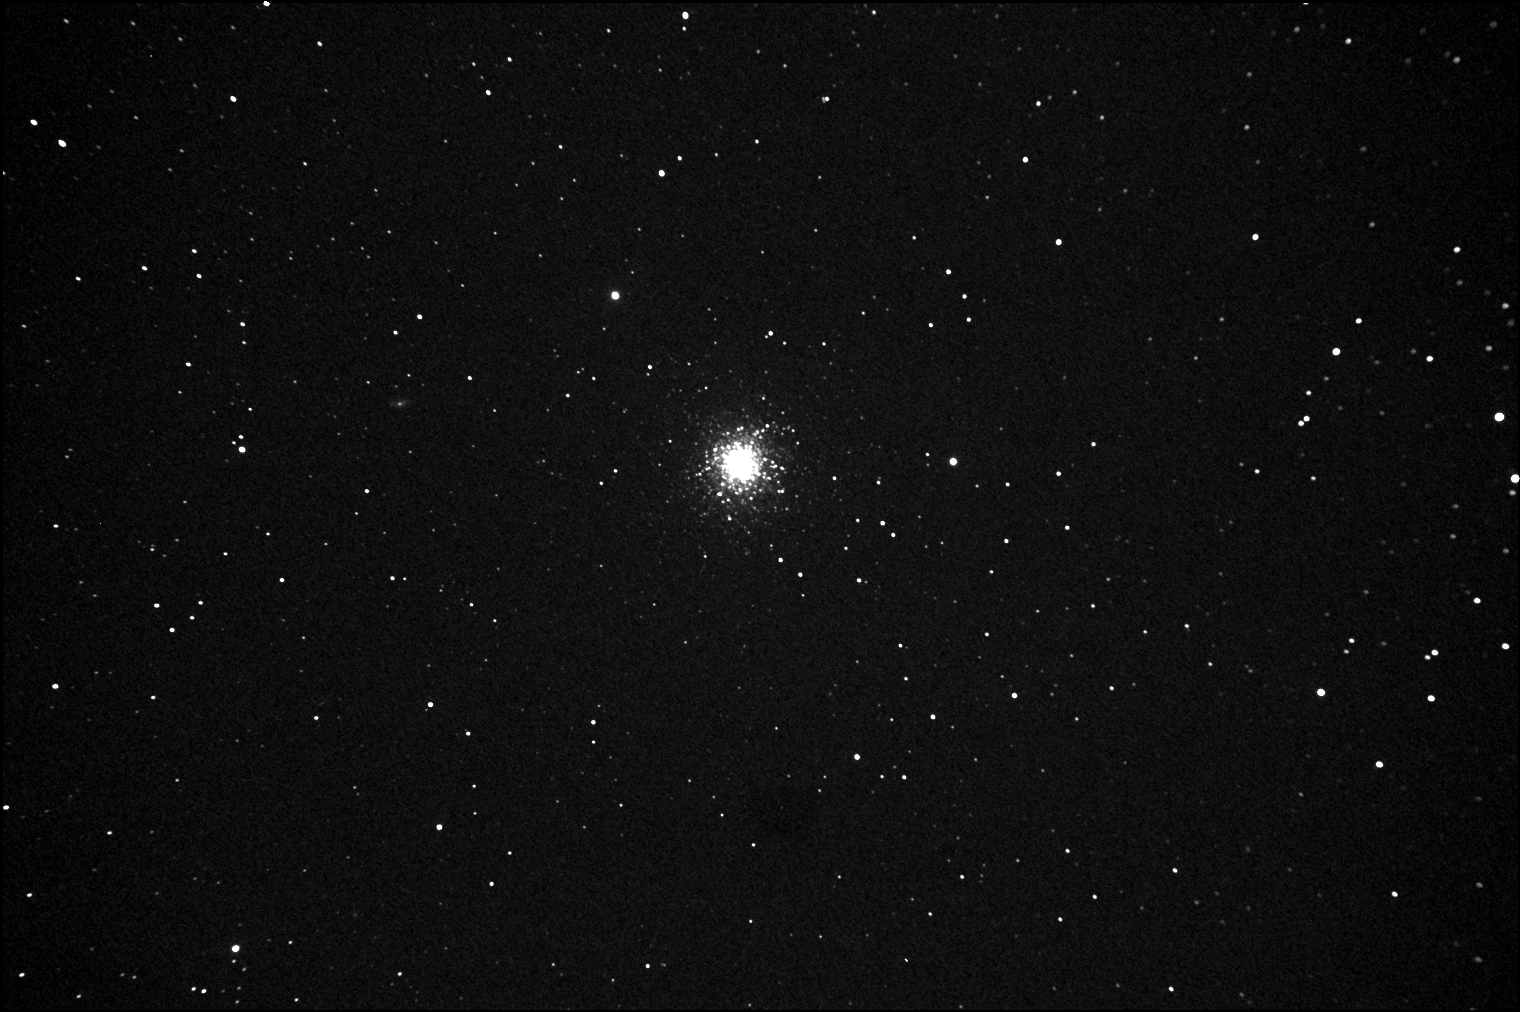 M13 with the Orion StarShoot Pro Deep Space CCD Color Imaging Camera This is my first processed image of
M13 using the SSDSI and the Vixen 102ED refractor. This image is a combination of ten 30 second exposures
(processed with dark frames only, I did not process with flat frames). As for the other night images on this first night I
had the camera in binned 2x2 mode. I am very pleased with this unit so far as I was able to get a very nice image
on my very first night out with the unit! Also seen in this image is NGC 6207, a galaxy visible to the slight
upper left of M13. Conditions tonight were not very good, there was haze in the sky and the limiting naked eye
magnitude near M13 was around 4.7 (M13 was not visible to the naked eye). I am very excited about the potential
for this imager and can hardly wait to get it out under a dark sky!
M13 with the Orion StarShoot Pro Deep Space CCD Color Imaging Camera This is my first processed image of
M13 using the SSDSI and the Vixen 102ED refractor. This image is a combination of ten 30 second exposures
(processed with dark frames only, I did not process with flat frames). As for the other night images on this first night I
had the camera in binned 2x2 mode. I am very pleased with this unit so far as I was able to get a very nice image
on my very first night out with the unit! Also seen in this image is NGC 6207, a galaxy visible to the slight
upper left of M13. Conditions tonight were not very good, there was haze in the sky and the limiting naked eye
magnitude near M13 was around 4.7 (M13 was not visible to the naked eye). I am very excited about the potential
for this imager and can hardly wait to get it out under a dark sky!
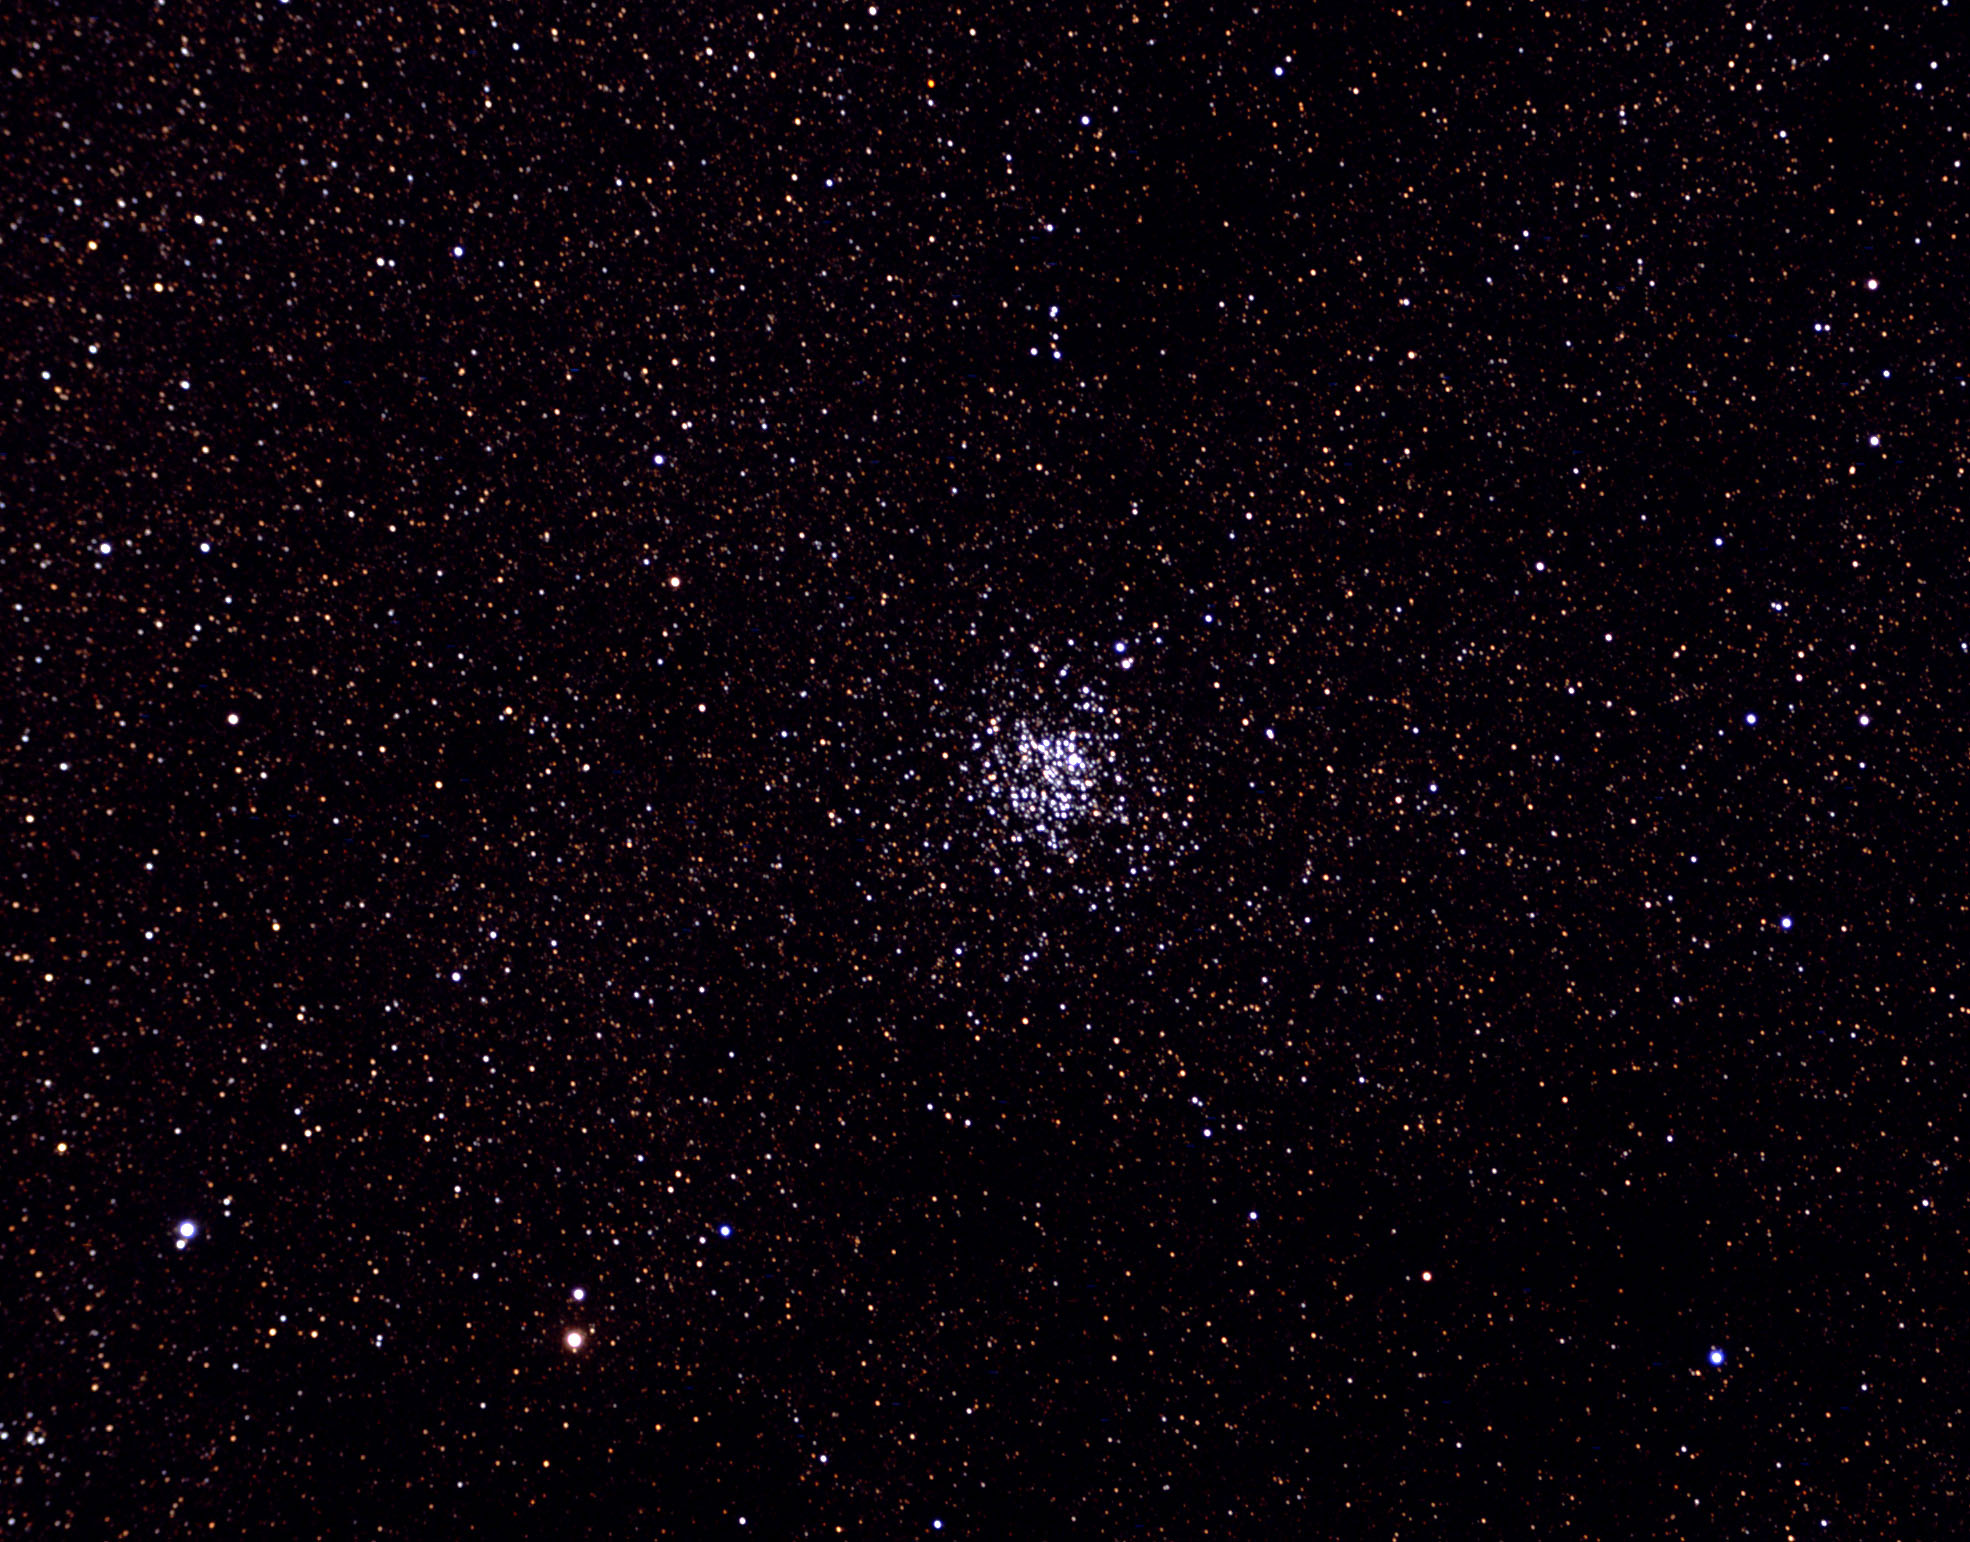
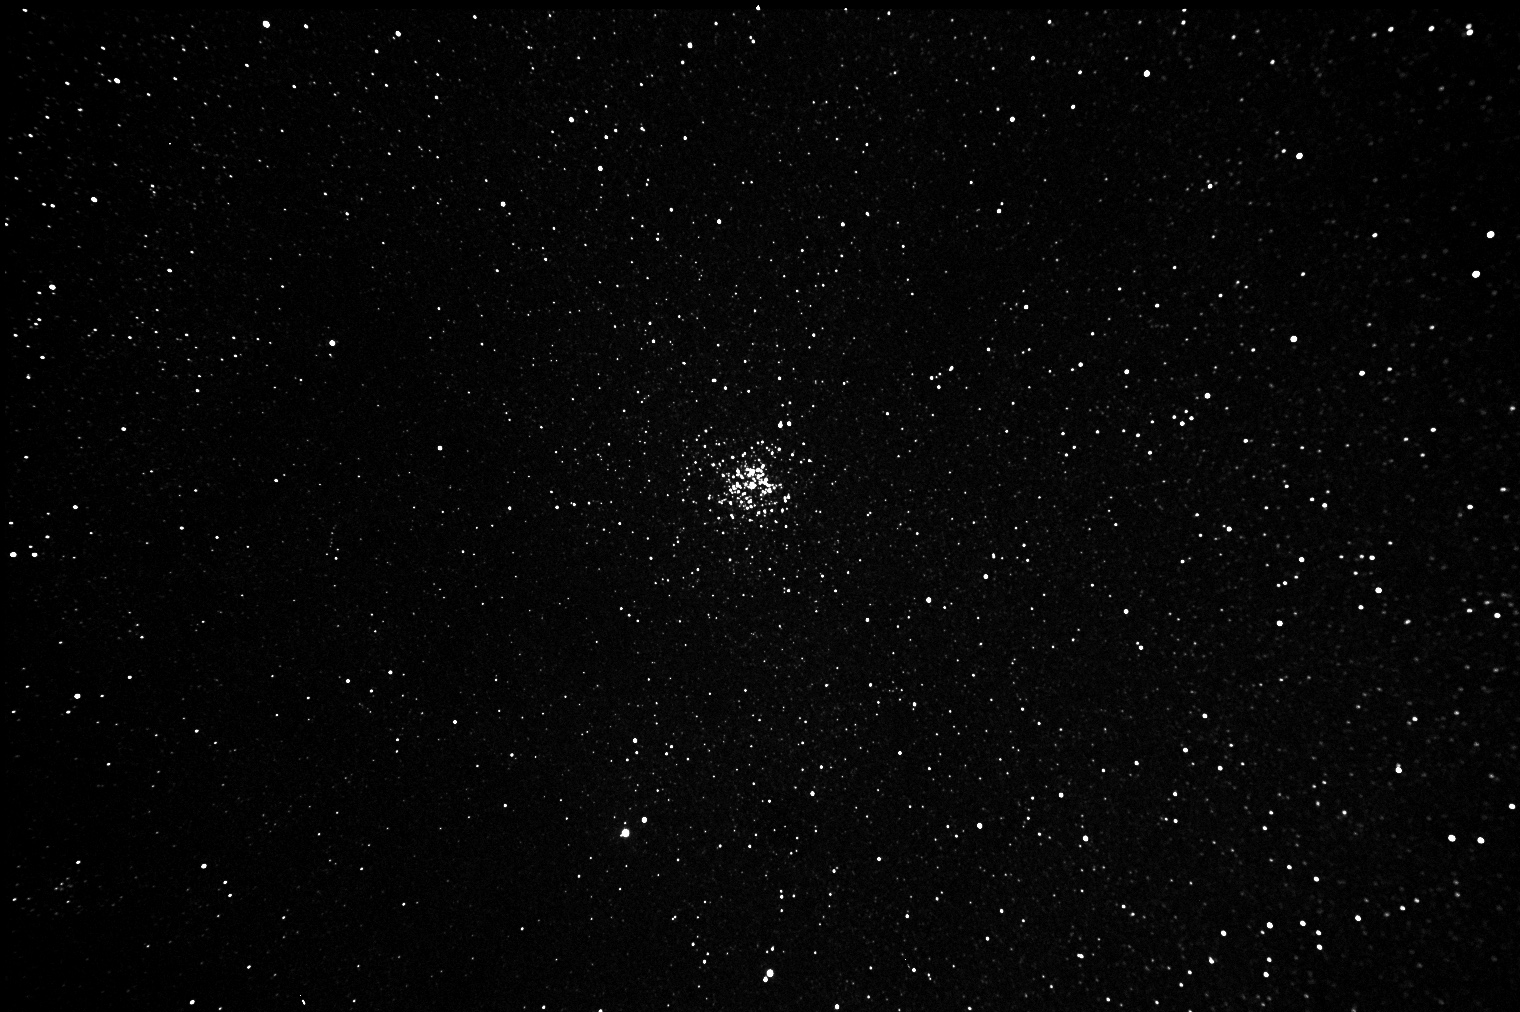 First night image of M11 with the Orion StarShoot Pro Deep Space CCD Color Imaging Camera Tonight was a
work night so I did not have a lot of time to stay out. I managed to get this decent image of M11. This image
is a stack of 4 30 second frames of M11 using the same scope and processing as described above for M13. All in
all day 1 with the Orion imager was very successful. I am very anxious to get a clear night when I can stay out
and acquire lots more data!
First night image of M11 with the Orion StarShoot Pro Deep Space CCD Color Imaging Camera Tonight was a
work night so I did not have a lot of time to stay out. I managed to get this decent image of M11. This image
is a stack of 4 30 second frames of M11 using the same scope and processing as described above for M13. All in
all day 1 with the Orion imager was very successful. I am very anxious to get a clear night when I can stay out
and acquire lots more data!
Overall I am quite please with the Orion unit after only one night of use, especially considering what I went through using the Meade Pictor 216XT about 10 years ago. I basically abandoned using that imager as it was very difficult to use. Ten years of technology improvements have made things a LOT easier to use and with a much larger format CCD. One of the major difficulties of using the Meade Pictor 216XT was getting the target of interest onto the CCD chip. This was because the CCD in the Meade units was only 336x242 pixels whereas the CCD in the Orion unit is 3032x2016 pixels (meaning the Orion unit has about 75 times as much area, making the field of view MUCH larger using the same focal length!). So, even without a flip mirror or precisely aligned guide scope, getting the object of interest into the CCD field of view is far easier than it was 10 years ago.
If you are thinking about getting an imager like the Orion unit, you'll still need a scope with ability to accurately track the stars. This pretty much means a decent equatorial mount, or possibly an alt-az mount that is motor driven to follow stars (however with an alt-az mount you'll have some amount of field rotation to deal with if exposures are long). Your scope will need to be accurately polar aligned if you want to do anything but very short exposures, and your scope's mount needs to have a very small periodic error (all of these requirements become more stringent as the focal length of your scope increases). In other words, the quality of tracking needed for a scope like an 8" SCT (2000mm focal length) is quite a bit more than that needed for a short focal length scope (like a small, fast refractor with a 500mm focal length).
CCD imaging has become a lot easier than it was 10 years ago, however it is still not a "point and shoot" process. To get a decent image of one object requires possibly 50 short exposures of the image itself and then a number of other exposures for dark and flat field frames (dark frames are absolutely required to get a decent image, you can skip flat fields for your early images but they definitely help to make a better overall image). After you have taken all of your individual images they must then be processed to form the final image. Fortunately the Maxim DL Essentials software makes this task much easier than it was in the "old days". It should be noted that the files from the Orion StarShoot Pro Deep Space CCD Color Imaging Camera are LARGE files, in the vicinity of 36MB per file! Years ago this would have been impossible for computers to handle (the laptop I had in 1998 only had a 400MB hard drive for everything!) but today's machines can handle it fine. If you do plan to get the Orion unit you must have USB II (USB I will not work, and even if it did it would be painfully slow). My recommendation is to make sure your computer is up to the task (try to have at least 1GB of RAM and a lot of space on the hard drive if you plan to do a lot of imaging in one session).
I am quite pleased with the "first night" images I got using the Orion StarShoot Pro Deep Space CCD Color Imaging Camera. I am very anxious to get back outside with the unit (once the weather clears again) as I am sure I have only tapped a small portion of its potential.
 M15 with the Orion StarShoot Pro Deep Space CCD Color Imaging Camera Tonight (31 August - 01 September) I tried my first color images. Here's a shot of M15 through a 4" refractor, the image is a result of thirteen 30 second exposures (processed with dark frames only, I did not do flat frames). This image is at full scale but it is cropped somewhat as the stars on the edge of the field were a bit distorted (due to the refractor).
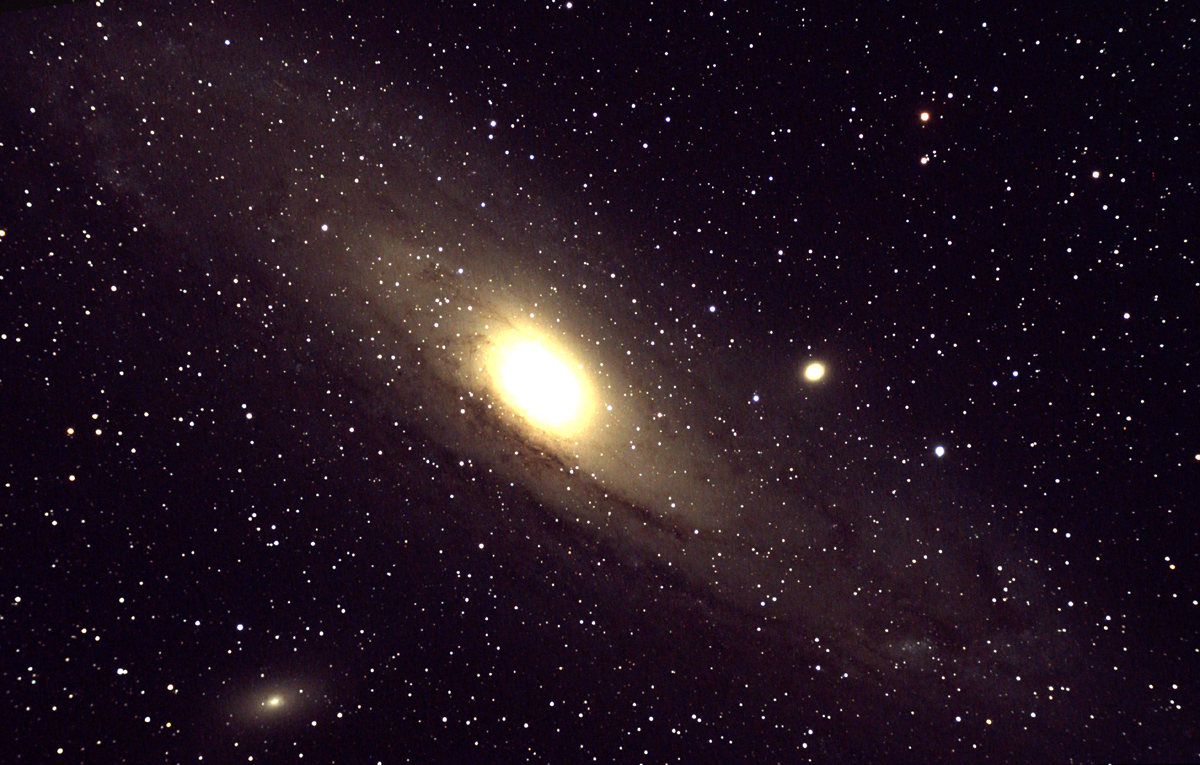
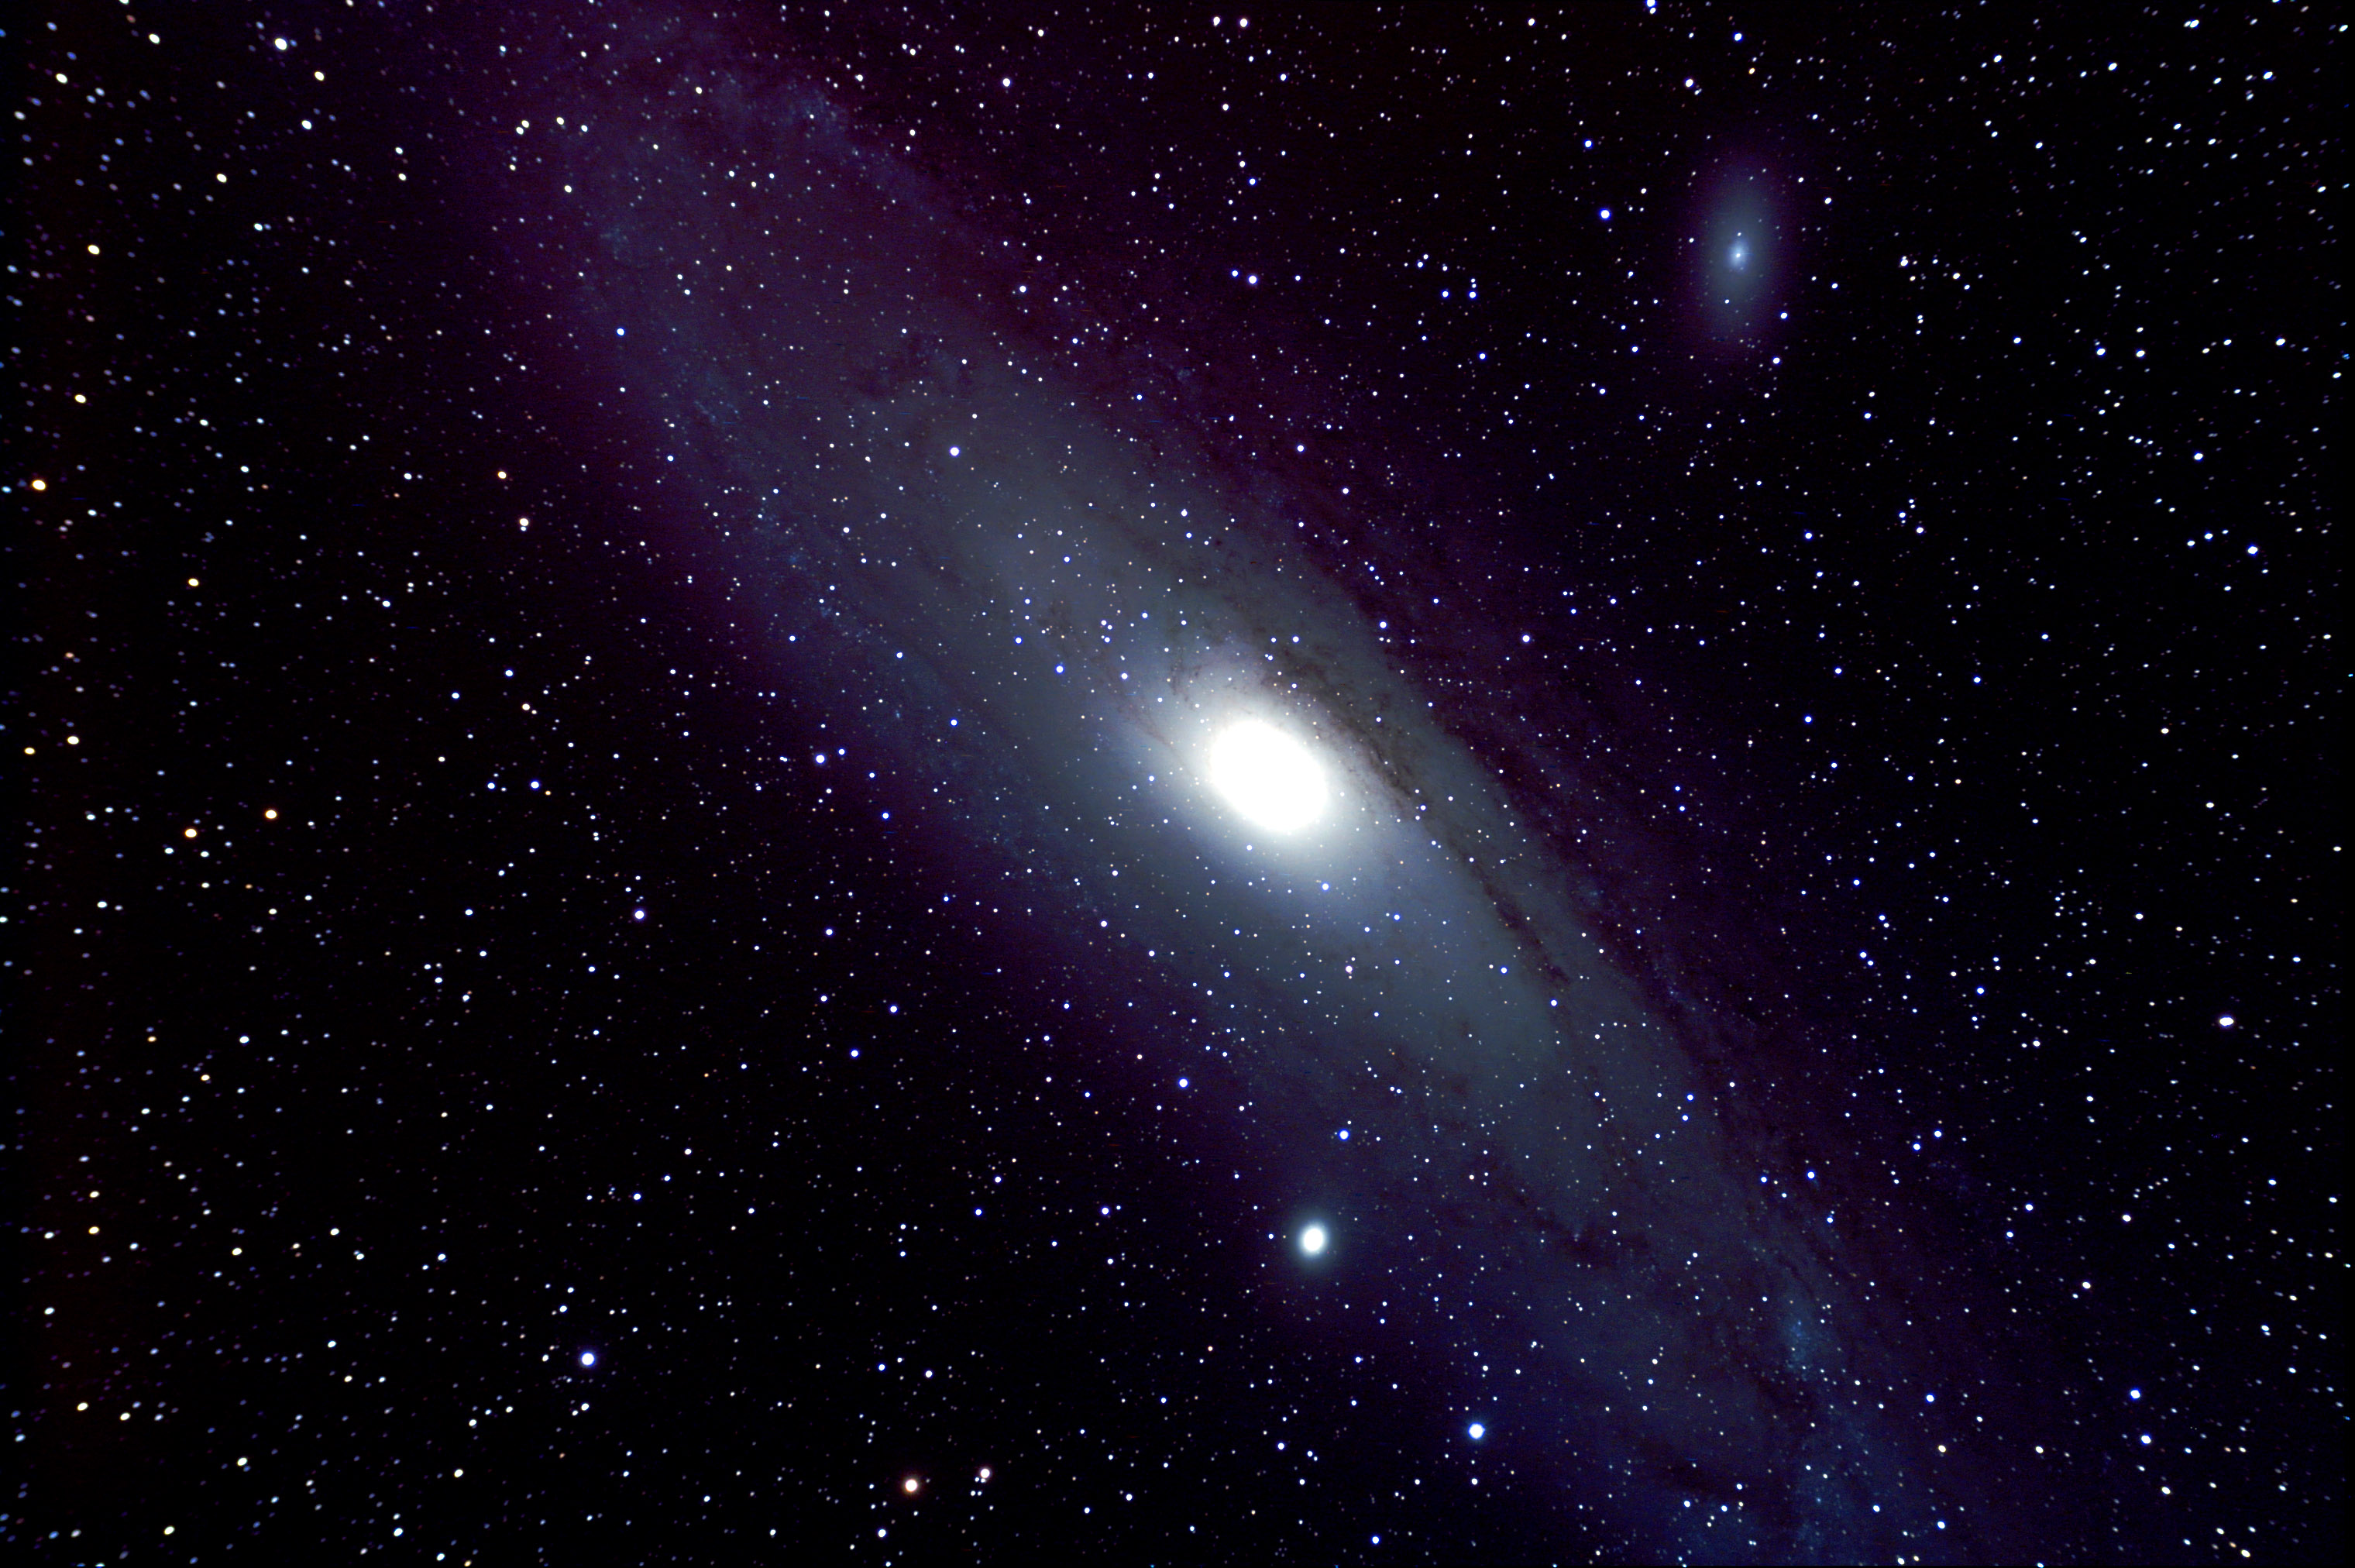
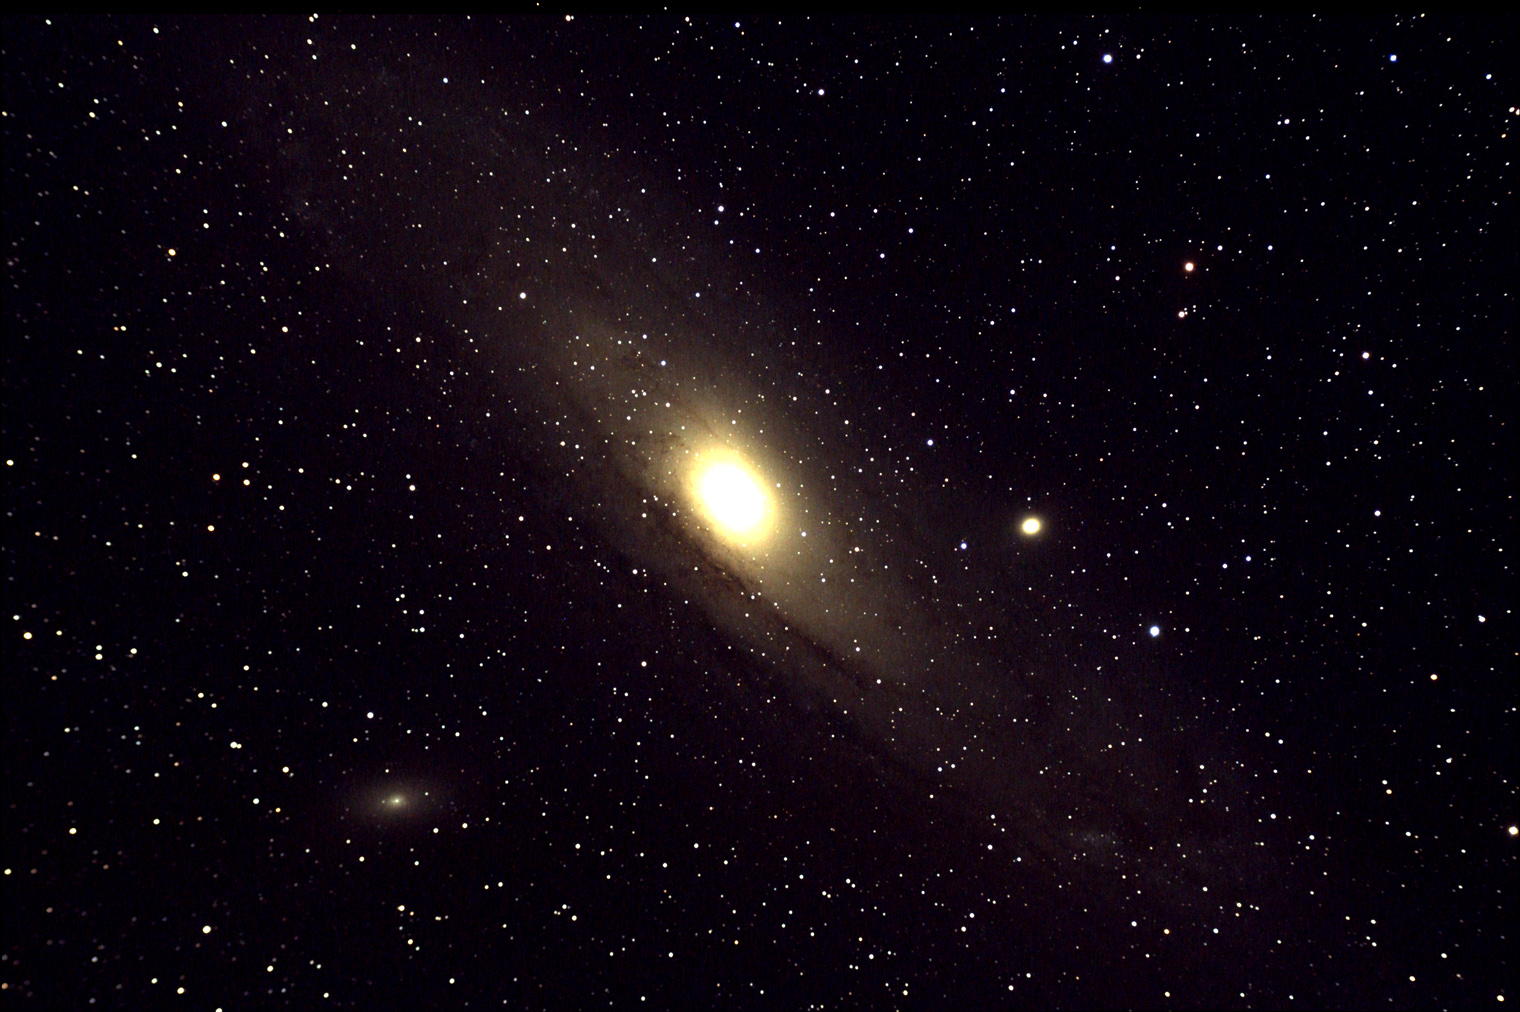 M31 with the Orion StarShoot Pro Deep Space CCD Color Imaging Camera This is a shot of M31 (and companions) taken on 30 Aug 2008. This shot is a composite of fifty 30 second expsoures (processed with dark frames, no flat frames). Telescope was a Vixen 102ED (4") refractor. This shot was scaled to 1/2 the dimensions of the SSDSI.
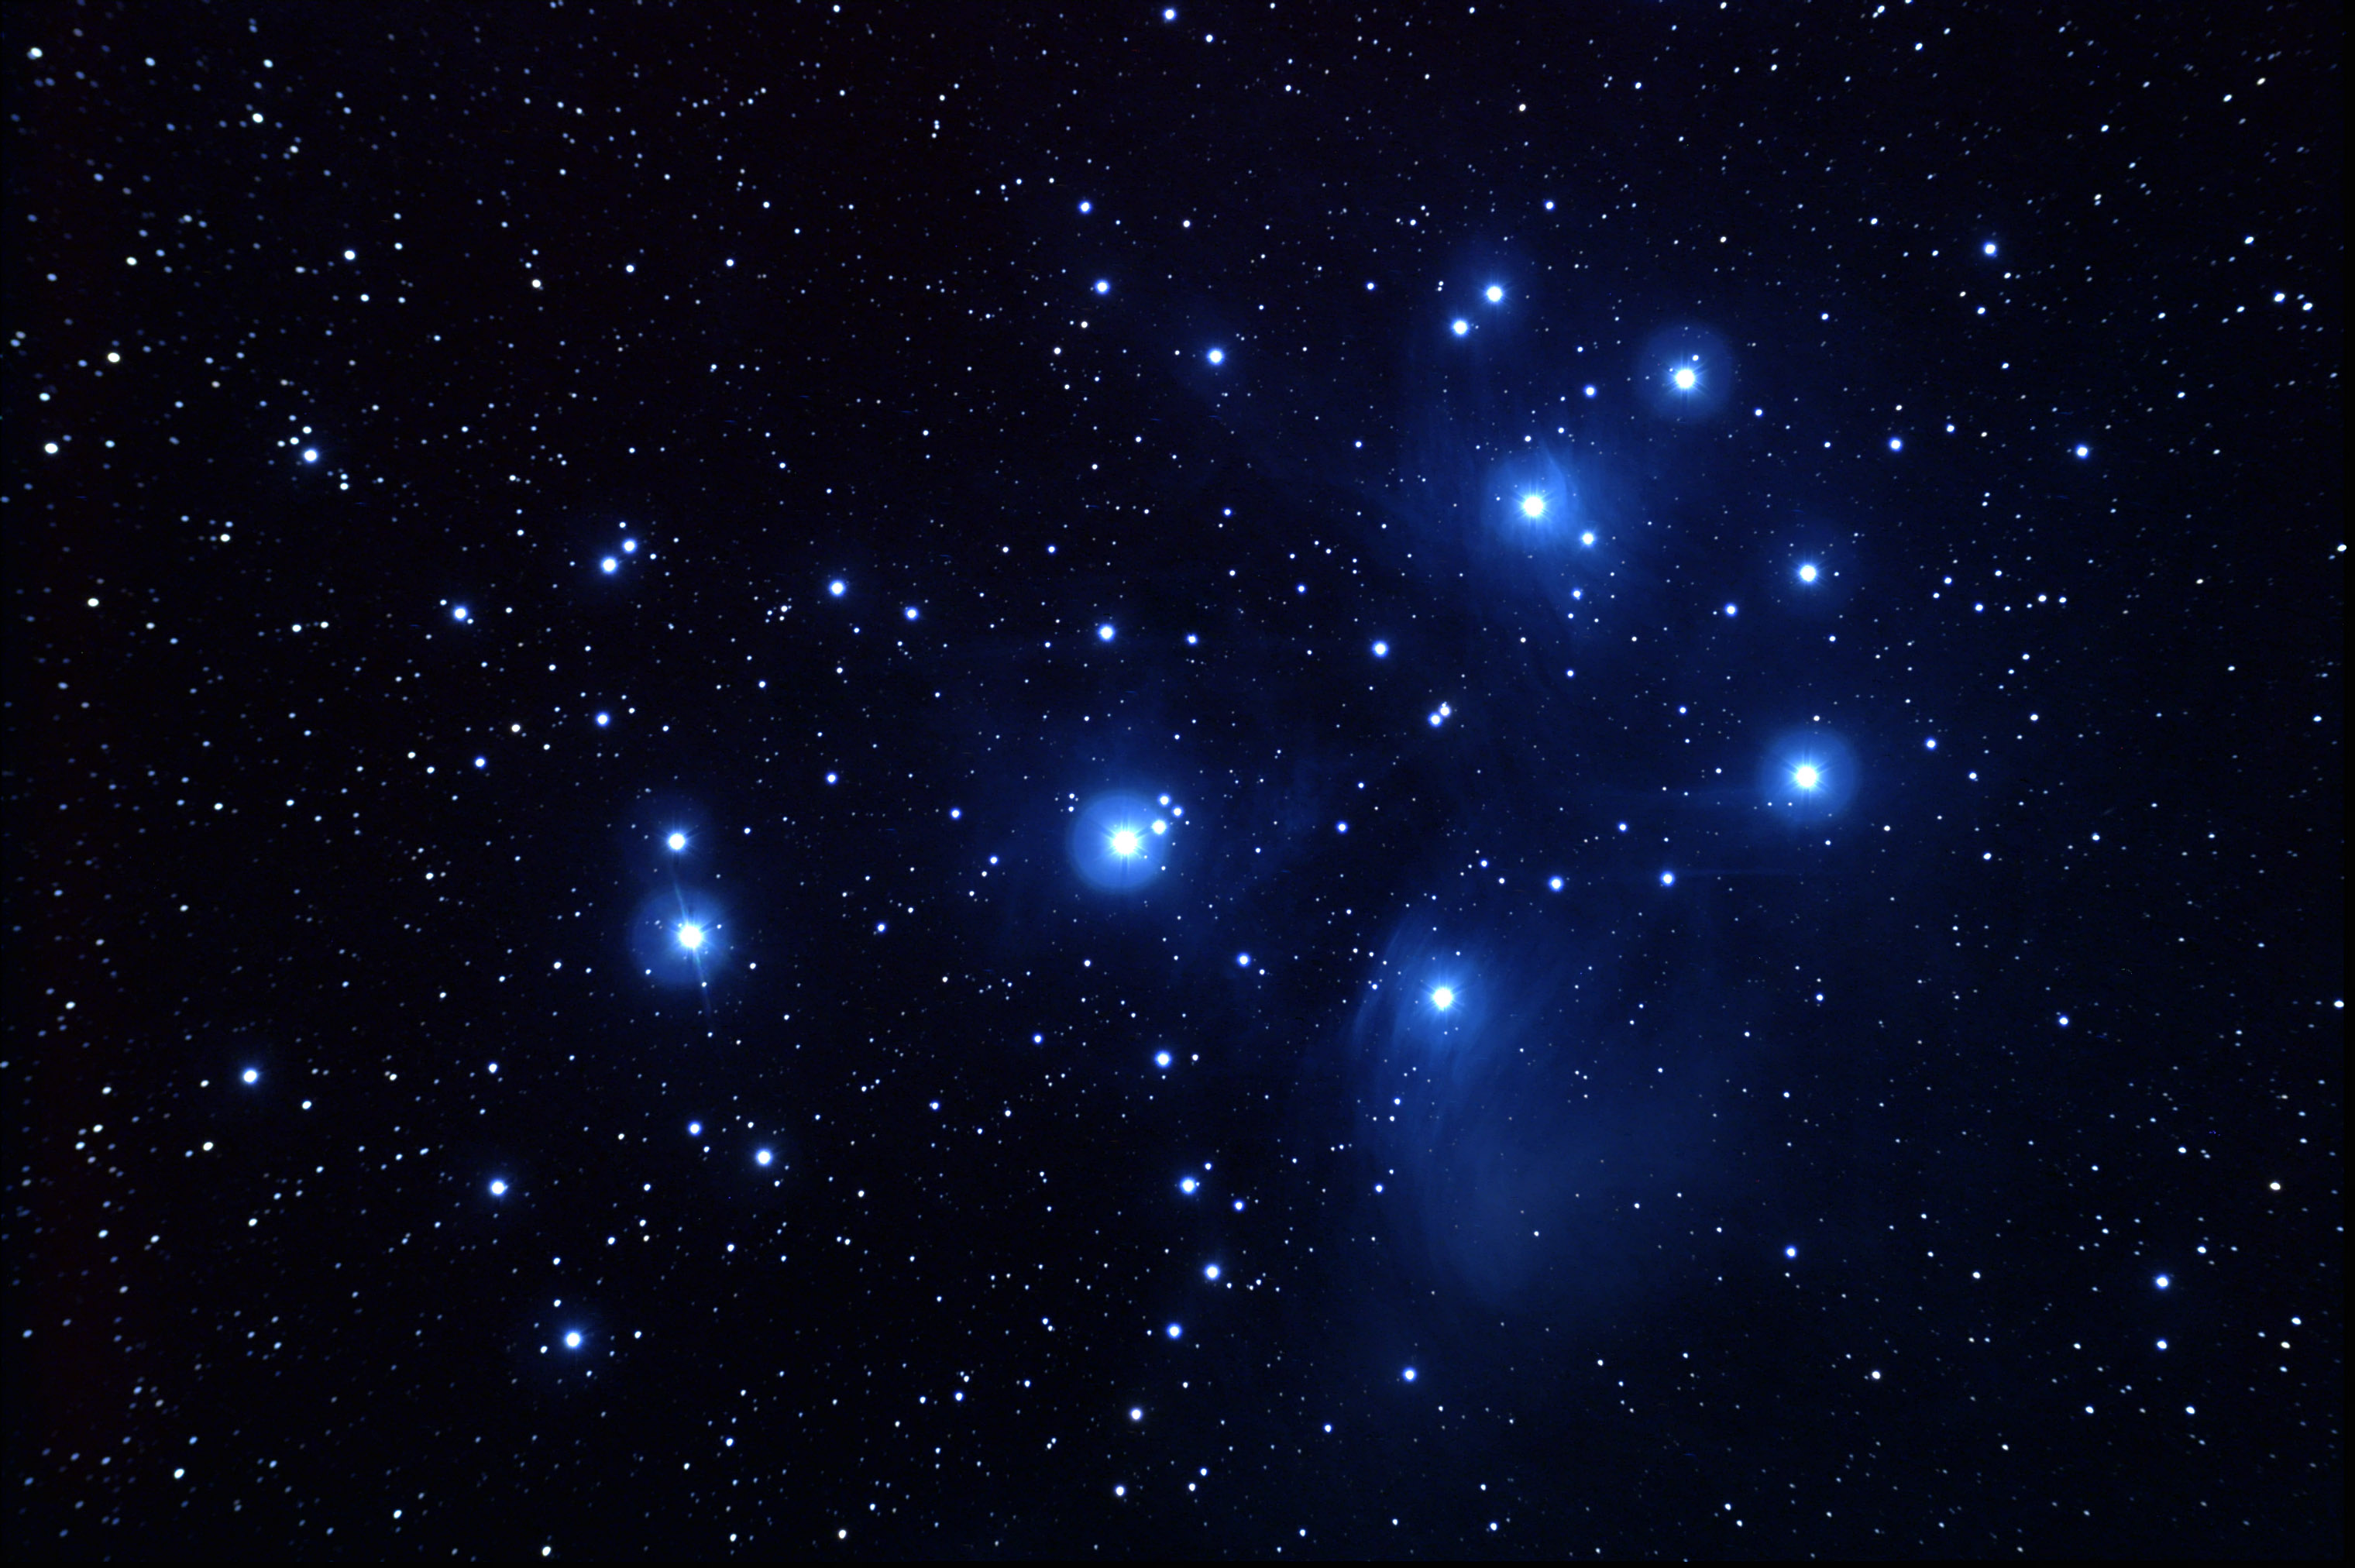
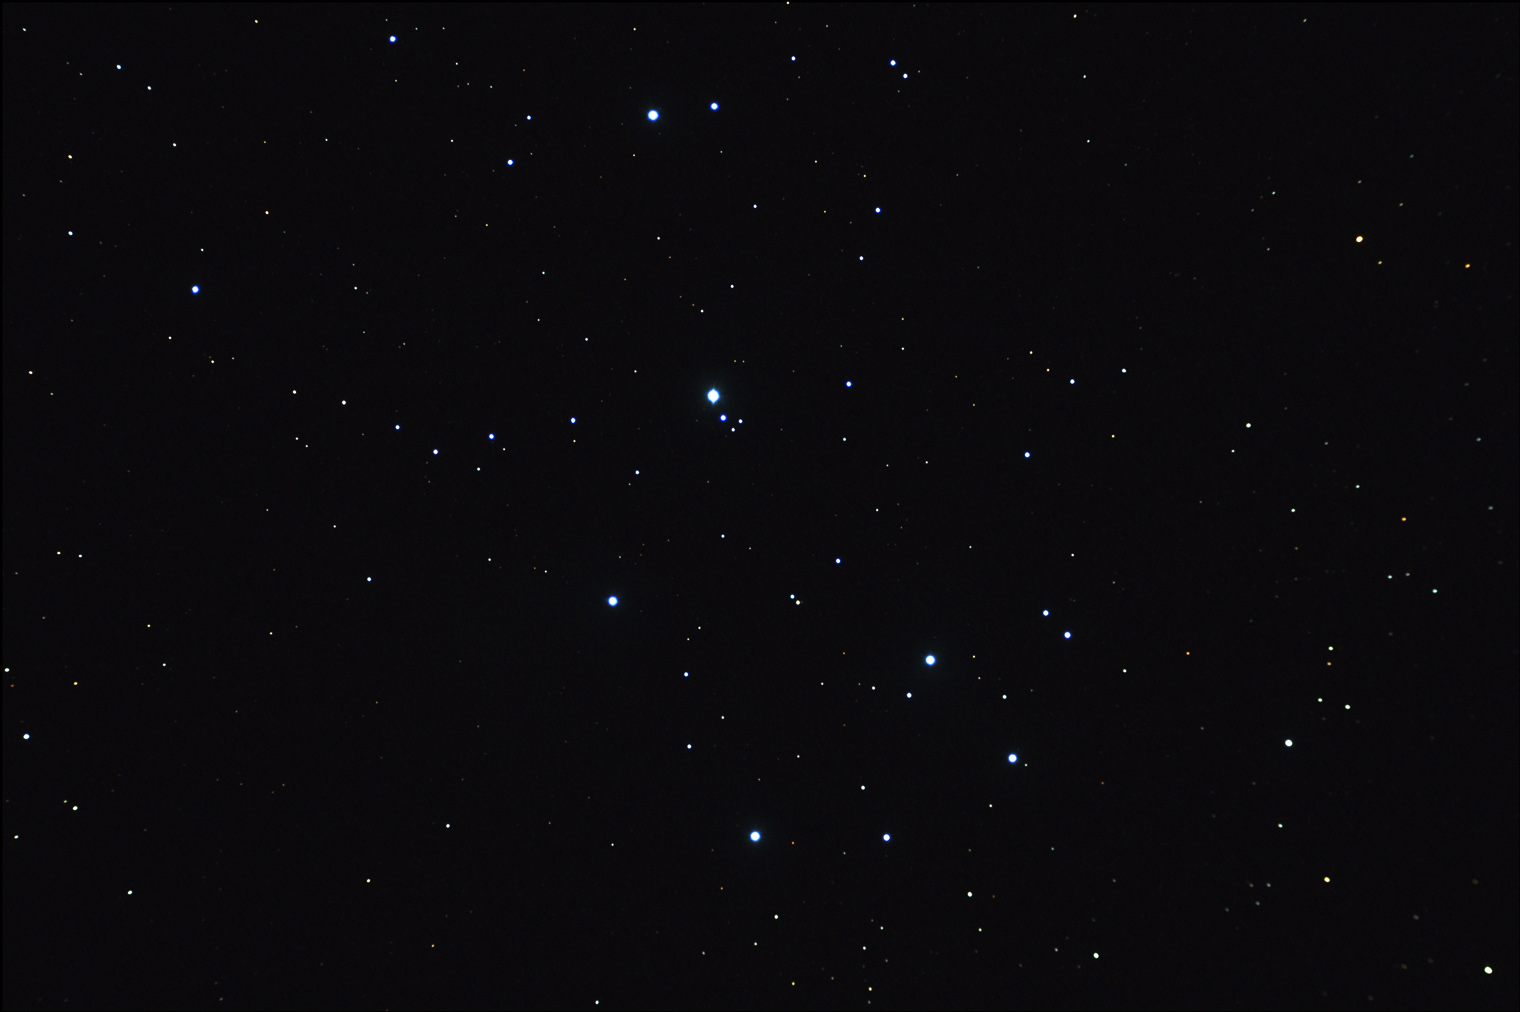 Pleiades with the Orion StarShoot Pro Deep Space CCD Color Imaging Camera This is a shot of the Pleiades taken on 30 Aug 2008. This shot is a composite of 10 ten second expsoures (processed with dark frames, no flat frames). Telescope was a Vixen 102ED (4") refractor. This shot was scaled to 1/2 the dimensions of the SSDSI.
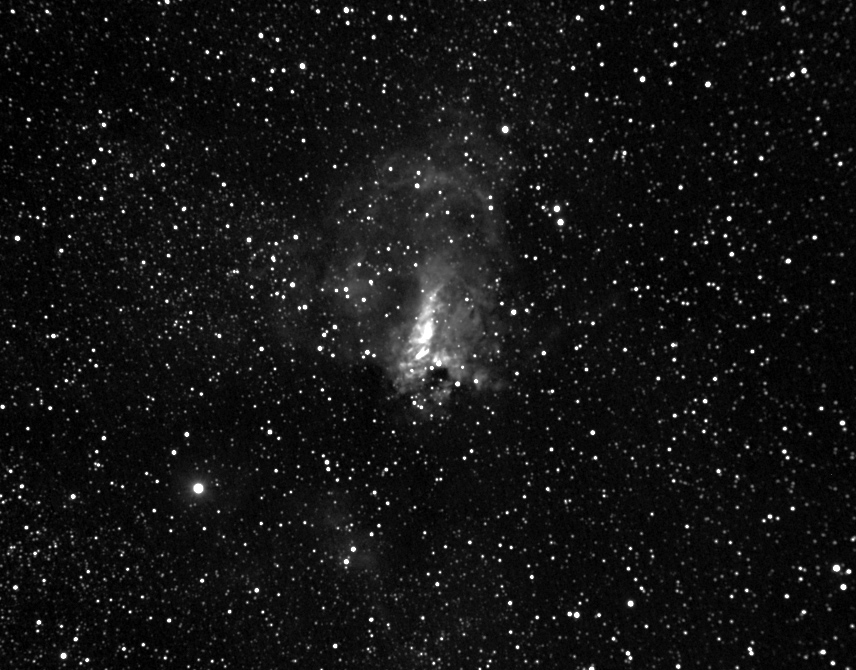 Omega Nebula with the Orion StarShoot Pro Deep Space CCD Color Imaging Camera This is a shot of the Omega Nebula (M17) taken on 01 September 2008. This shot is a composite of 29 thirty second expsoures (processed with dark frames, no flat frames). Telescope was a Vixen 102ED (4") refractor. For this shot I had the camera in binned 2x2 mode (B+W image). THis image is at the full scale of the SSDSI in 2x2 binned mode but it is cropped.
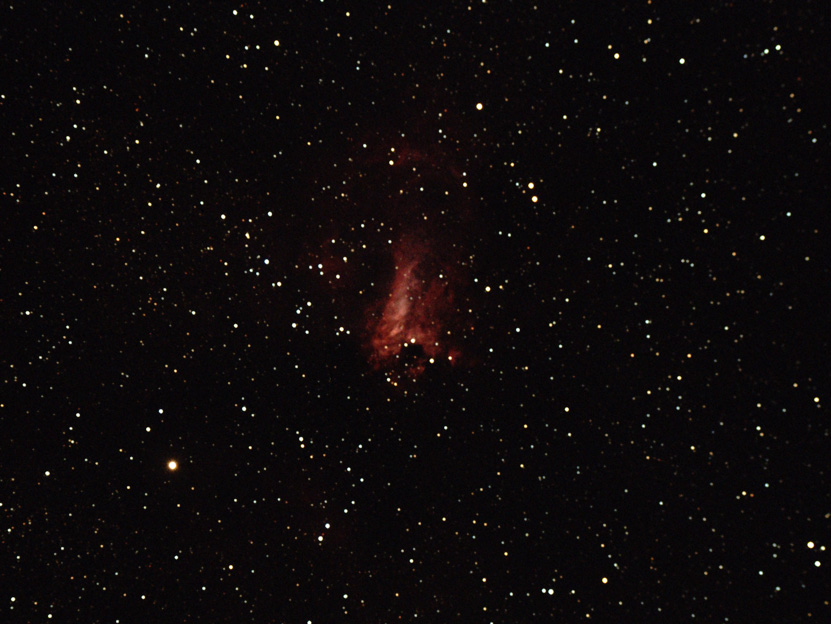 Omega Nebula with the Orion StarShoot Pro Deep Space CCD Color Imaging Camera This is a shot of the Omega Nebula (M17) taken on 01 September 2008. This shot is a composite of 5 thirty second expsoures (processed with dark frames, no flat frames). Telescope was a Vixen 102ED (4") refractor. This shot is cropped. I had taken many more frames however the scope was not tracking well so I could not use those images in the final composite.
 M15 with the Orion StarShoot Pro Deep Space CCD Color Imaging Camera This shot is with the camera in binned 2x2 mode. This shot is a composite of 45 thirty second exposures. Shot is at te full resolution of the camera but it is cropped.
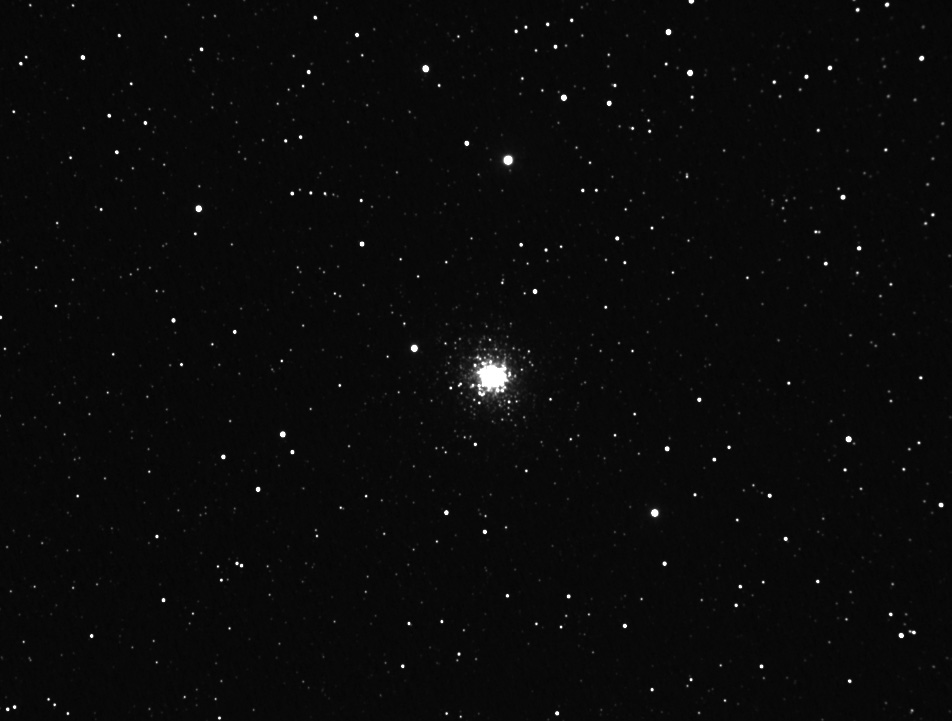
 M2 with the Orion StarShoot Pro Deep Space CCD Color Imaging Camera Here is M2, a composite of 40 thirty second exposures (processed with dark frames, no flat frames). This shot is at the full resulution of the camera but it is cropped. Telescope was a Vixen 102 ED (4") refractor.
Overall I am finding that this imager is a pleasure to use and it is working quite well. So far the software has been very stable when operating the camera. I am also finding that processing the images takes a computer with significant processing power. I have tried to do some image processing on the computer in my observatory, but it does not handle that task well. The observatory machine is an older machine (Pentium 1 GHz with 512MB of RAM). It seems fine for acquiring data. I have had much better luck doing the image processing on a more powerful machine I have in the house (AMD Phenom Triple Core Processor 2.10 GHz, 3GB of RAM). THis computer is far faster than the observatory machine, however when processing color images sometimes things have to be done in stages. If you open too many images at once the computer complains about low memory. When stacking color images, I find that it is better to stack 10 images, then save that off as a file (for more stackng later). Then I stack the next 10 and save that. Once I have all the images stacked I then stack the intermeidate files. This has worked well. I typically do dark frame calibration and color convert and then save those images (on the chance that the machine dies, I won't lose all the work). So far I have done all of the processing manually (meaning not in batch mode). I will do this until I am more familair with using it. Overall I am finding that Maxim DL Essentials works pretty well.
TO get really nice color images does take a fair number of exposures. The most I have done so far is fifty 30 second exposures. I have limited exposures to 30 seconds mainly due to the fact that my scope's drive has some periodic error that can ruin longer exposures (the mount is a vintage Celestron fork mount). I do have a scope with a Losmandy mount, I may try this mount to see how it works. The nice thing about this kind of imaging is that one can acquire data over the course of several nights and still process them like it was one lone exposure)!
After 3 sessions with the Orion imager I am quite happy with the results. I am getting some nice images on my first attempts, I am certain that once I get everything fine tuned I'll be able to get some truly great images!
 M71 with the Orion StarShoot Pro Deep Space CCD Color Imaging Camera This is a shot of the cluster M71 in Sagitta taken on 15 September 2008. This shot is a composite of 10 twenty second expsoures (processed with dark frames, no flat frames). Telescope was a Vixen 102ED (4") refractor. This image is at the full resolution of the camera but it is cropped. Note the red color of the stars in the cluster. Also, this shot was taken with a FULL MOON in the sky!
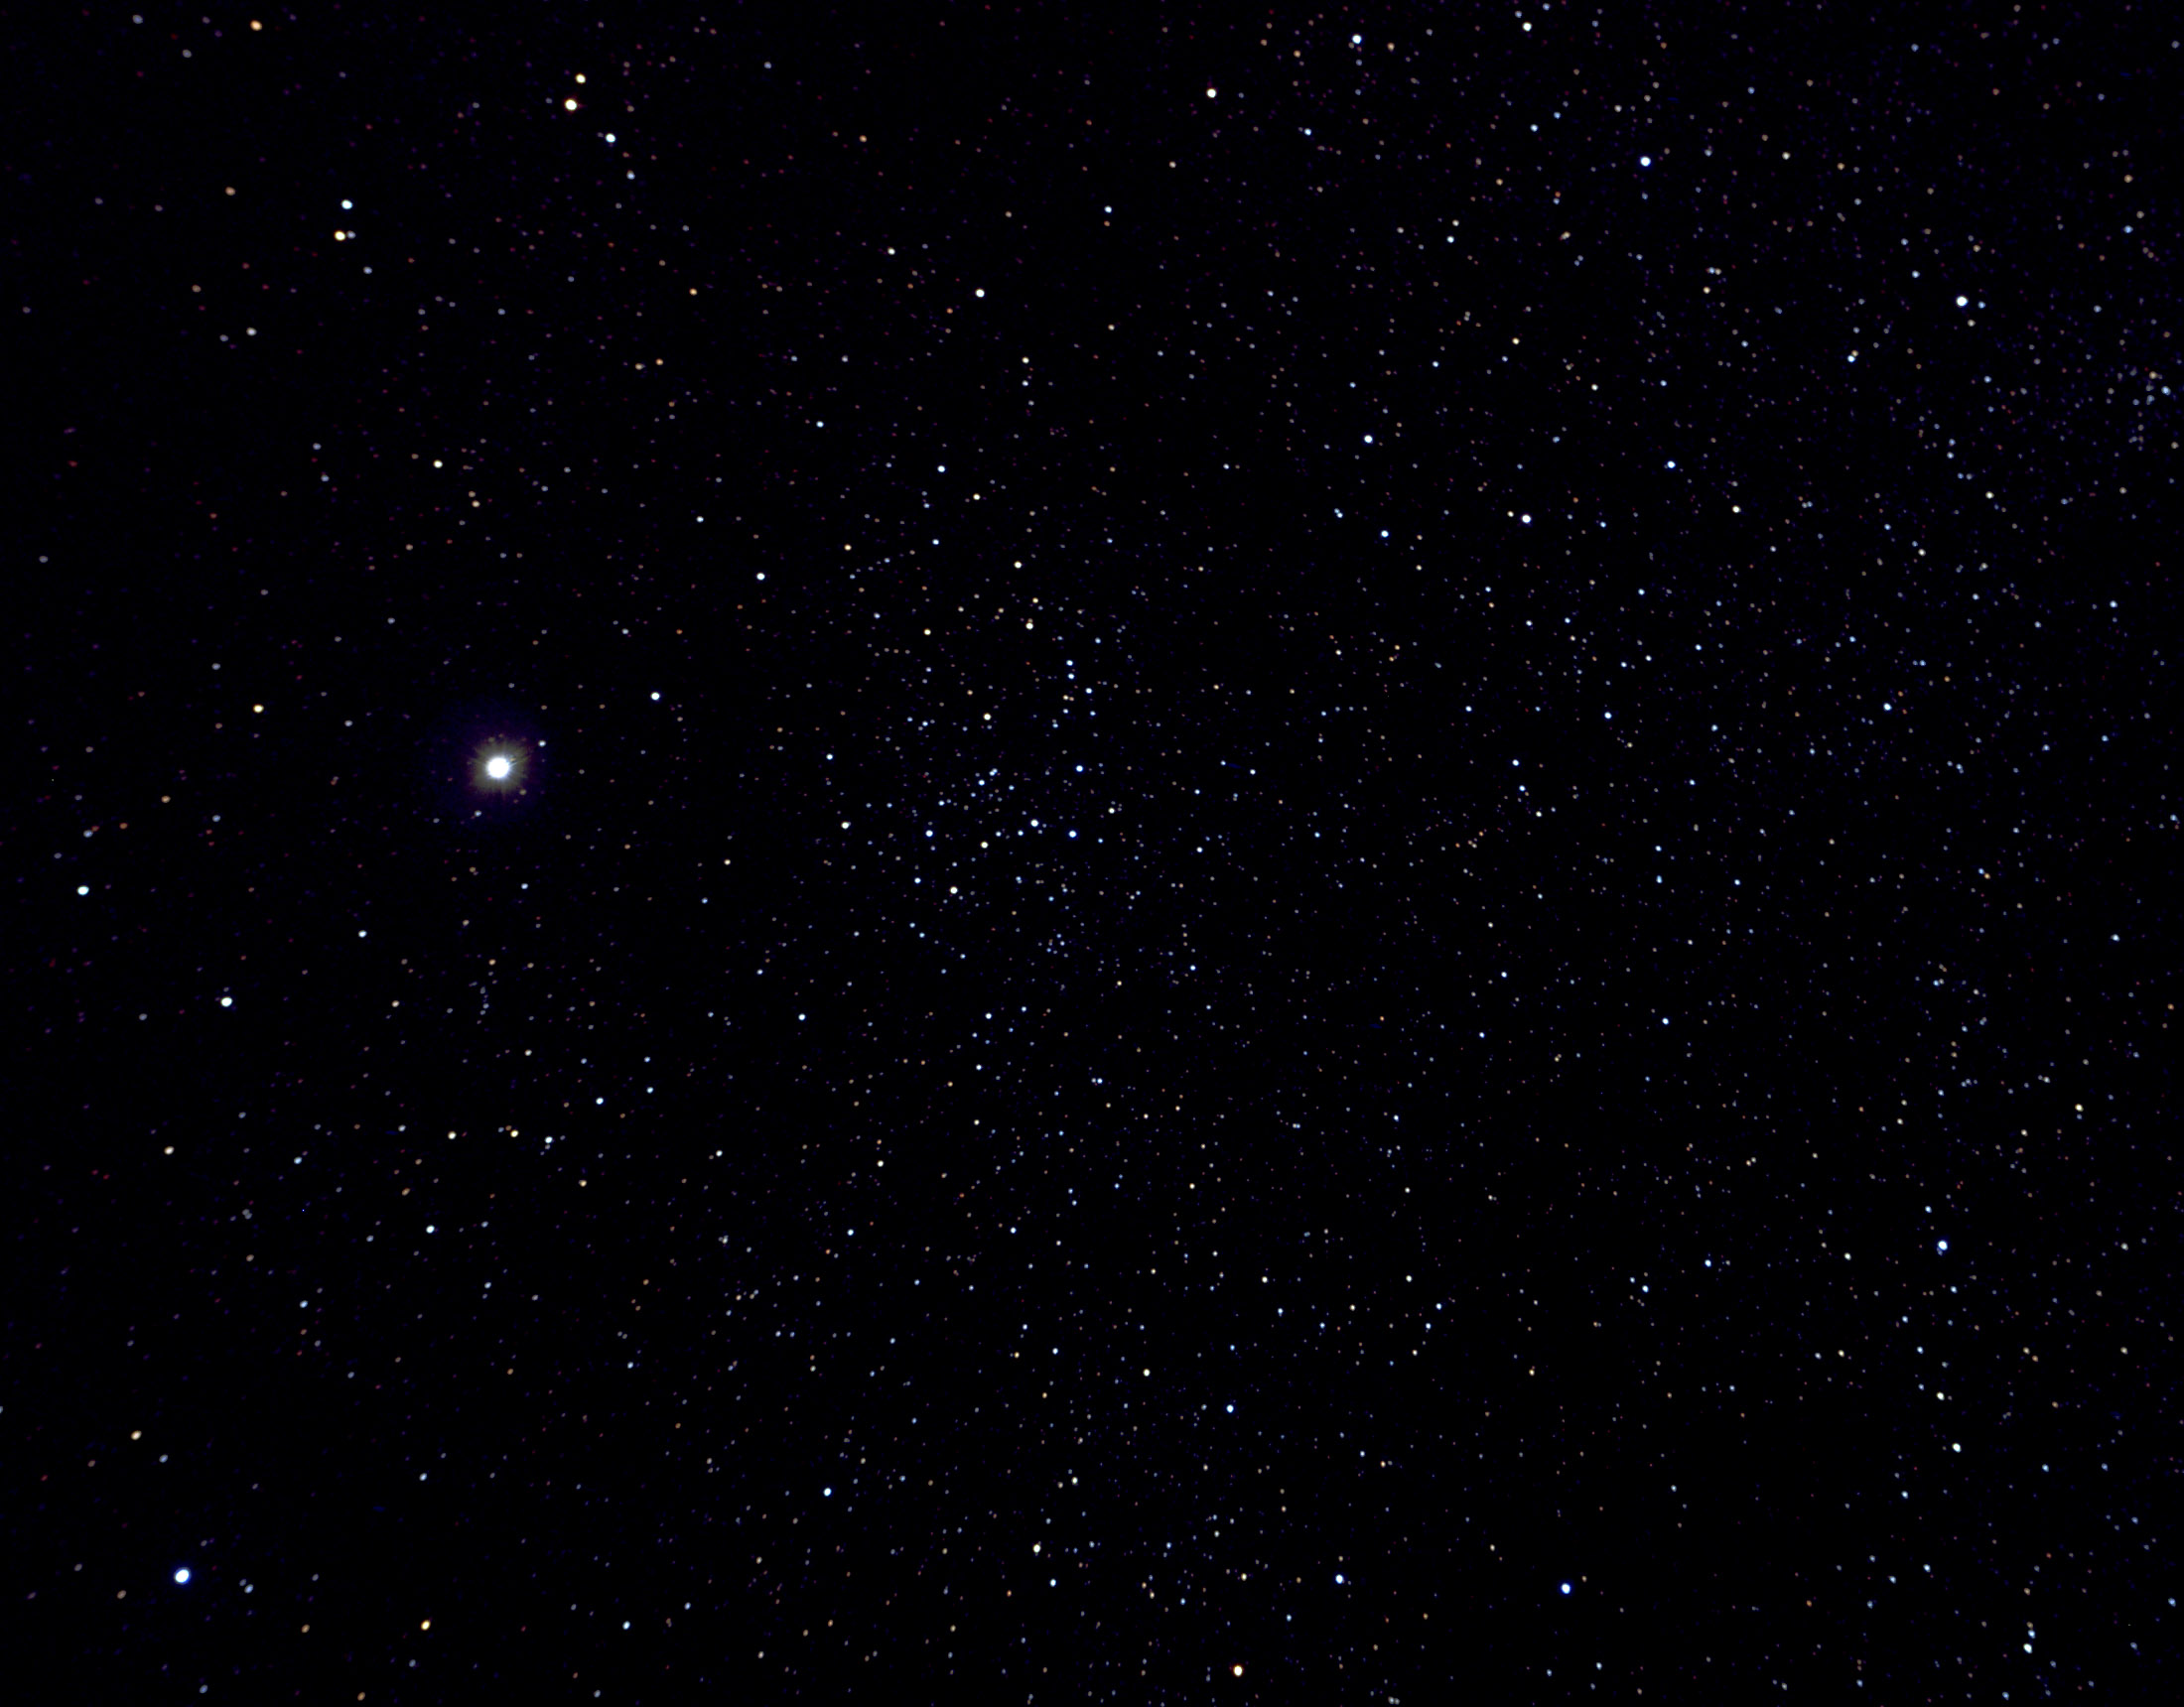
 M39 with the Orion StarShoot Pro Deep Space CCD Color Imaging Camera Here's a shot of M39 taken on 15 September 2008 ( a Full Moon was out)! This shot is a composite of 23 twenty second expsoures (processed with dark frames, no flat frames). Telescope was a Vixen 102ED (4") refractor. This shot was taken at the full resolution of the camera, but then it was downsized by a factor of 2 (1/4 the area) and it is cropped.
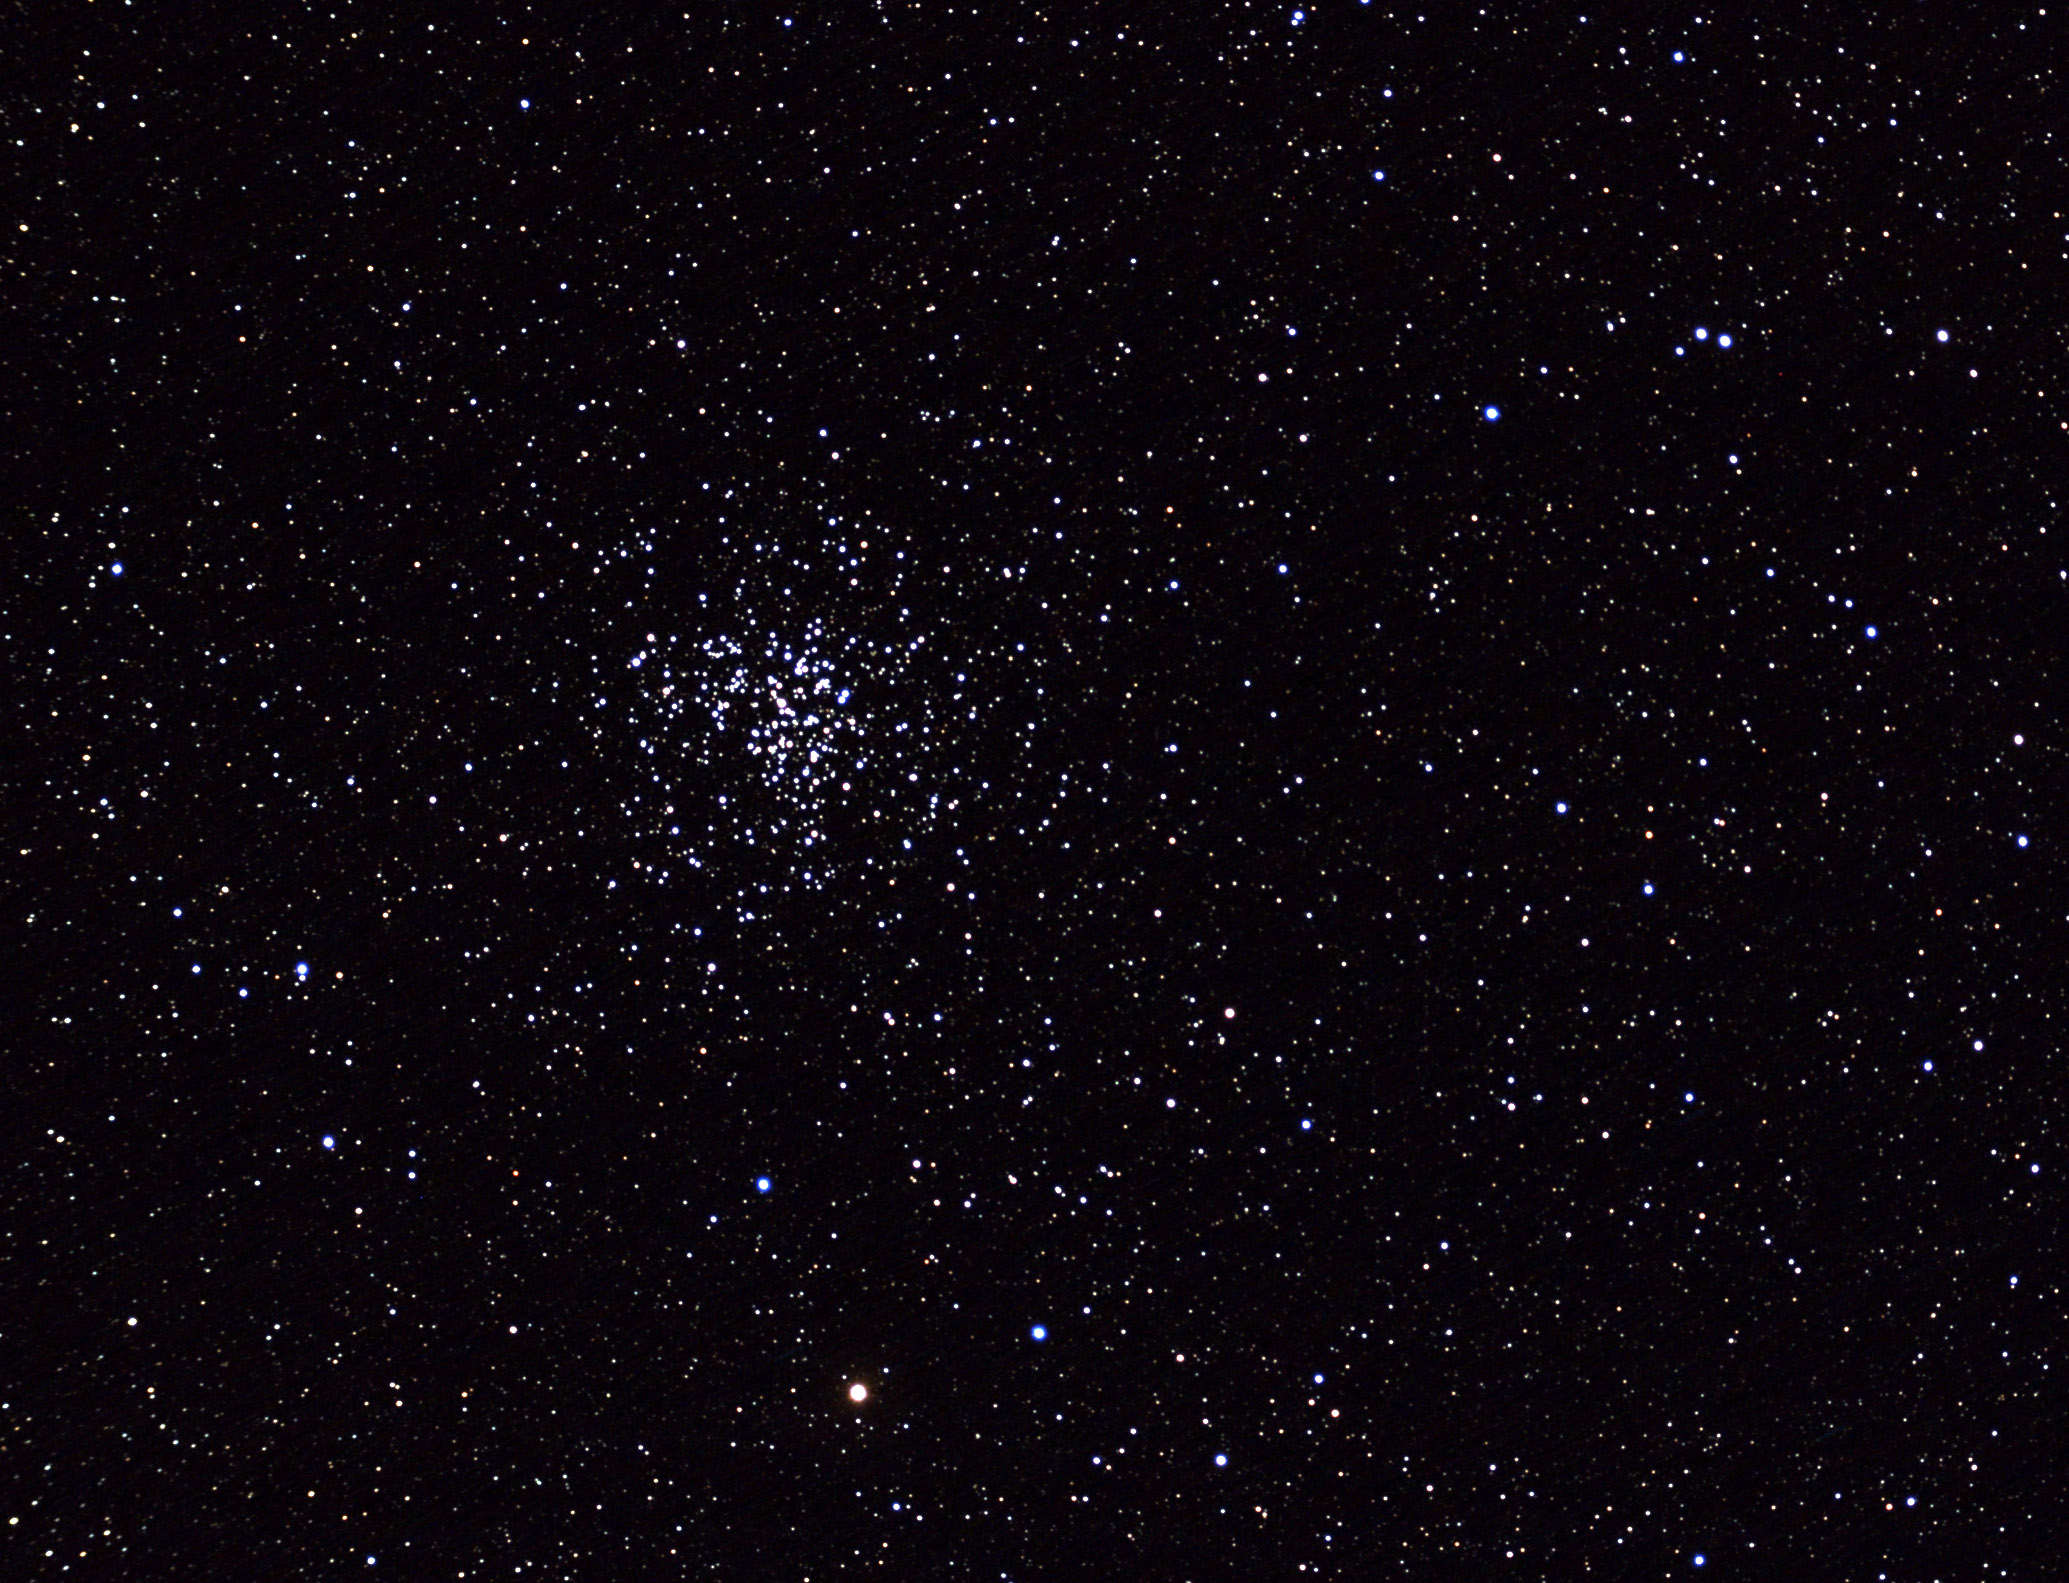
 NGC 188 with the Orion StarShoot Pro Deep Space CCD Color Imaging Camera Here's a shot of the far northern ( + 85 deg north) and very old open cluster NGC 188. This cluster's stars are pretty faint (~ 13th magnitude) yet I was able to easily pick them up using a 20 second test exposure! This shot is through the 4" refractor and is a composite of thirteen 120 second exposures (26 minutes total). This shot is at the full resolution of the camera but it is cropped.
Due to work and lousy weather this is the first night I've been able to get back out with the camera in about 2 weeks. I continue to really like using this camera! Focusing is so easy compared to my days with the old Meade Pictor 216XT! What really amazes me is how good of an image I can get despite a Full Moon being high up in the sky when the above 3 images were taken! Granted it is always better to shoot in a dark sky, however remarkable results are still possible under less than ideal conditions. I got these three images in about a 3 hour session (start to finish including processing). I am anxious to get back out with the unit as weather and work schedules allow! I will state however that your computer (the one you will use for image processing) cannot be a slouch. Mine is a late model and fairly powerful unit and image processing (combining) does give it w workout. I also find that if I try to open more than about 12 color images at one time the computer starts throwing out "low memory" warnings. The computer required for data acquisition (out in the field) needs a lot less processing power, a good thing (but ideally it will have a large hard drive [ > 100 GB] if you plan to take large numbers of images).
 M57 with the Orion StarShoot Pro Deep Space CCD Color Imaging Camera Here's a shot I took using a C-14 scope (with a 6.3 focal reducer attached). This shot is a composite of 45 ten second exposures. I am using short exposures as the drive on this vintage scope has a lot of periodic error (if I expose for a minute I get a lot of streaking on the images). This is a "quck and dirty" shot, done hastily before the Moon came up (it was not even terribly dark when I started this shot!). I think the focus was slightly out also. This shot is cropped slightly and it is reduced in size by a factor of 2 (1/4 the area). Overall I am very happy so far. I have M27 shooting outside while I am working on this update (see next image)!
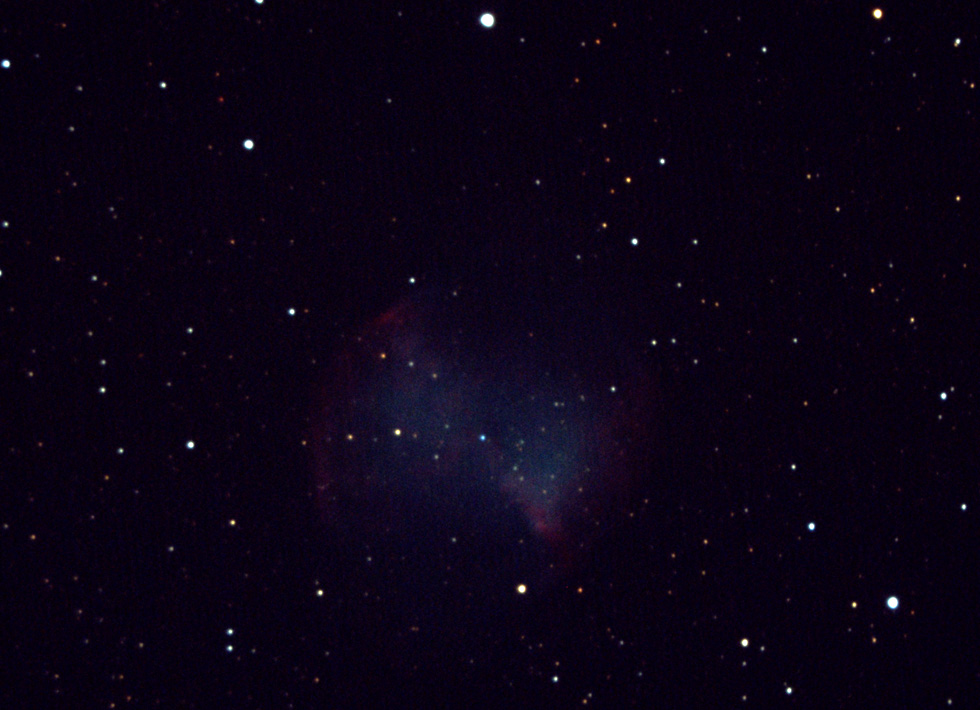 M27 with the Orion StarShoot Pro Deep Space CCD Color Imaging Camera Here's a shot I took using a C-14 scope (with a 6.3 focal reducer attached). This shot is a composite of 50 ten second exposures. I am using short exposures as the drive on this vintage scope has a lot of periodic error (if I expose for a minute I get a lot of streaking on the images). This shot is cropped slightly and it is reduced in size by a factor of 2 (1/4 the area).
 M13 with the Orion StarShoot Pro Deep Space CCD Color Imaging Camera Unfortunately this shot is out of focus. While I was focusing I did what I knew that I should not have: I focused on a star over near Altair, then I moved the scope and centered in on M13. With an SCT mirror shift is almost always certain to occur when moving the scope a fair distance away. The shift is small, but at the scale CCD detectors work at it is significant. I am including this shot as an example of little things that can mess up a shot (had it not been for the focus issue this shot would have been ok)! This shot is through a Celestron C-14 scope (with a 6.3 focal reducer attached). This shot is a composite of 43 ten second exposures. I am using short exposures as the drive on this vintage scope has a lot of periodic error (if I expose for a minute I get a lot of streaking on the images). This shot is cropped slightly and it is reduced in size by a factor of 2 (1/4 the area). If nothing else the stars being out of focus tends to show their colors better. Stars in globular clusters tend to be reddish in color; note in this image there are a few blue stars. These are very likely foreground stars (not members of the cluster).
I've used the camera on 5 nights now and I must say that it is really working out well. The software has been stable when acquiring data. I did manage to cause a crash of Maxim DL Essentials during processing, however I am pretty sure this is due to the machine I am using not having enough memory for the number of images I was trying to simultaenously open. I will stress this point again: for image processing you will need a late model computer with plently of memory. An older Pentium class machine (1 GHz with 512MB RAM will not cut image processing unless you do all monochrome images). Another point: your scope will need to be able to accurately track the stars during exposures. My C14 is very accurately polar aligned, however the scope's vintage drive has periodic error that so far has prevented me from doing exposures longer than about 10 seconds when using the camera on the C14 scope with an F6.3 focal reducer. I do have an F3.3 reducer, but when I tried it the first time I could not reach focus (I am pretty sure I will ultimately be able to get the F3.3 reducser to work, I was too lazy the night I was attempting to use it to change out the adapters on the back of the C14 optical tube). Bottom line so far: I really like this camera! It is easy to use, the field of view is nice and large, and the images I am getting after only 5 nights are pretty decent. Once I get everythign fine tuned and tinker more with the processing I am certain I will be able to get some magazine quality images with this unit.
I am back from a month long business trip (and finally some clear weather) so I was able to get out and try some more imaging.
 M31 I took 38 more images of M31 tonight and then processed them into a final image. I took this final image and then combined it with the data I got on 30 August. The result is shown here. This is basically 88 frames (30 seconds each) through a 4" refractor. This image is cropped and resized (it is not at the full resolution of the SSDSI). My scope's mount does have some tracking error so I have had to resize images to avoid stars that look out of round.
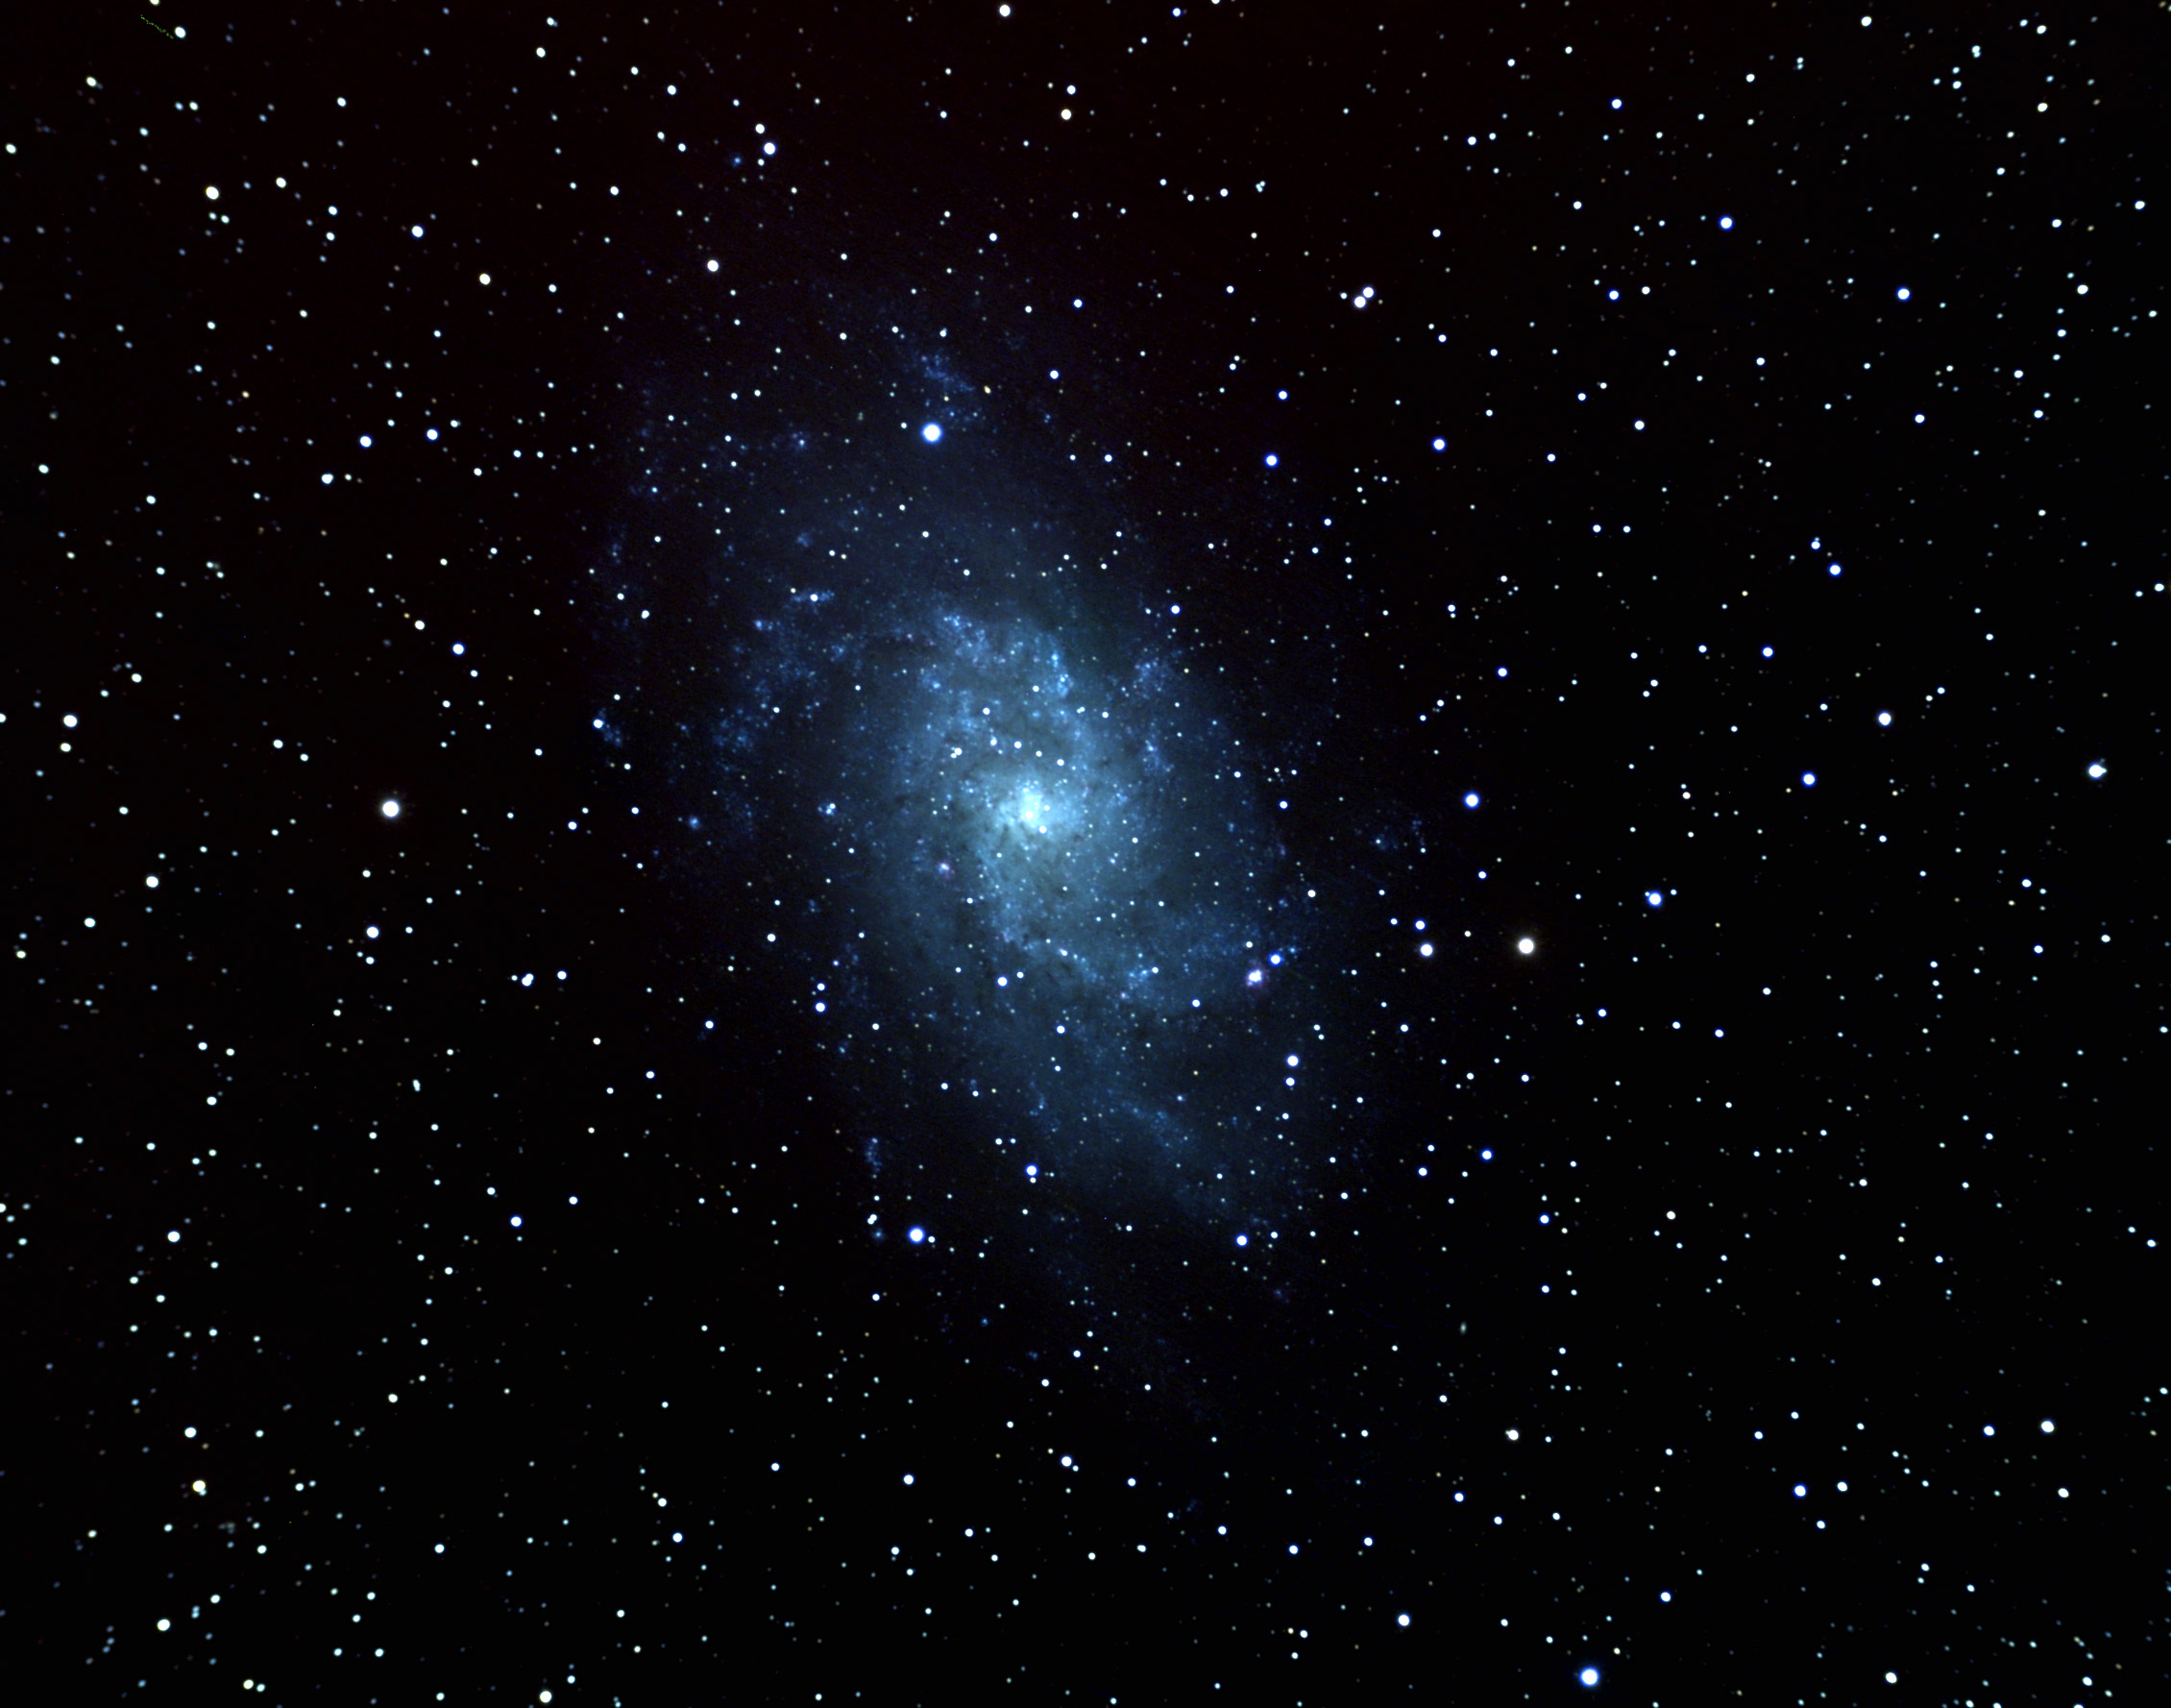
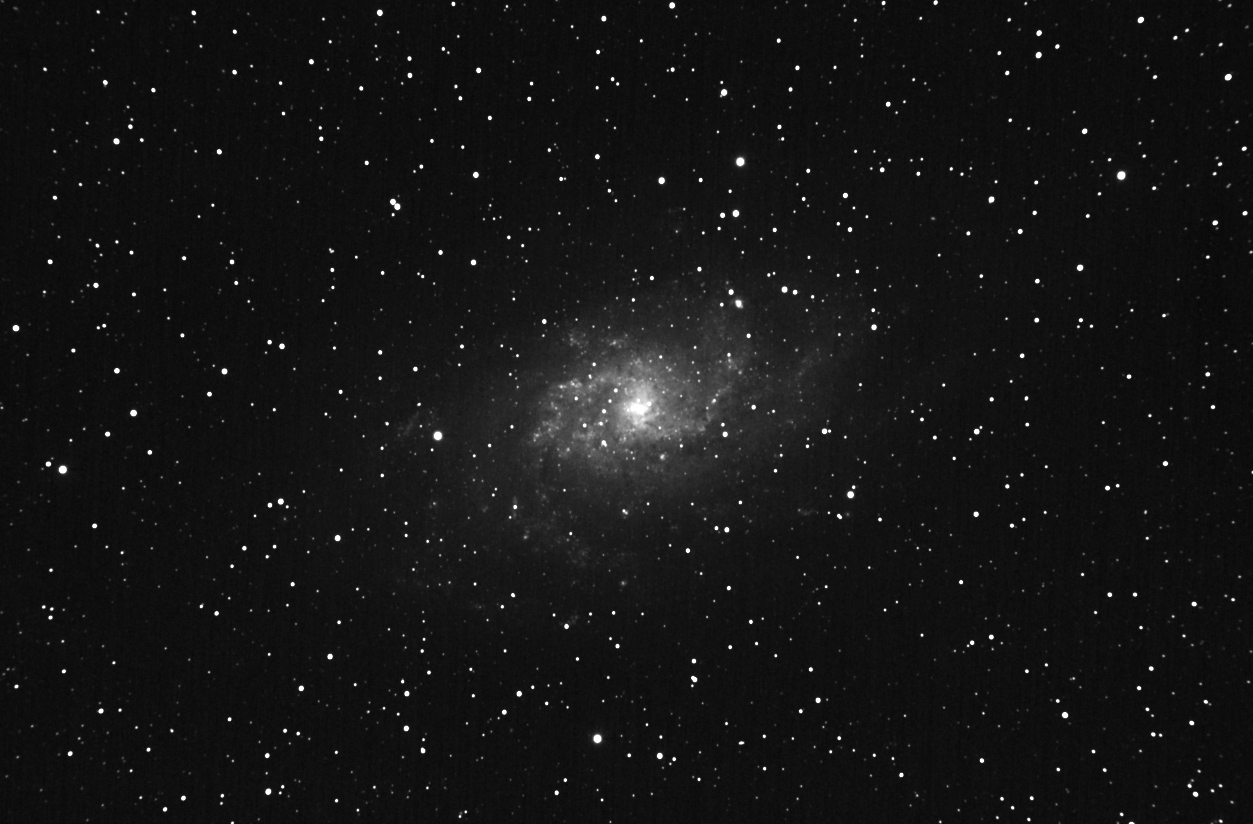 M33, Triangulum Galaxy Here is a shot of m33 through a 4" refractor (Vixen 102ED). This shot is a composite of one hundred 30 second exposures (total exposure time is 50 minutes). This shot was taken with the SSDSI in binned 2x2 mode (reduces the image scale by a factor of 2 (1/4 the area) but it also makes it more sensitive to light. THis image is uncropped and is at the full image scale of the SSDSI. I find that my computer can combine 50 frames at a time when the data frames are in 2x2 mode. For this shot I took the first 50 frames and made a final image, then did the same for the second set of 50 frames. I then took the two finals and combined them to get the image shown here.
A clear night this Halloween so here are more images:
 M56 Here's a shot of M56, this is 28 exposures of 30 seconds each stacked (I took 30 exposures but airplanes ruined 2 of them). THis image is with the camera in binned 2x2 mode. The image is at the full resolution of the camera but it is slightly cropped. Telescope was a Vixen 102ED (4" refractor, focal length 665mm).
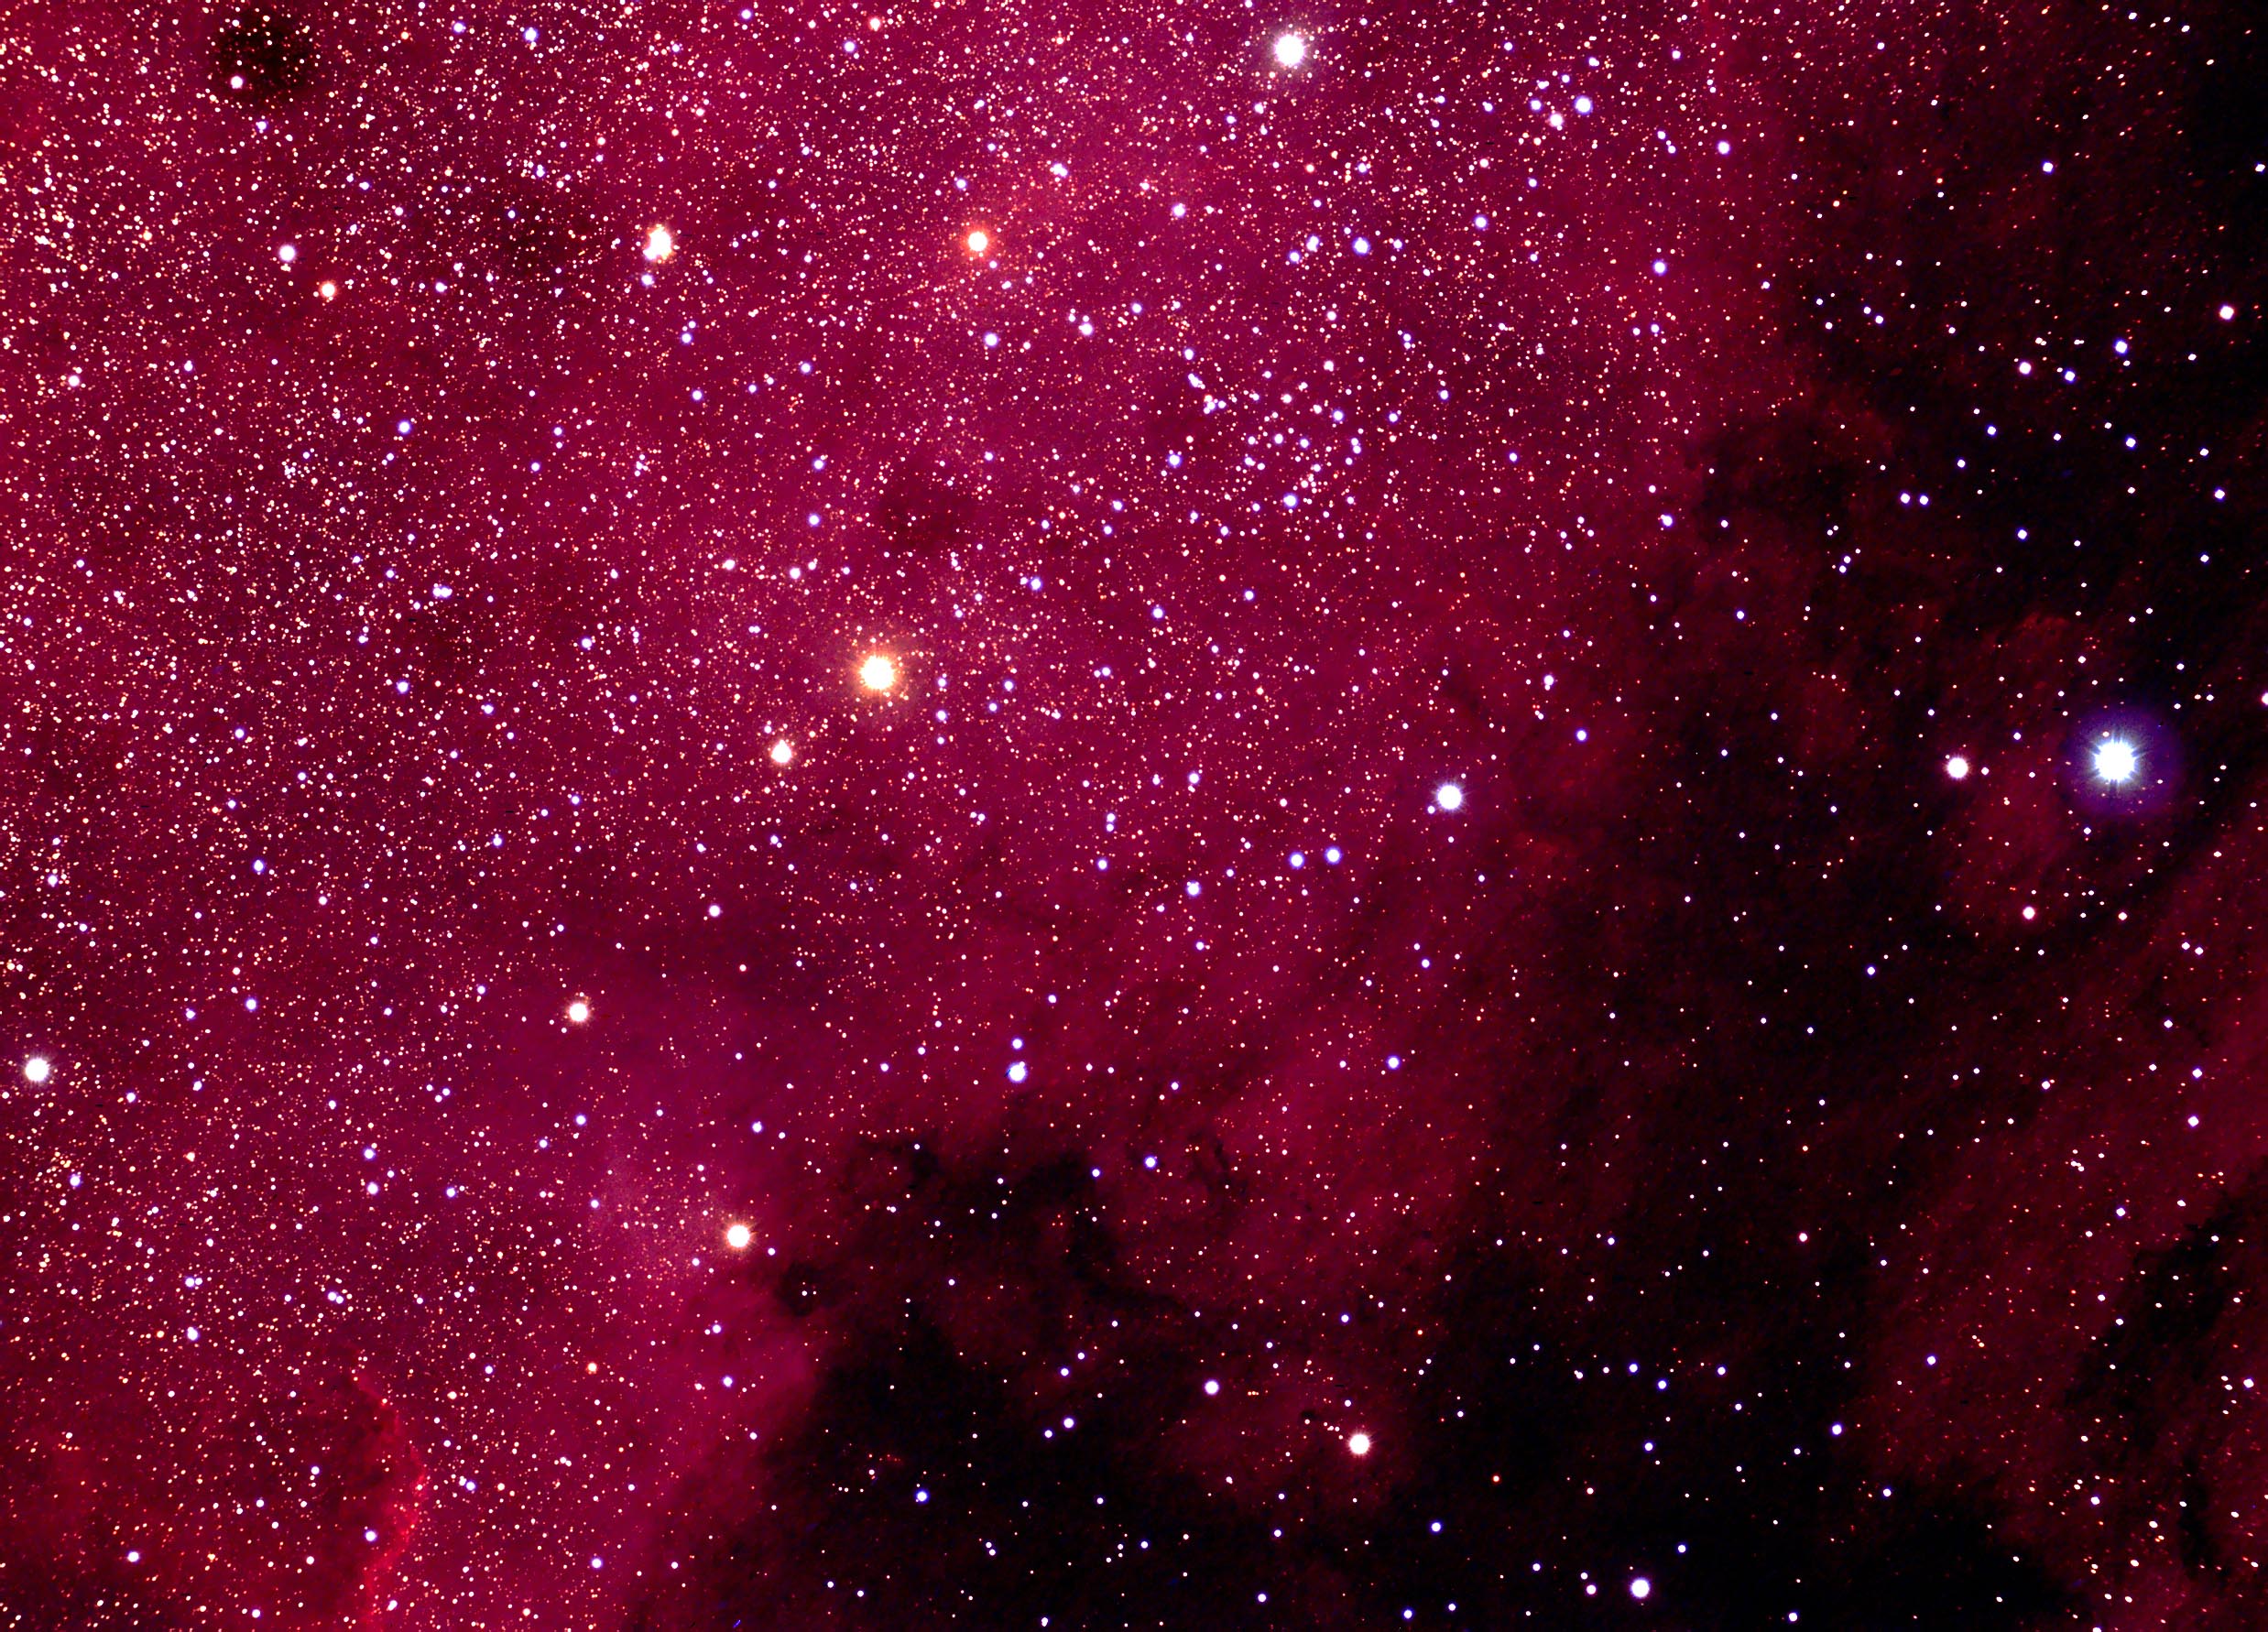
 North American Nebule and Pelican Nebula This is a shot of the area of the North American and Pelican Nebulae. My aim was slightly off but not too bad (the scope I used [Vixen 102ED] has a field that is too narrow to get both of these items in the field. This shot is 59 exposures of 1 minute each. I took 60 exposures but a plane ruined one of them. This image is reduced in size by a factor of 2 (1/4 the area).
 M33 This shot of M33 consists of 41 one minute exposures combined. THis image is with the camera in binned 2x2 mode. The image is at the full resolution of the camera but it is slightly cropped. Telescope was a Vixen 102ED (4" refractor, focal length 665mm).
 NGC246 This is a shot of the faint planetary nebule NGC246 in Cetus. Also visible is galaxy NGC 255 (to the upper left of the nebula). THis image is a stack of 49 one minute exposures. THis image is with the camera in binned 2x2 mode. The image is at the full resolution of the camera but it is slightly cropped. Telescope was a Vixen 102ED (4" refractor, focal length 665mm).
 M42 (Preliminary shot) Here's a shot of M42. I took 120 one minute images for this but so far I've only had time to process 60 of them (the result is shown). This image is reduced by a factor of 2 (1/4 the area) and slightly cropped. I had to reduce the image scale as the scope's mount was not tracking as well as I had wanted (and the stars were slightly oblong). This shot got some post-processing in PhotoShop. Telescope was a Vixen 102ED (4" refractor, focal length 665mm). Images acquired early in the morning (between 3 and 5am) on 01 November.
One new image added during this session:
 Flame Neblua in Orion Here's a shot of the Flame Nebula in Orion. The very bright star to the lower left of the neblua is second magnitude zeta Orion. This shot is a stack of 32 one minute exposures (total time 32 minutes). I actually took 120 exposures, however the telescope drive continues to have accuracy issues so I had to throw 3/4 of the images away. This shot is rescaled and cropped slightly. Telescope was a Vixen 102ED (4" refractor, focal length 665mm).
FINALLY some clear weather!!!
 M37 in Auriga Here is a shot of M37 taken on 13 Feb 2009. This shot is a composite of 24 thirty second expsoures. The image is at the full scale resolution of the camera but it is cropped slightly. Telescope was a Vixen 102ED (4" refractor, focal length 665mm).
 Crab Nebula The Crab Nebula, 23 thirty second stacked exposures. The image is at the full scale resolution of the camera but it is cropped slightly. Telescope was a Vixen 102ED (4" refractor, focal length 665mm).
Another clear night!
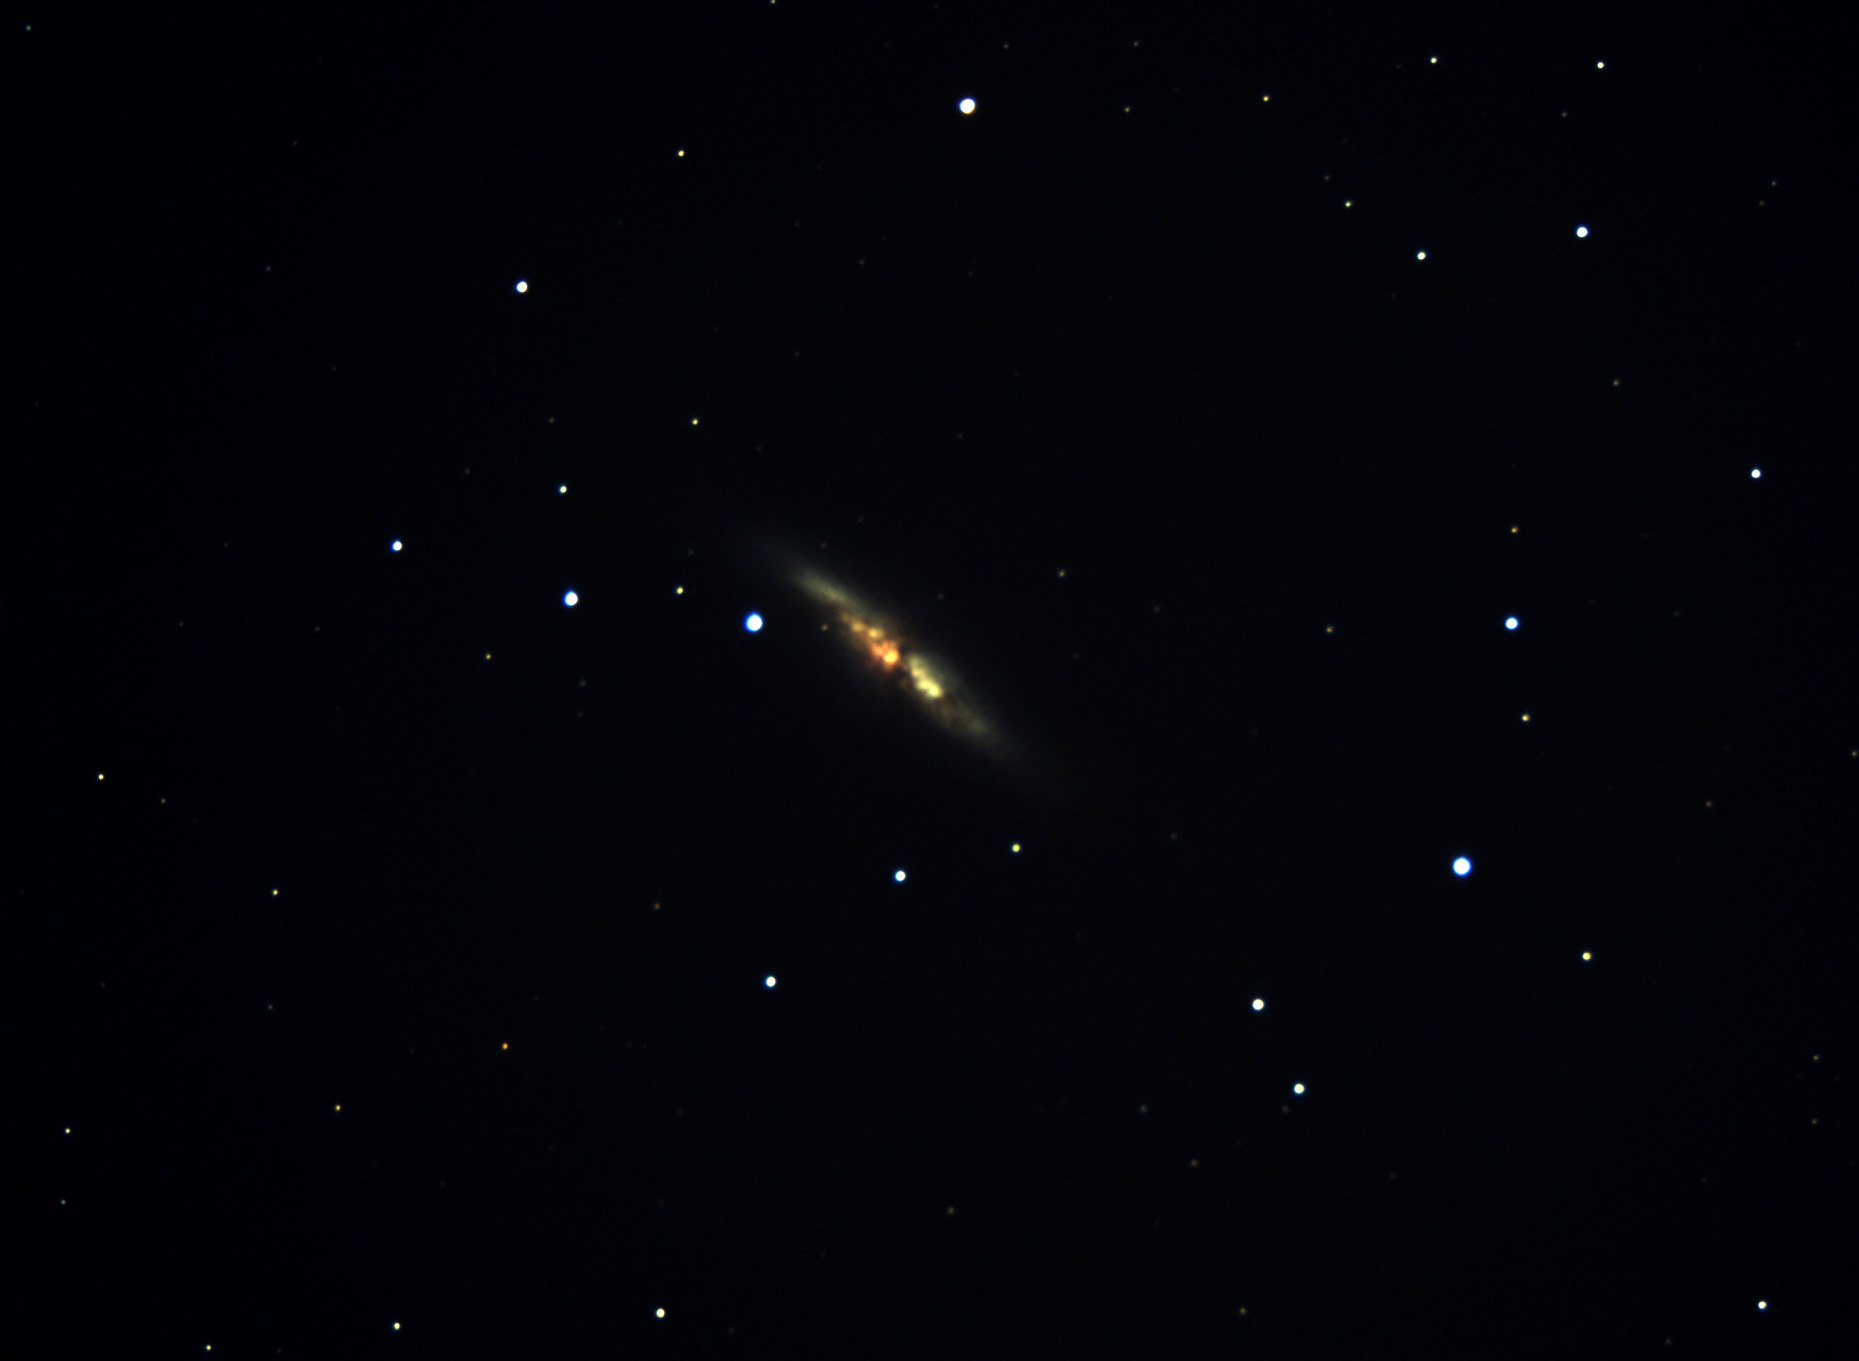 M82 in Ursa Major This is a shot of the galaxy M82. This image is the result of stacking 48 thirty second exposures. Telescope was a Celestron CG-11 operating at F6.3. The image is at the full scale resolution of the camera but it is cropped slightly.
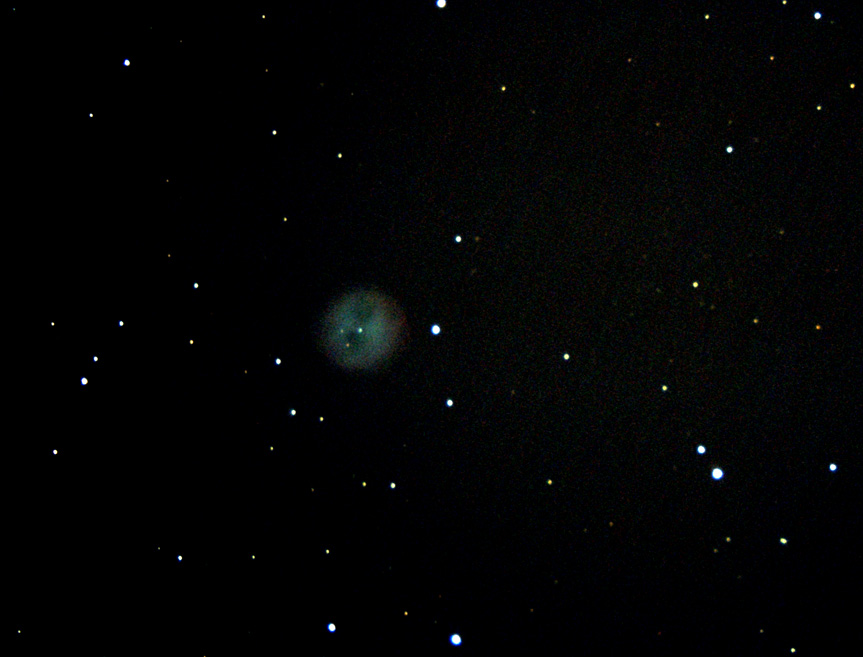 Owl Nebula Ursa Major This is a shot of Owl Nebula (M97). This image is the result of stacking 31 thirty second exposures. Telescope was a Celestron CG-11 operating at F6.3. This image is at 1/2 scale and it is cropped slightly.
I got up at 2:30am to image Comet Lulin. Conditions were OK, not fantastic, just OK. The comet was not visible to the naked eye but easy to see in a telescope finder.
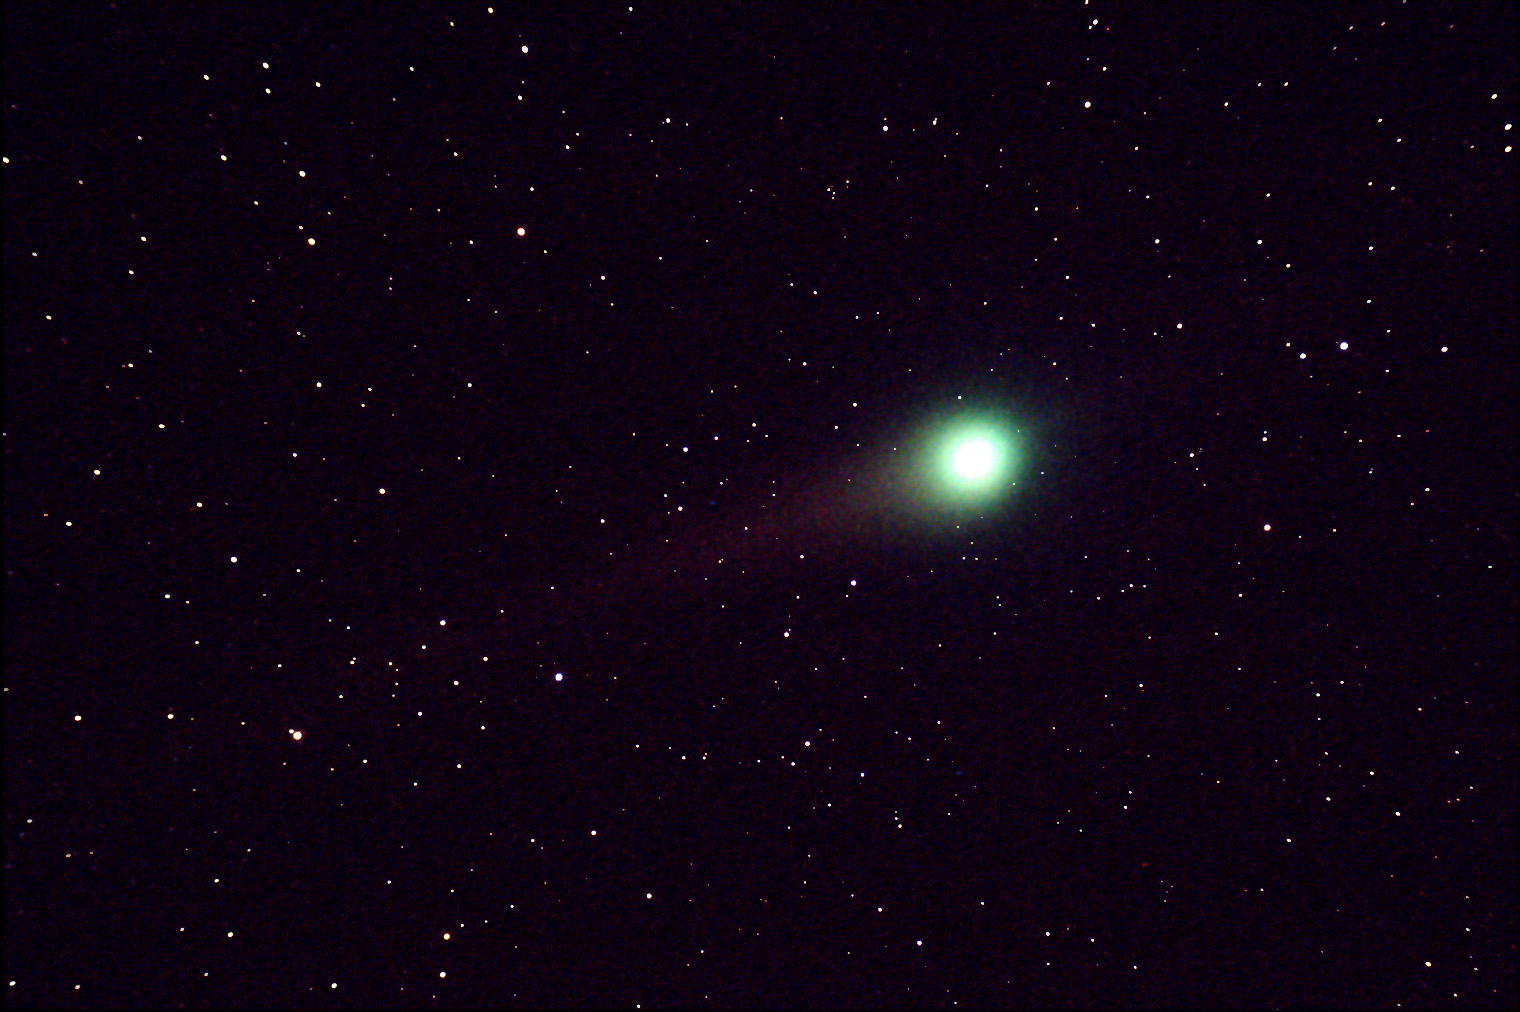 Comet Lulin, 21 Feb 2009 I took about 60 images of this comet and stacked them, however after stacking the result was a very elongated comet. The comet was moving so fast that over the course of taking 60 twenty second exposures it had moved enough to totally distort the image. So, the result here is 10 stacked images (taken over a period of about 5 minutes), even with this short total exposure there is some evidence of elongation. The telescope used was a Vixen 102 ED refractor (665mm focal length), the Vixen was riding piggyback on a CG-11 telescope. The image is scaled by 1/2 from the full resolution.
Due to many business trips (and crappy weather) it has been some time since I was able to do some imaging. Also I have been experiencing tracking problems with the telescope mount, so getting good images has been a challenge (this problem is being addressed now).
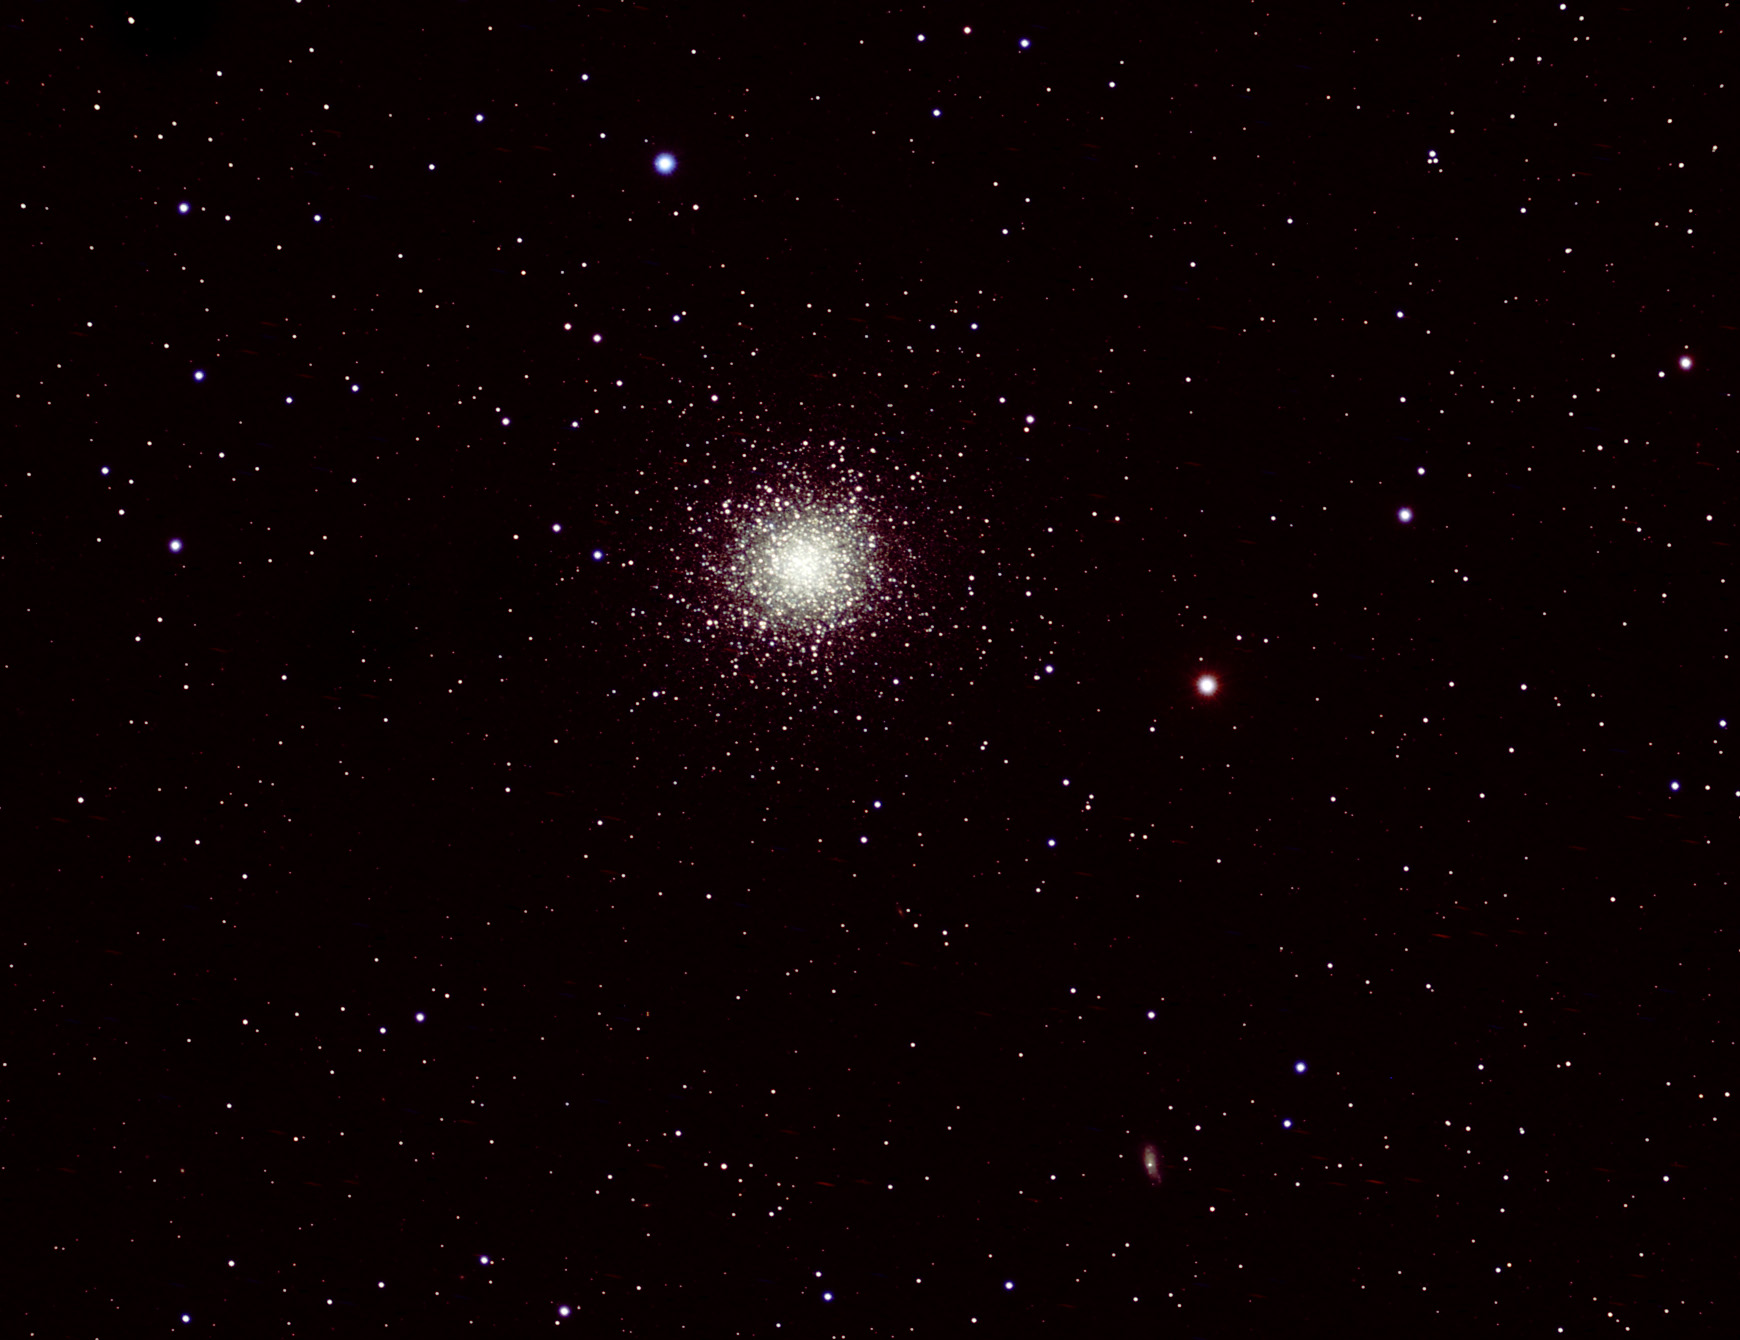
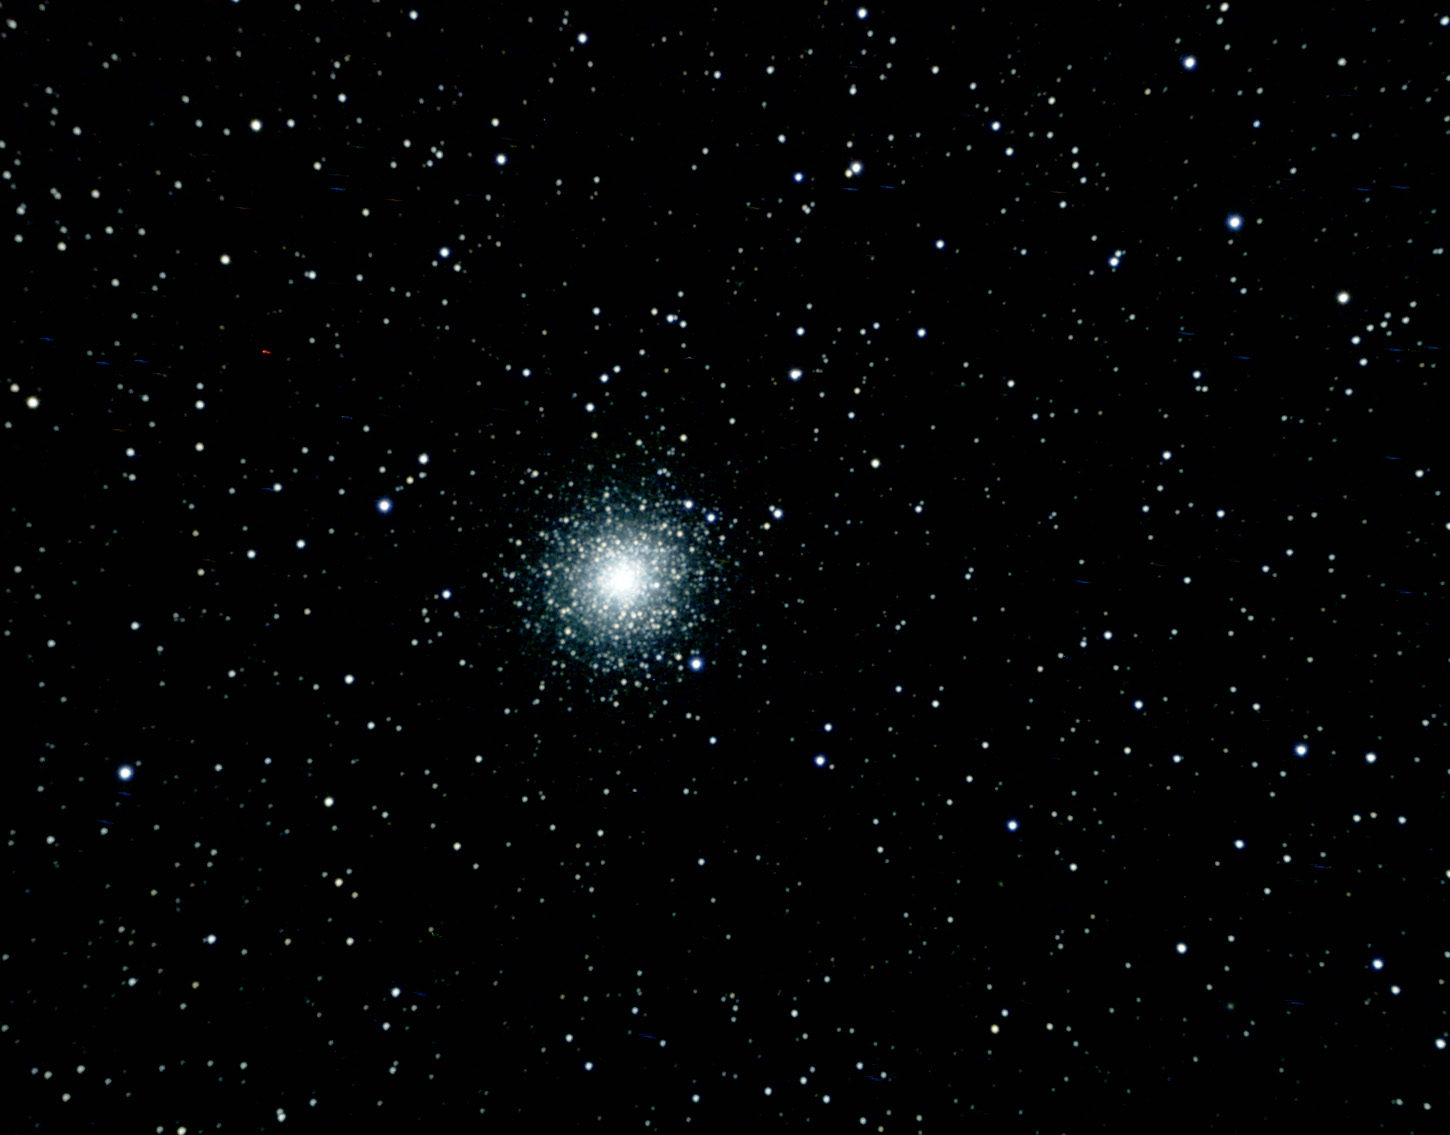
 Globular Cluster M3 in Canes Venatici This is an image of M3 made up from ten sixty second exposures (total exposure 10 minutes). The telescope used was a Vixen 102 ED refractor (665mm focal length), the Vixen was riding piggyback on a CG-11 telescope. The image is at the full resolution of the camera but is cropped slightly. Look carefully and you will see a background galaxy to the right of the cluster.
Due to more business trips (and crappy weather) it has once again been a significant time since I was able to do any imaging. I am still working on trackign problems with the telescope mount. Despite all the problems I was able to get 3 satisfactory images during this session.
 Globular Cluster M5 in Serpens Caput This is a 26 minute expsoure (26 one minute exposures) of M5. The telescope used was a Vixen 102 ED refractor (665mm focal length). The image is at the full resolution of the camera but is cropped slightly. I reprocessed the raw data in January 2012 (with Maxim DL and also using the processing knowledge I have gained in 2 years), the result is here . The reprocessed image is definitely improvved, however I am sure I can do better with a new data set (it's coming back around into visibility again so I will try to get something new in early 2012).
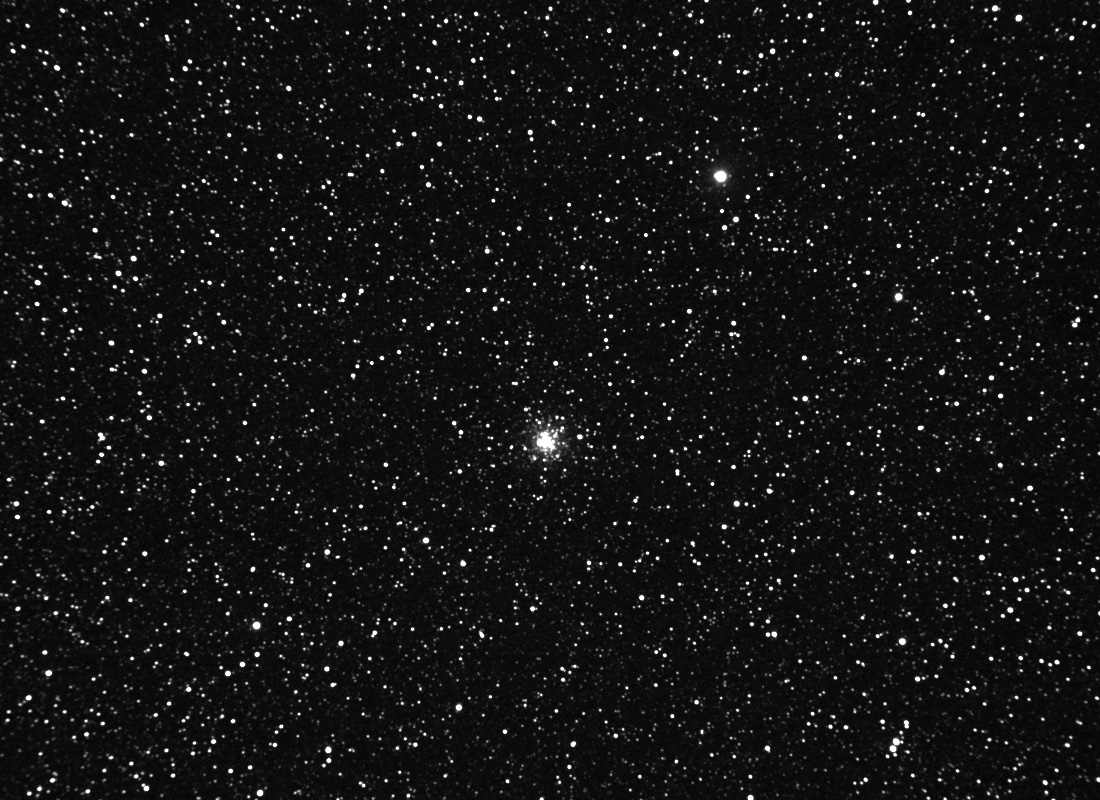
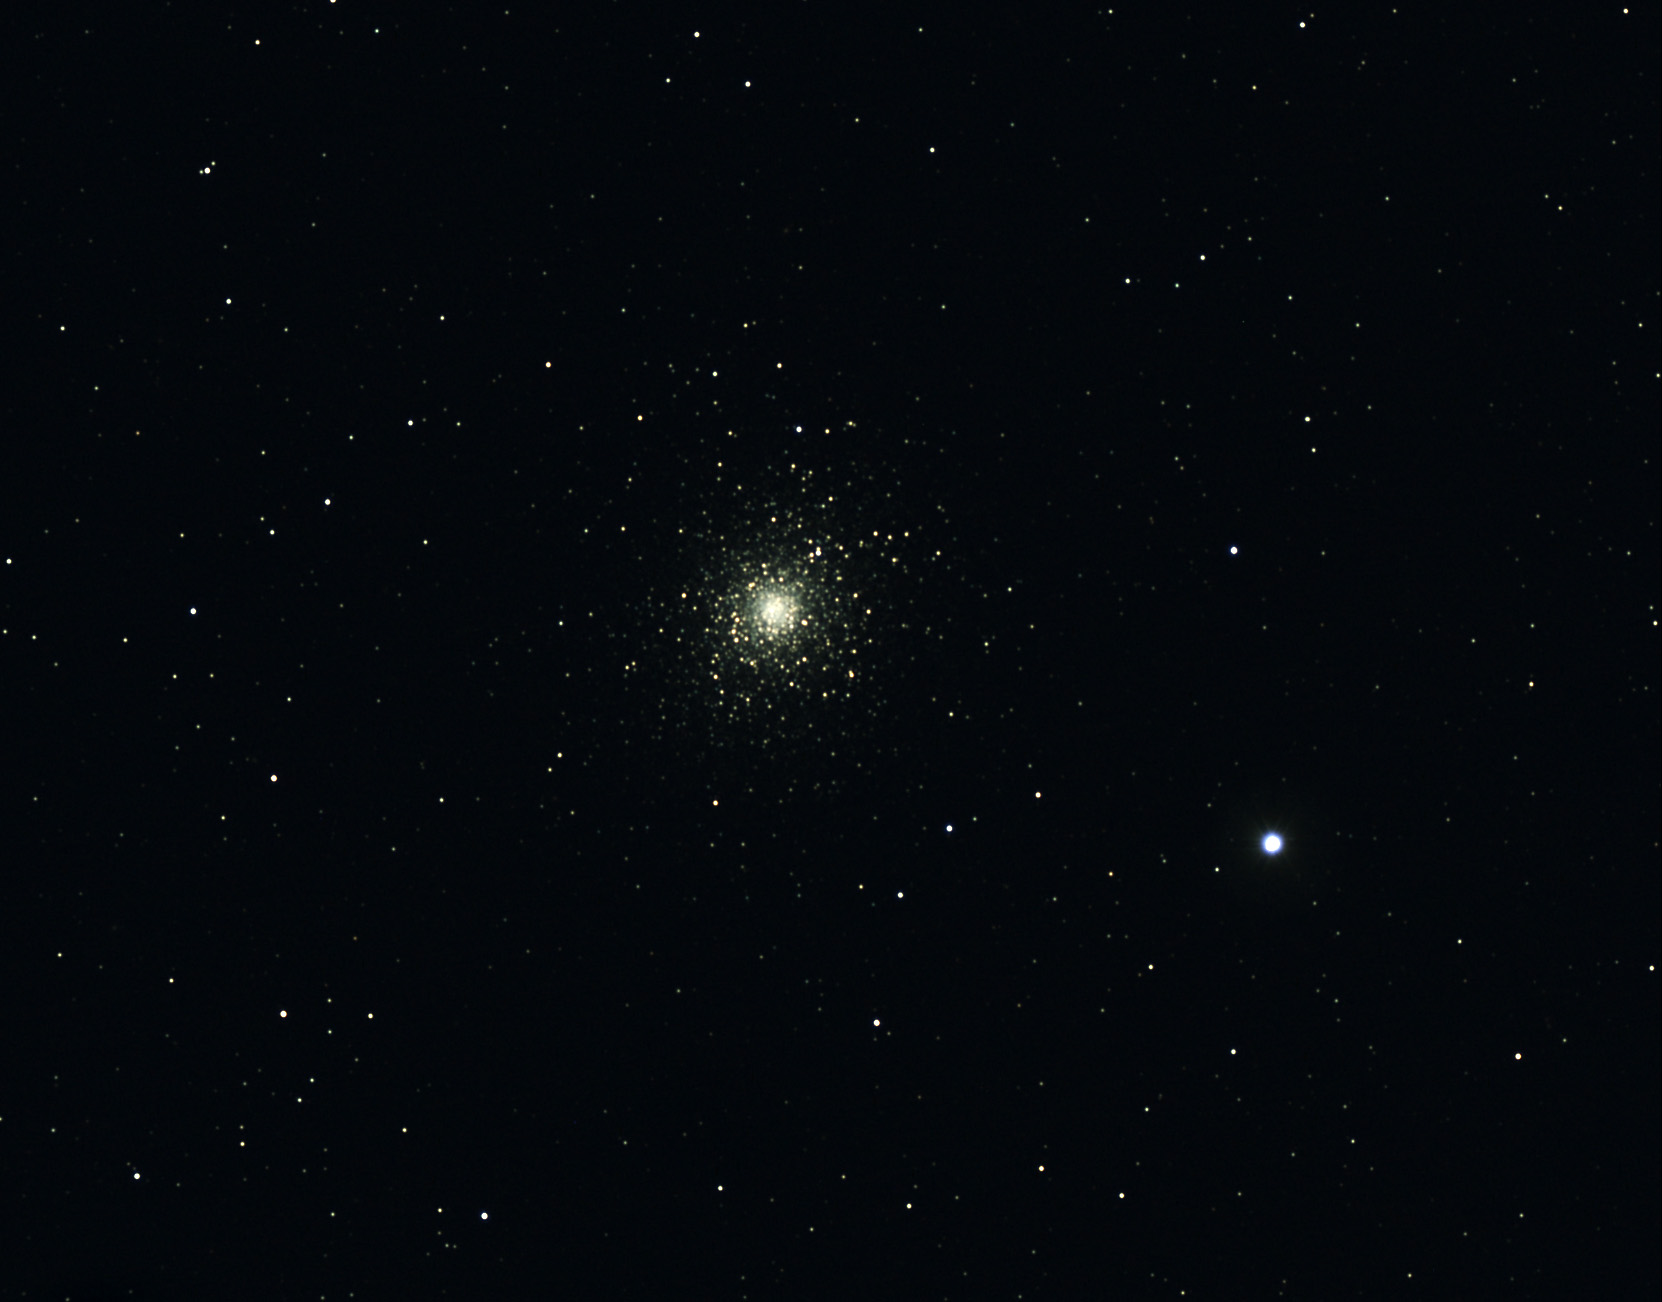
 Globular Cluster M13 in Hercules This is a 12 minute expsoure (12 one minute exposures) of M13. The telescope used was a Vixen 102 ED refractor (665mm focal length). The image is at the full resolution of the camera but is cropped slightly. Look carefully to the lower right of the cluster and you can spot galaxy NGC 6207!
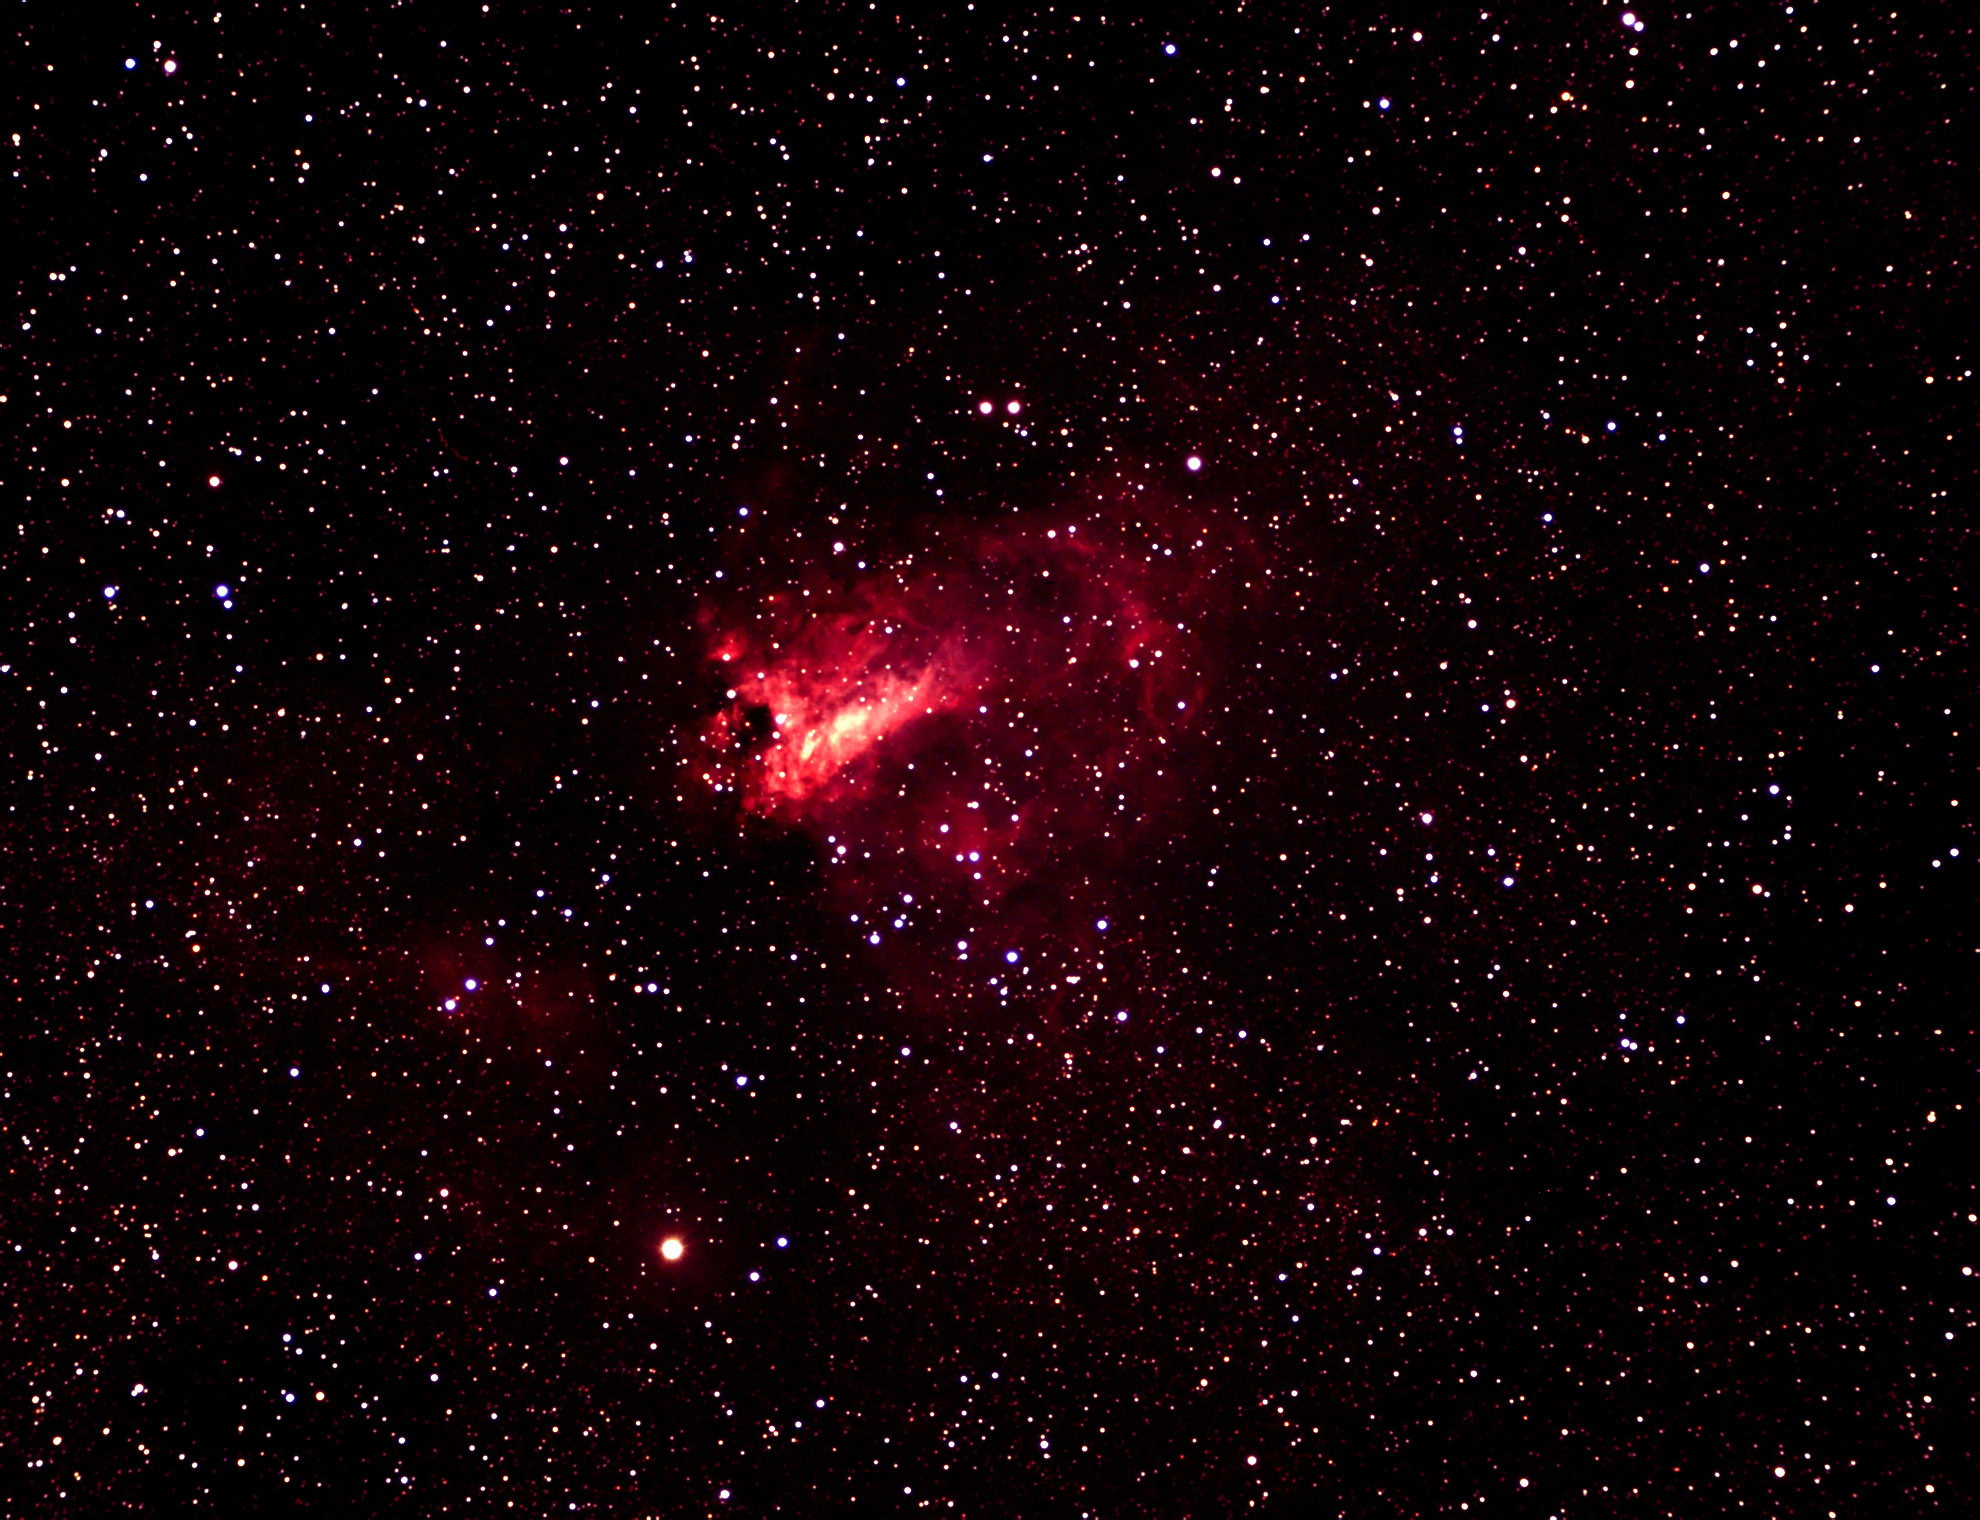 Swan Nebula, M17 This is a 19 minute expsoure (19 one minute exposures) of M17. The telescope used was a Vixen 102 ED refractor (665mm focal length). The image is at the full resolution of the camera but is cropped slightly. Compare this image to the one in the section "Third Night Images" (time and patience results in better images)!
The weather here in New England has been horrible for astronomy... a very cloudy wet and rainy spring. I ordered an Orion autoguider (got it 12 days ago) and TONIGHT was the FIRST night I actually got to use it (due to clouds)! The results are good, I am very happy with the unit. See two new photos below.
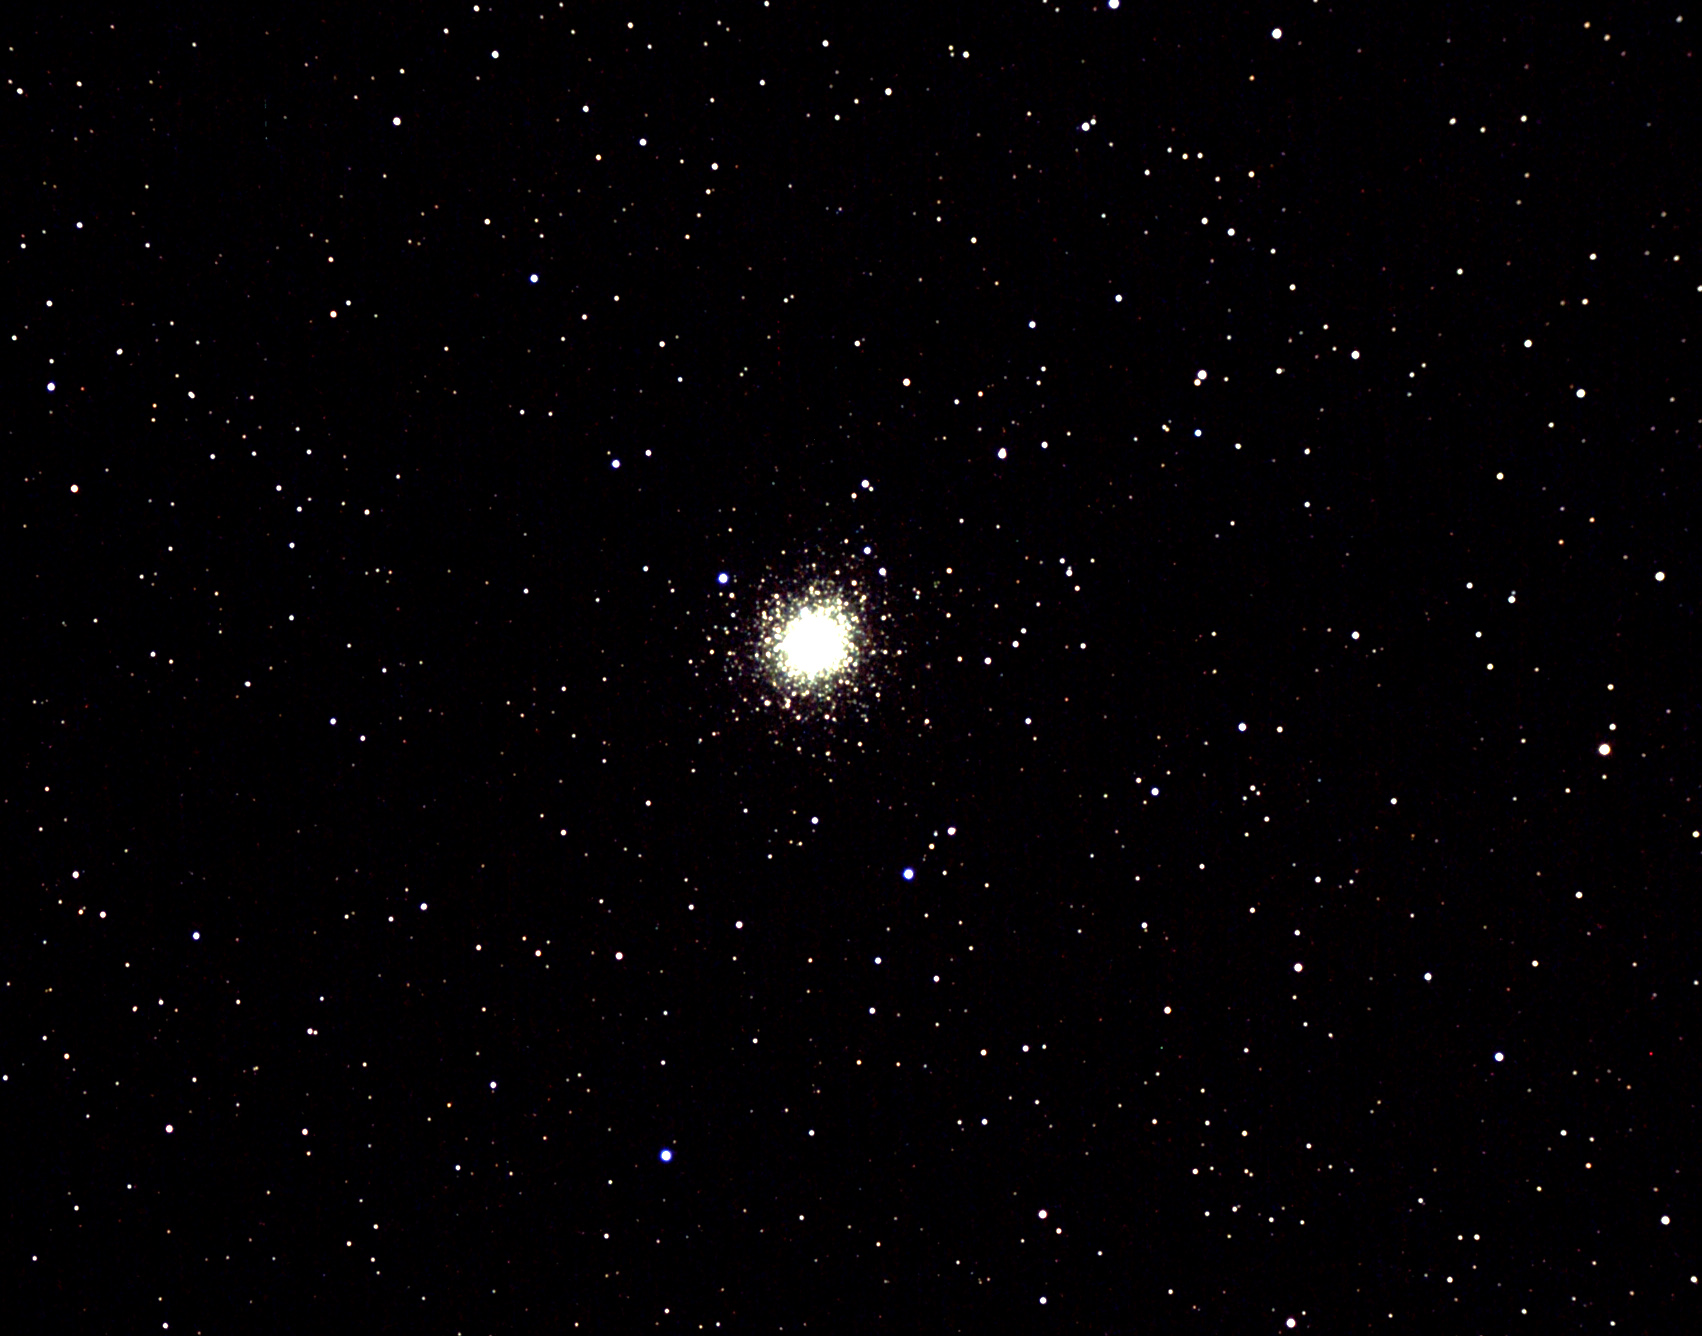
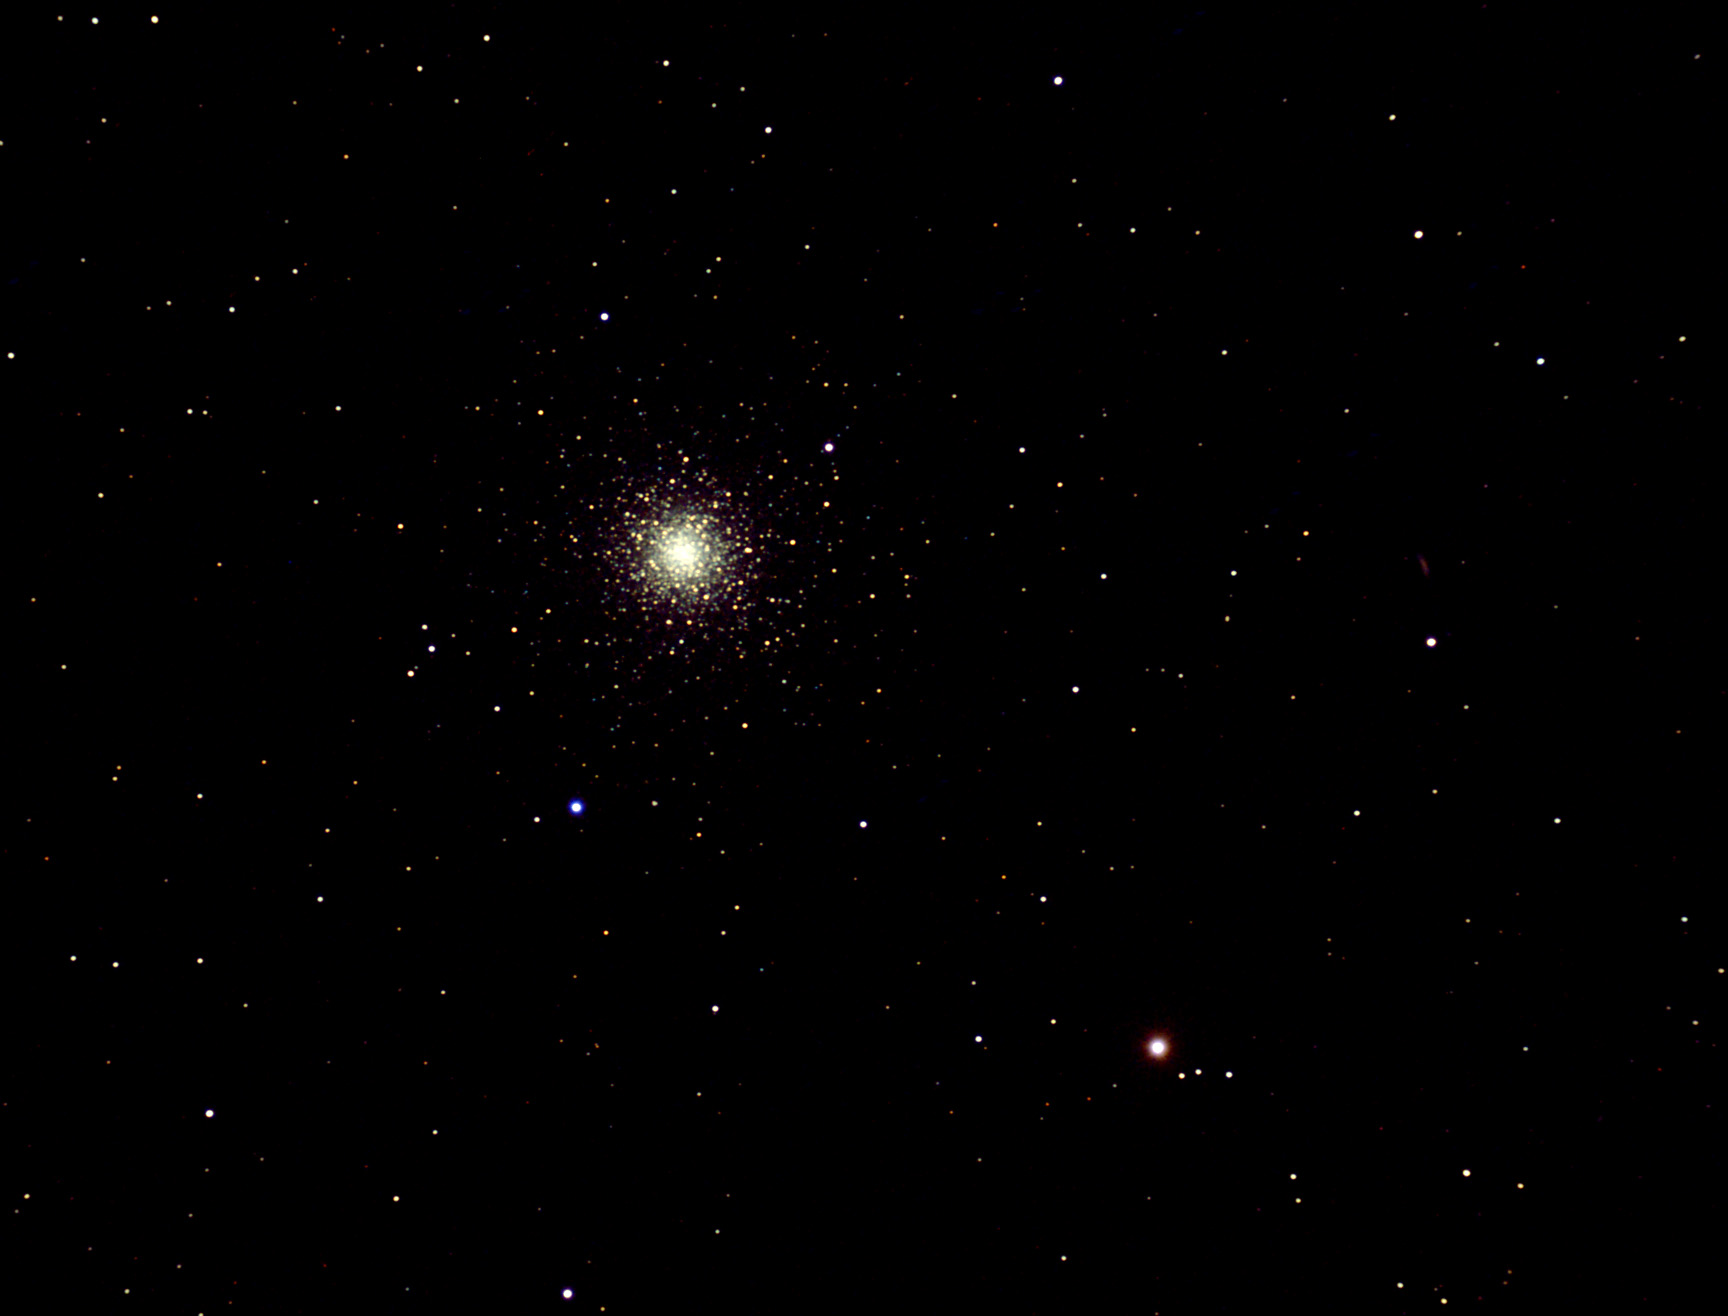
 Globular Cluster M13 in Hercules This is a one hour (12x300 seconds) expsoure of M13. The telescope used was a Vixen 102 ED refractor (665mm focal length). The image is at the full resolution of the camera but is cropped slightly. The autoguider allowed excellent tracking with no hassles. This is my best image of M13 to date (compare it to one in the previous session).
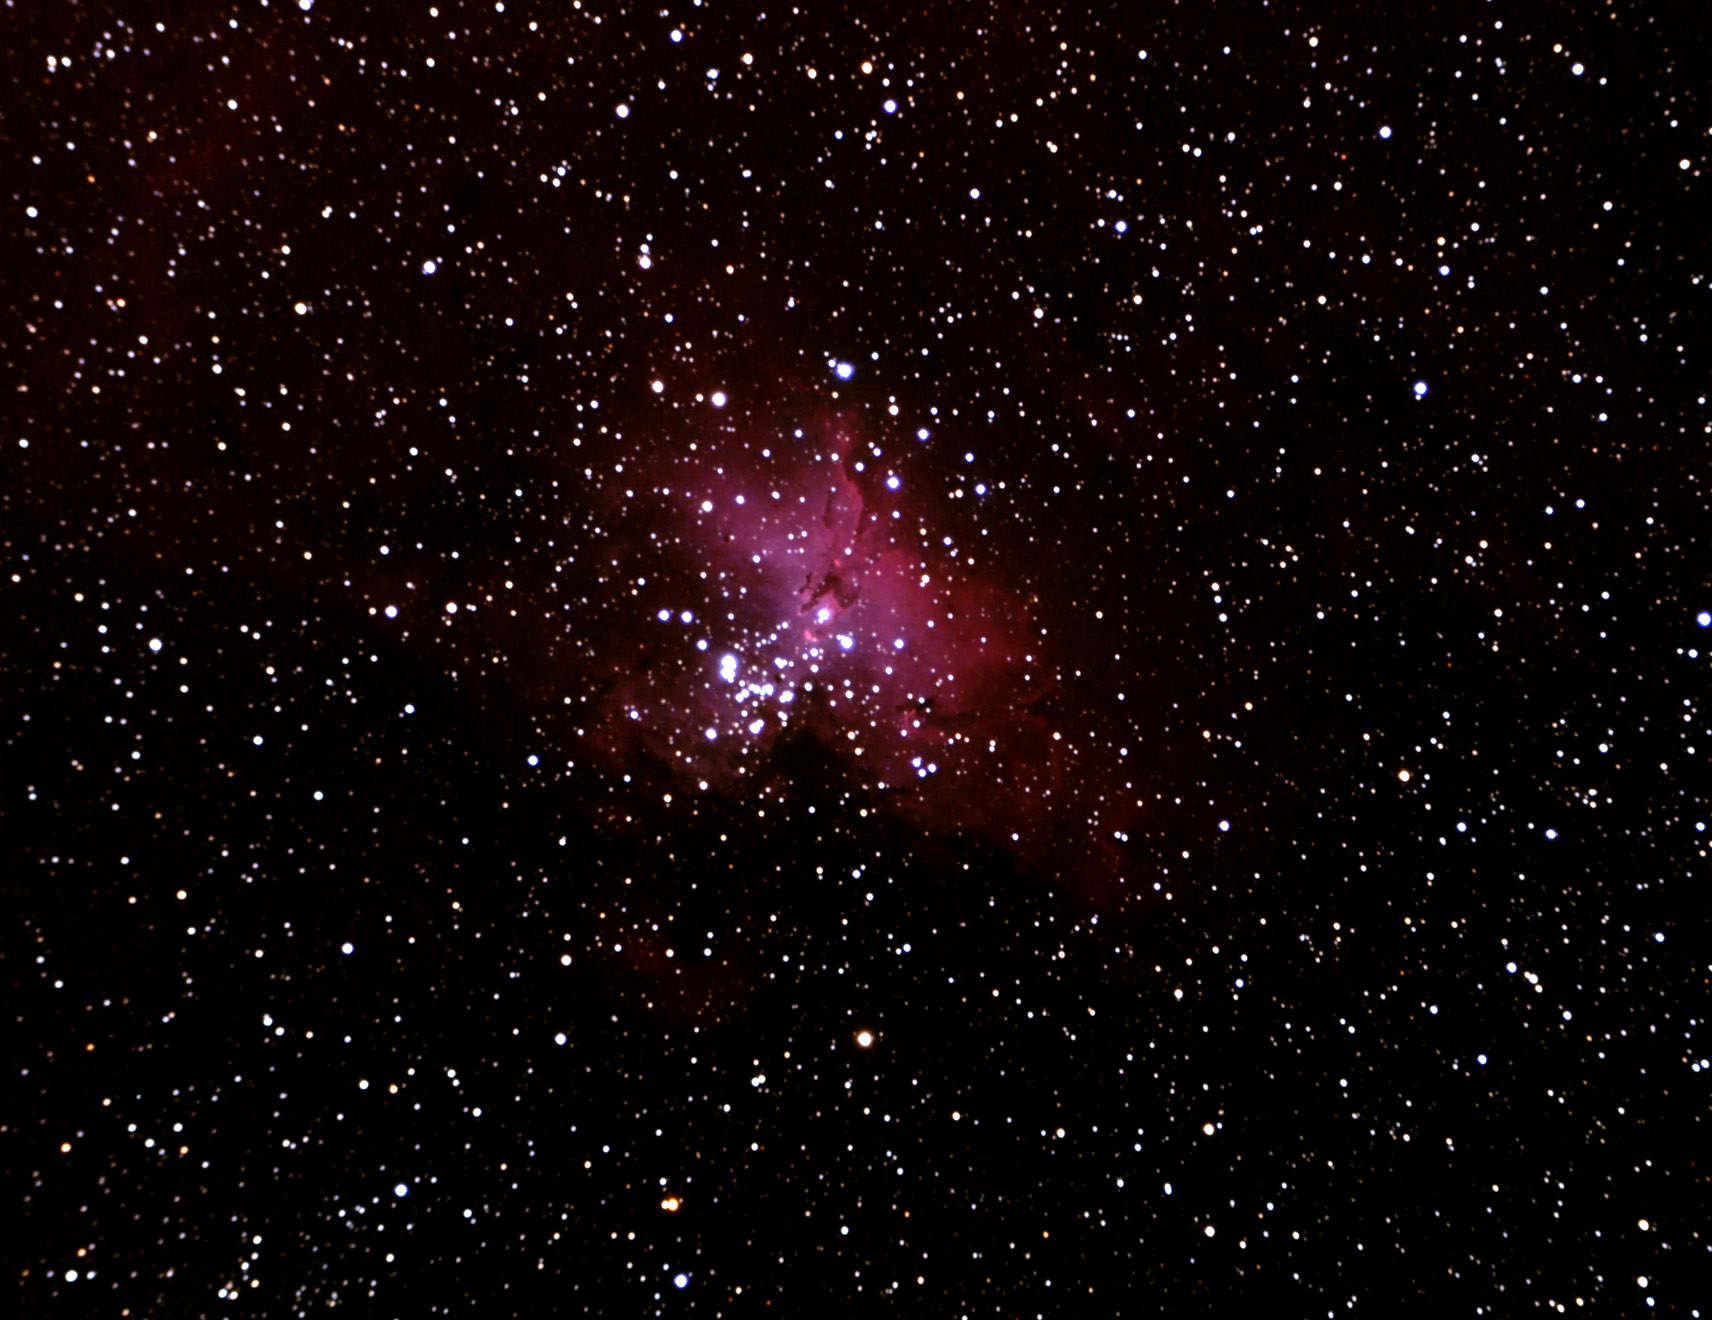
 Eagle Nebula, M16 This is a 50 minute (10x300 seconds) expsoure of M16. The telescope used was a Vixen 102 ED refractor (665mm focal length). The image is at the full resolution of the camera but is cropped slightly. I had planned to take 12 images (5 minutes each) however it fogged over, ceasing imaging for the evening. The autoguider allows me to get some decent images, defintely better than the previous ones I had taken. I expect that the quality of images will go up significantly now that I have the Losmandy G-11 tracking problems solved.
The weather here in New England has been UNBELIEVABLY bad this season. I had 13.3" of rain in July (more than 3x normal), June wasn't much better. So far there have been only four clear nights this summer (clear enough for astronomy)! On two of them I was not able to observe. Tonight was the FIRST night I've been out since June! I managed to get data for one decent image.
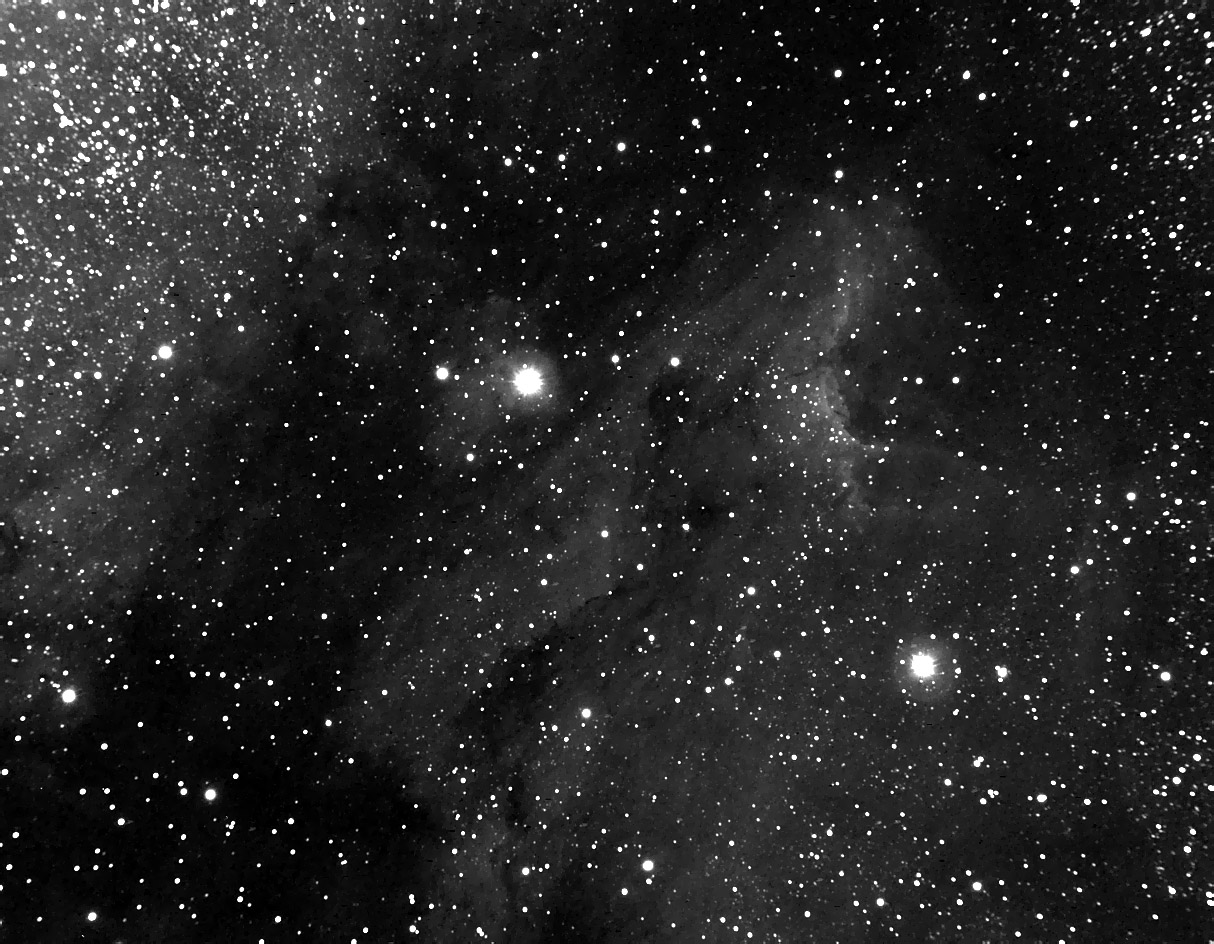
 North American Nebula This is a 56 minute (14x240 seconds) expsoure of the North American Nebula taken through a 4" refractor (665mm focal length). This nebula is really too large for this telescope/camera combination (too large to get in one shot). However, this was my object of choice for the evening as it was well placed and I had to get going before the Moon came up. I did take 15 exposures, however airplane trails rendered one of them useless for the final image. This shot includes 5 dark frames but no flat frames. The image is at the full resolution of the camera but it is cropped somewhat (stars to the left edge of the field were somewhat distorted so I deleted that part of the image). The Orion autoguider allowed excellent tracking with no hassles.
The weather was not that great... the Milky Way was barely visible, however I decided to do some imaging anyway...
 Pelican Nebula This is a 60 minute (15x240 seconds) expsoure of the Pelican Nebula taken through a 4" refractor (665mm focal length). This monochrome (binned 2x2) shot includes dark frames and flat frames. The image is at the full resolution of the camera but it is cropped somewhat.
Skies started out clear, then as soon as I started imaging it clouded over. Only got 2 frames on one subject:
 M11 This is a 6 minute (2x180 seconds) expsoure of the cluster M11 taken through a 4" refractor (665mm focal length). The image is at the full resolution of the camera but it is cropped somewhat. I had hoped to get at least 30 minutes of exposure on this, however the clouds prevented it.
Tonight was a productive night, I got some of my best images yet:
 NGC 6664 This is a 21 minute (7x180 seconds) expsoure of the cluster NGC 6664 (located very close to Alpha Scutum) taken through a 4" refractor (665mm focal length). The image is at the full resolution of the camera but it is cropped somewhat.
 M31 This is (so far) my best image of M31. This is a one hour exposure (15x240 seconds) taken through a 4" refractor (665mm focal length). The image is at the full resolution of the camera. Some of the stars on the edges of the field are showing abberations. I decided to leave them in the shot as the eye tends to be drawn to the galaxy making the abberations less noticeable.
 The Pleiades This is (so far) my best image of M45. This is a one hour exposure (15x240 seconds) taken through a 4" refractor (665mm focal length). The image is at the full resolution of the camera however it is cropped somewhat.
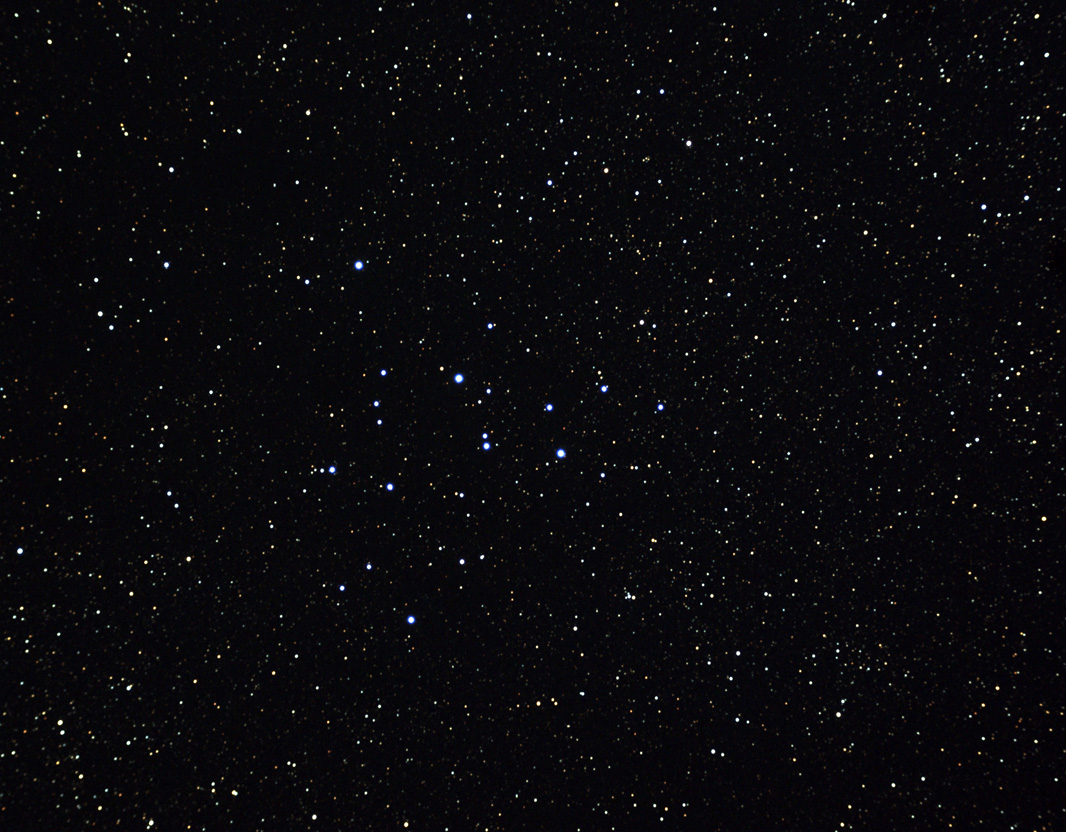
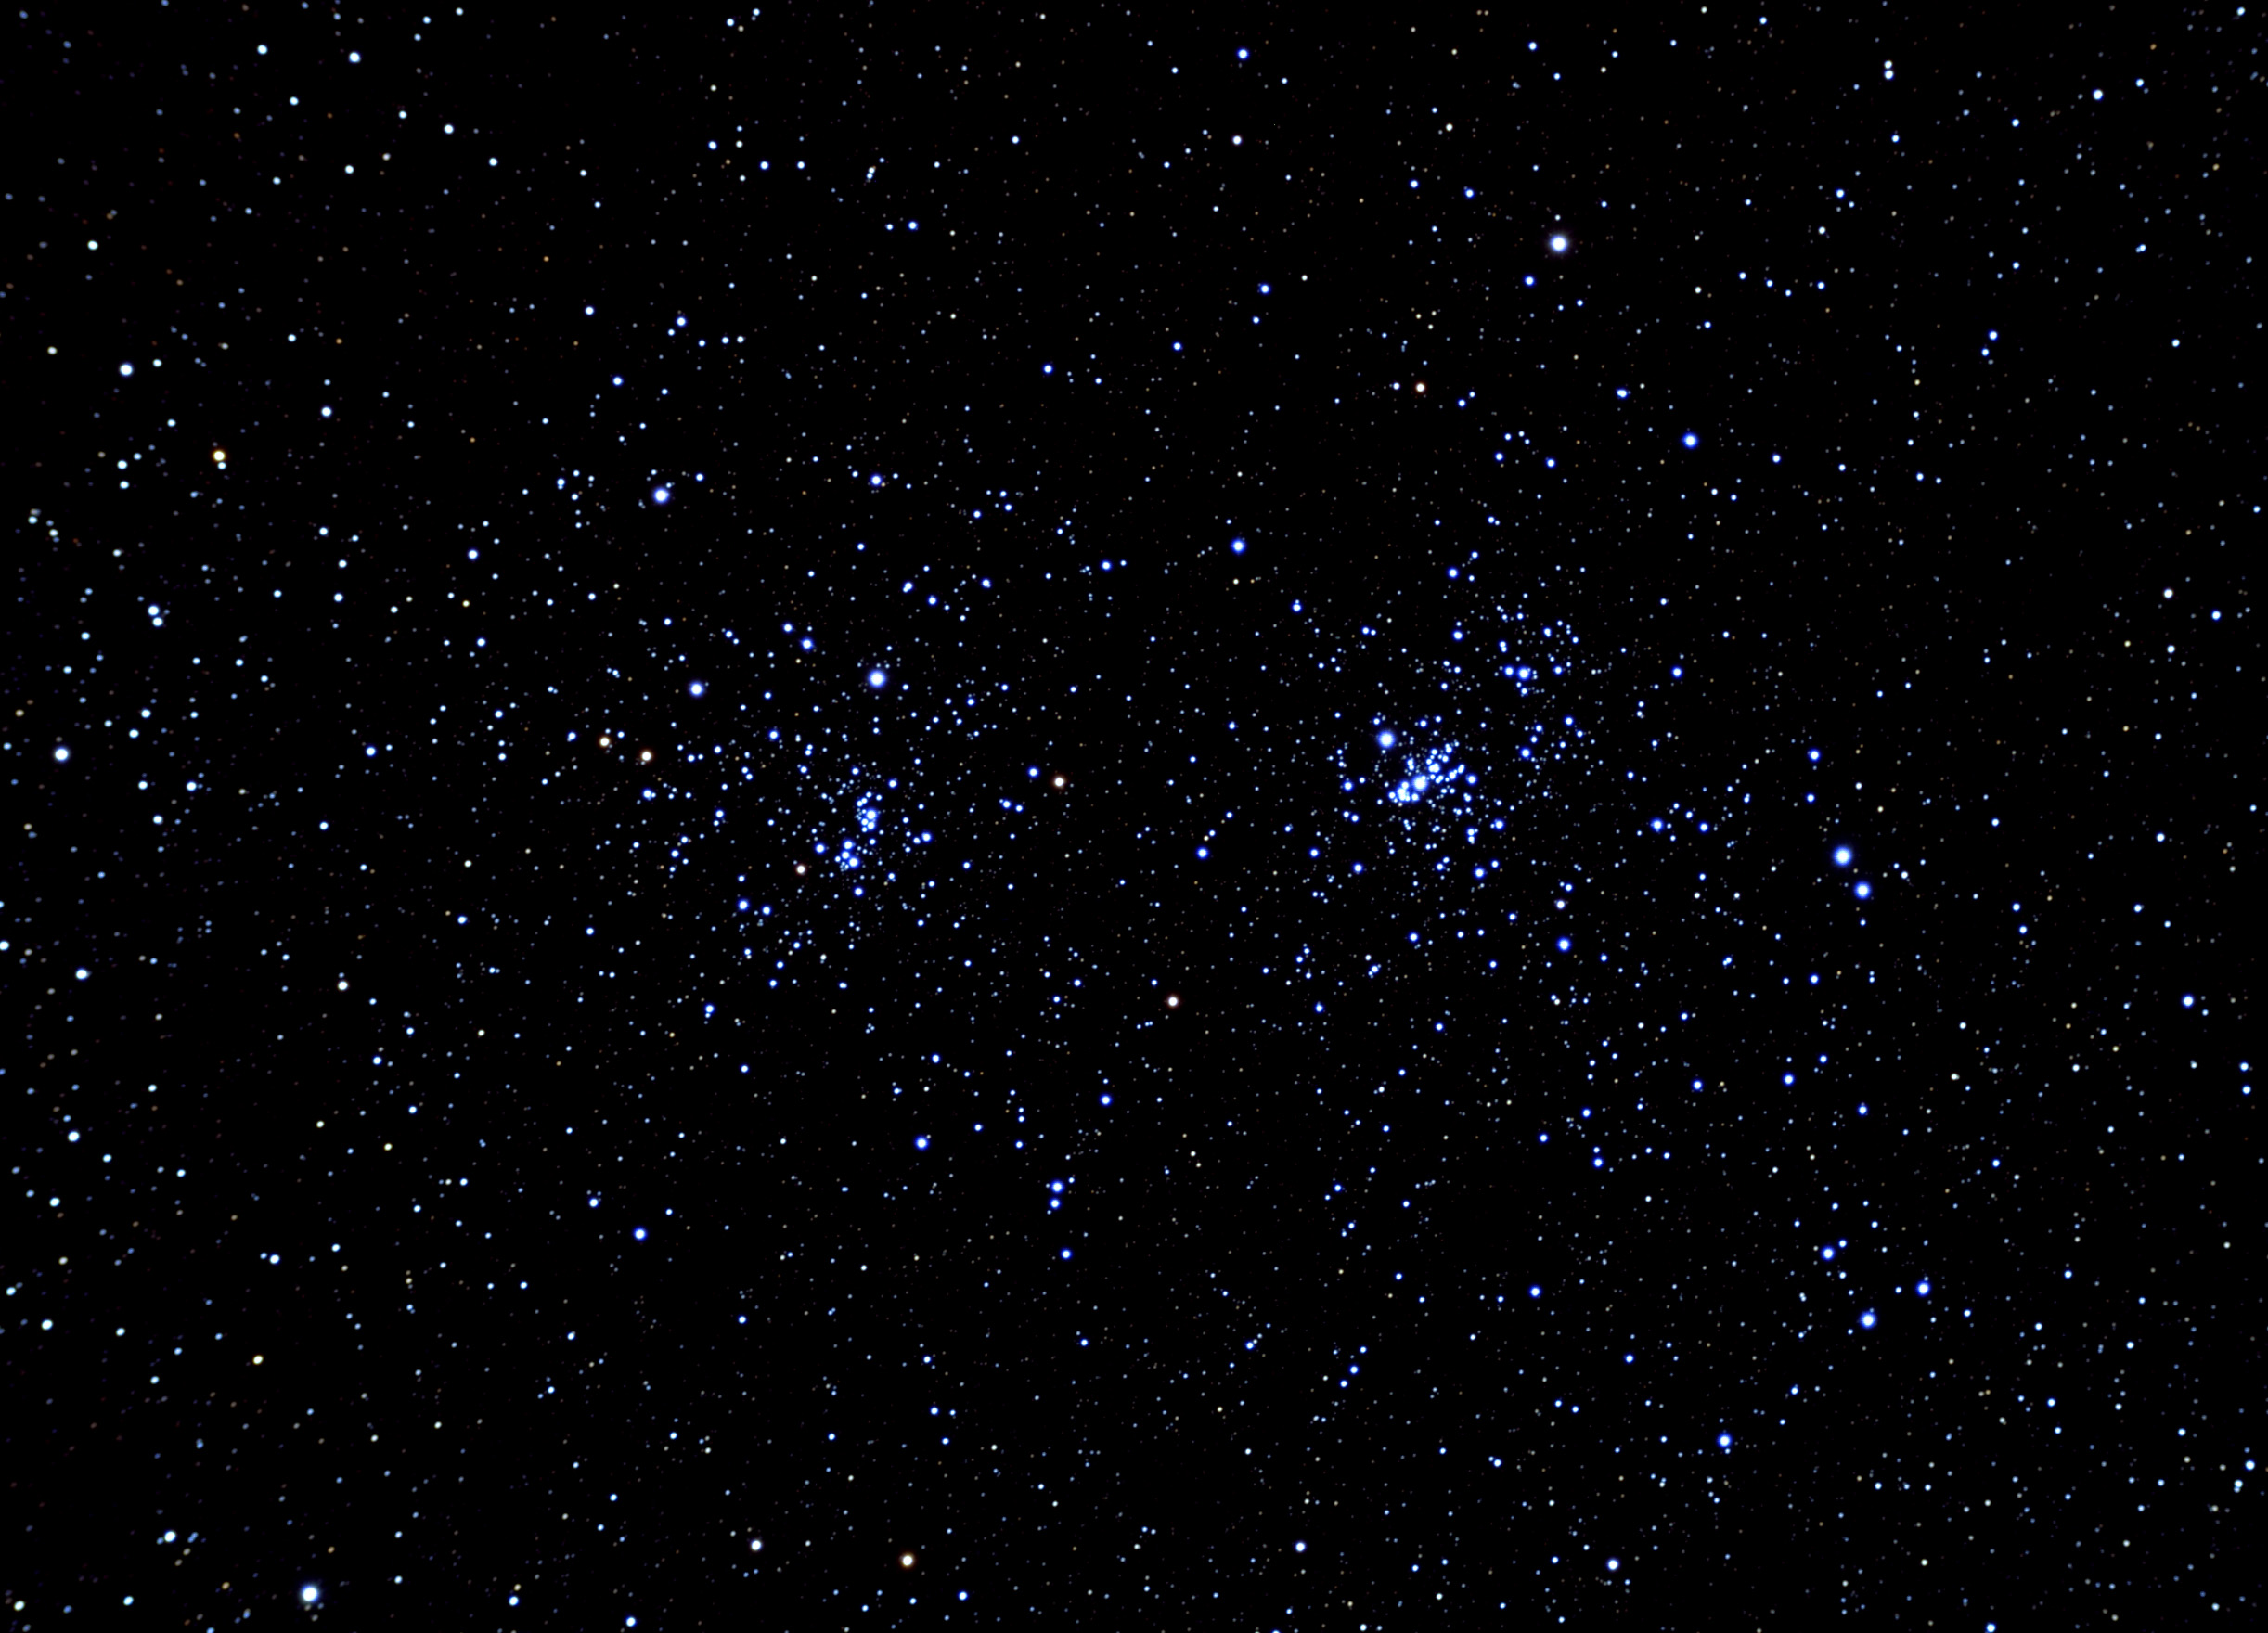 The Double Cluster This is (so far) my best image of the Double Cluster. This is a 28 minute exposure (7x240 seconds) taken through a 4" refractor (665mm focal length). The image is at the full resolution of the camera however it is cropped somewhat.
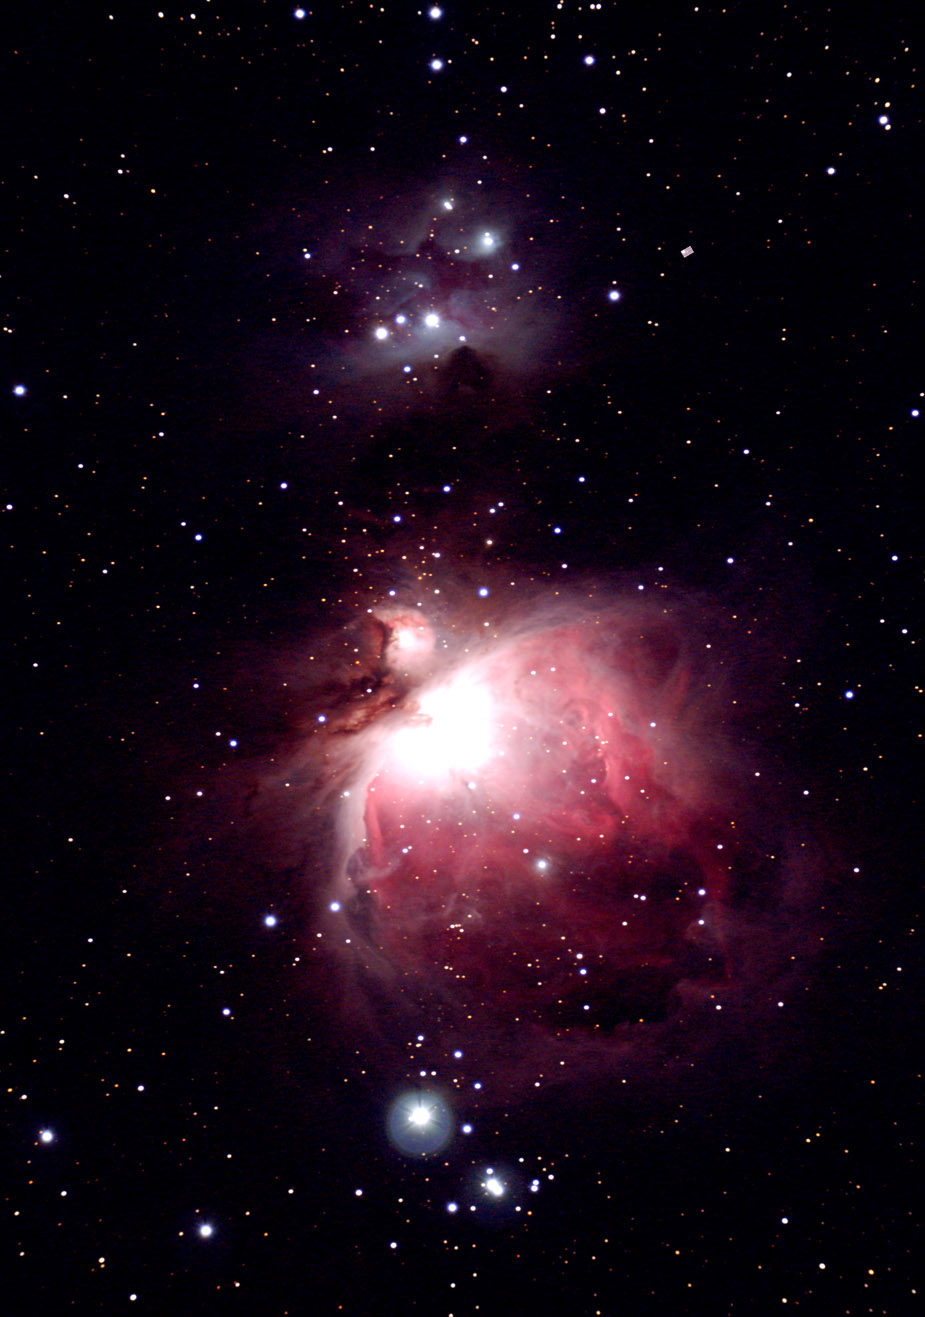
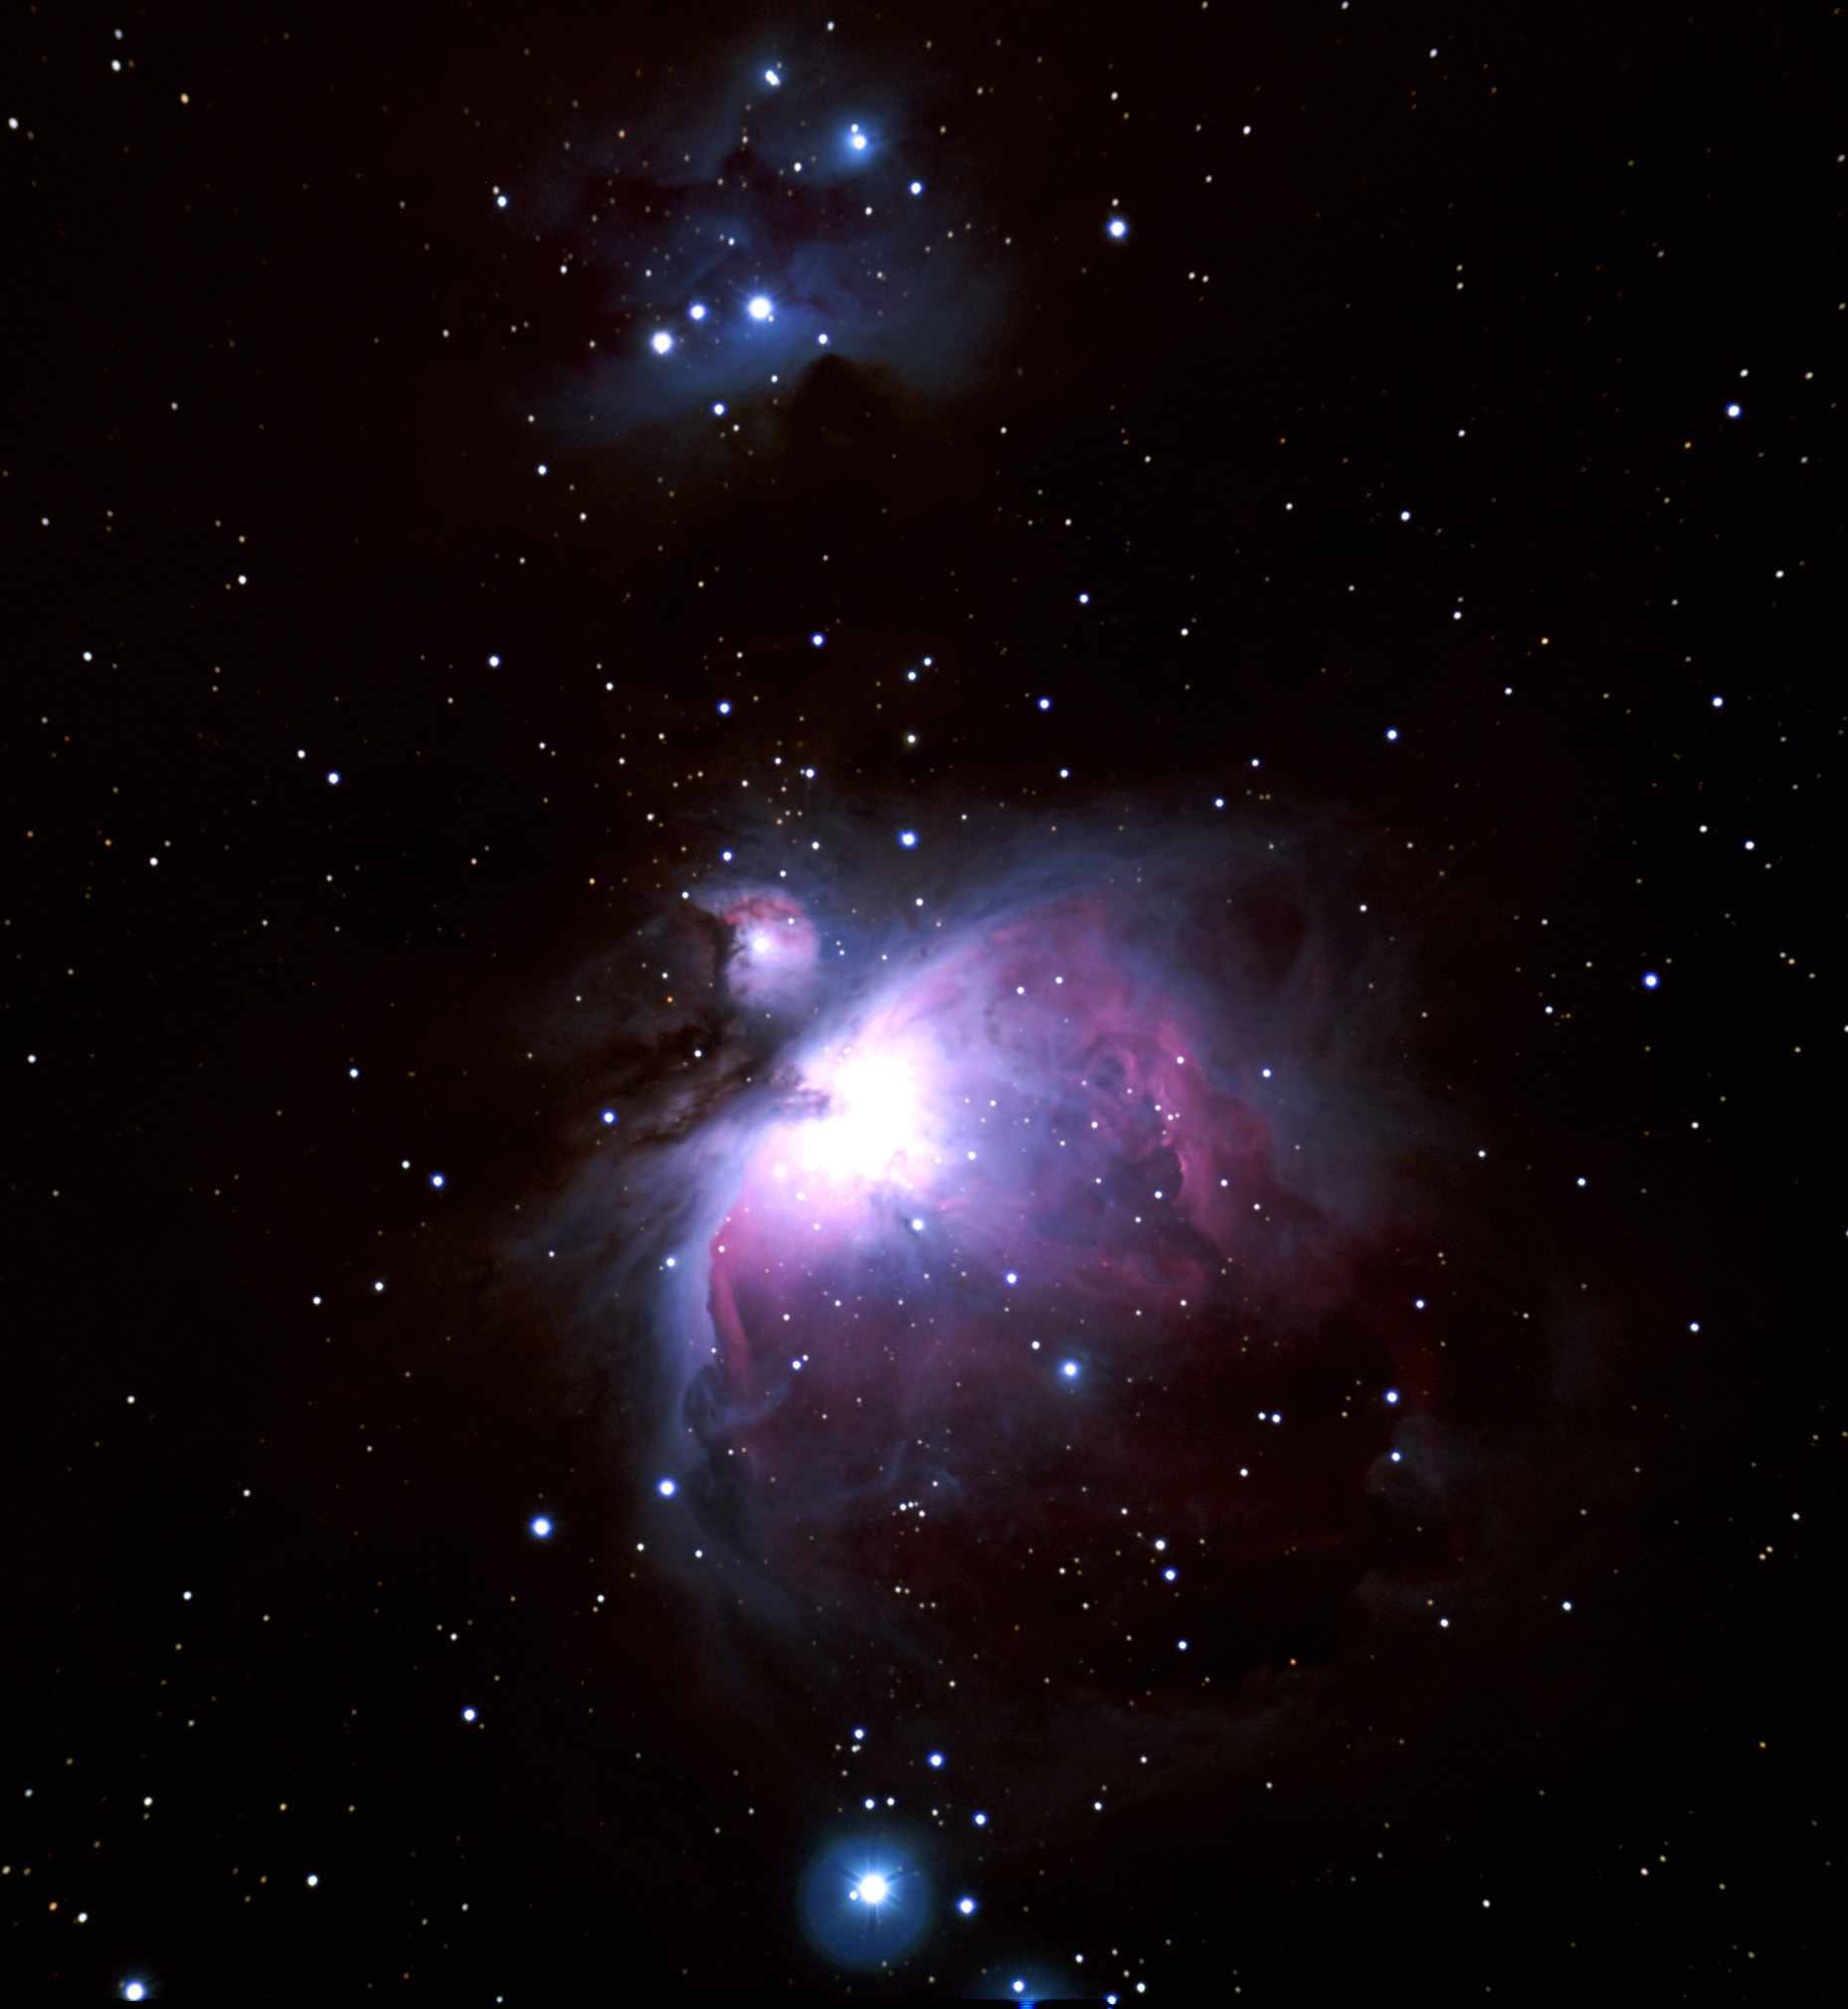 The Orion Nebula This is (so far) my best image of the Orion Nebula. This is a 48 minute exposure (12x240 seconds) taken through a 4" refractor (665mm focal length). The image is at the full resolution of the camera however it is cropped somewhat. I had to cut the exposures short (was hoping for one hour) due to twilight about to begin.
Tonight was a another productive night, I got some more decent images:
 M33 This is a 2 hour (30x240 seconds) expsoure of the galaxy M33. The image is at the full resolution of the camera but it is cropped somewhat. This image was taken during the early morning hours of 20 Sep. UPDATE: I reprocessed the raw data in January 2012 (with Maxim DL and also using the processing knowledge I have gained in 2 years), the result is here (a smaller version but it's a BIG improvement)!
 NGC 246 This is a 1 hour (15x240 seconds) expsoure of the planetary nebula NGC 246 in Cetus. Also easily visible is galaxy NGC 255 to the upper left of the nebula (several other fainter galaxies can also be spotted with careful inspection). The image is at the full resolution of the camera but it is cropped somewhat. UPDATE: I reprocessed the raw data in January 2012 (with Maxim DL and also using the processing knowledge I have gained in 2 years), the result is here .
 M2 This is a 1 hour (15x240 seconds) expsoure of the globular cluster M2 in Aquarius. The image is at the full resolution of the camera but it is cropped somewhat. UPDATE: I reprocessed the raw data in January 2012 (with Maxim DL and also using the processing knowledge I have gained in 2 years), the result is here .
 M16 This is a 52 minute (13x240 seconds) expsoure of the Eagle Nebula (M16). The image is at the full resolution of the camera but it is cropped somewhat. UPDATE: I reprocessed the raw data in January 2012 (with Maxim DL and also using the processing knowledge I have gained in 2 years), the result is here .
Tonight was reasonably clear (not ideal but good enough to do some imaging considering how bad the weather has been this year). Tonight I imaged through a Celestron 11 scope (with an F6.3 focal reducer in place). Guding was done via the 4" refractor. The main issue I am finding with imaging through an SCT is focus drift. SCTs are particularly sensitive to focus change as temperature changes.
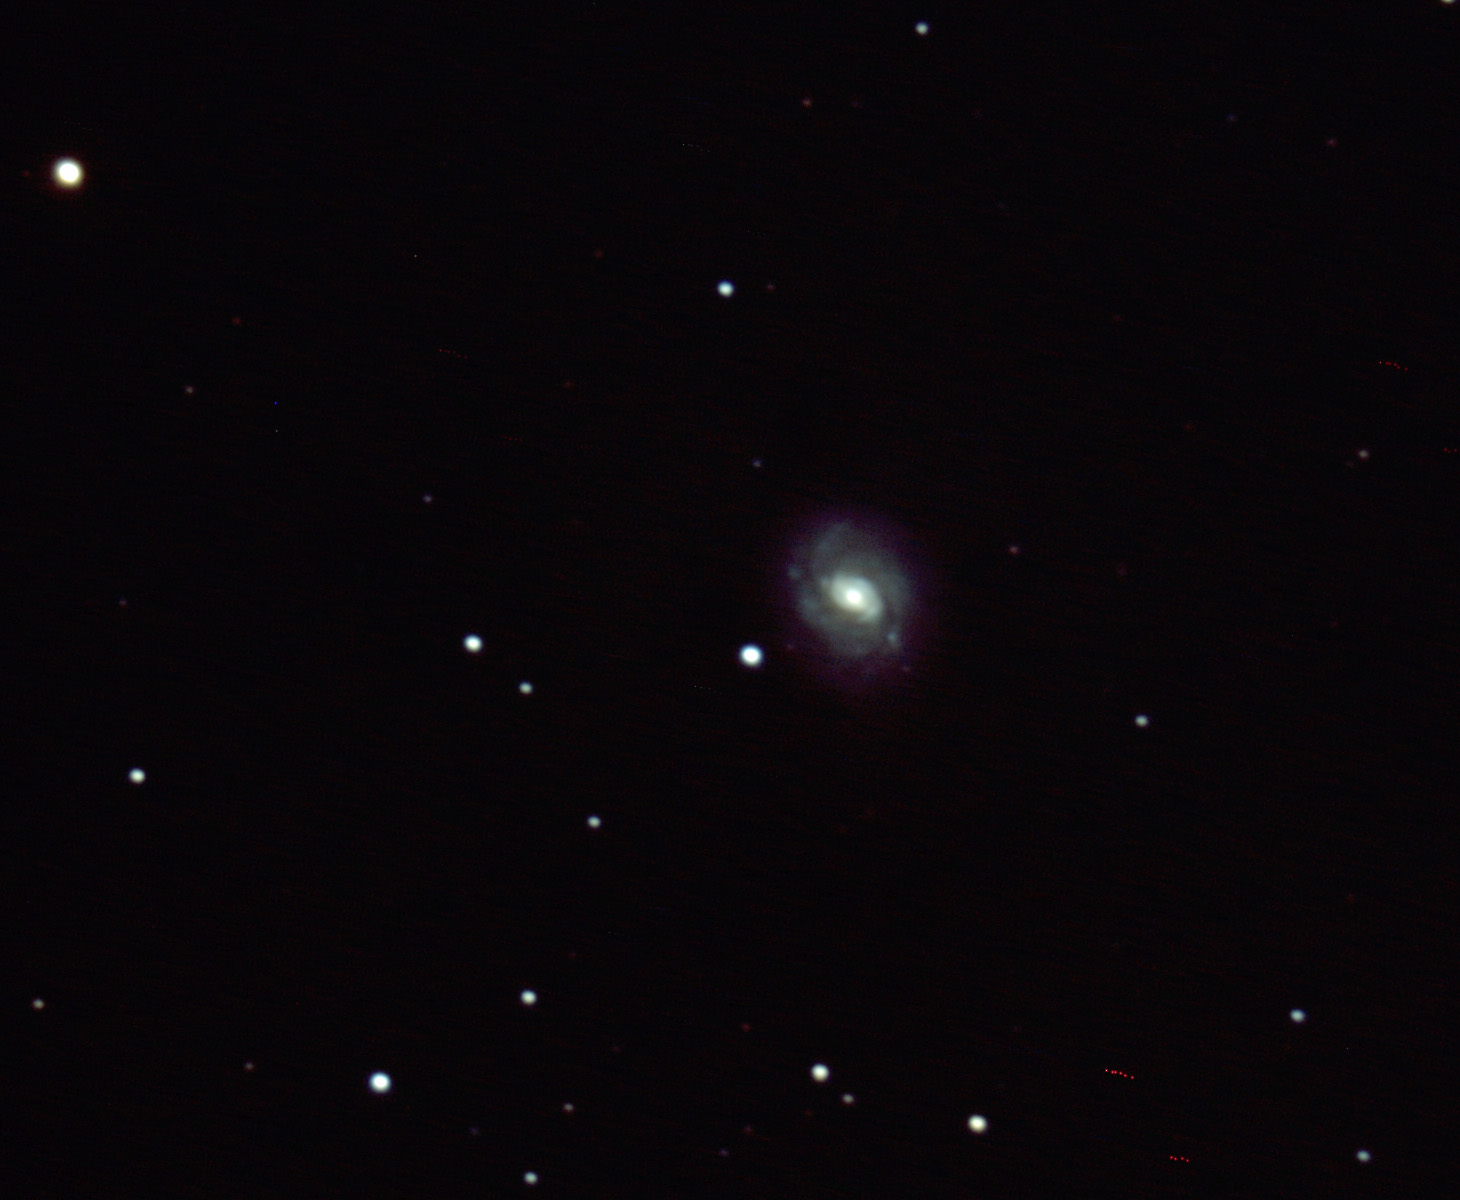 Galaxy M77 in Cetus Here is a 40 minute exposure of M77. The visibility in this area of the sky was not too good. This image is soft, I had to do a focus touch up during the shoot. This image is processed with both dark and flat frames. The image is at the full resolution of the camera but it is cropped considerably.
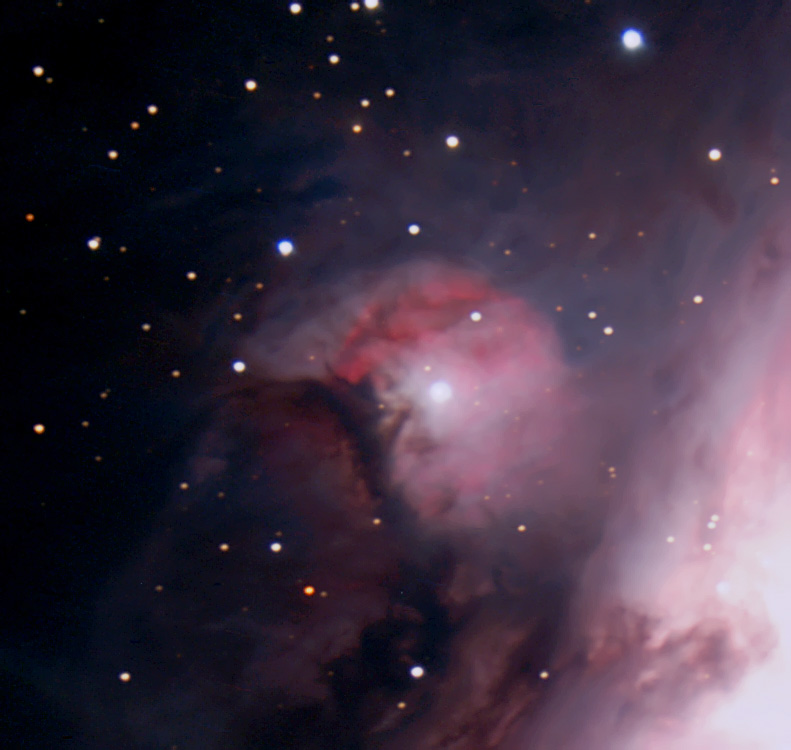 M43 Here is a 40 minute exposure of M43 (basically this is the northeast section of the Orion Nebula). This image is processed with both dark and flat frames. The image is at the full resolution of the camera but it is cropped considerably.
Not the absolute best night, but clear enough to try some imaging. Tonight I used the C-11 as the imaging scope (with an F6.3 reducer installed) and the 4" refractor was used for guiding. It was a worknight so I was not able to stay up for more imaging (this was unfortunate as the conditions got MUCH better later in the night)...
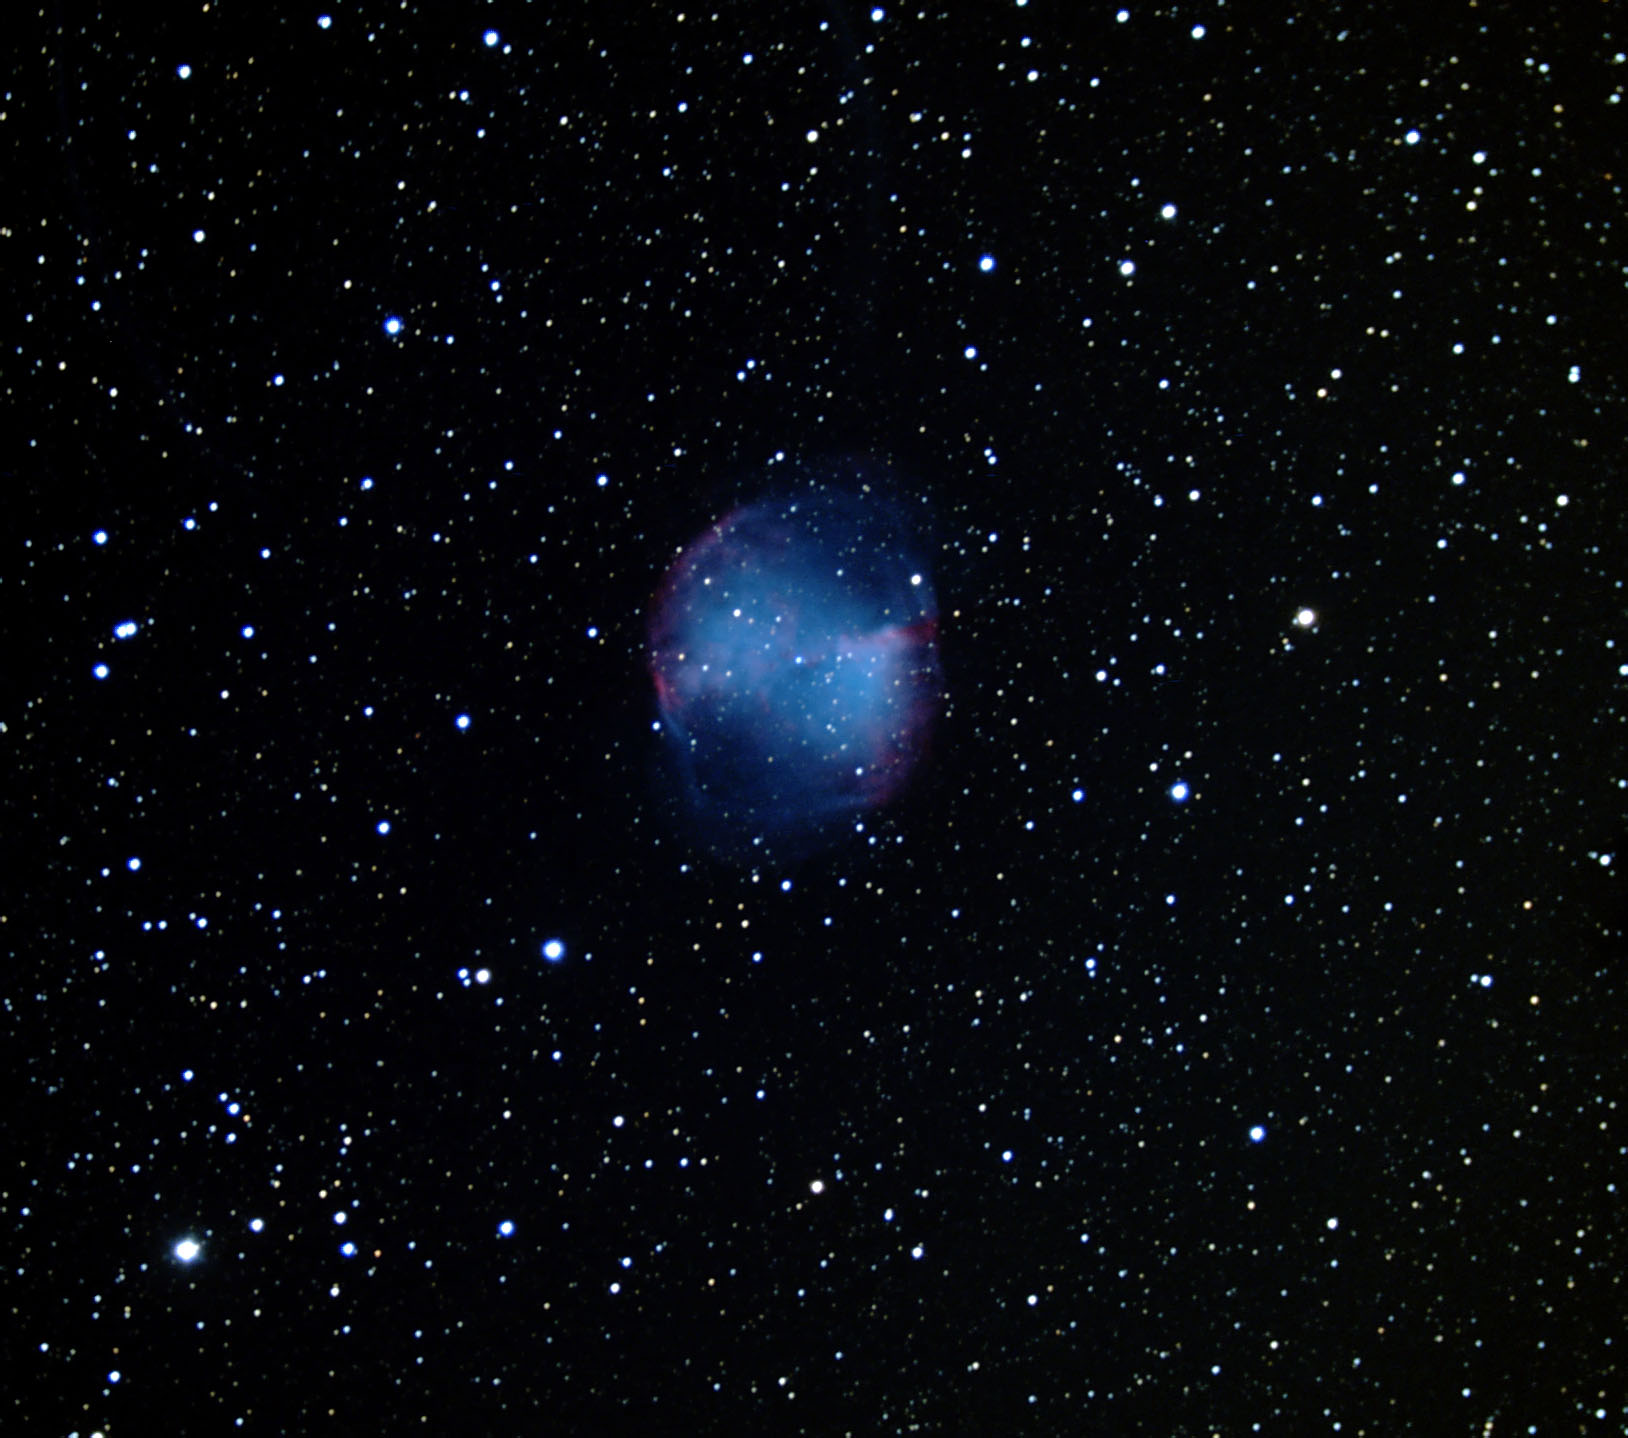 Dumbell Nebula, M27 Here is a 16 minute exposure of M27. I took more images, however some were not in good focus and a few were not guided well. This image is at the full resolution of the camera but it is cropped considerably.
Tonight's primary activity was to test out a Bahtinov mask (focusing aid) that I made for the C-11. There was a very fat Moon in the sky making visibility not so great. However the skies were clear enough to do some astrophotography work.
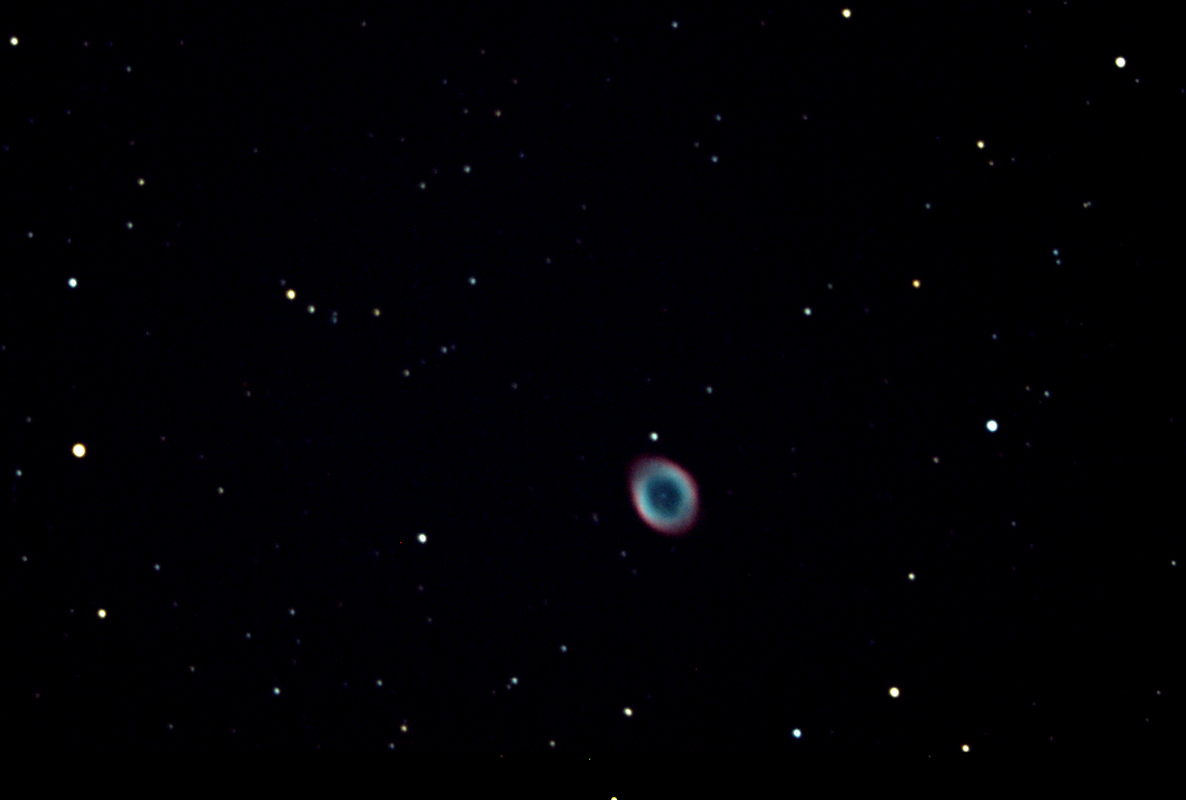
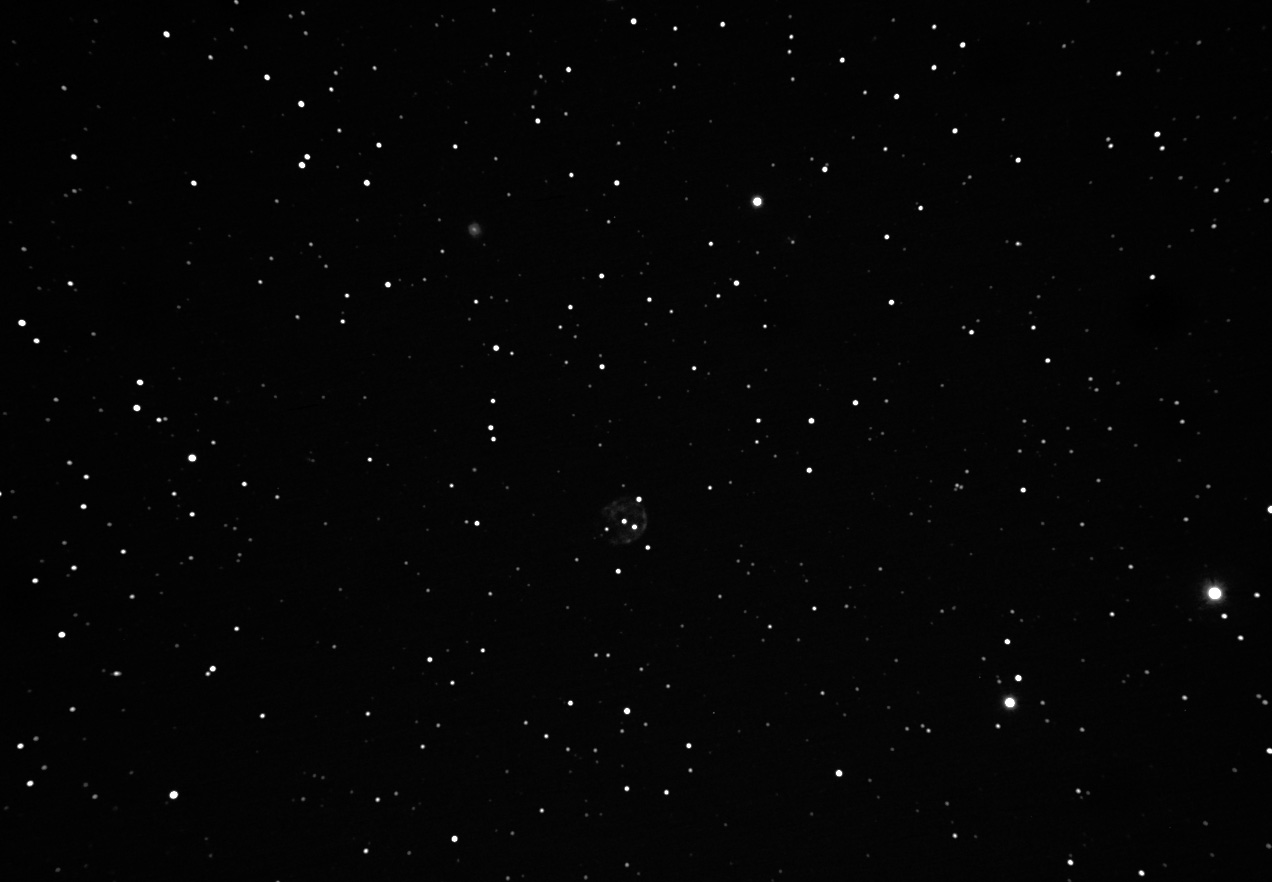
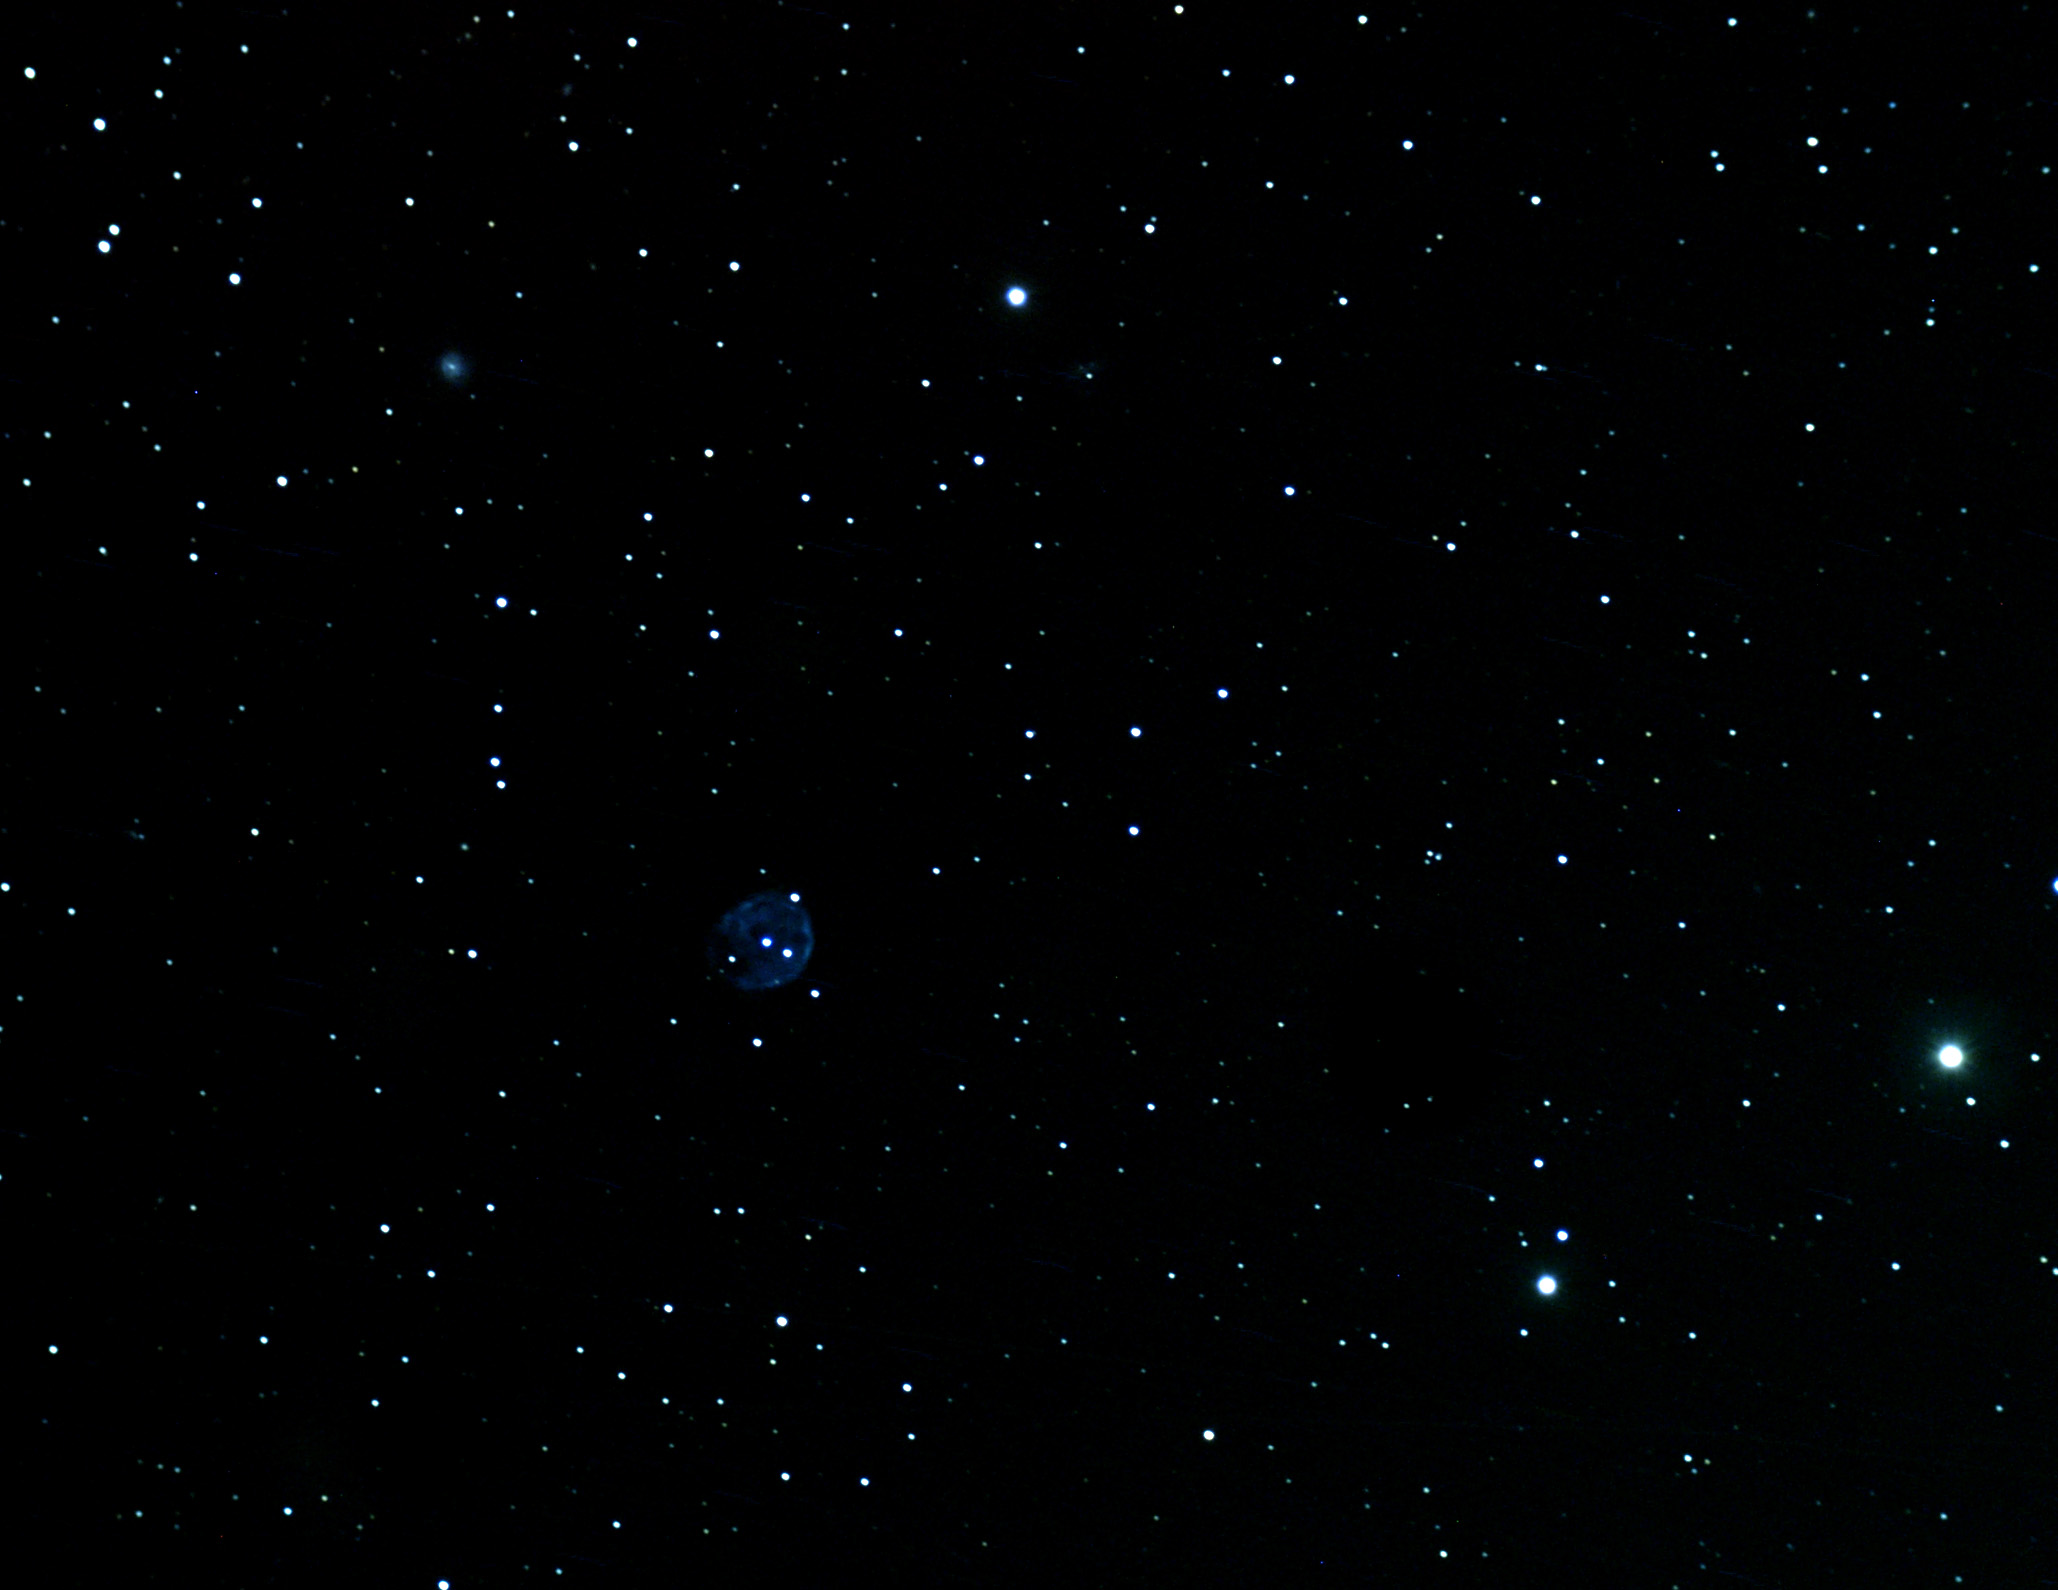
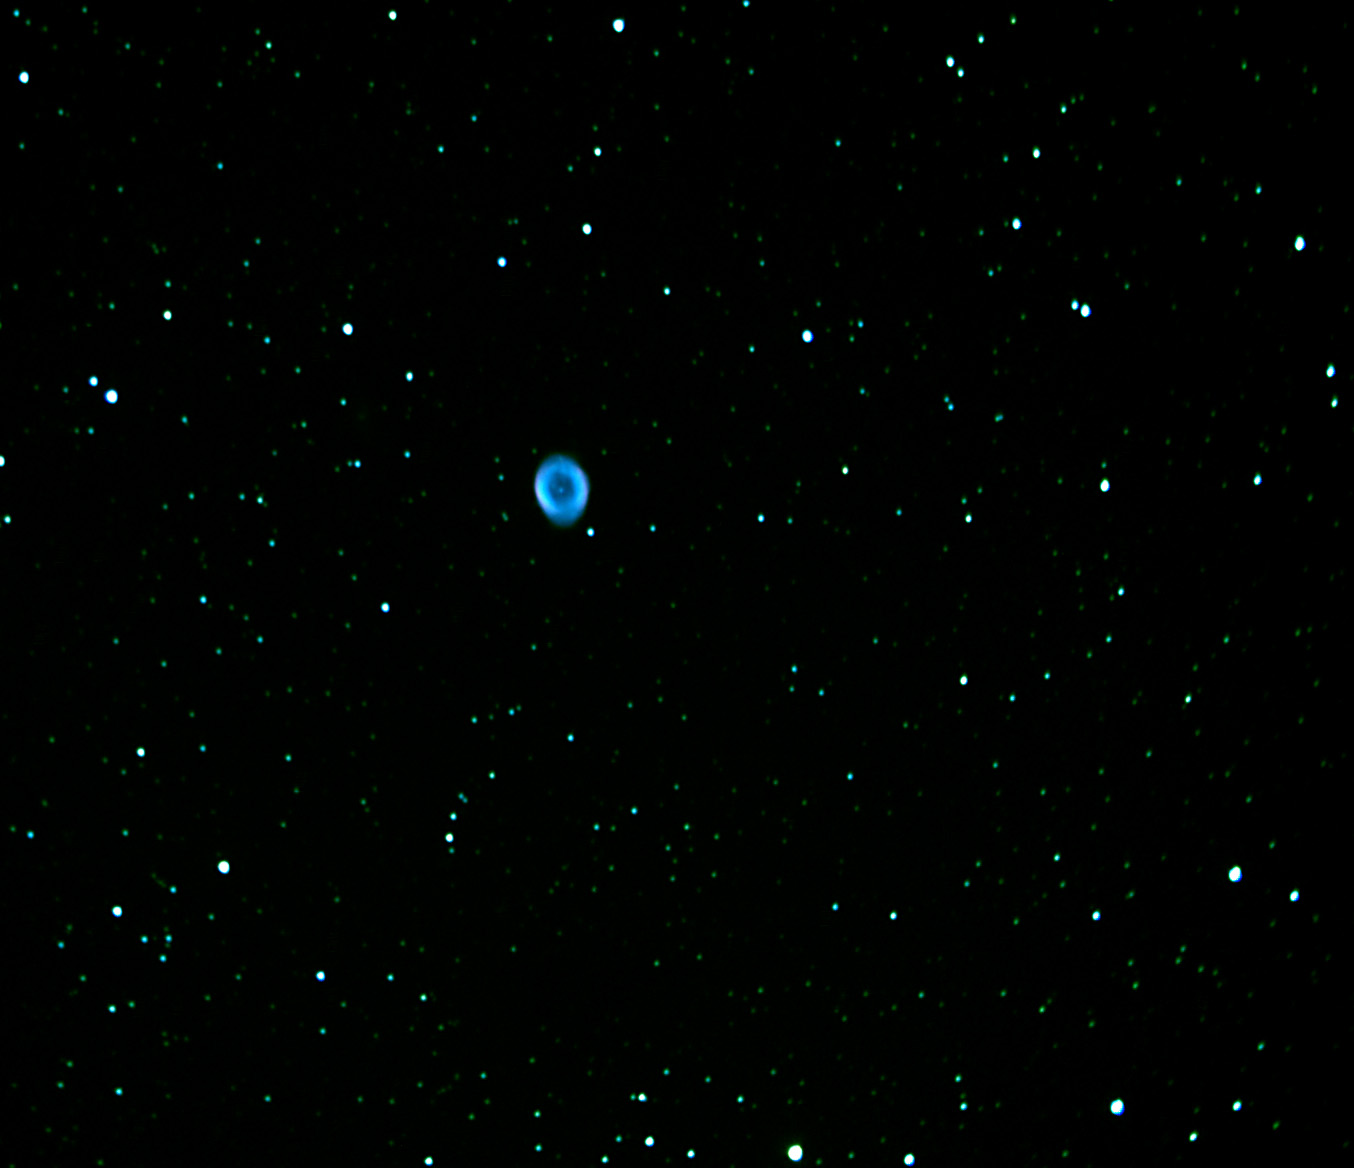 Ring Nebula, M57 Here is a 24 minute exposure of M57 through the C-11 with an F6.3 reducer (effective focal length is about 1765mm). A satisfactory image for having such a bright Moon in the sky. This image is at the full resolution of the camera but it is cropped considerably. Guiding was done using the Orion autoguider with the 4" refractor, however I used a 2.4x Barlow lens on the refractor to get a better image scale at the autoguider.
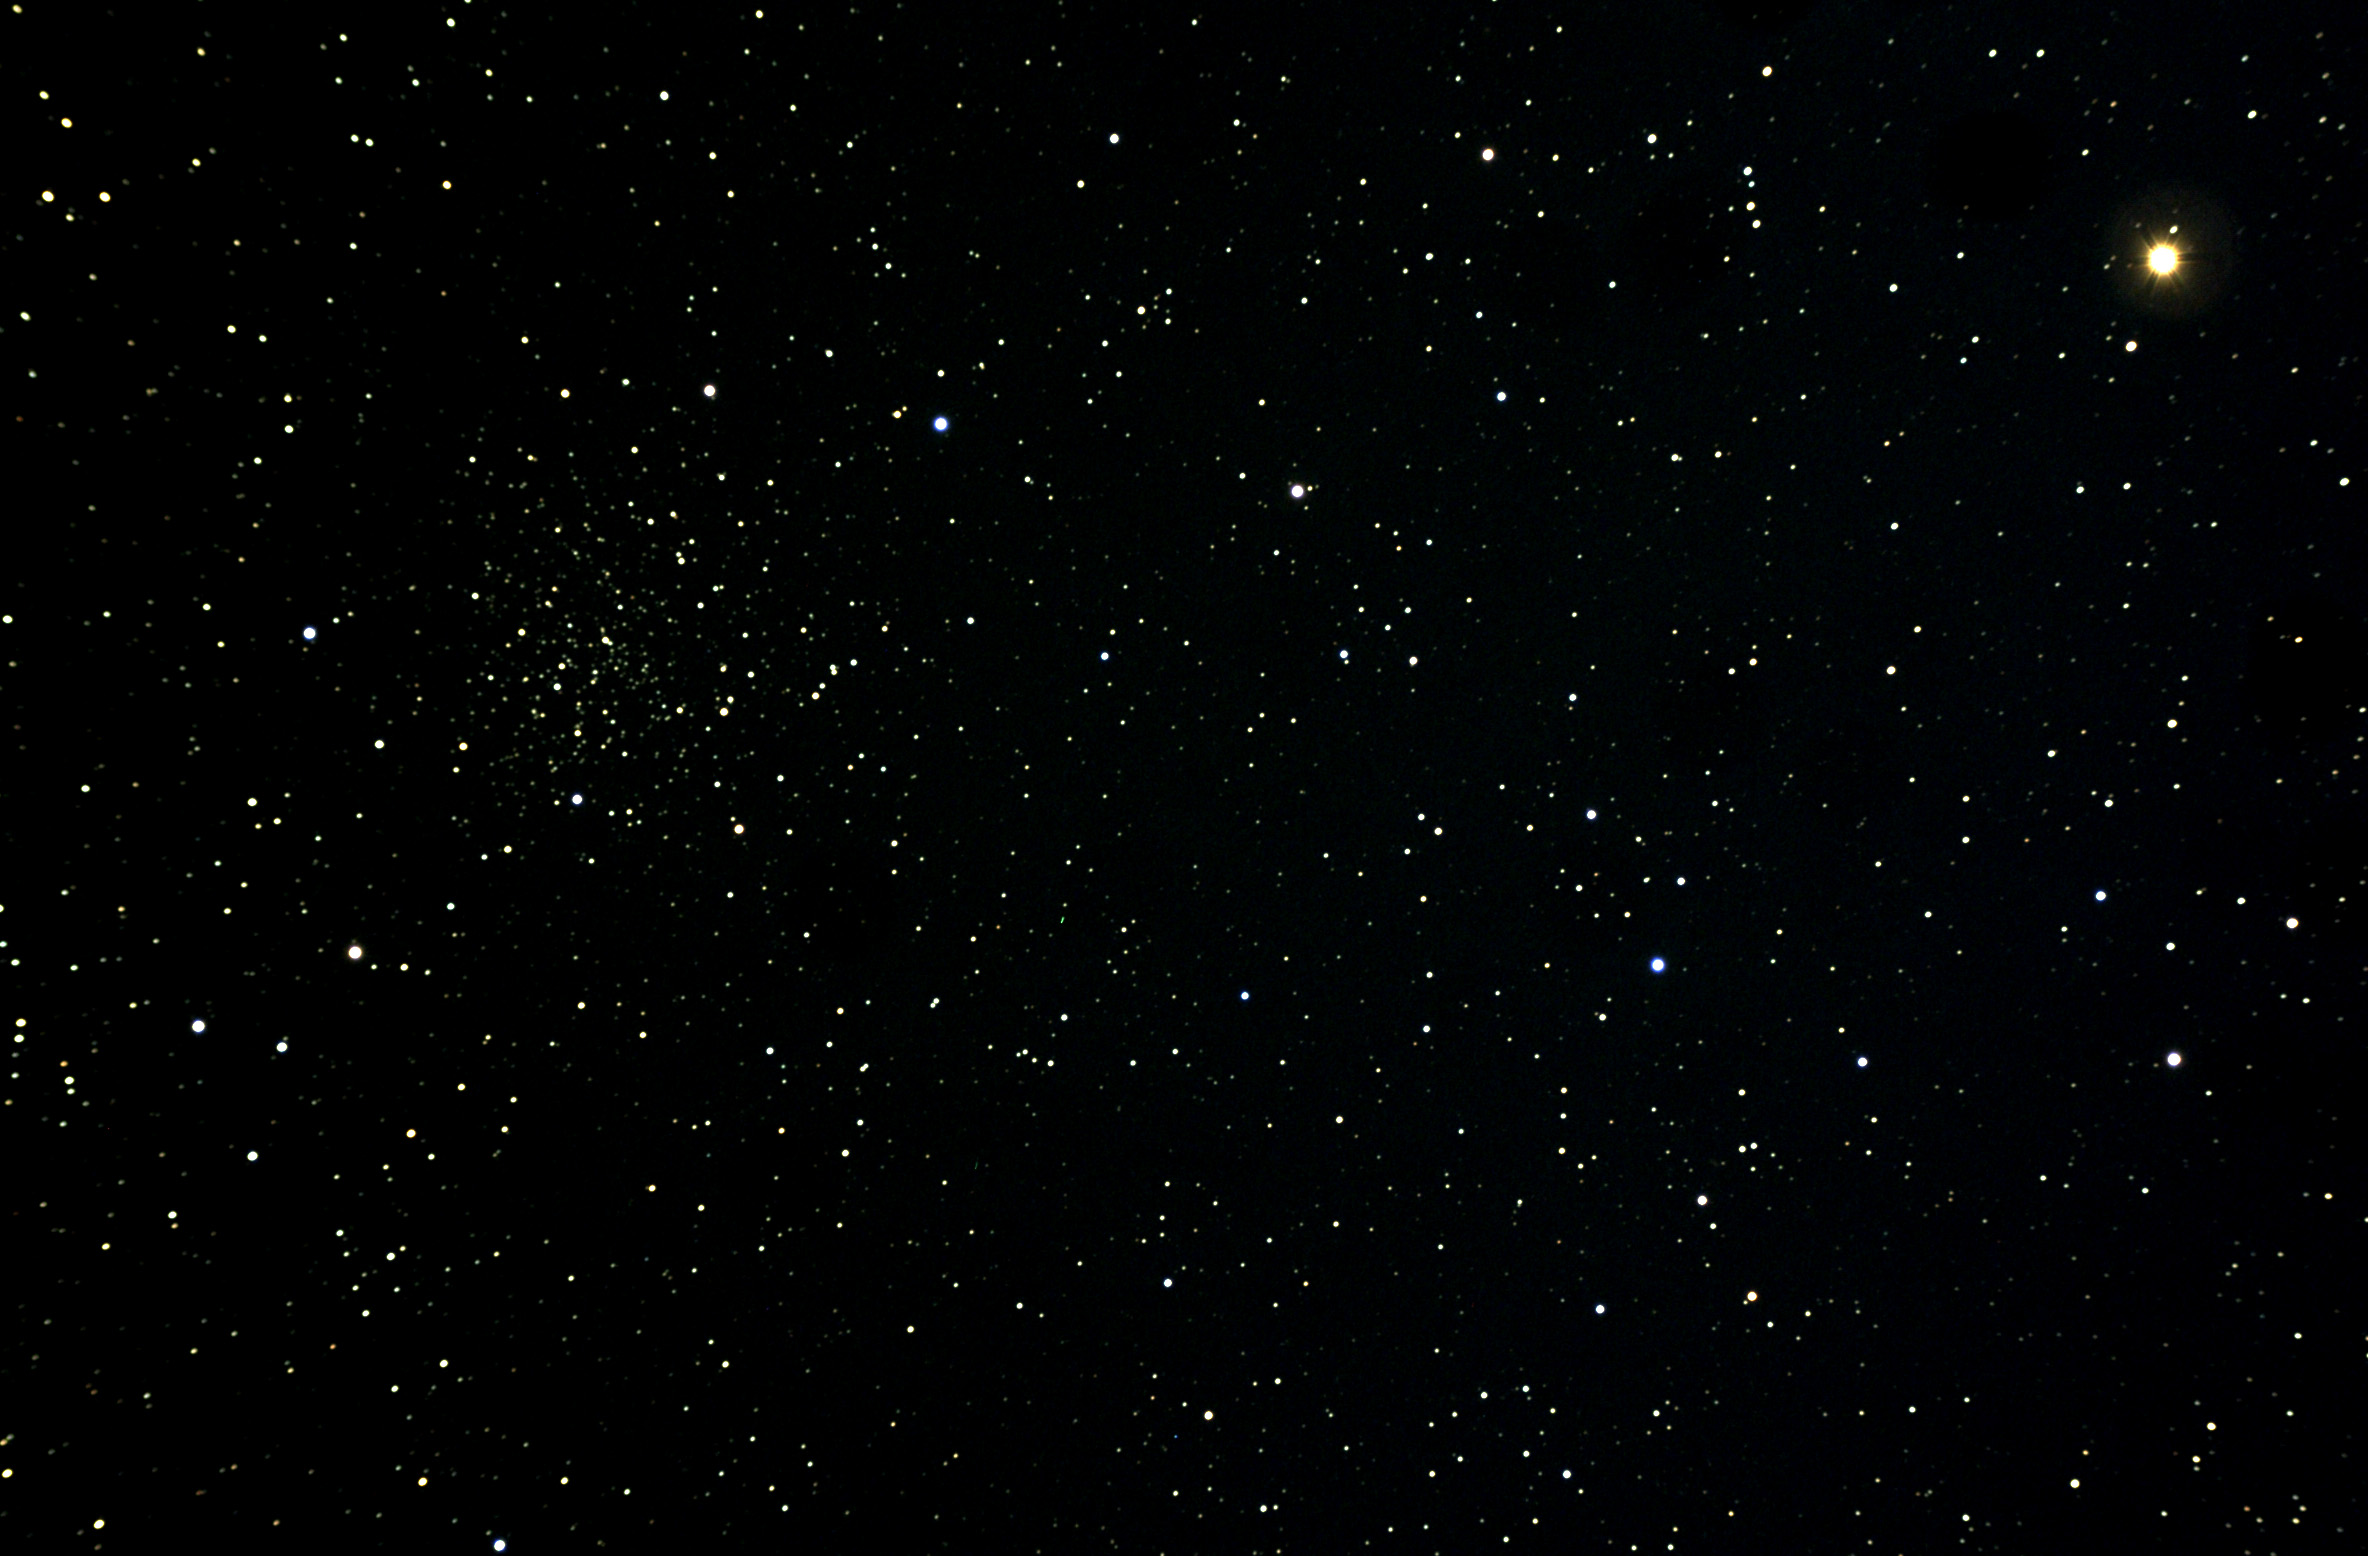
Tonight I worked M2 and NGC404. I was having problems with focus drift on the C-11, this resulted in a less than great image of M2. I also tried NGC 404, however I was having some tracking problems. I did get one interesting frame of NGC 404 however that shows what an object looks like after an airplane goes through the field.
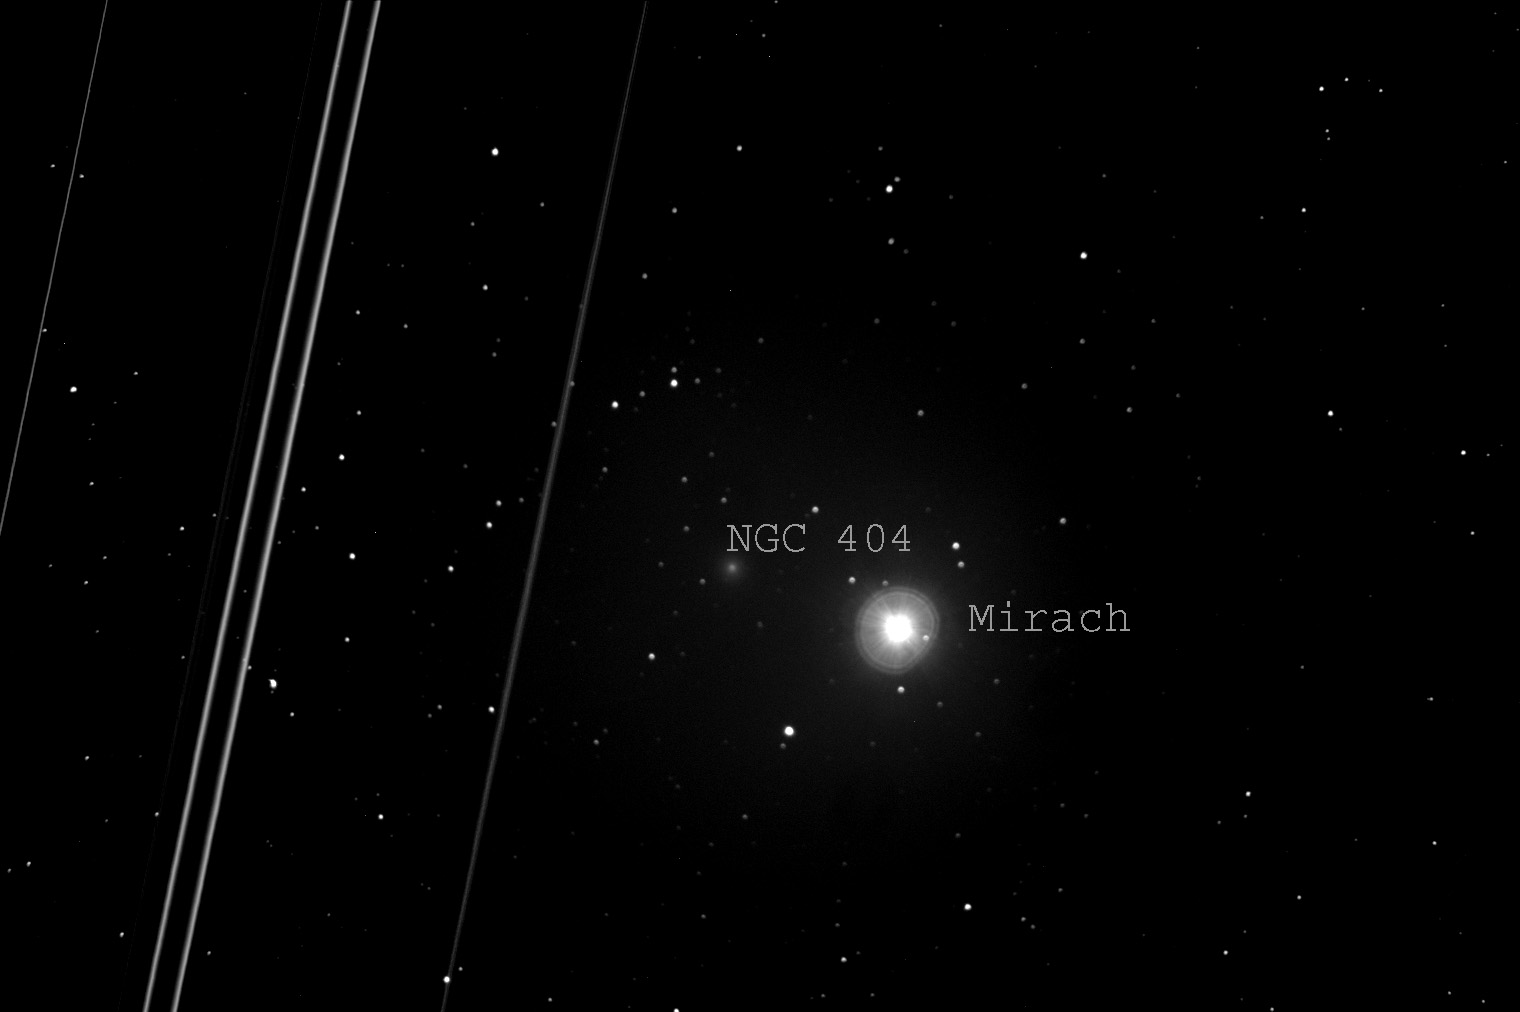 Galaxy NGC 404 Here is a 3 minute monochrome exposure of galaxy NGC 404. This galaxy is challenging to image as it sits very close to a 2.4 magnitude star (beta Andromeda). This is a single 180 second frame, no dark frame or flat frame, monochrome, at the full resolution of the camera. Labels were added to identify the objects of interest. The airplane trail is clearly seen in this image. Guiding was done using the Orion autoguider with the 4" refractor, however I used a 2.4x Barlow lens on the refractor to get a better image scale at the autoguider.
I got home about midnight after a week long trip to Seattle (7 days of nonstop rain and clouds out there while it was clear [and new Moon] back home)! Tonight was a really clear night so I decided to set up for imaging. I do not have a flip mirror on the 4" scope so the centering of the objects is a little off. It took 18 hours to get back from Seattle (due to a plane maintenance issue) and then I stayed up until 5am, so it was a LONG day. However, I wanted to take advantage of the clear skies as the Moon is starting to get fat again and the forecast for the week is less than great for astronomy.
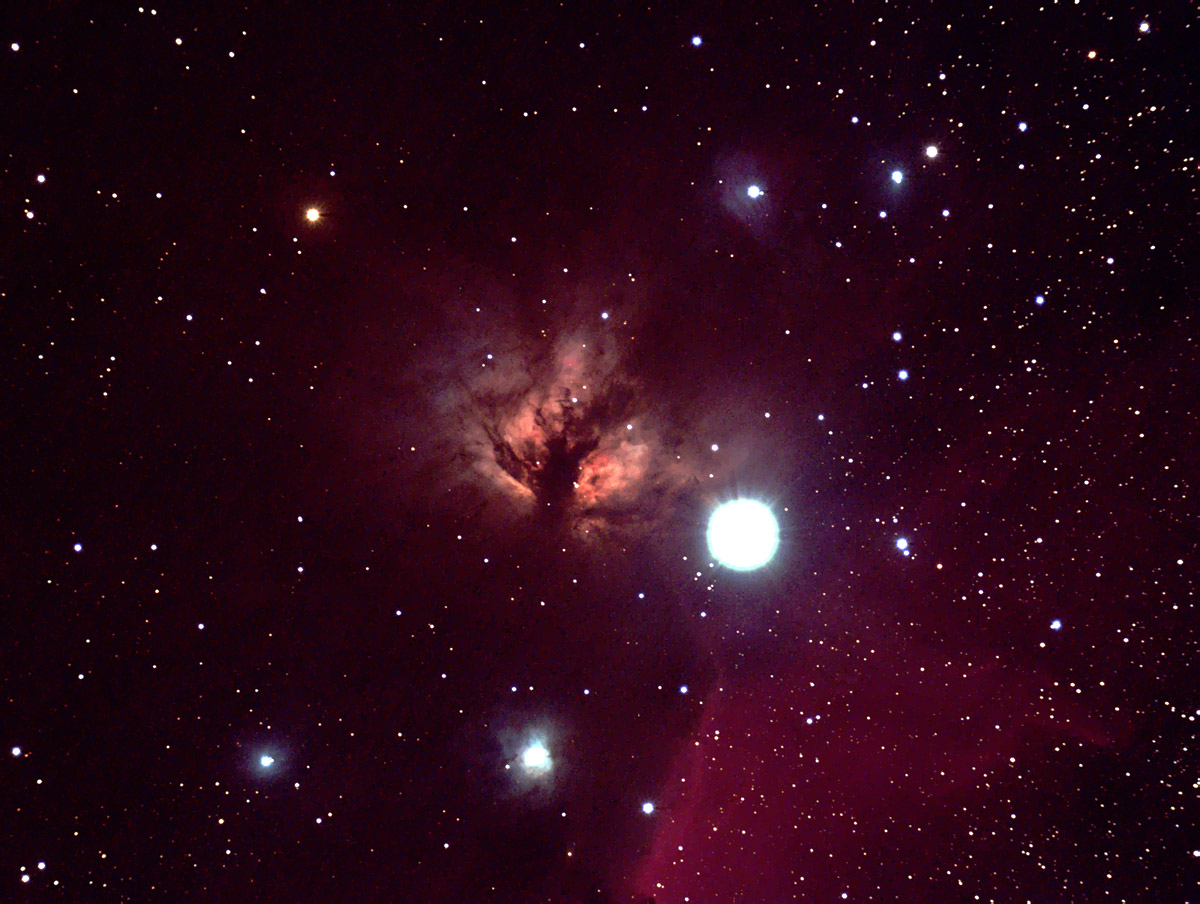
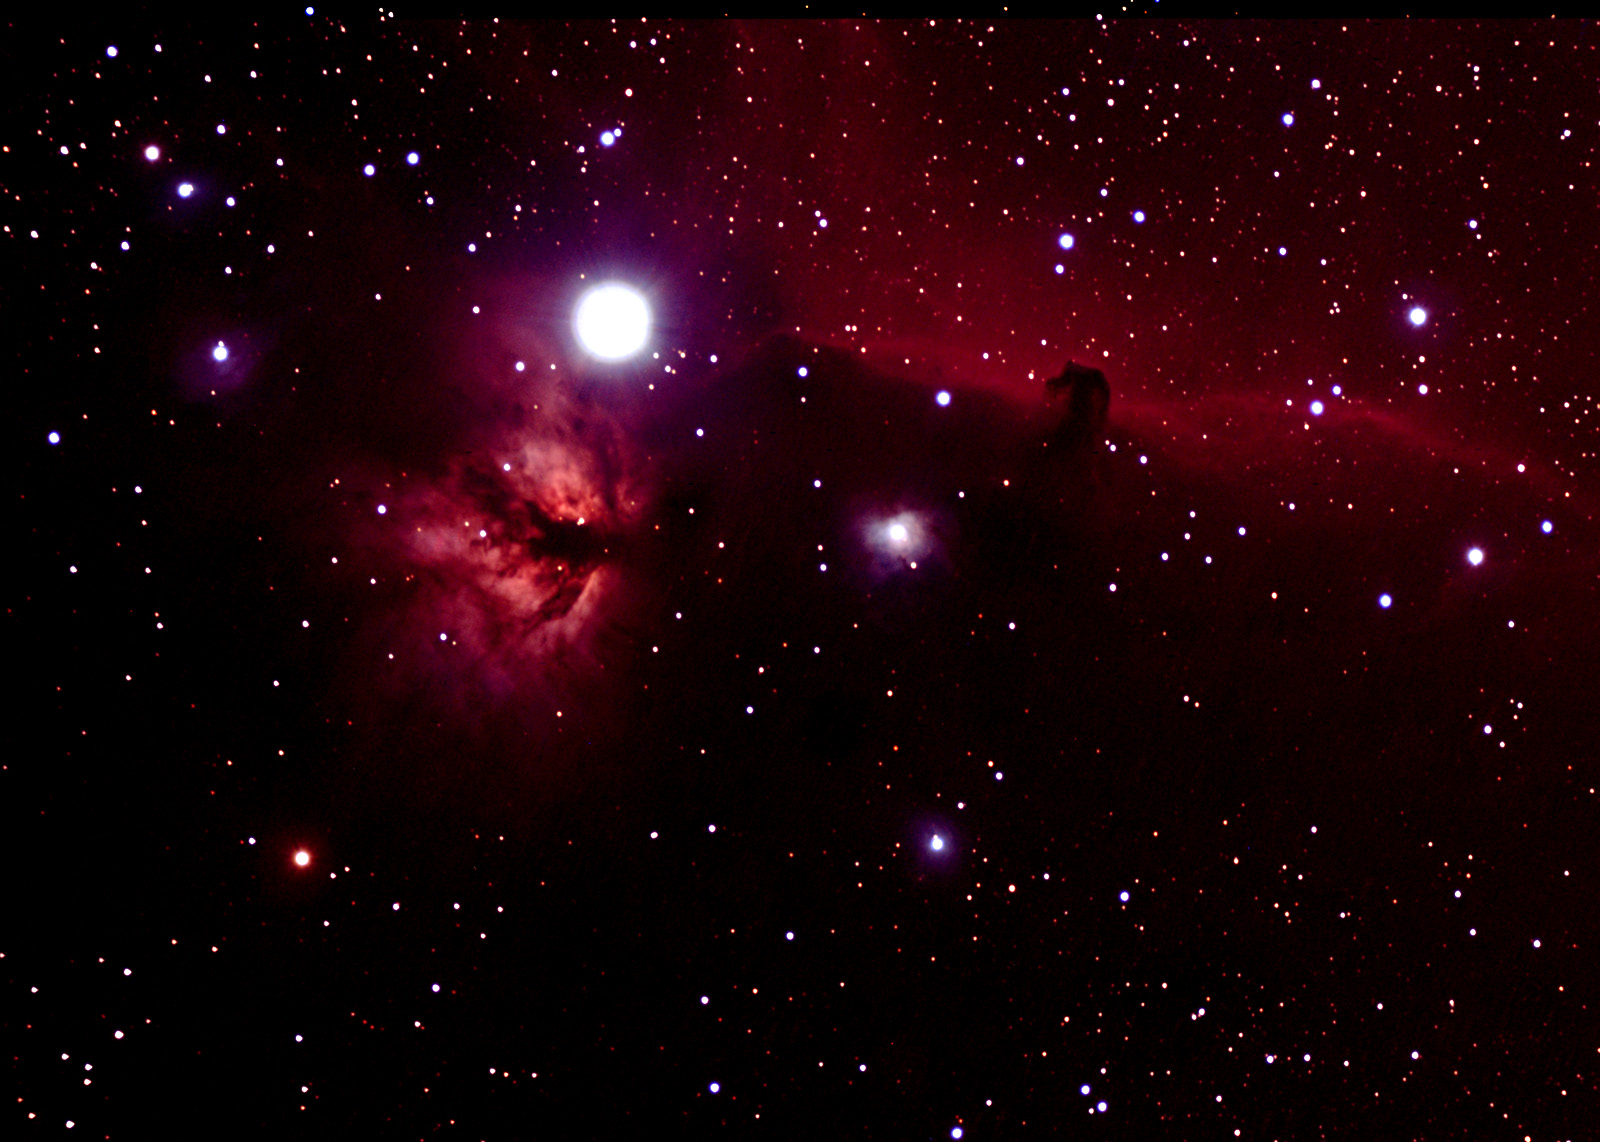 Flame and HorseHead Nebulae This is a 72 minute (18x240 seconds) exposure of the Flame-HorseHead area in Orion taken with a 4" refractor. The image has been downsized by a factor of about 1.5 (I did this because there were some focus inaccuracies that made the full resolution shot a bit soft). Guiding was done with the Orion autoguider on the C-11 at F6.3. After the focus issues here I went into the basement and cut out a Bahtinov mask for the 4" scope. It worked perfectly when aimed at Sirius!
 Rosette Nebula Here's an 80 minute (20x240 seconds) shot of the Rosette Nebula in Monoceros taken through the 4" refractor. This image has been cropped slightly and has been reduced from full scale by a factor of 2.
 Beehive Cluster, M44 This is a 40 minute (10x240 seconds) of M44, the Beehive Cluster in Cancer. This shot is cropped slightly but is at the full resolution of the camera. I kept the resolution full for this image for a reason... look carefully and you can spot about a half dozen background galaxies! These galaxies are about 15th magnitude... they are faint in this image but definitely visible with careful inspection. Not bad for a 4" telescope!
Tonight was a worknight so I could not stay out late (unfortunate as the night was very clear all night long). I did have time to get data on one object (M34). When I started looking at the raw data files I saw what I thought were abnormalities in some areas of the images. These turned out to be distant background galaxies! I processed the images 2 ways, one to show the cluster and one that emphasizes the background galaxies. I never knew there were so many galaxies in and around M34! I am pretty happy with these results, as I am recording galaxies that are magnitide 15+ using a 4 inch telescope. (January 2012 update: I am easily getting galaxies down to magnitude 17.5 now, and very likely getting past magnitude 18).
 Star Cluster M34 This is a 72 minute (18x240 seconds) exposure of the star cluster M34 taken with a 4" refractor. The image is at the full resolution of the imager however it is cropped somewhat. Guiding was done with the Orion autoguider on the C-11 at F6.3. This image is processed to approximate what the cluster looks like through a good sized telescope. UPDATED IMAGE: I reprocessed the raw data in January 2012 (with Maxim DL and also using the processing knowledge I have gained in 2 years), the result is here . The stars in the new image are significantly clearer in this reprocessed image.
 Star Cluster M34 and Background Galaxies This is the same 72 minute (18x240 seconds) exposure of the star cluster M34 as above, however it has been processed to show the background galaxies. The galaxies I located are circled in red on this image. At time of writing I have not identified any of the galaxies (the probably have UGC numbers). Note: ability to see the background galaxies in this image will be difficult if your monitor is not calibrated. Addendum: A visitor to this site writes "Of the top two galaxies circled, the one on the left is 17.1 magnitude UGC 2146! Also, counting from the left, galaxy number three is 16.5 magnitude PGC 10427. "
Tonight I did not get started until around 9:30pm, however I imaged until around 5am the next morning (have to take the few clear nights when we get them). It was a very good night for imaging despite a forecast for increasing clouds. Temps were chilly, by 5am it was around 15 degrees. I managed to get images of 3 subjects tonight... results were "satisfactory" but leave room for substantial improvement.
 Galaxy M74 This is a 108 minute (27x240 seconds) exposure of galaxy M74 through a 4" telescope (Vixen 102ED). The image is at the full resolution of the camera but is highly cropped. Guiding was done using the Orion autoguider on the C-11. This is a tough object to image, it has low surface brightness and presents processing challenges (trying to bring out detail in the arms without showing noise in the background sky). Raw data reprocessed January 2012, this is the new image.
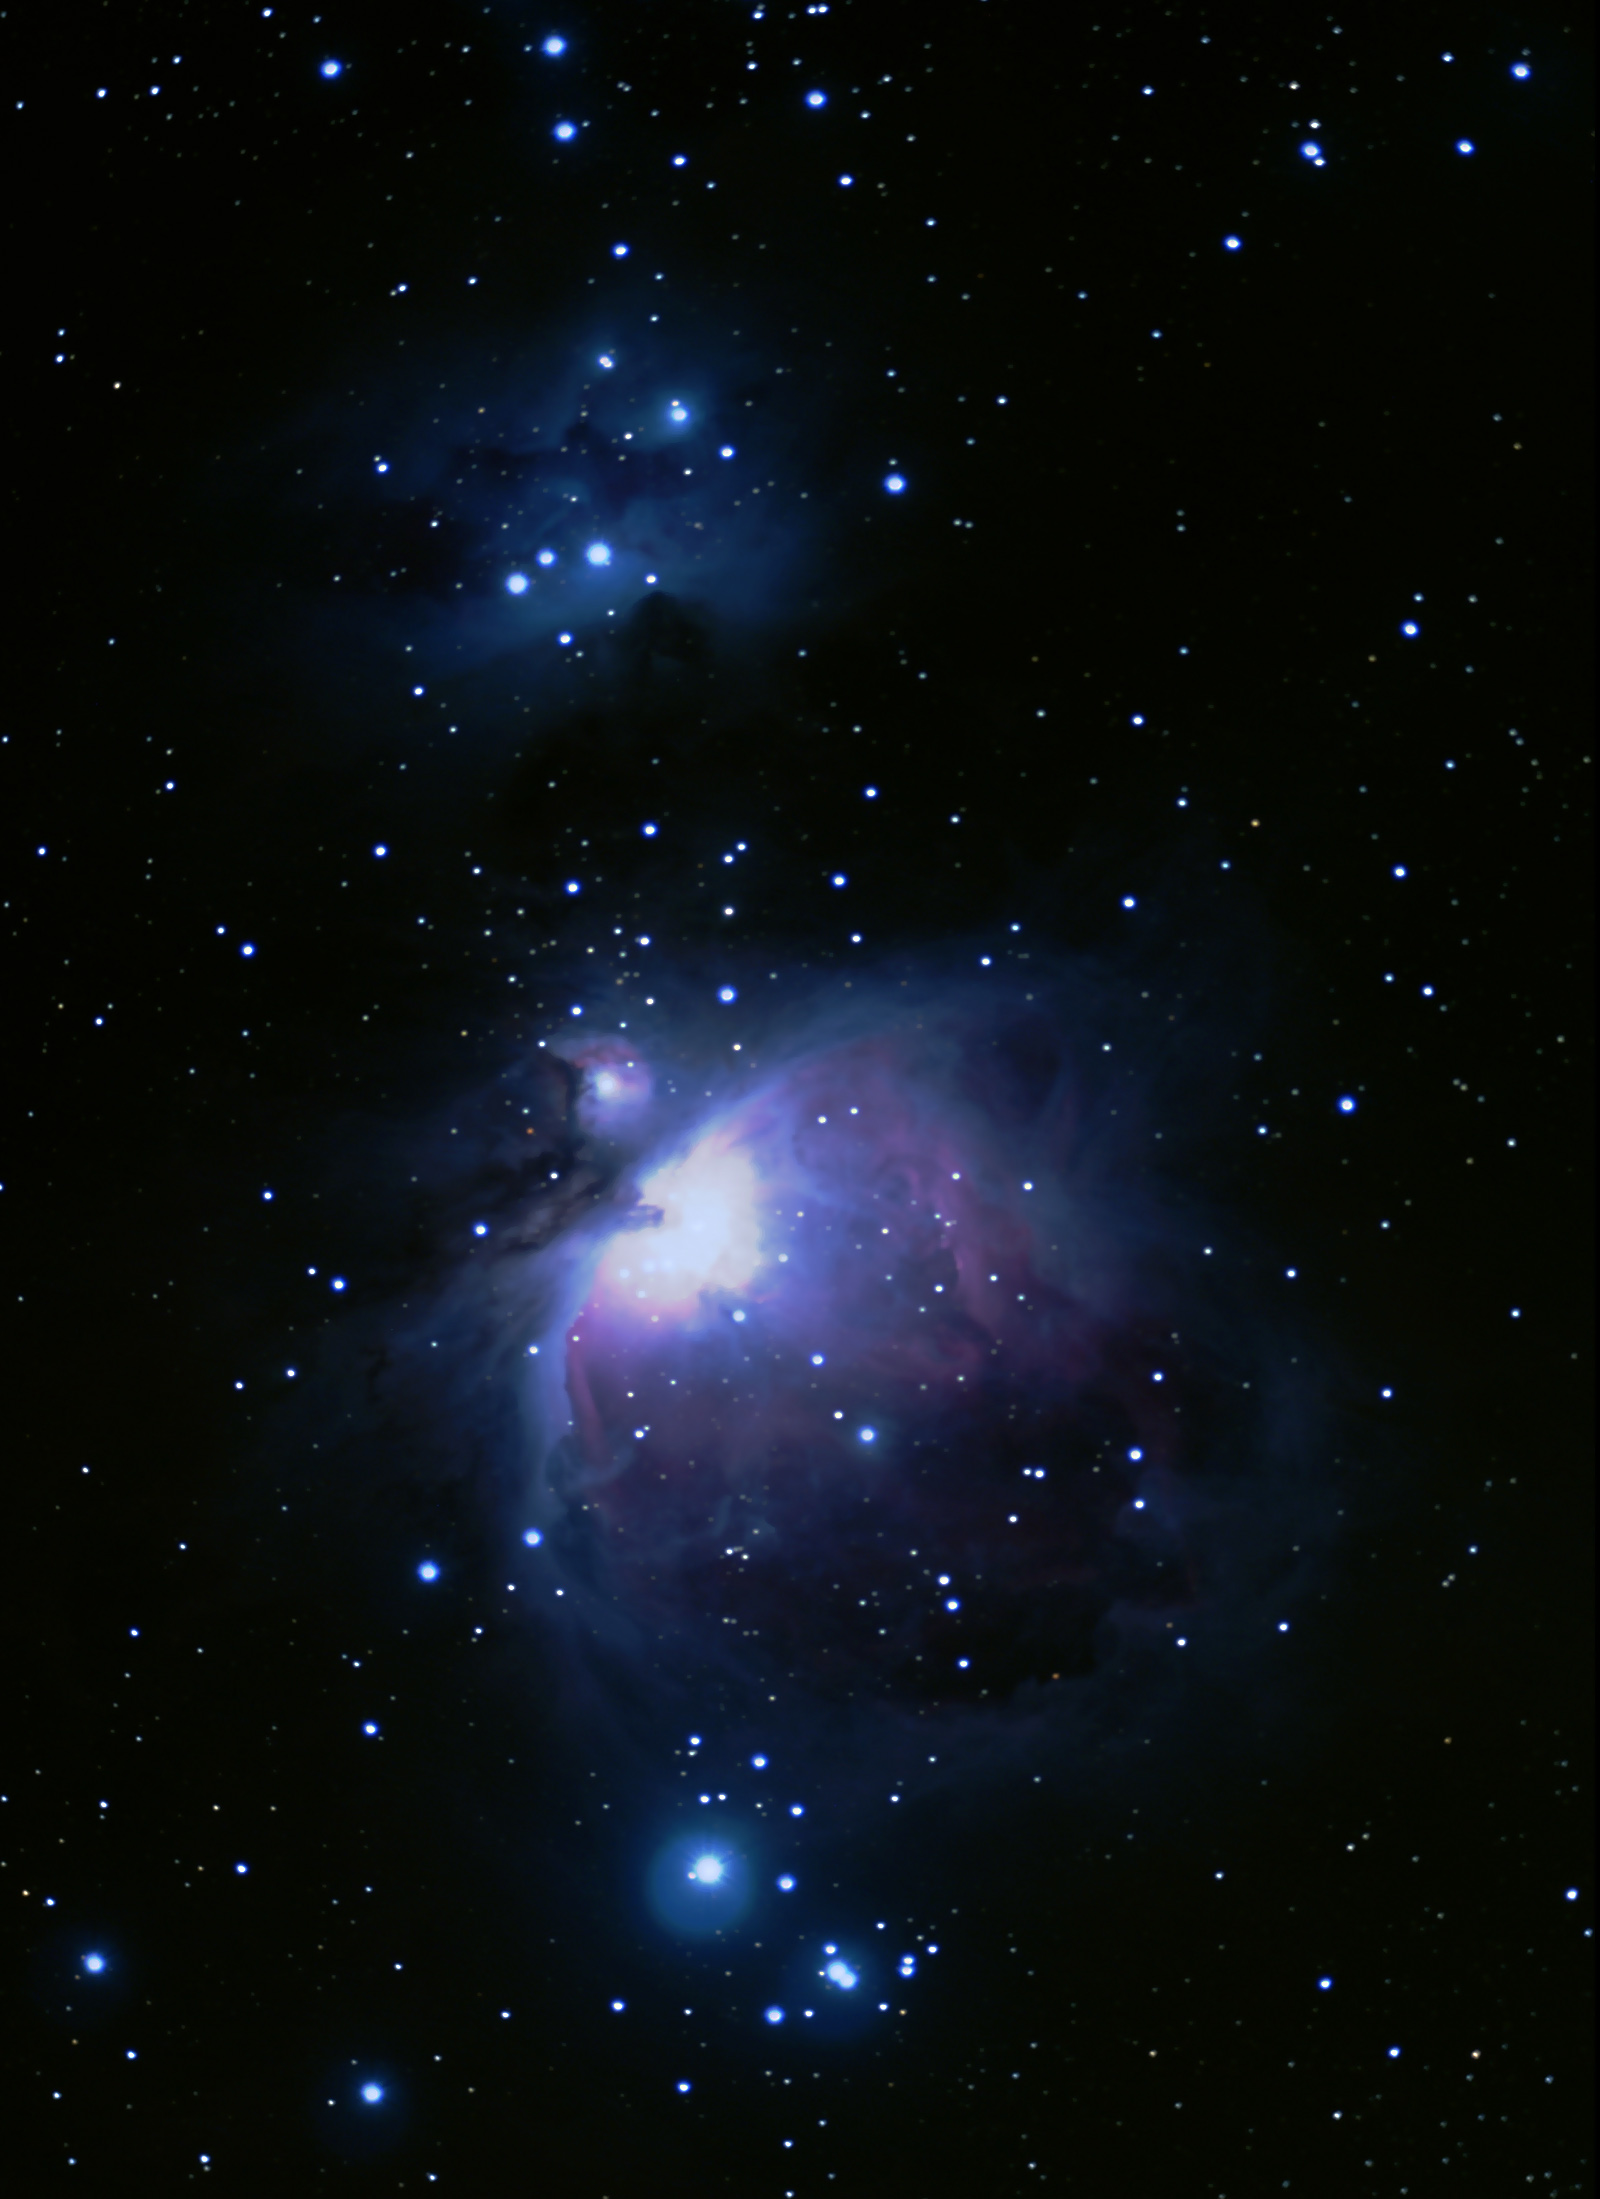 Orion Nebula This is a 96 minute (24x240 seconds) exposure of the Orion Nebula through a 4" telescope (Vixen 102ED). The image has been cropped slightly and reduced in scale somewhat (for reasons unknown the guiding on the raw data shots was not perfect). Also, I had hoped to get 3 hours of data on this object, but Windows went and freakin' rebooted the machine (due to a WIndows update) during the exposures. I want to bed for 3 hours only to wake up and see that I got only about 1/2 the data I had hoped for! Typical, Windows can be a royal pain with these rebooting events. Guiding was done using the Orion autoguider on the C-11. This image of Orion is not as good as the one I got on 17 September.
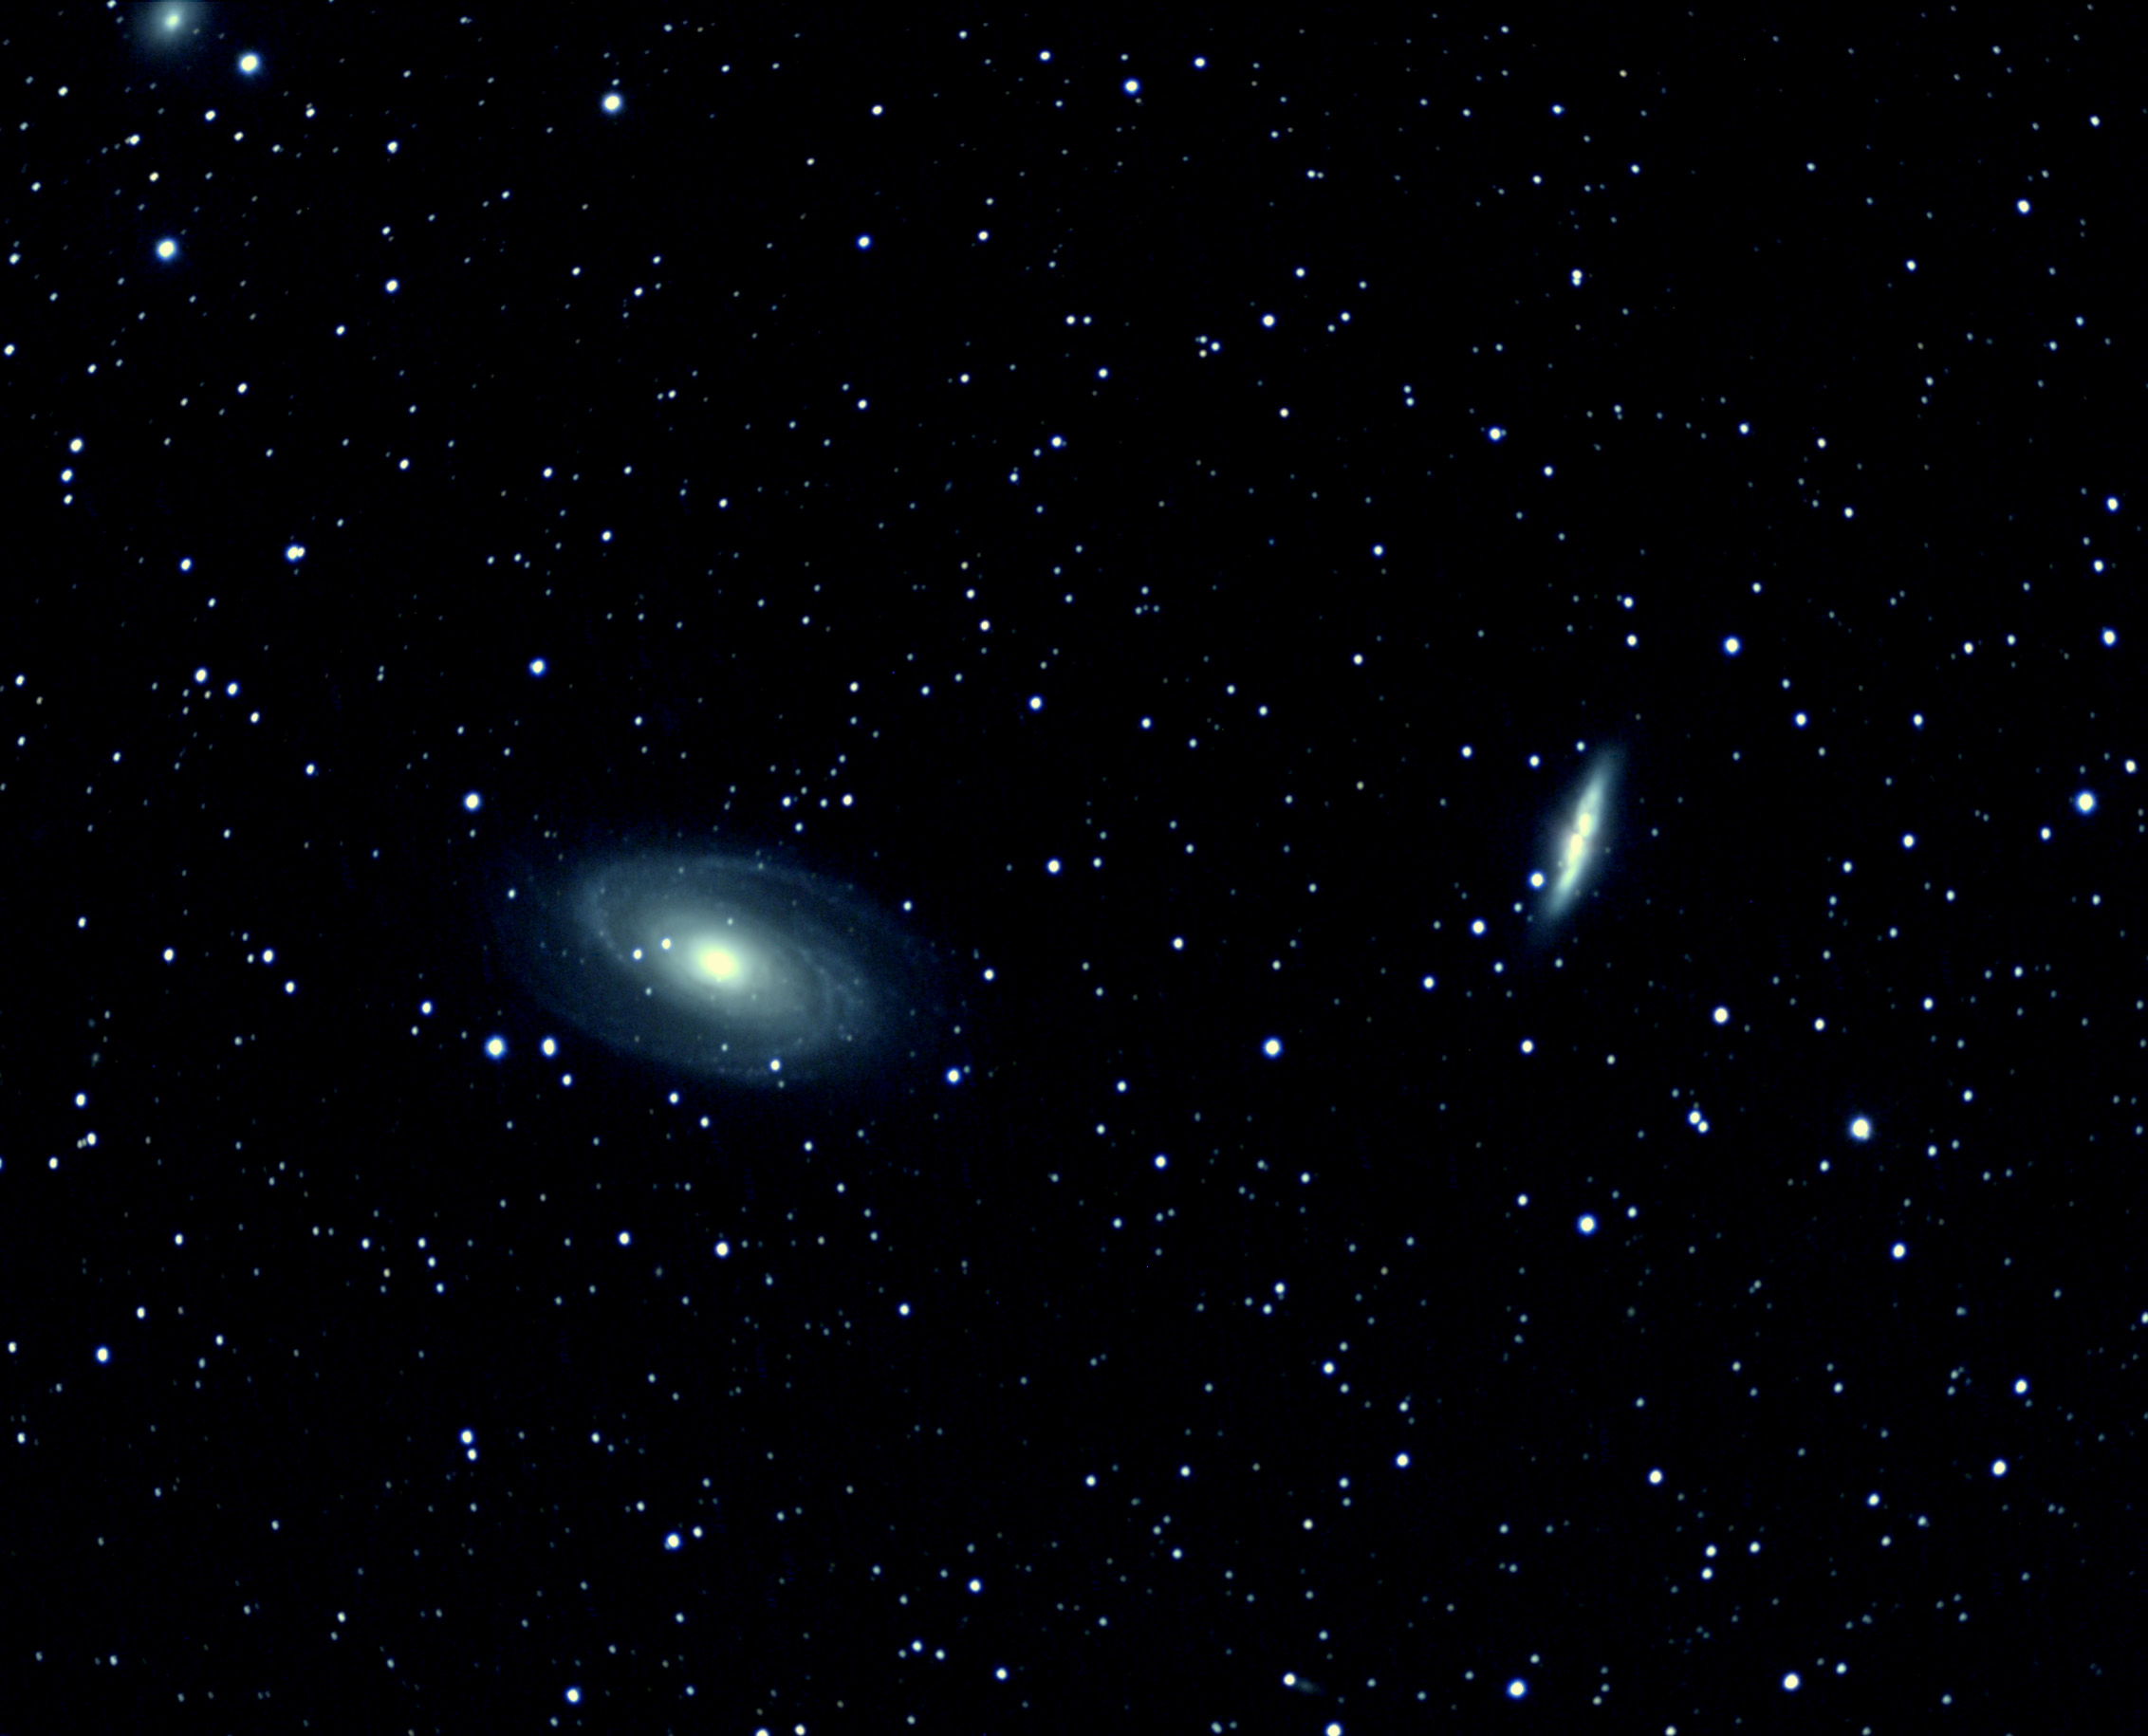 Galaxies M81 and M82 This is a 116 minute (29x240 seconds) exposure of galaxy pair M81 and M82 through a 4" telescope (Vixen 102ED). The image is at the full resolution of the camera but is slighty cropped. Guiding was done using the Orion autoguider on the C-11. The focus was a bit off on this shot and the guiding was a little short of ideal. I am satisfied with this first attempt at this pair however I am looking forward to doing a lot better!
Tonight turned out to be a night with really good conditions, however it was a work night so I could only image until around 9pm. I worked one subject, NGC 891.
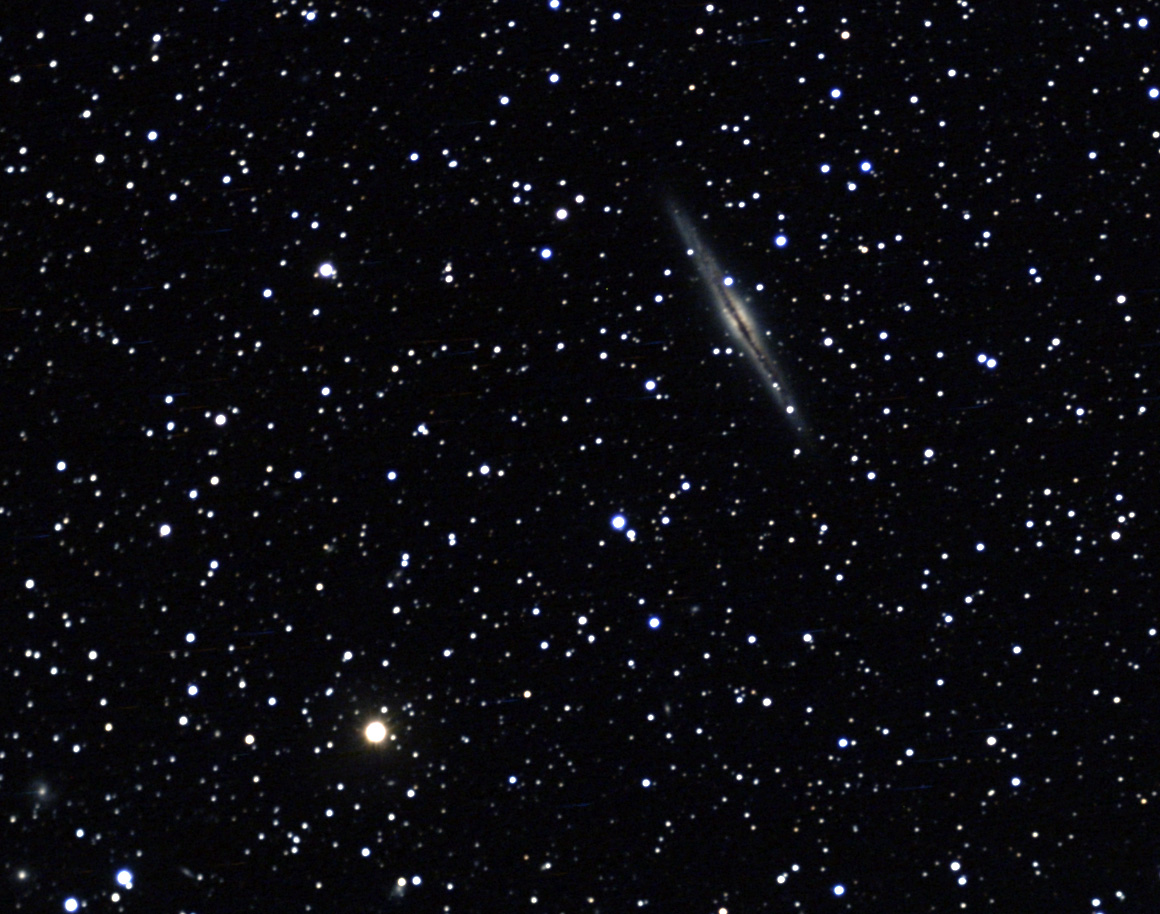 Galaxy NGC 891 This is a 112 minute (28x240 seconds) exposure of the pretty edge-on galaxy NGC 891 in Andromeda. This galaxy is visible in my 11" scope, not real bright but certainly visible. Visually I can see the dust lanes, however the image here (through a 4" scope) shows the galaxy with FAR more detail. This image is at the full resolution of the camera but highly cropped. I have another version of this image: wide field view of NGC 891. This is the same image but cropped much wider. Look to the lower left of the image and you'll be able to see a plethora of fainter background galaxies. Stars towards the edge of the field are not ideal in shape (I have ordered a field flatenner). Guiding was done through the C-11 using the Orion autoguider. UPDATED IMAGE: I reprocessed the raw data in January 2012 (with Maxim DL and also using the processing knowledge I have gained in 2 years), the result is here . The stars in the new image are significantly clearer in this reprocessed image.
I was not too sure about imaging tonight, a large snowstorm was forecast for the next day and I expected the sky to start clouding over. I was able to image until around 9pm or so (at which time haze was becoming too thick). I managed to get some good data on 2 objects. Both were taken with the Vixen 102ED refractor (4 inches).
 NGC 1275 and the Perseus Galaxy Cluster This is a 96 minute exposure of the area around galaxy NGC 1275. The small image at left does not look like much, however there are over 100 galaxies visible in this image! Here is another version of the same shot NGC 1275 with galaxies circled. The latter shot has the galaxies circled in red (many of them are faint) to help show where they are. I've seen about 15 of these (ones near NGC 1275) visually in a Celestron 14 at Arunah Hill. The faintest galaxies in this shot are magnitude 17+! I am very pleased to be reaching this deep using only a 4 inch telescope!!! Also, conditions tonight were "OK" but not ideal. In really good conditions I am sure I could have pulled even more galaxies. Guiding was done through the C-11 using the Orion autoguider.
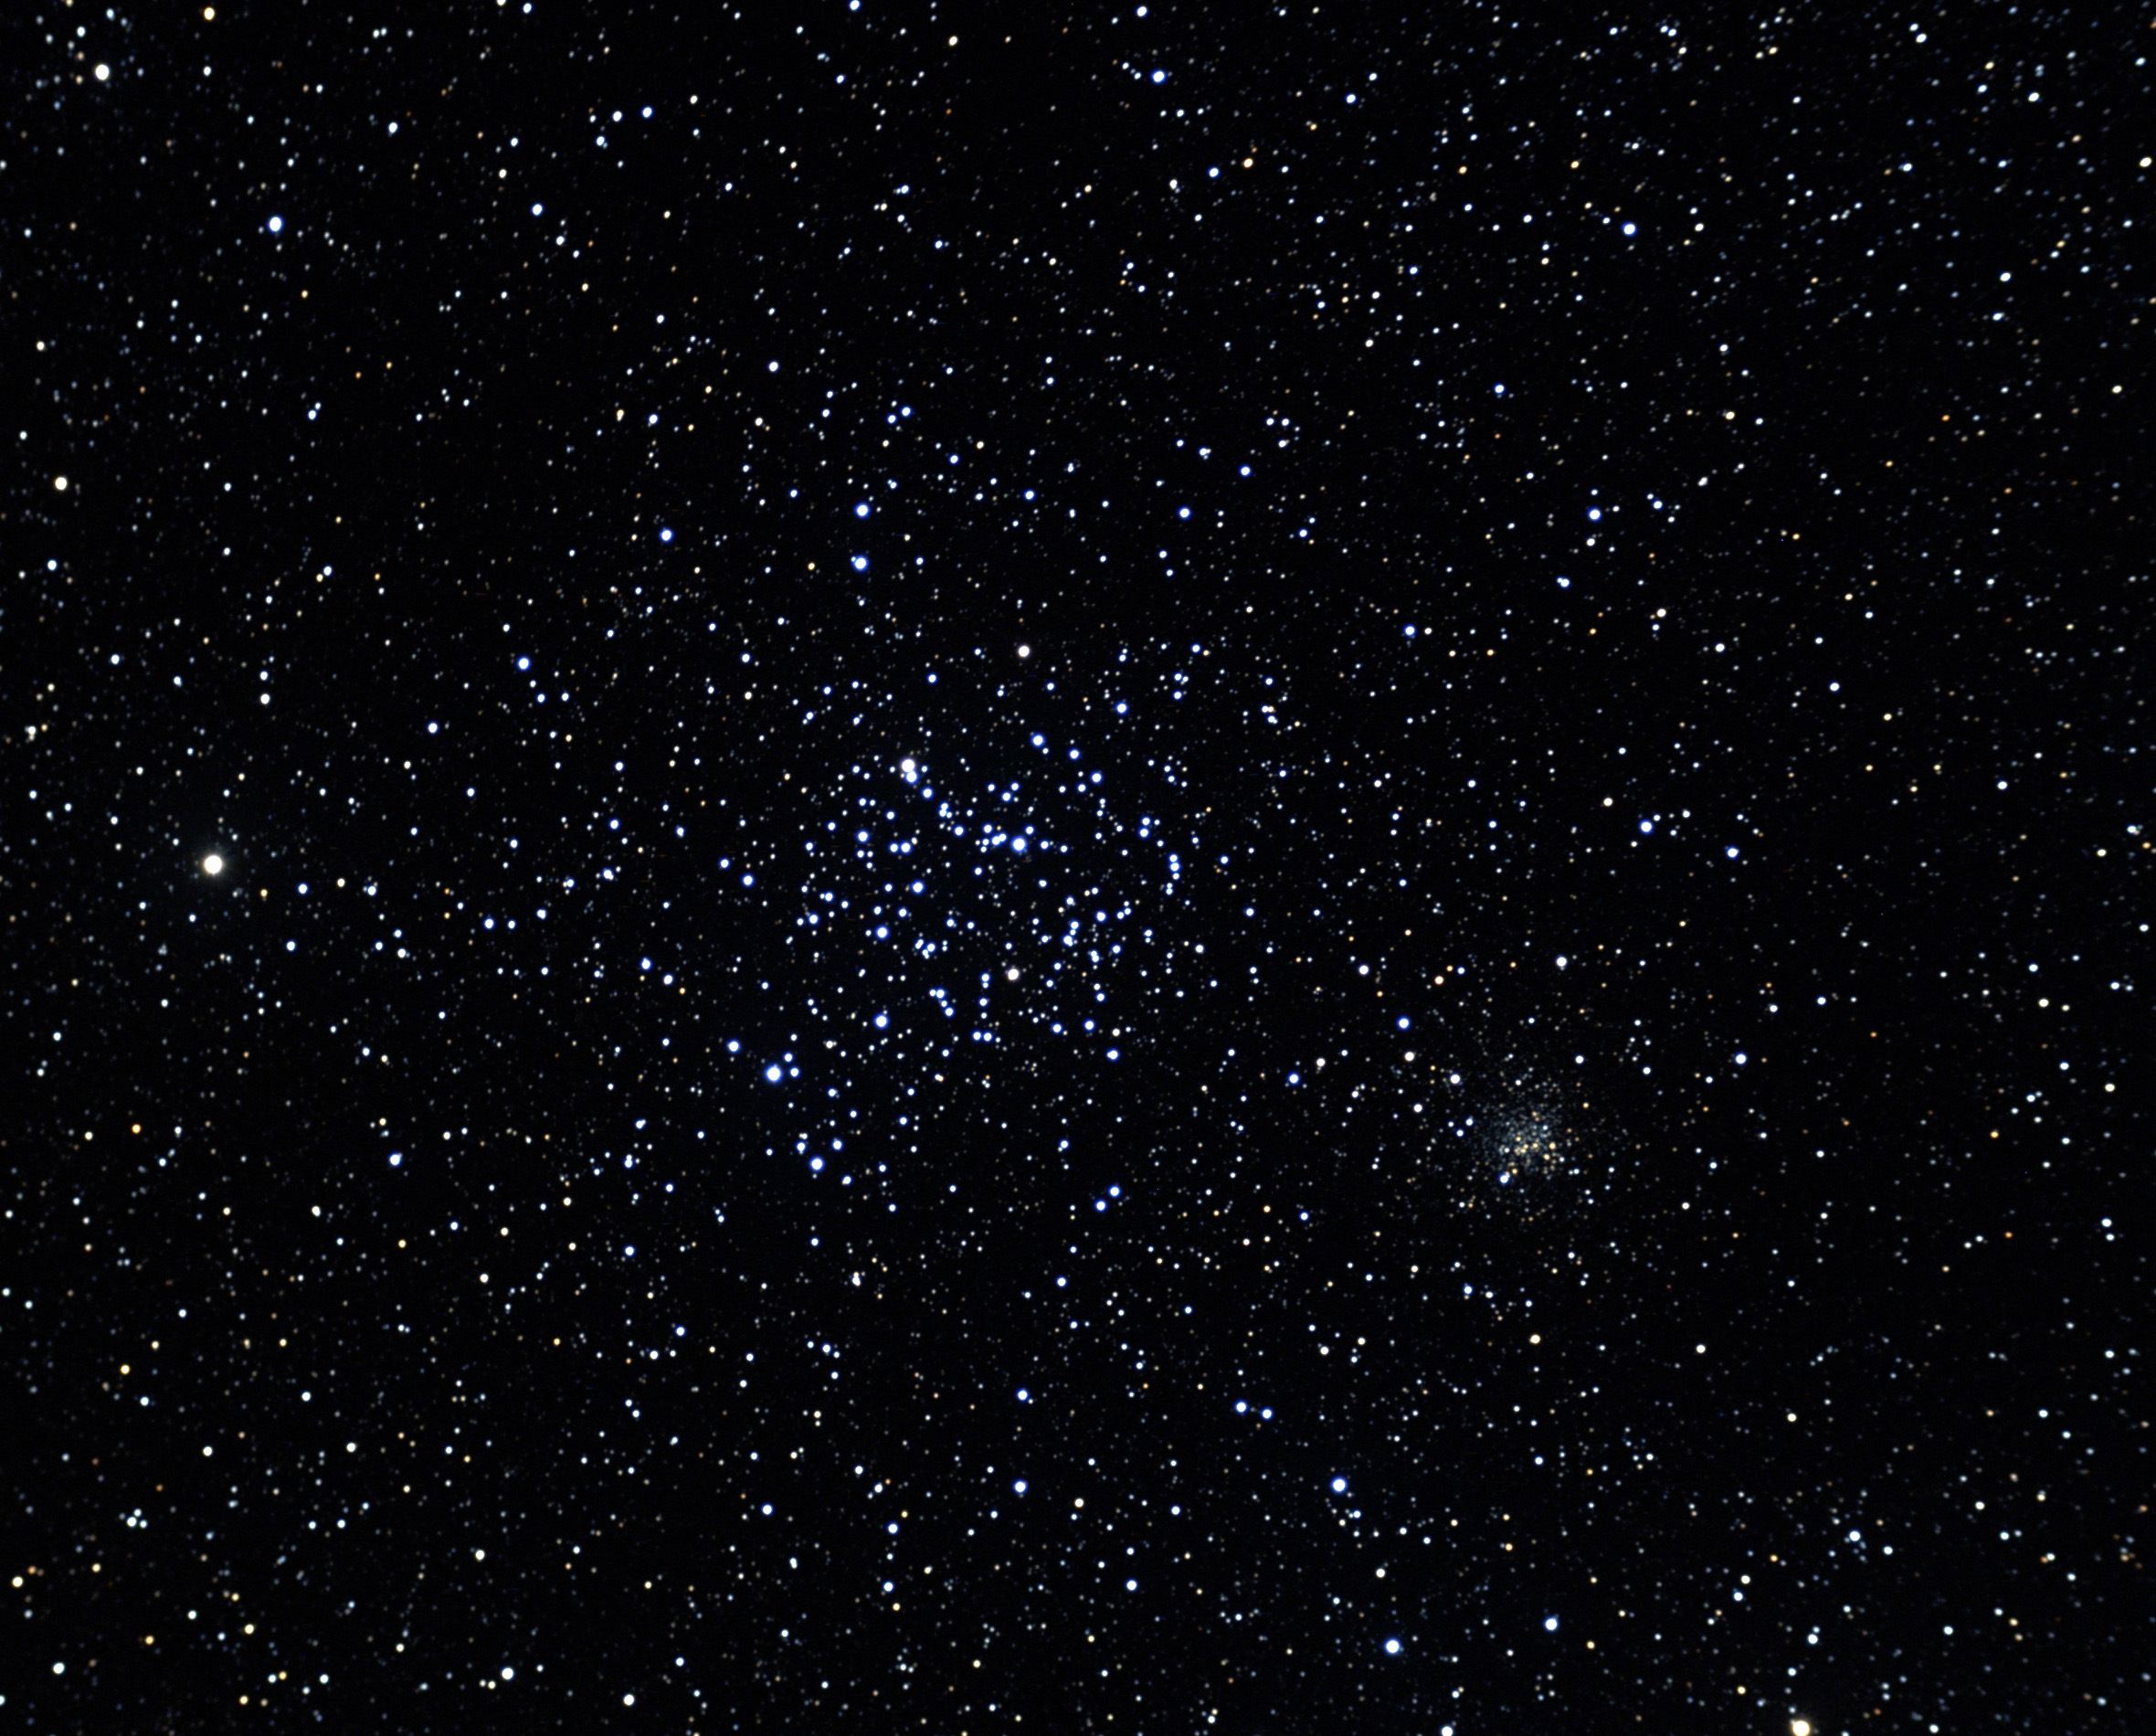 M35 and NGC 2158 This is a 36 minute shot (cut short due to worsening haze) of clusters M35 and NGC 2158 (the latter is the dense cluster to the lower right of M35). This image is at the full resolution of the camera but cropped somewhat. Guiding was done through the C-11 using the Orion autoguider. UPDATED IMAGE: I reprocessed the raw data in January 2012 (with Maxim DL and also using the processing knowledge I have gained in 2 years), the result is here . The stars in the new image are significantly clearer in this reprocessed image.
Tonight's imaging session required some extra steps. We got ~ 20" of snow on 19-20 December, so I first had to clear a path to the observatory and then use a snow rake to get the snow off the observatory roof. It was pretty cold tonight too, down to around 11 degrees by early morning. I used the Vixen 102ED scope (4") for all images. I received an Astro-Tech field flatenner today, however the threads were not compatible with the Orion camera (or any of my other T-thread items) so I was not able to try it out. I have sent for a replacement.
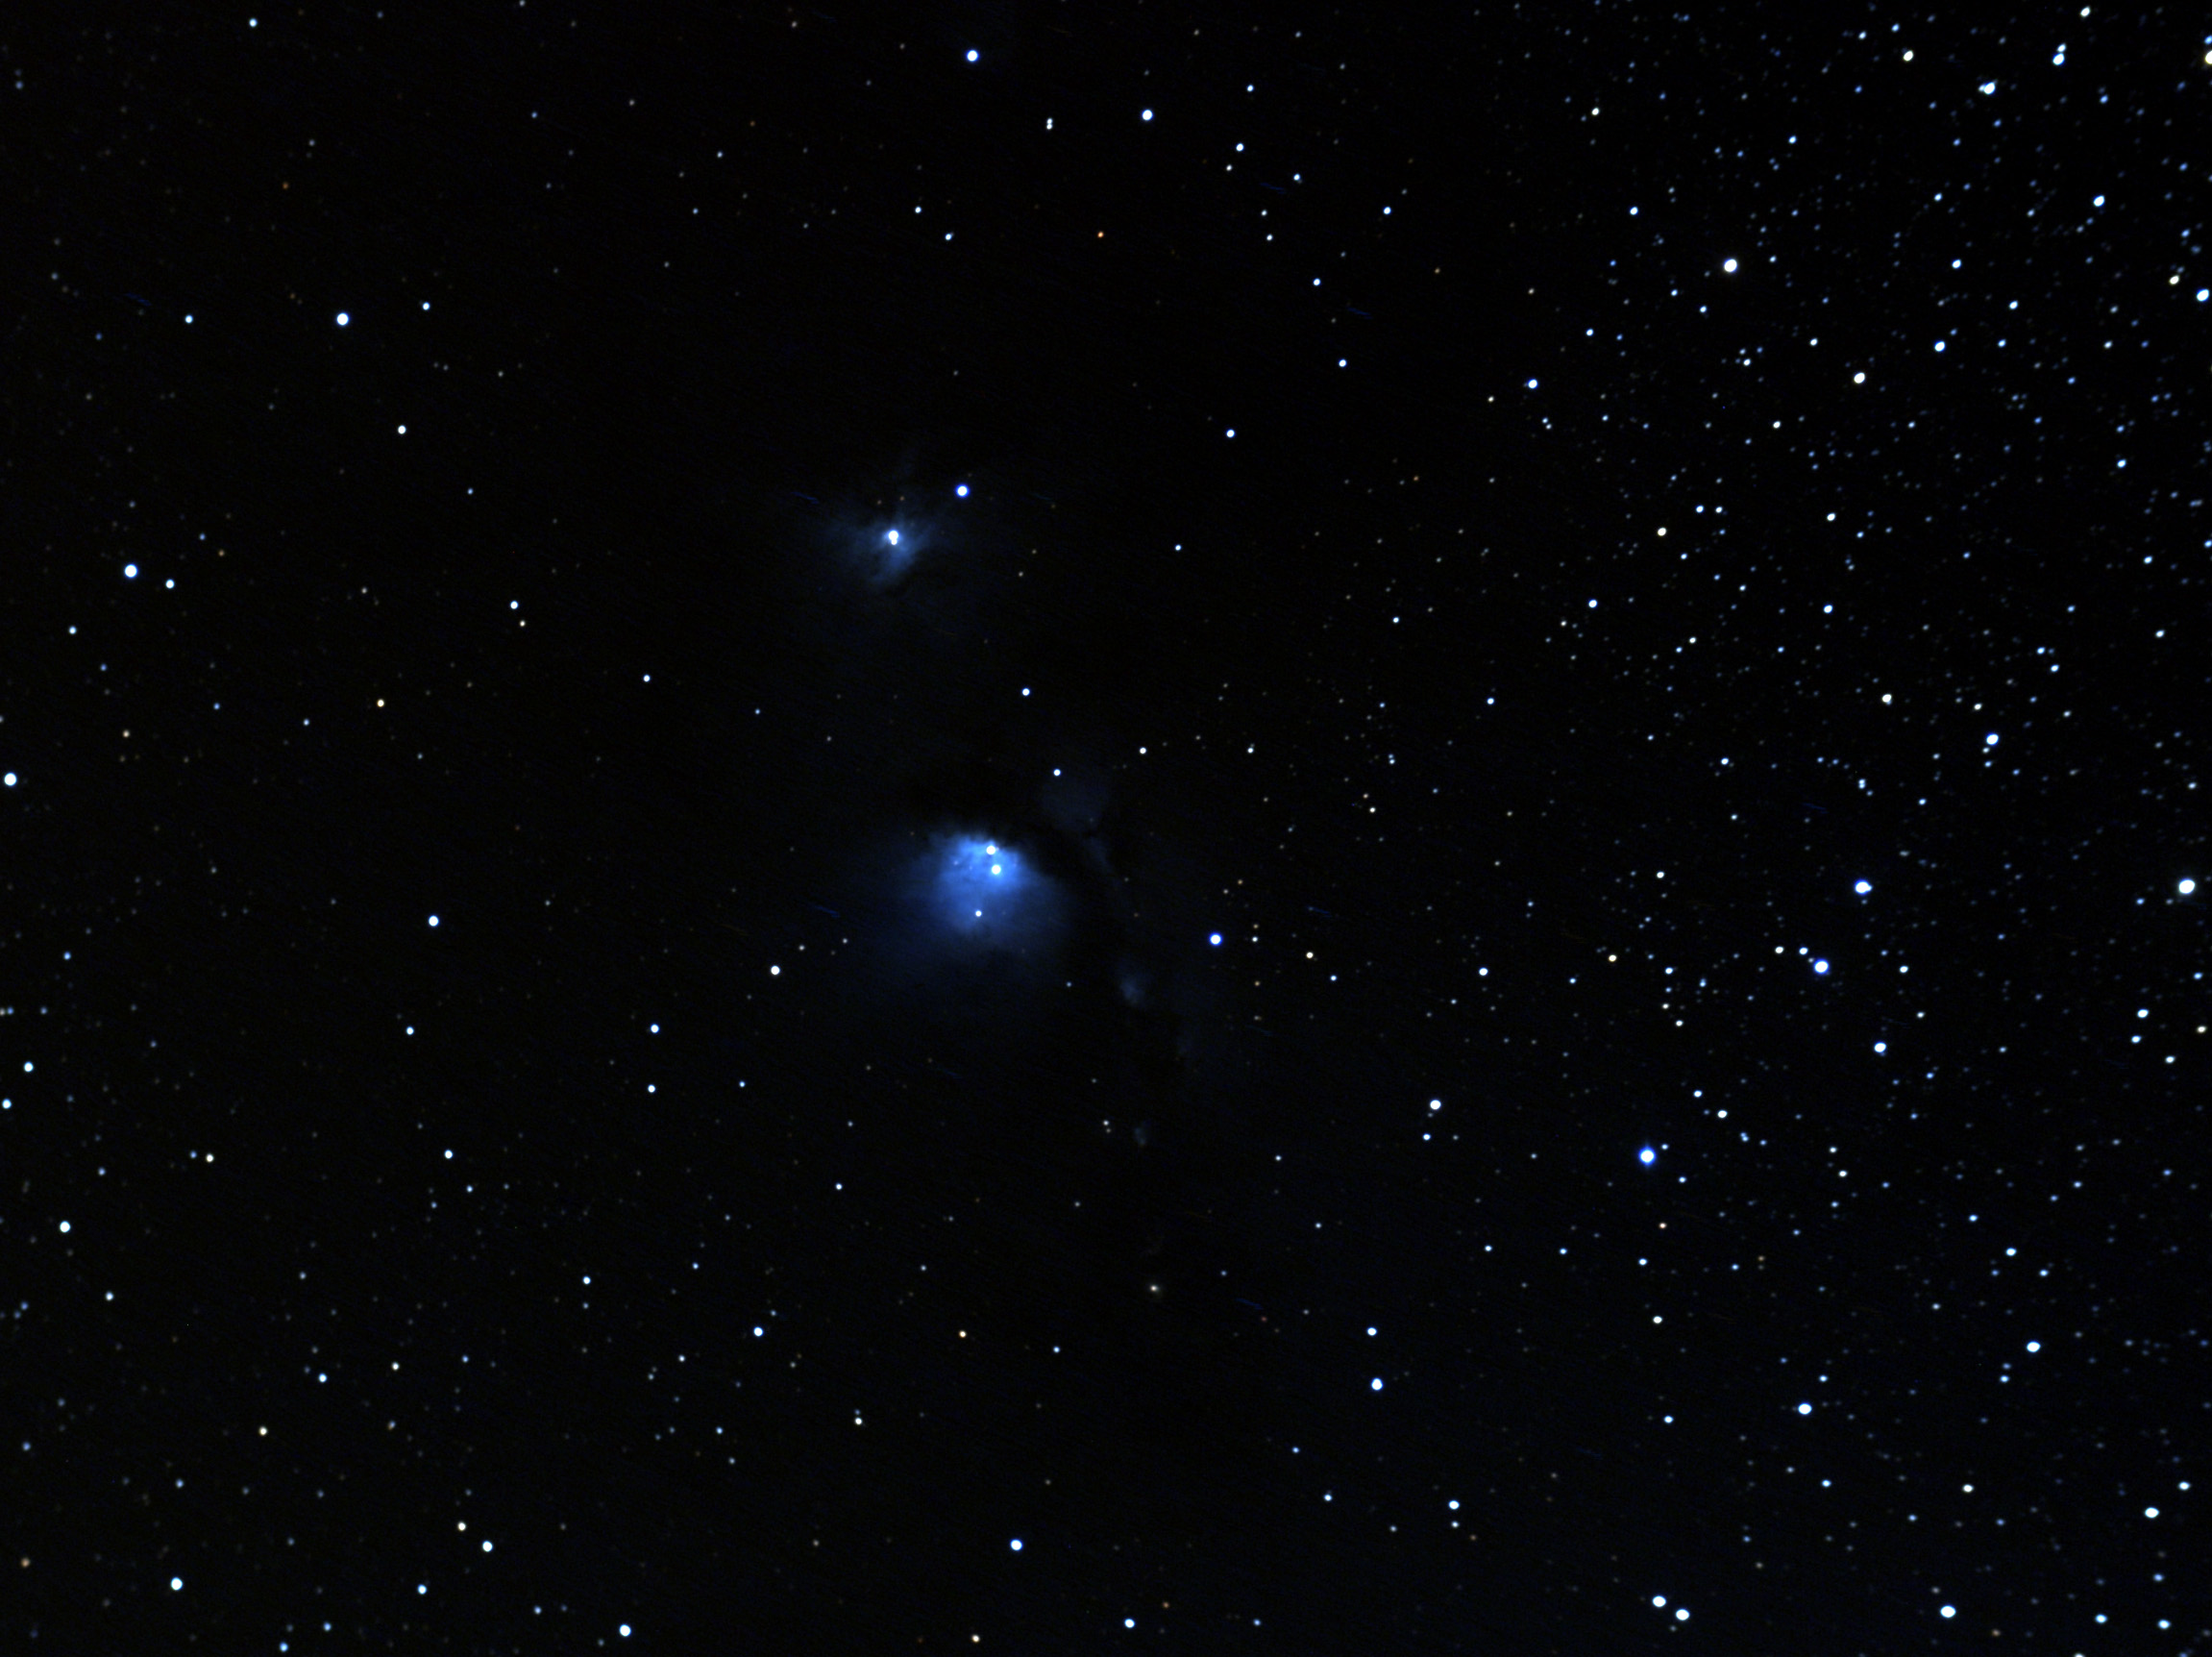 M78 This is a 88 minute exposure of reflection nebula M78 in Orion. This shot is at the full resolution of the camera however it is somewhat cropped. Note that there are a good number of stars in the right hand portion of the image as compared to the left hand portion. This is most likely due to obscuring dust and gas blocking stars that would otherwise be visible. Guiding was done through the C-11 using the Orion autoguider.
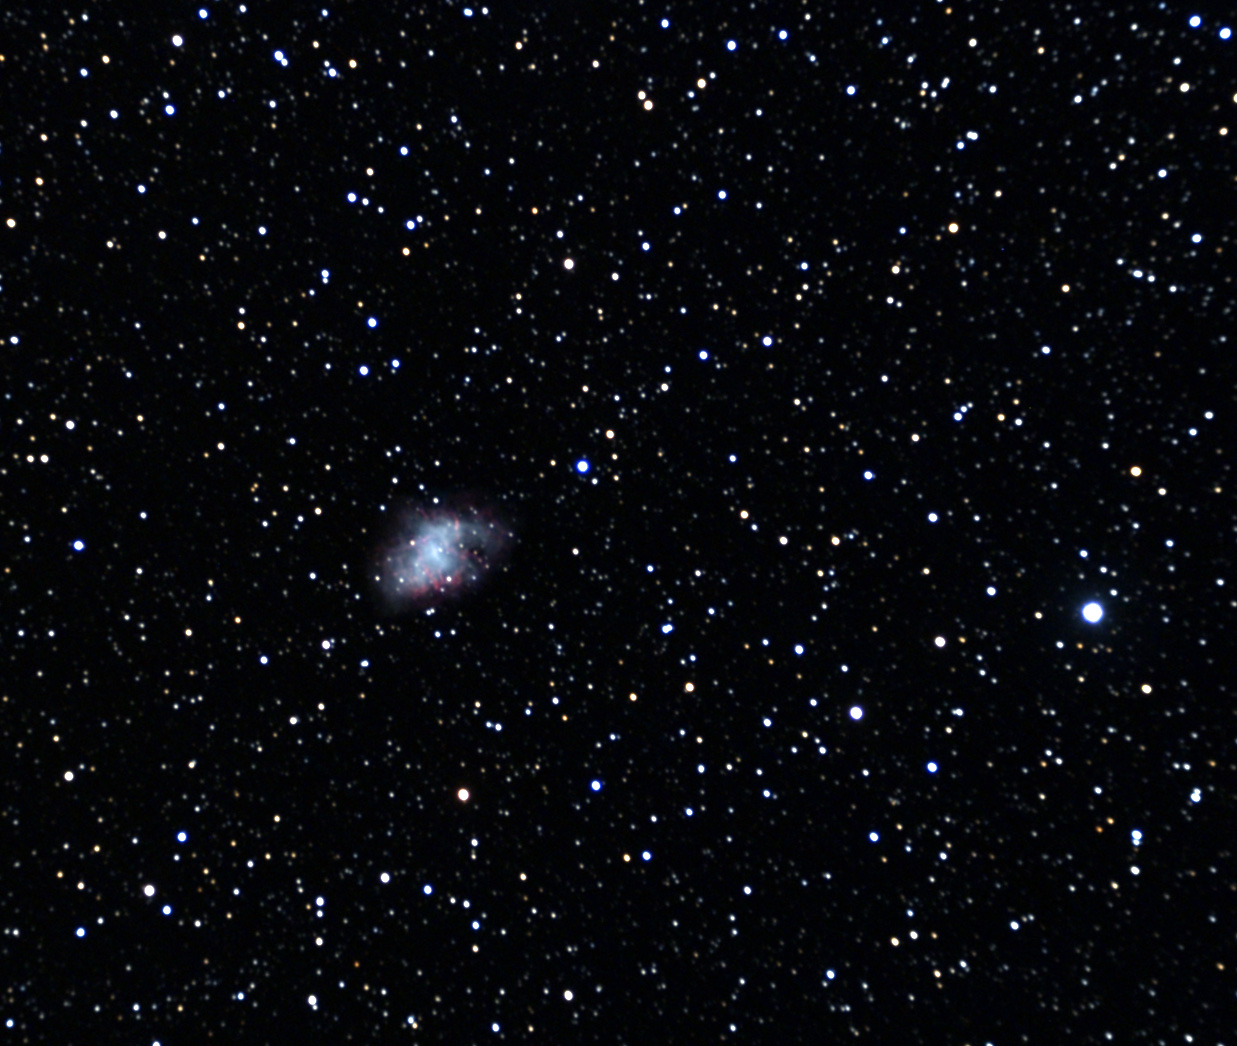 The Crab Nebula This is a 156 minute exposure of M1, the Crab Nebula. This image is at the full resolution of the camera but it is cropped significantly. The Crab really needs a bit more focal lemgth (it is a small object to be imaging at a focal length of 665mm). Guiding was done through the C-11 using the Orion autoguider.
 M65, M66 and NGC 3628 in Leo This is a 180 minute (3 hour) exposure of the galaxy trio of M65, M66 and NGC 3628. M66 is to the lower left, M65 is to the lower right and NGC 3628 is at the top. Careful inspection will reveal several other faint background galaxies. This shot is at the full resolution of the camera but it is cropped somewhat. Guiding was done through the C-11 using the Orion autoguider. Raw data reprocessed 02 January 2012, this is the new image.
Due to a having a very bad year (family tragedy, a flood that caused damage to the observatory, skin cancer and a hernia) it has been a long time since I was able to do any imaging. Tonight's session was the the second one for 2010. I purchased a copy of Maxim DL5 Pro, tonight was the first time using it. It will take quite some time to learn all of it.
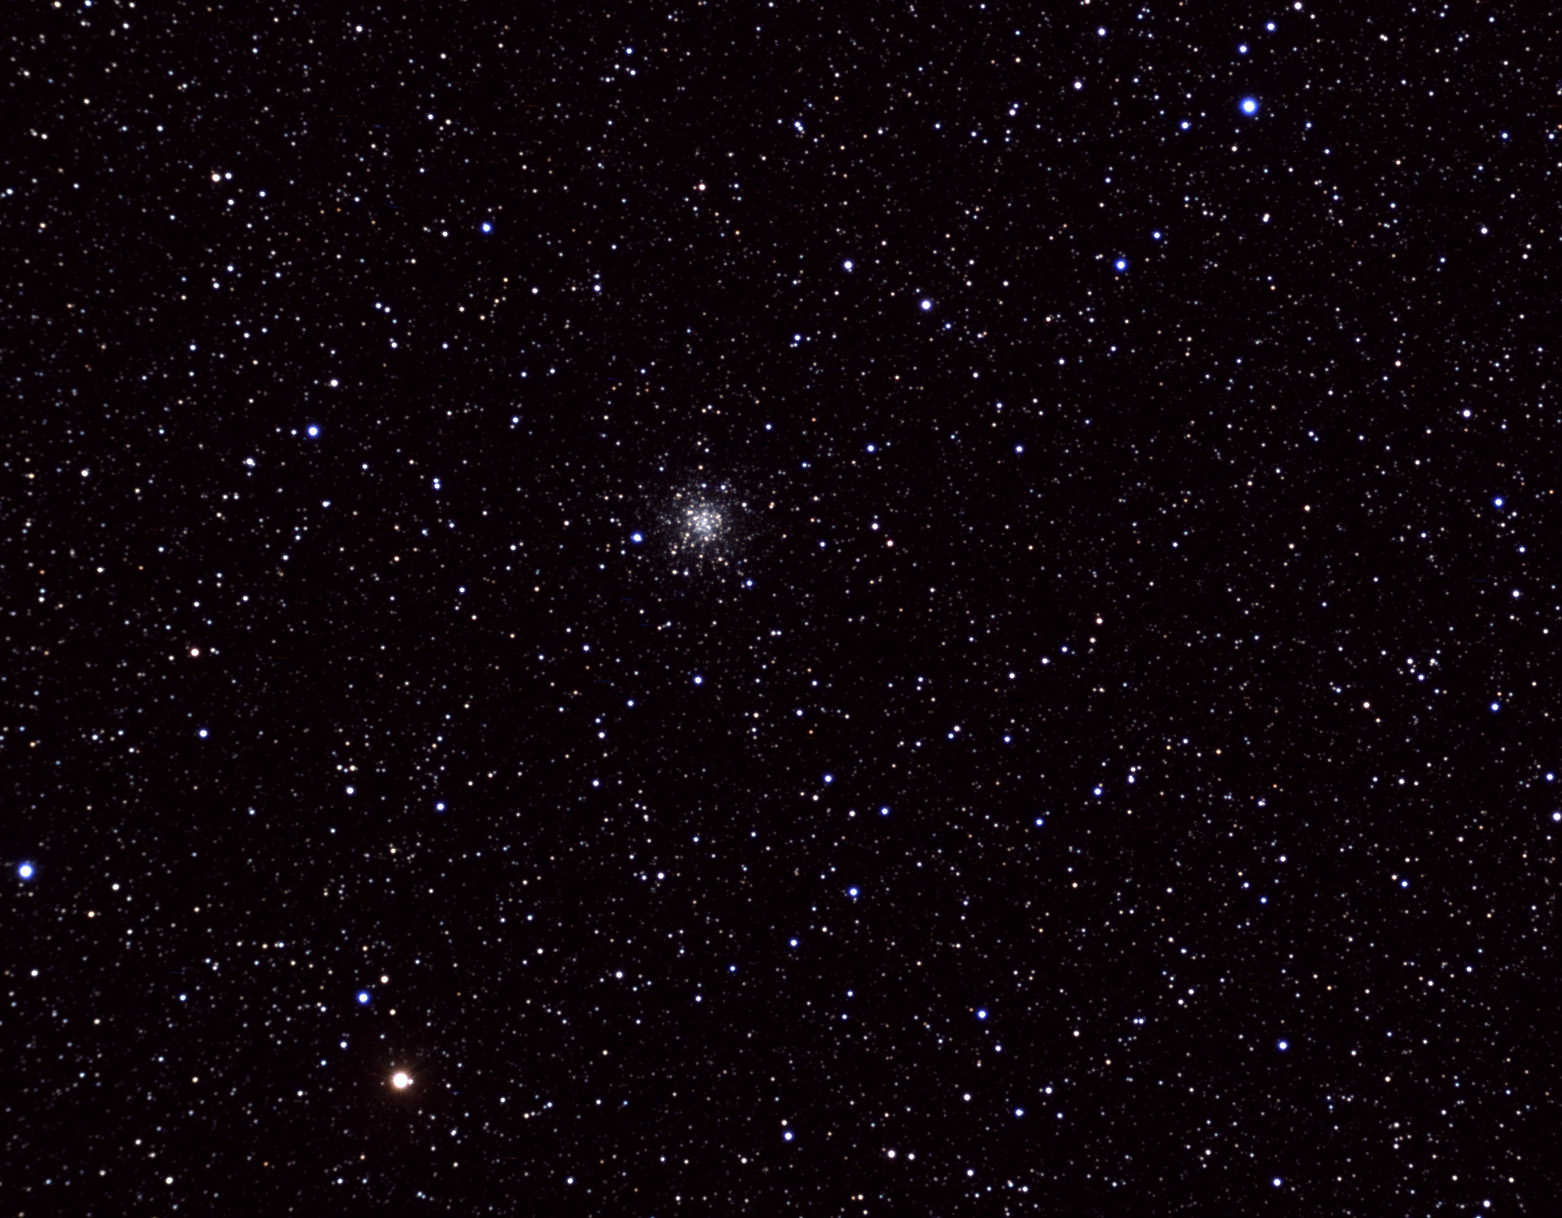 M56 Here is a 40 minute (10x240) esposure of M56 in Lyra through a 4" refractor. The image is at the full scale of the imager but it is cropped. Guiding was done through the C-11 using the Orion autoguider.
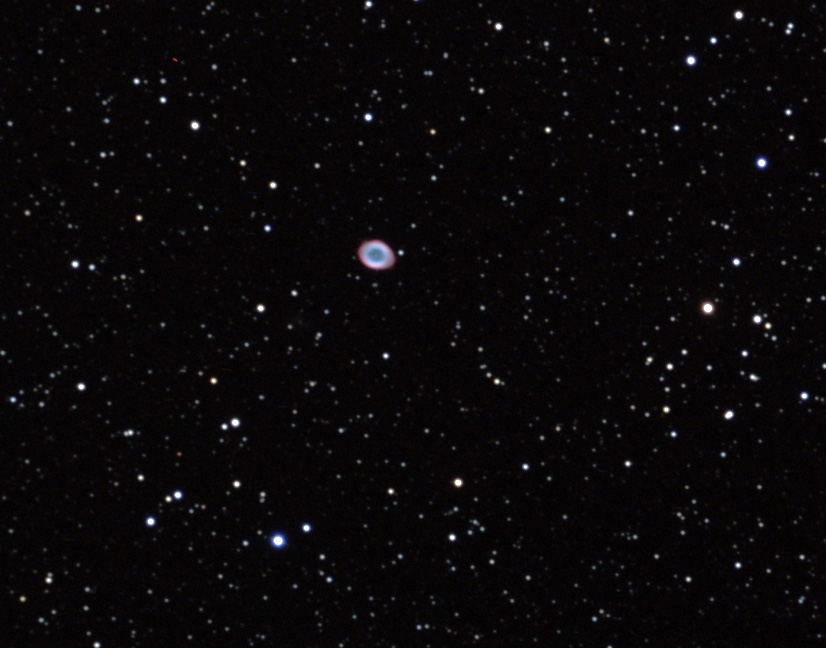 Ring Nebula, M57 Here is a 16 minute (4x240) esposure of Ring Nebula in Lyra through a 4" refractor. The image is at the full scale of the imager but it considerably is cropped. I only took a few shots of this; as I was taking the image I remebered that comet Hartely-2 was visible and I wanted to locate and image it (see below). Guiding was done through the C-11 using the Orion autoguider.
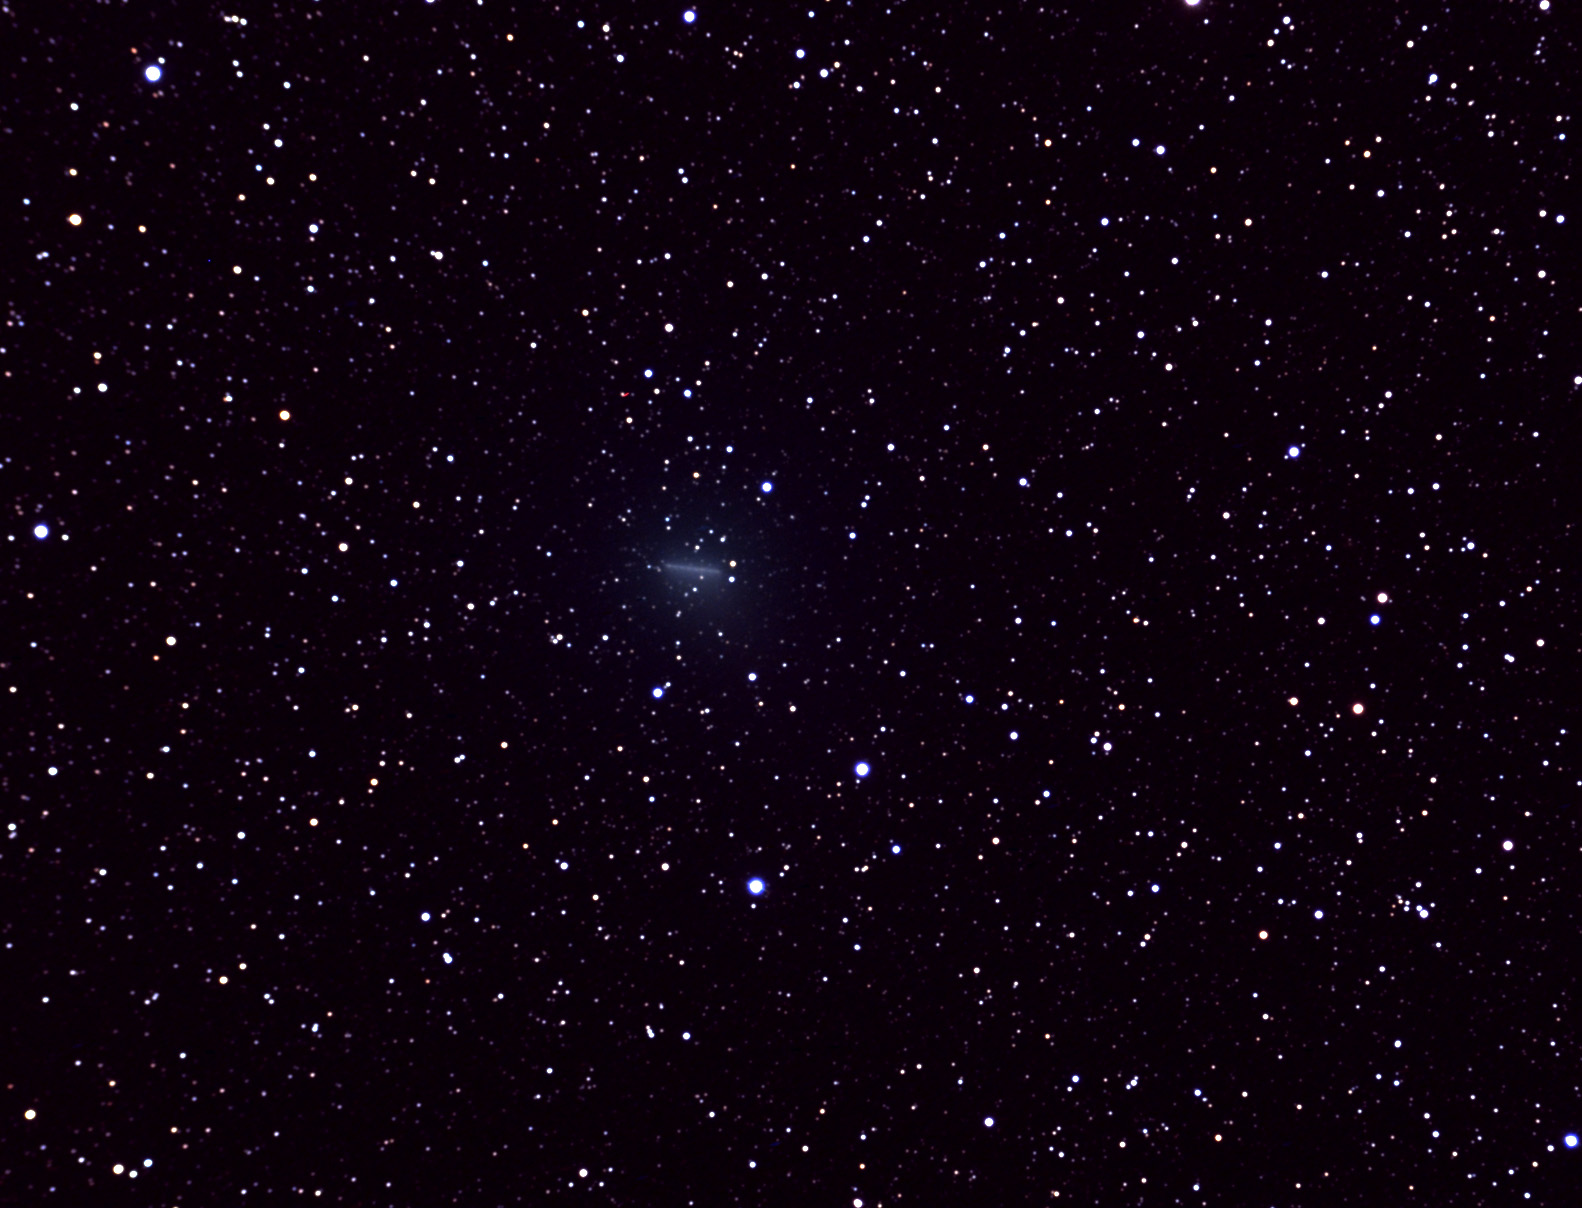 Comet Hartley-2, 02 October 2010 Here is a 32 minute (8x240) esposure of comet Hartely-2 in Lyra through a 4" refractor. The image is at the full scale of the imager but it is cropped. After taking the images and stacking them (the result you see here), it became very obvious that the comet was moving far too fast to get a clear shot of it while guiding on stars! The comet is the "streak" shown in the image, this is basically the distance it moved during the 32 minute total exposure. A close look reveals slight "spaces" in the streak, this is due to the time where imaging was not taking place (during raw image download from the camera). Note, this comet is a LOT fainter than I was expecting based on predictions, I could see it in an 11" telescope but it was not particularly bright! If it is to reach near naked eye visibility later this month it has a long way to go! Guiding was done through the C-11 using the Orion autoguider.
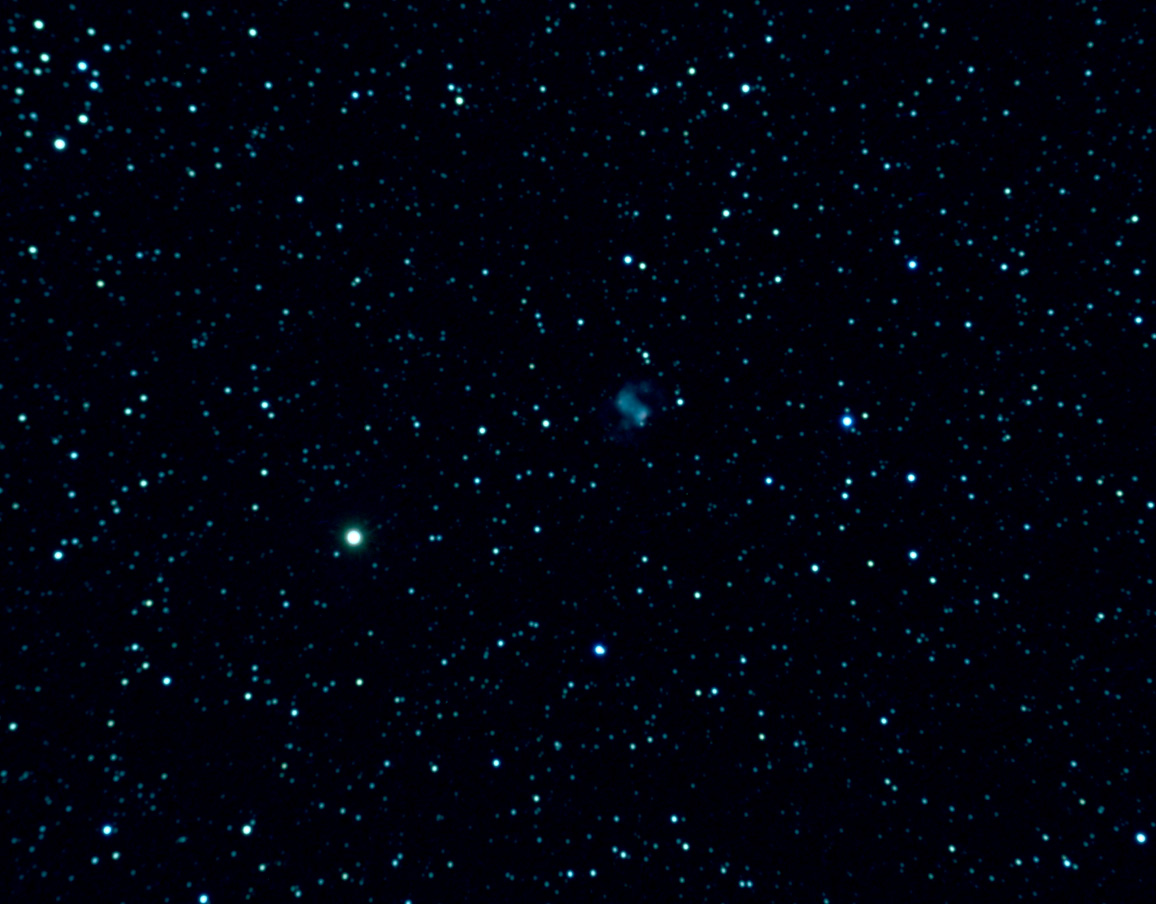 Little Dumbell Nebula, M76 Here is a 36 minute (9x240) esposure of M76 in Persuus through a 4" refractor. The image is at the full scale of the imager but it is cropped. Guiding was done through the C-11 using the Orion autoguider.
 NGC 1275 Galaxy Field in Perseus Here is a 144 minute (36x240) esposure of the galaxy field in and around NGC 1275 in Persuus through a 4" refractor. The image is at the full scale of the imager but it is cropped slightly. Guiding was done through the C-11 using the Orion autoguider. This image was converted to monochrome and processed to emphasize faint galaxies. A close inspection reveals over 100 galaxies, the faintest ones are approaching 17th magnitude.
It had been raining for 4-5 days but tonight it cleared up... breifly. I had planned to get more imaging in, however there was a lot of moisture in the air (caused the window on the camera to fog up) and then more clouds came in anyway. I managed to get 1 image of M27.
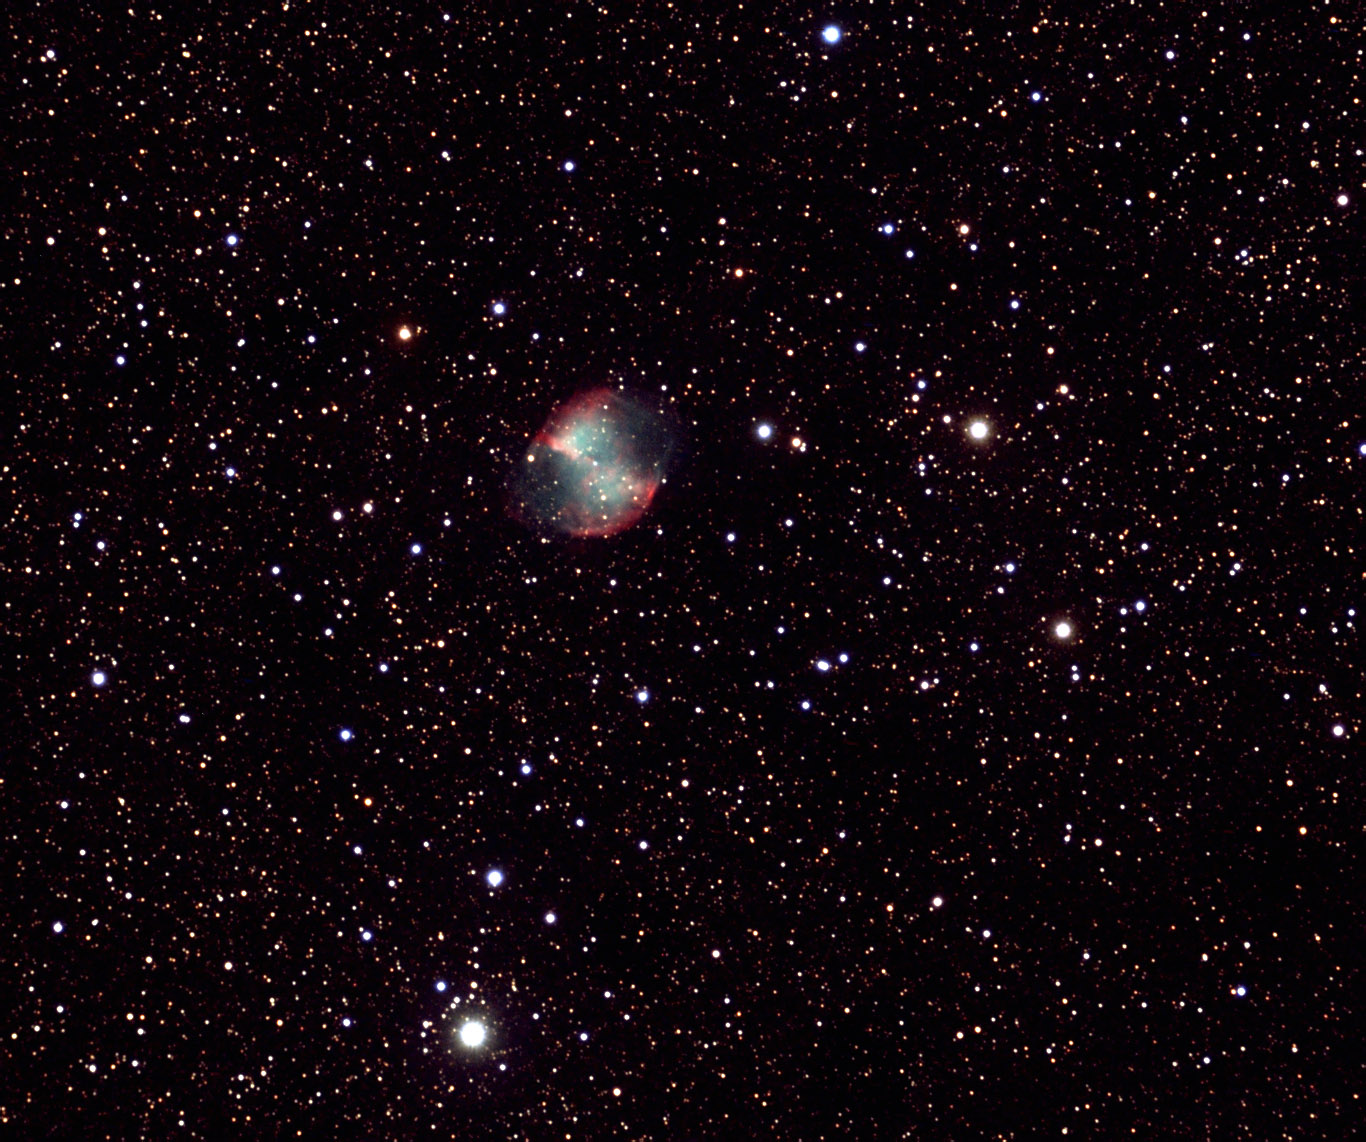 Dumbell Nebula, M27 Here is a 20 minute (5x240) exposure of M27 in Vulpecula through a 4" refractor. The image is at the full scale of the imager but it is cropped. Dark frames were used for processing but no flat frames. Guiding was done through the C-11 using the Orion autoguider.
Tonight started out pretty clear, then around midnight a bank of clouds rolled through, after which it cleared up again. I managed to get 4 images tonight.
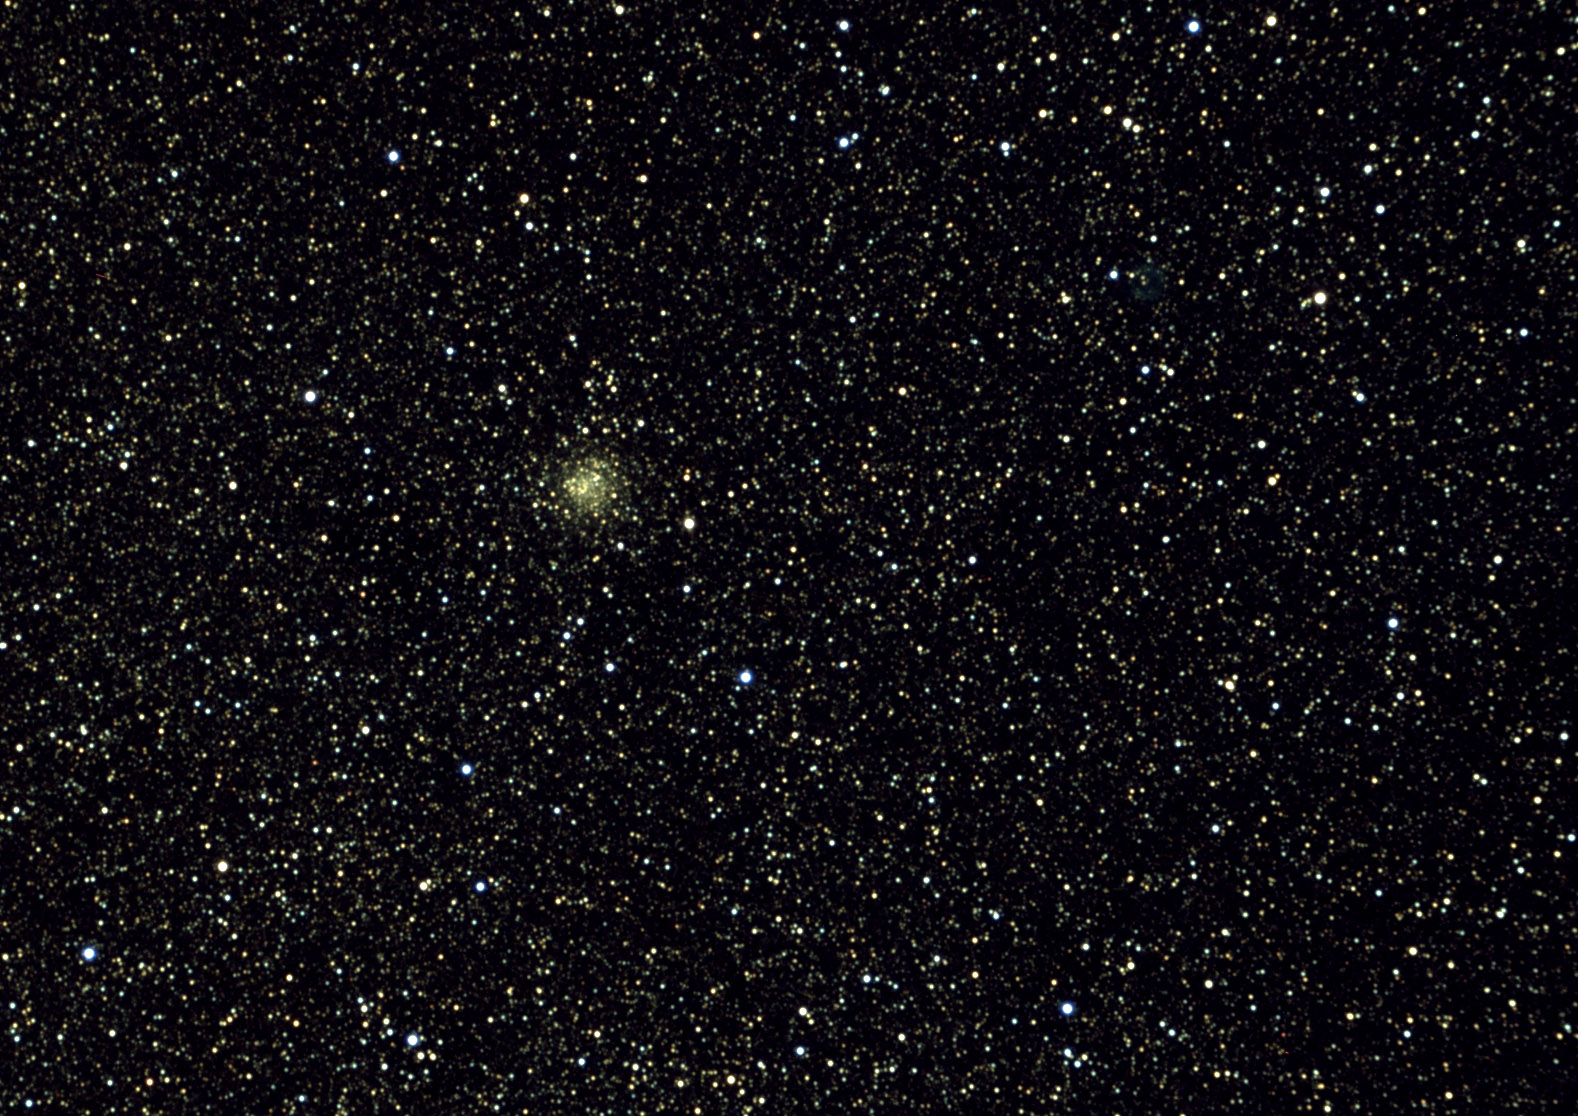 NGC 6712 in Scutum This is a 44 minute (11x240) exposure of NGC 6712 through a 4" refractor. The image is at the full scale of the imager but it is cropped. I had intended to get more frames on this object, however focus of the scope changed during some of the exposures (due to the dropping temperature) and this ruined a number of them. Guiding was done through the C-11 using the Orion autoguider. A very close inspection of this image will reveal traces of planetary nebula IC 1298 (on a line from NGC 6712 to the upper right hand corner of the image, a little more than 1/2 the way).
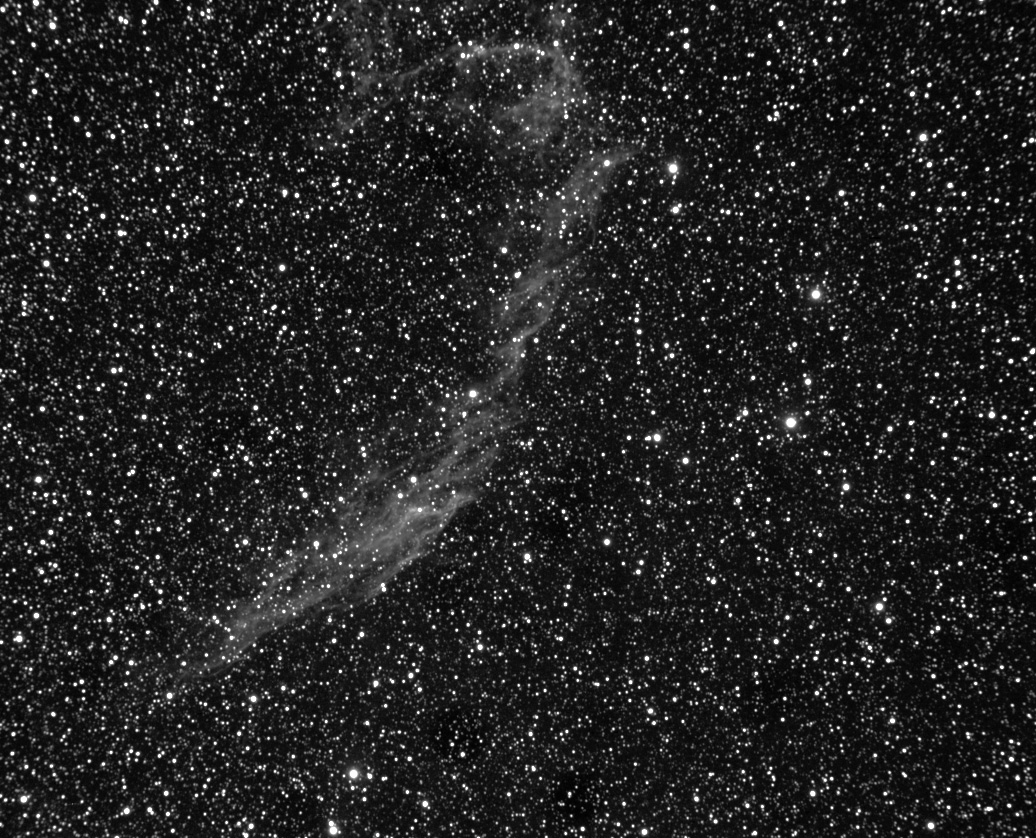 NGC 6992 in Cygnus This is a 115 minute (29x240) exposure of NGC 6992 (part of the Veil Nebula) through a 4" refractor (imager in monochrome mode, binned 2x2). I had 30 frames on this object however one was ruined by airplane trails. This is a difficult object to image (at least with my setup), it is hard to coax the nebula out without having all the stars totally saturated! Better than nothing at all however. I did not use flat frames for this image (used 8 dark frames).
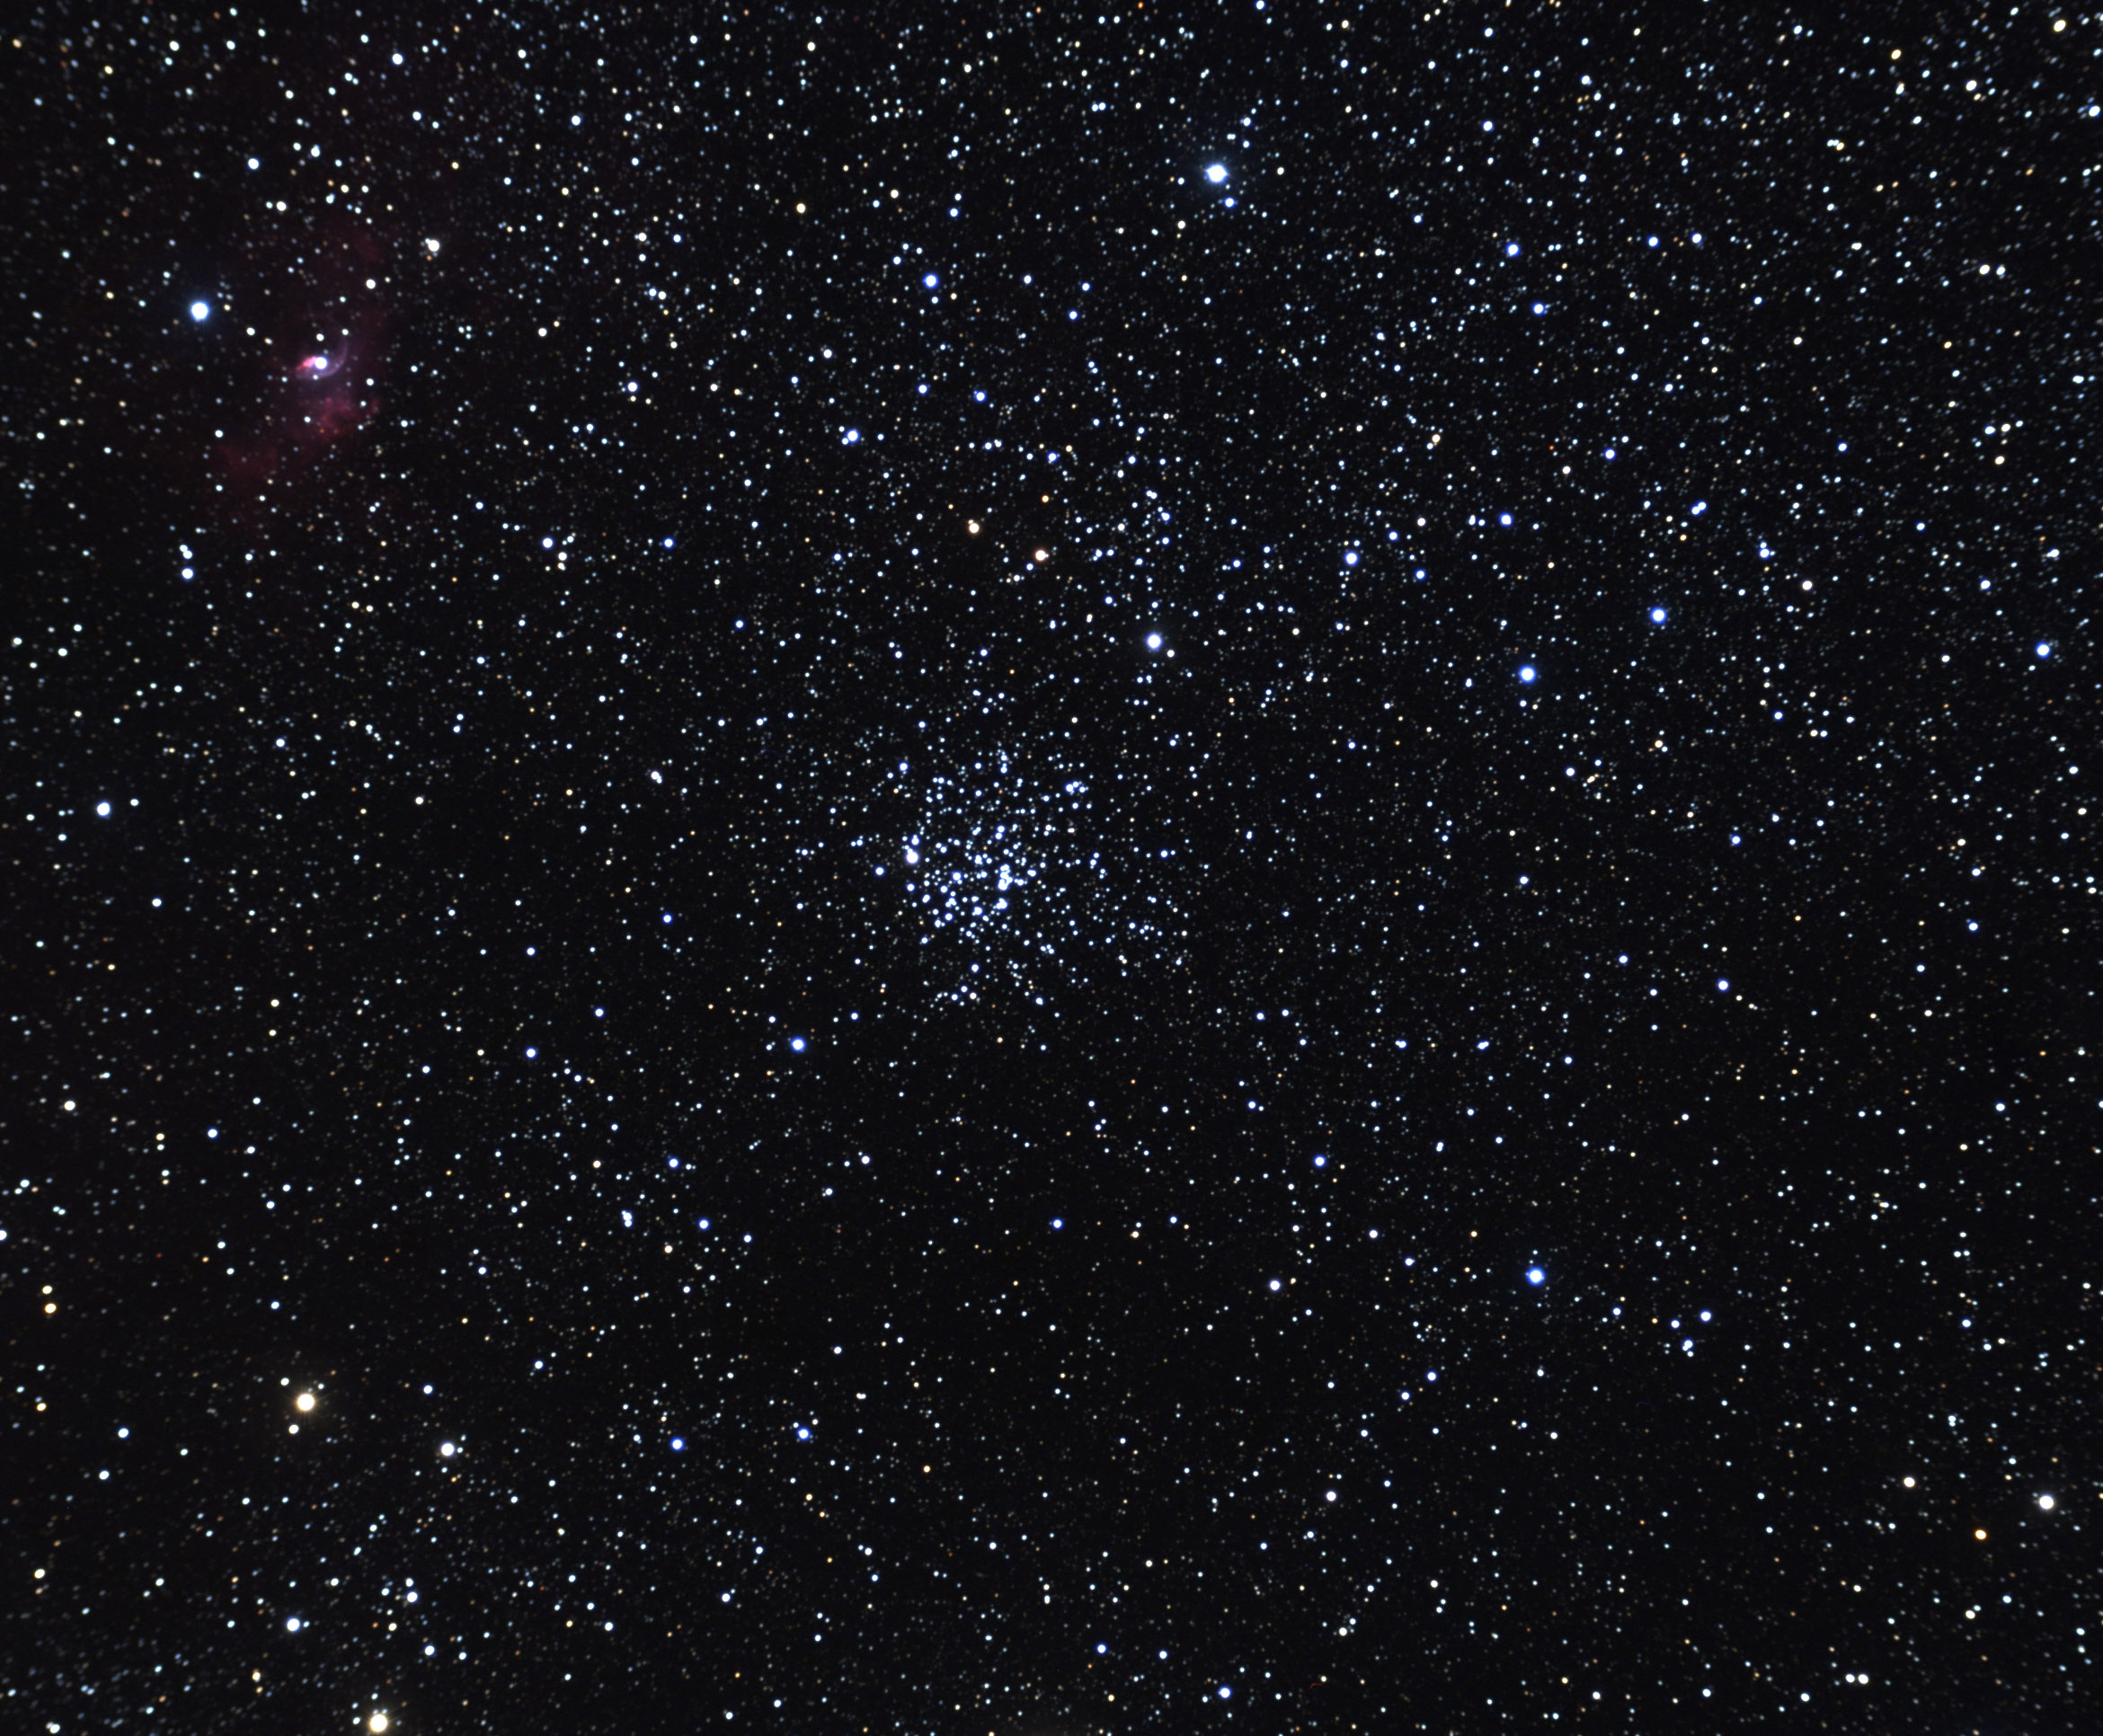 M52 and the Bubble Nebula This is a 3 hour (45x240) exposure of M52 through a 4" refractor (I had 4 hours on this however focus drift made the final hour of images too soft to use). This shot was taken between about midnight and 3am on 8 October. Dark and flat frames were used for processing. The Bubble Nebula is visible to the upper left of the cluster. It is very difficult to process this image in a way that shows the Bubble well without at the same time blowing out all the stars in M52. Here is a version of the image that is processed to show the Bubble more clearly, however note that the cluster is blown out considerably. This image is at the full resolution of the camera but it is cropped (note that the stars towards the corners of the image show abberations due to the telescope not having a totally flat field).
Another clear night (it's that time of year) so more images...
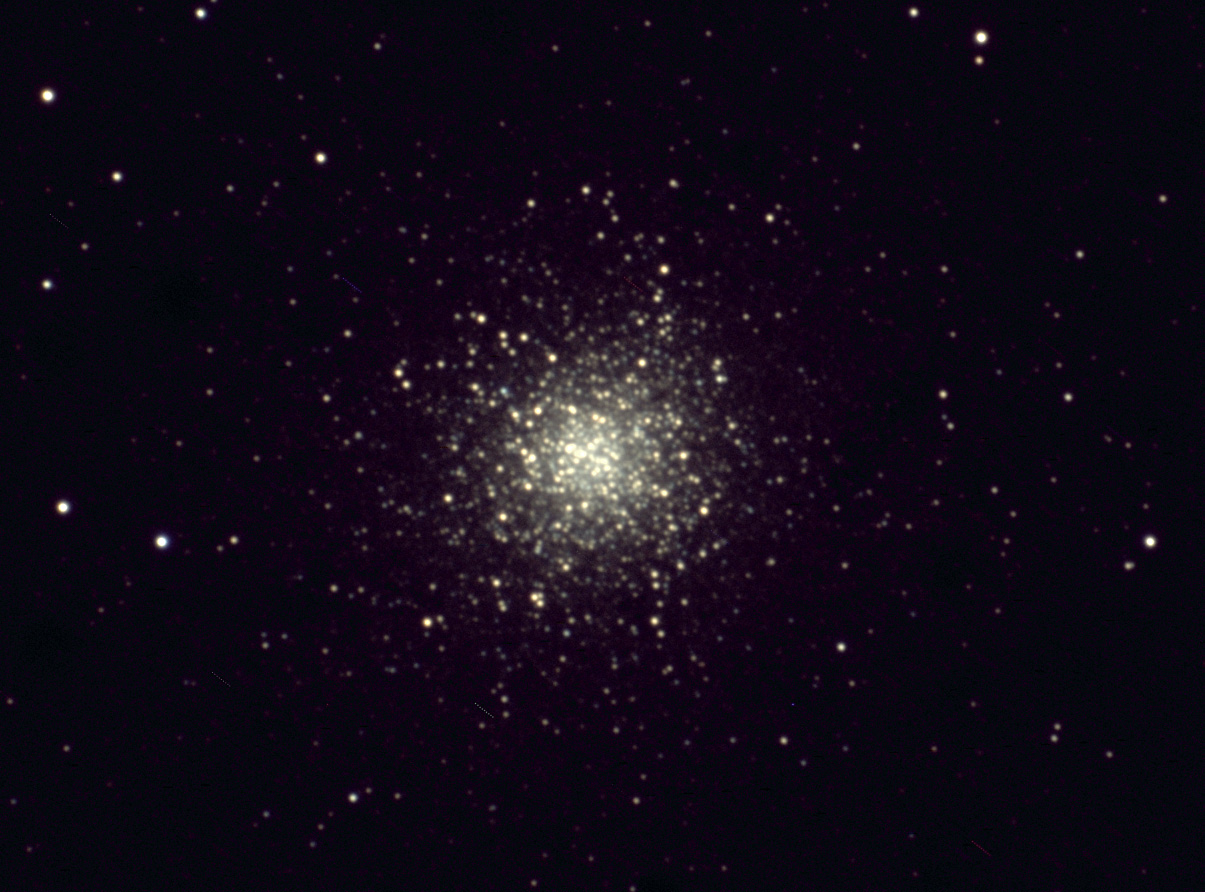 M13 This is a 36 minute (9x240) exposure of M13 through a 4" refractor (with a 2X Barlow in place, making the focal length around 1300mm). I was not terribly happy with the focus... the Bahtinov mask showed it to be dead on, however the stars are still not sharp pinpoints. Seeing conditions here in souther New England are among the worst in the world, this is probably a factor in why the stars are not sharper than they are. This image is processed with darks (8 of them) but no flats. The image is at the full scale of the imager but it is substantially cropped. Guiding was done through the C-11 using the Orion autoguider.
 Ring Nebula, M57 This is a 52 minute (13x240) exposure of M57 through a 4" refractor (with a 2X Barlow in place, making the focal length around 1300mm). Focus on this one seems a bit better than the one of M13 (above), M57 was pretty high up in the sky so this probably helped. This image is processed with darks (8 of them) but no flats. The image is at the full scale of the imager but it is substantially cropped. Guiding was done through the C-11 using the Orion autoguider.
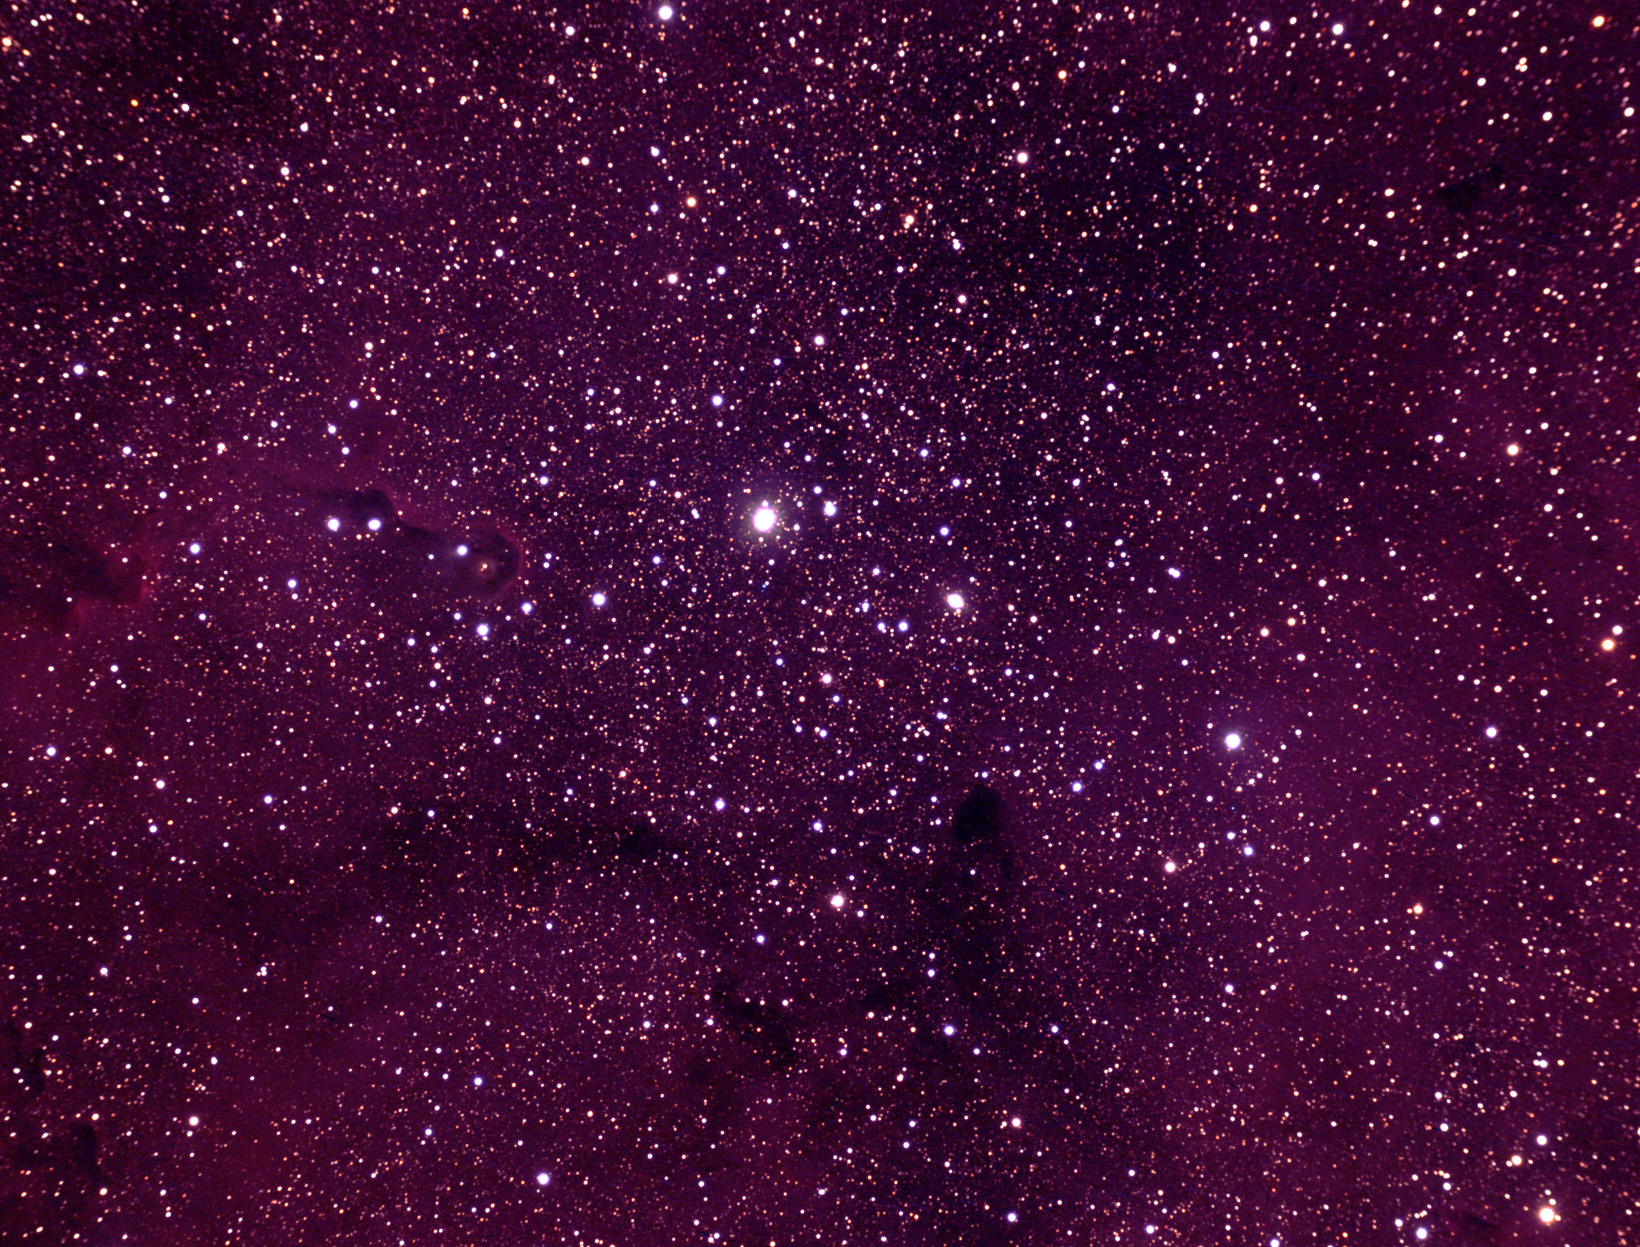 IC 1396, Nebula in Cepheus This is a 2 hour (30x240) exposure of the large nebula complex IC 1396 in Cepheus through a 4" refractor. This object is really way too large for my scope/camera combination, but I wanted to give it a shot anyway. The nebulosity is quite faint and a challenge to bring out in processing. Focus on this one seems a bit better than the one of M13 (above), M57 was pretty high up in the sky so this probably helped. This image is processed with darks and flats (8 each). I reduced the image size to 2/3 of the full resolution and cropped it somewhat. Guiding was done through the C-11 using the Orion autoguider.
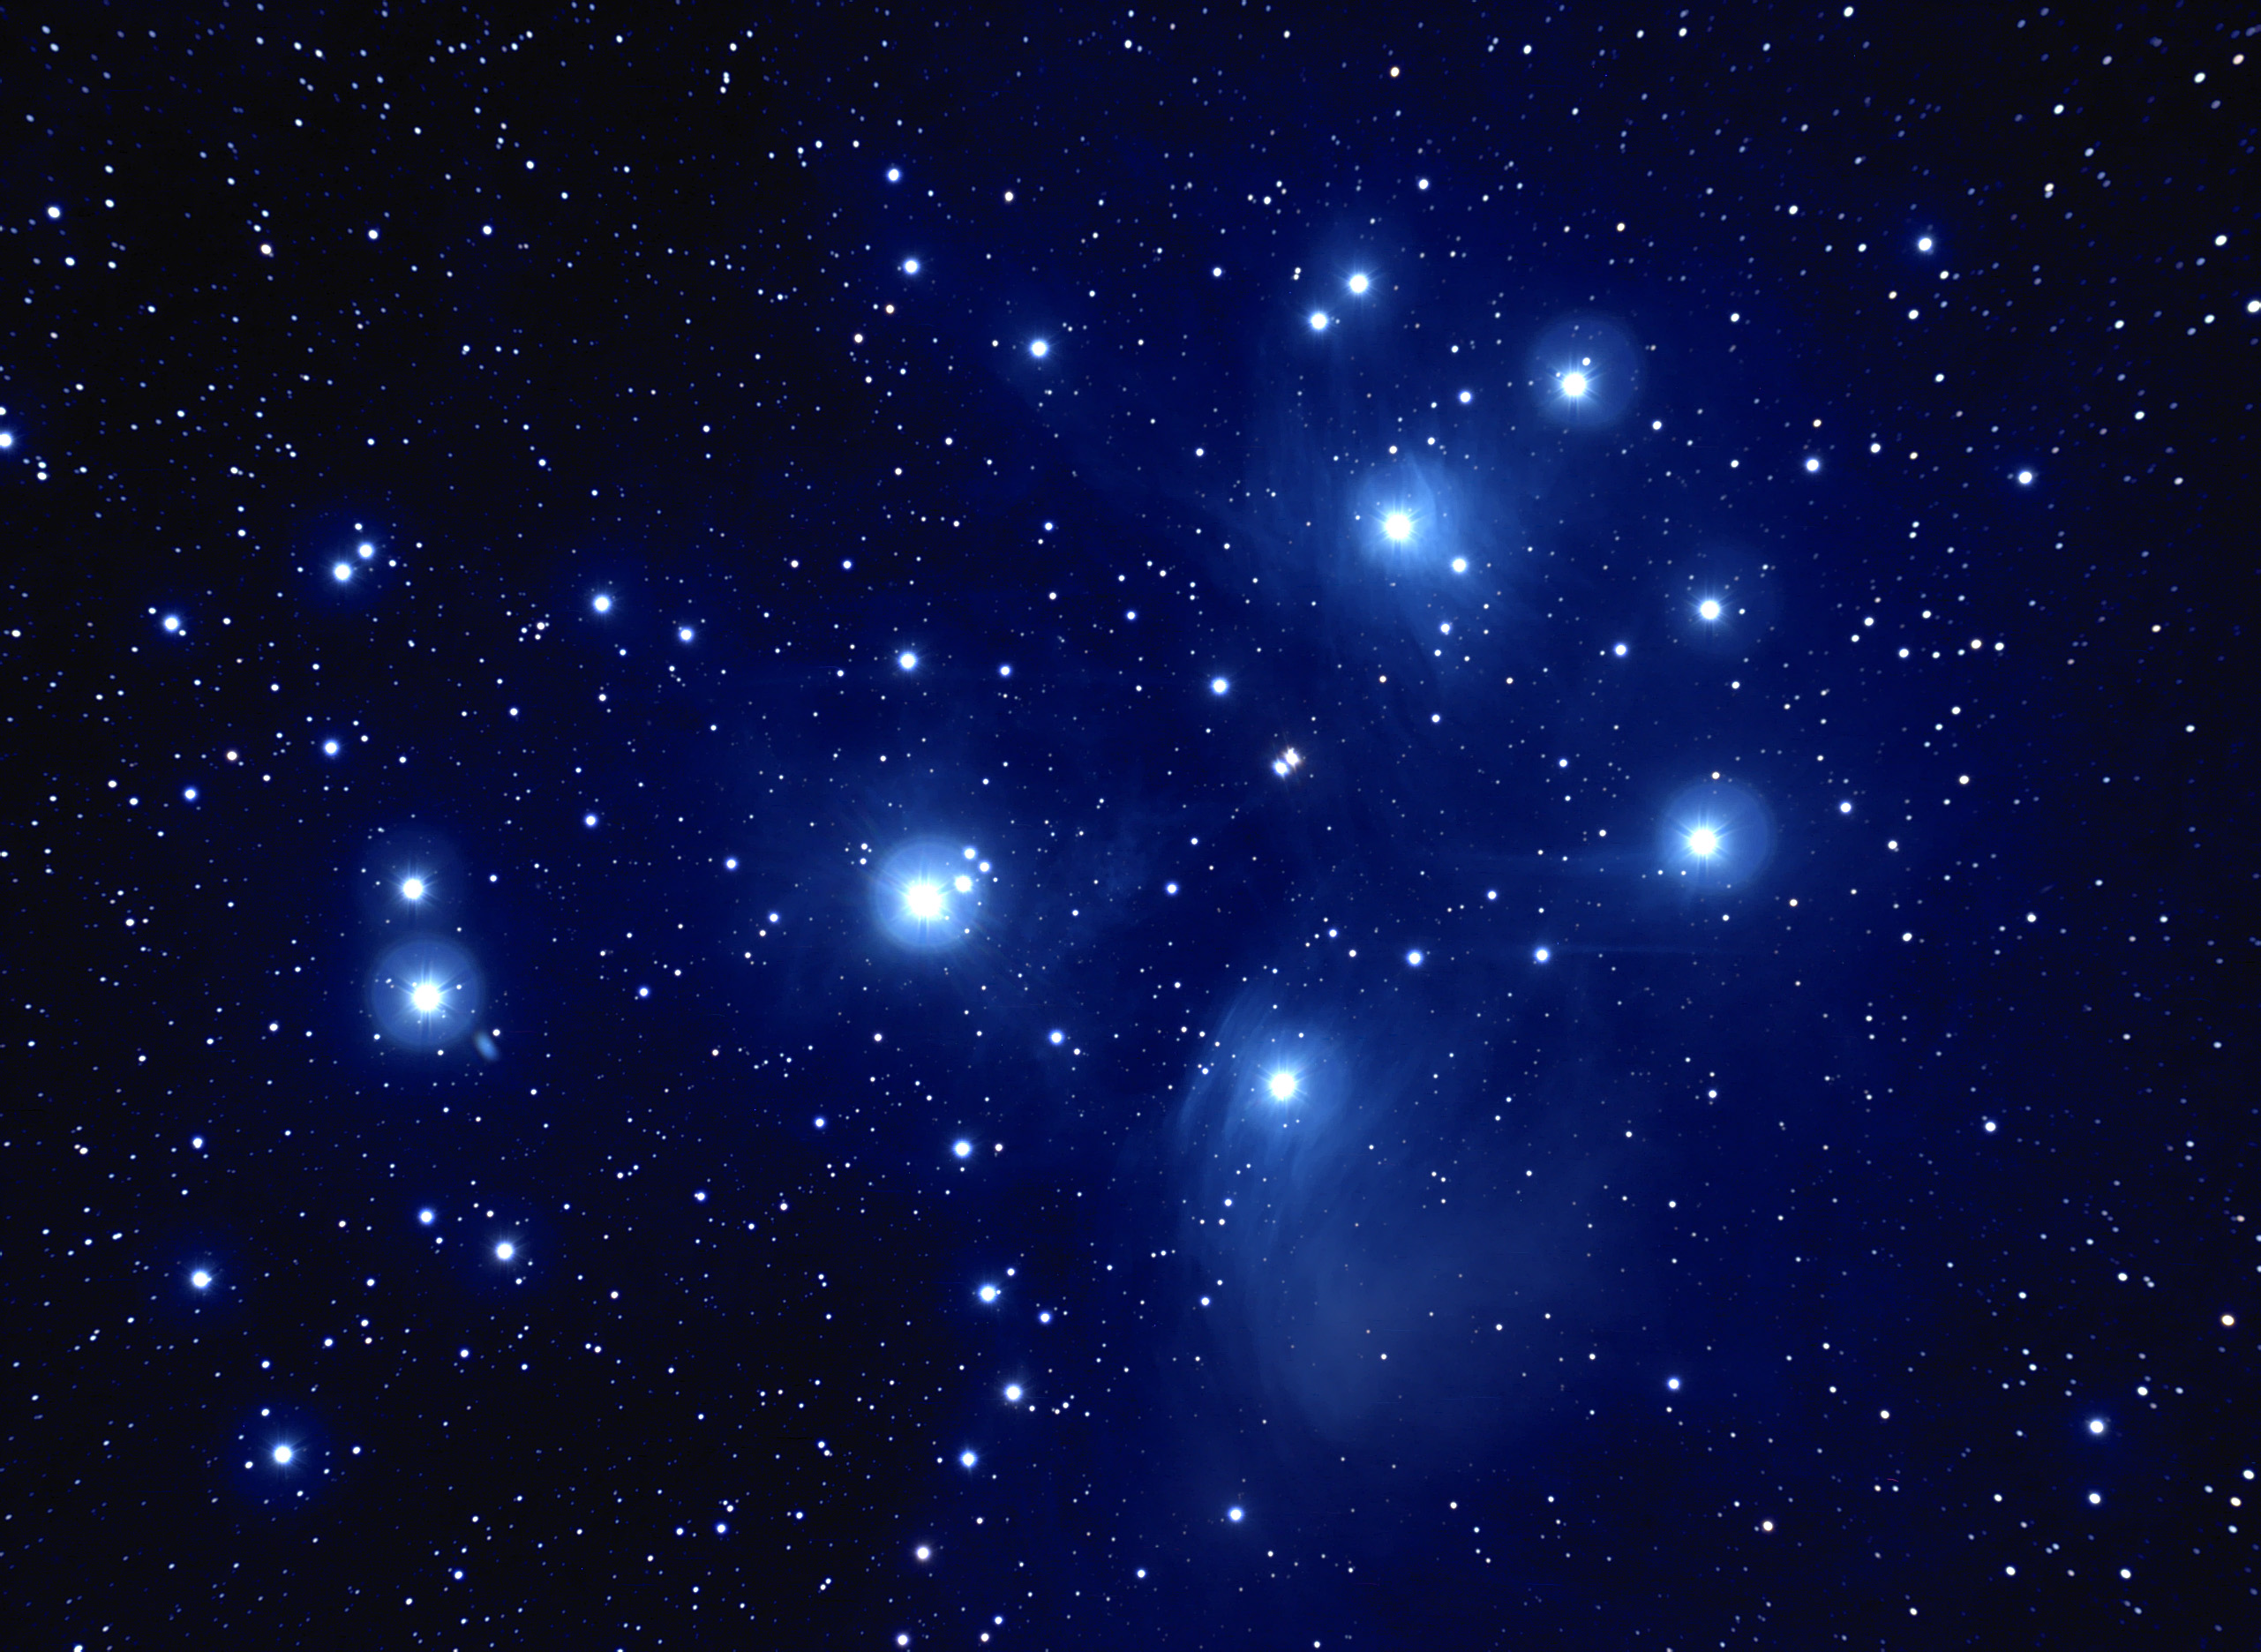 M45, the Pleiades This is a 172 minute (43x240) exposure of Pleiades through a 4" refractor. Even though I have other images of this object it is a perenial favorite so I could not resist working it again. The scope captured the images while I slept for roughly 3 hours. This shot is processed with 10 darks and 10 flats (and flats for darks). Guiding was done through the C-11 using the Orion autoguider. There is an artifact near one of the stars in this shot (soem kind of internal reflection). Aside from that I am quite pleased with this image, probably my best to date. It is at the full resolution of the camera but cropped somewhat.
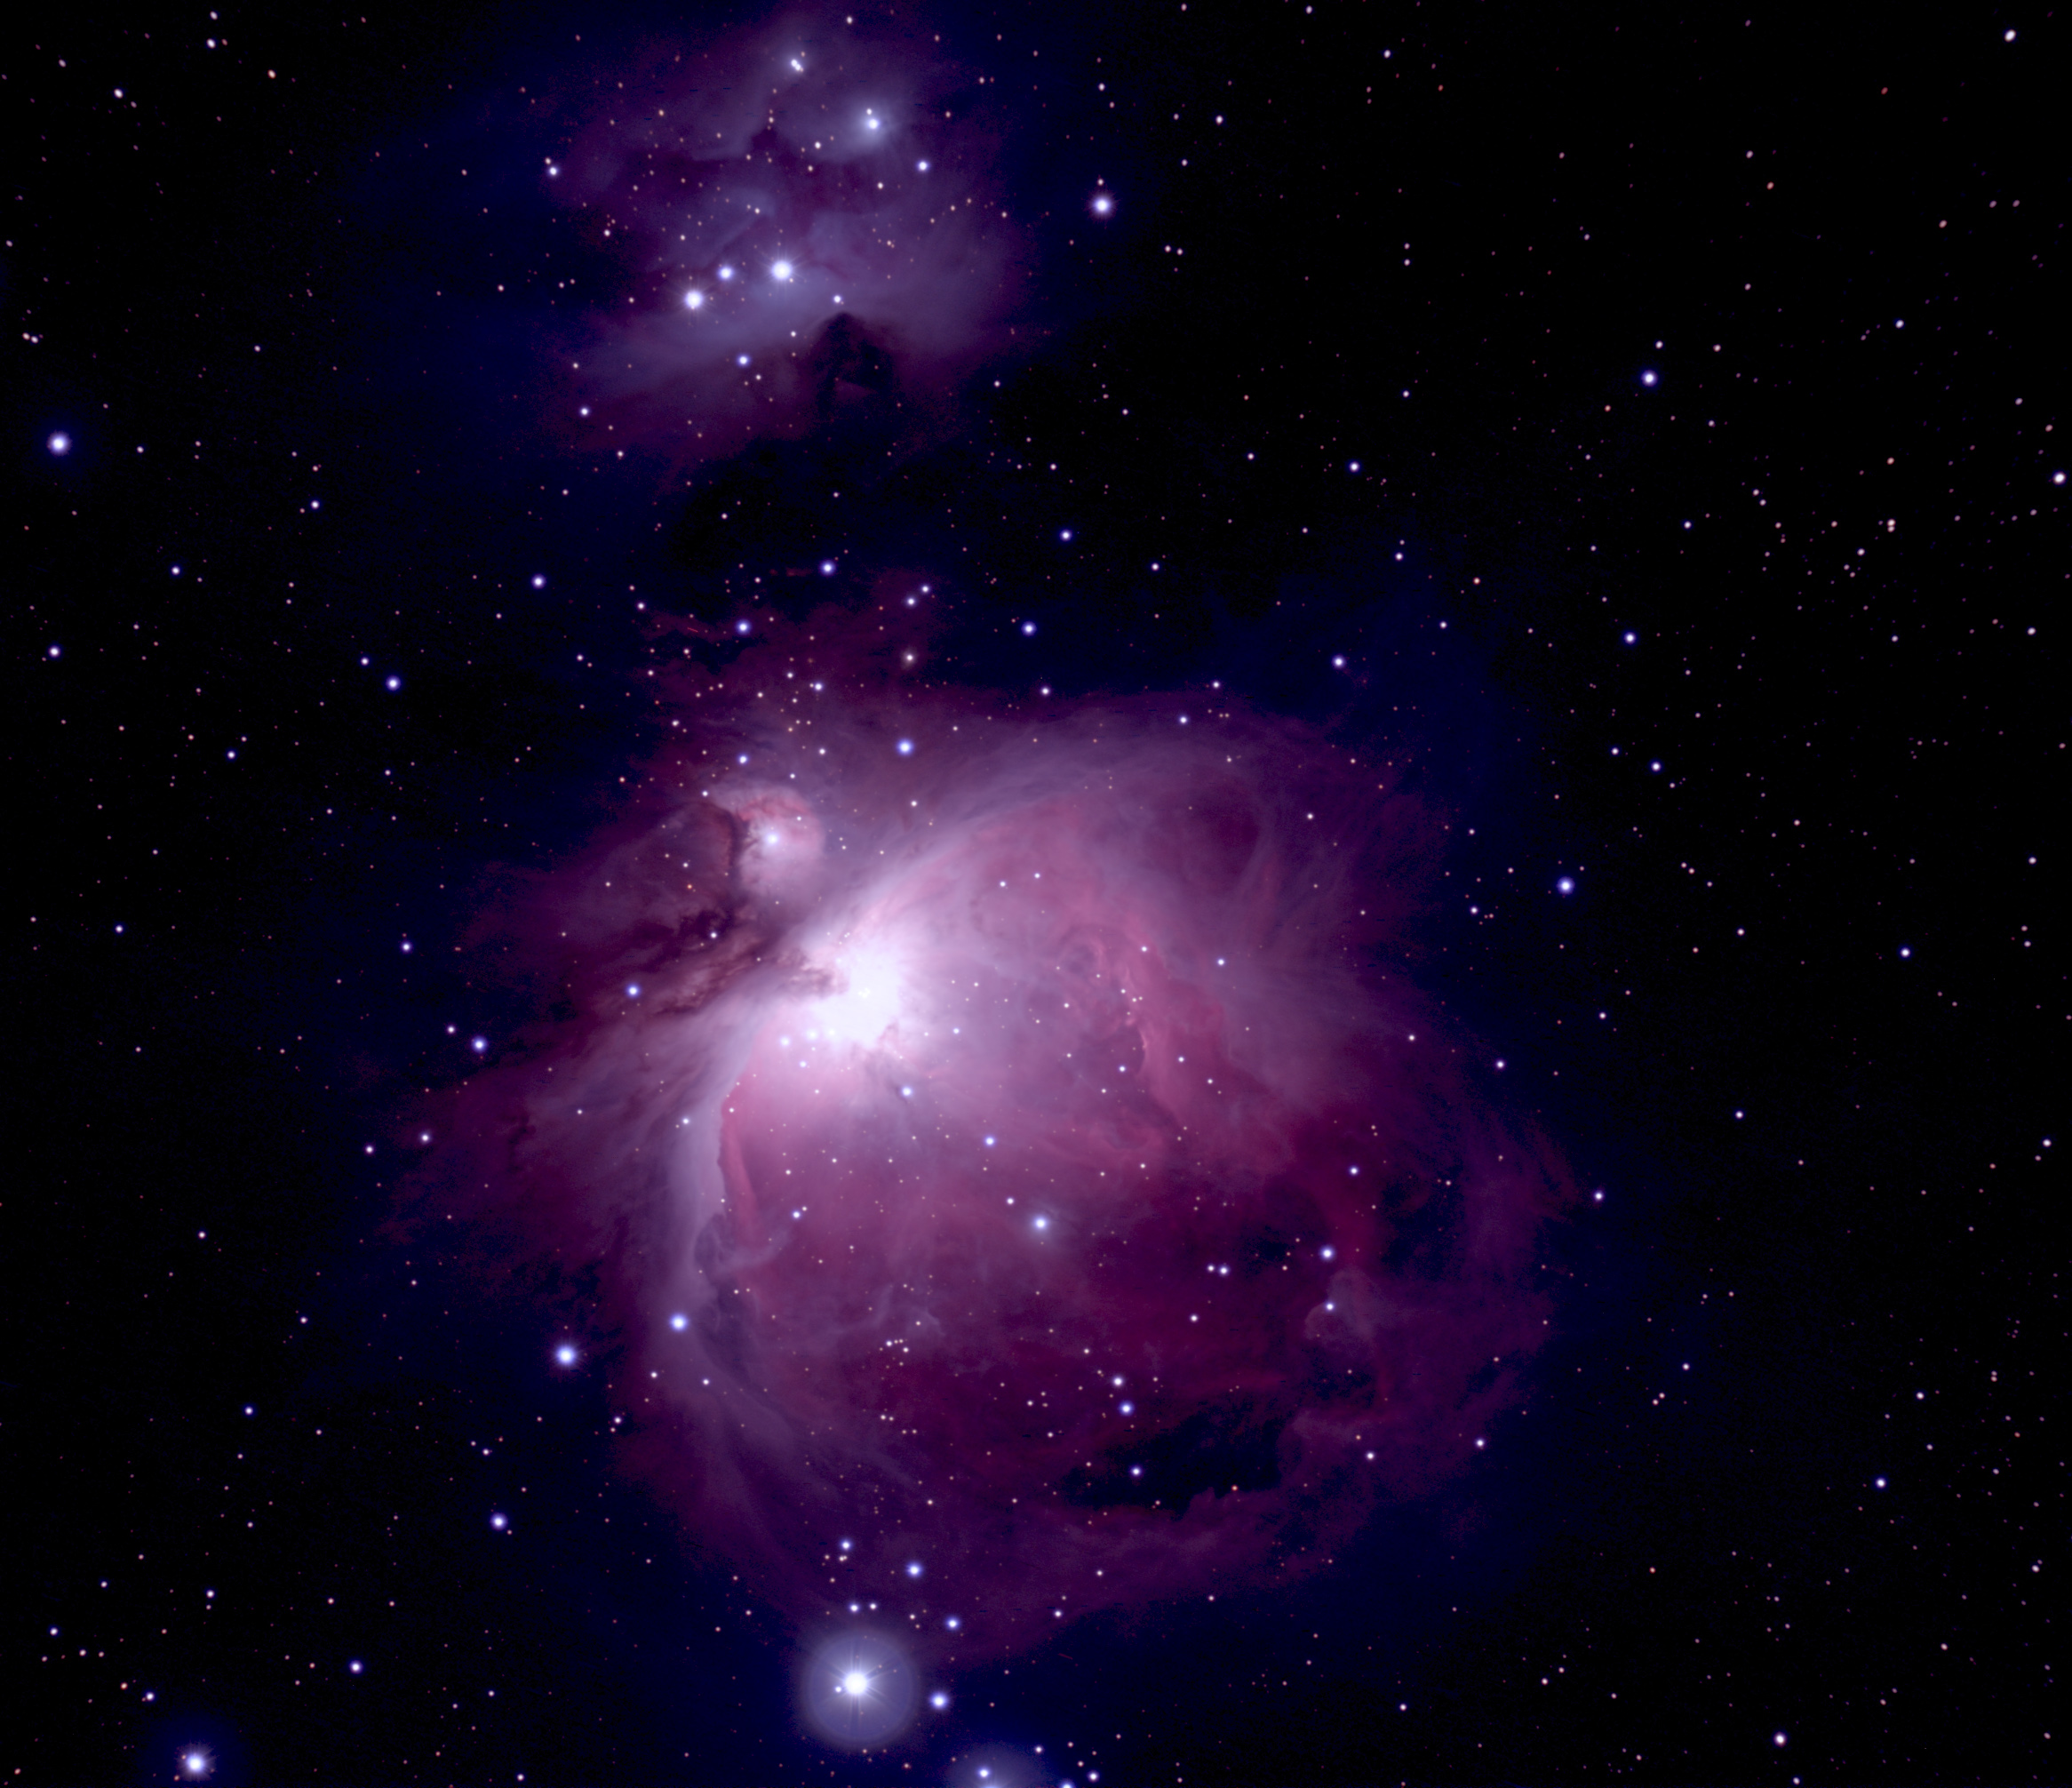 M42, the Great Nebula in Orion This is a 72 minute (18x240) exposure of the Orion Nebula through a 4" refractor. I had an hour or so before twilight after imaging M45, and M42 (another favorite target) was well placed so I decided to make use of the available imaging time and got this image. I grabbed another hour or so of sleep while this shot was being acquired. This shot is processed with 10 darks and 10 flats (and flats for darks). Guiding was done through the C-11 using the Orion autoguider. This shot is at the full resolution of the camera but cropped somewhat. I think it is my best image of M42 to date!
Wow... three really good clear nights in a row with no Moon... very unusual for New England... did more imaging tonight!
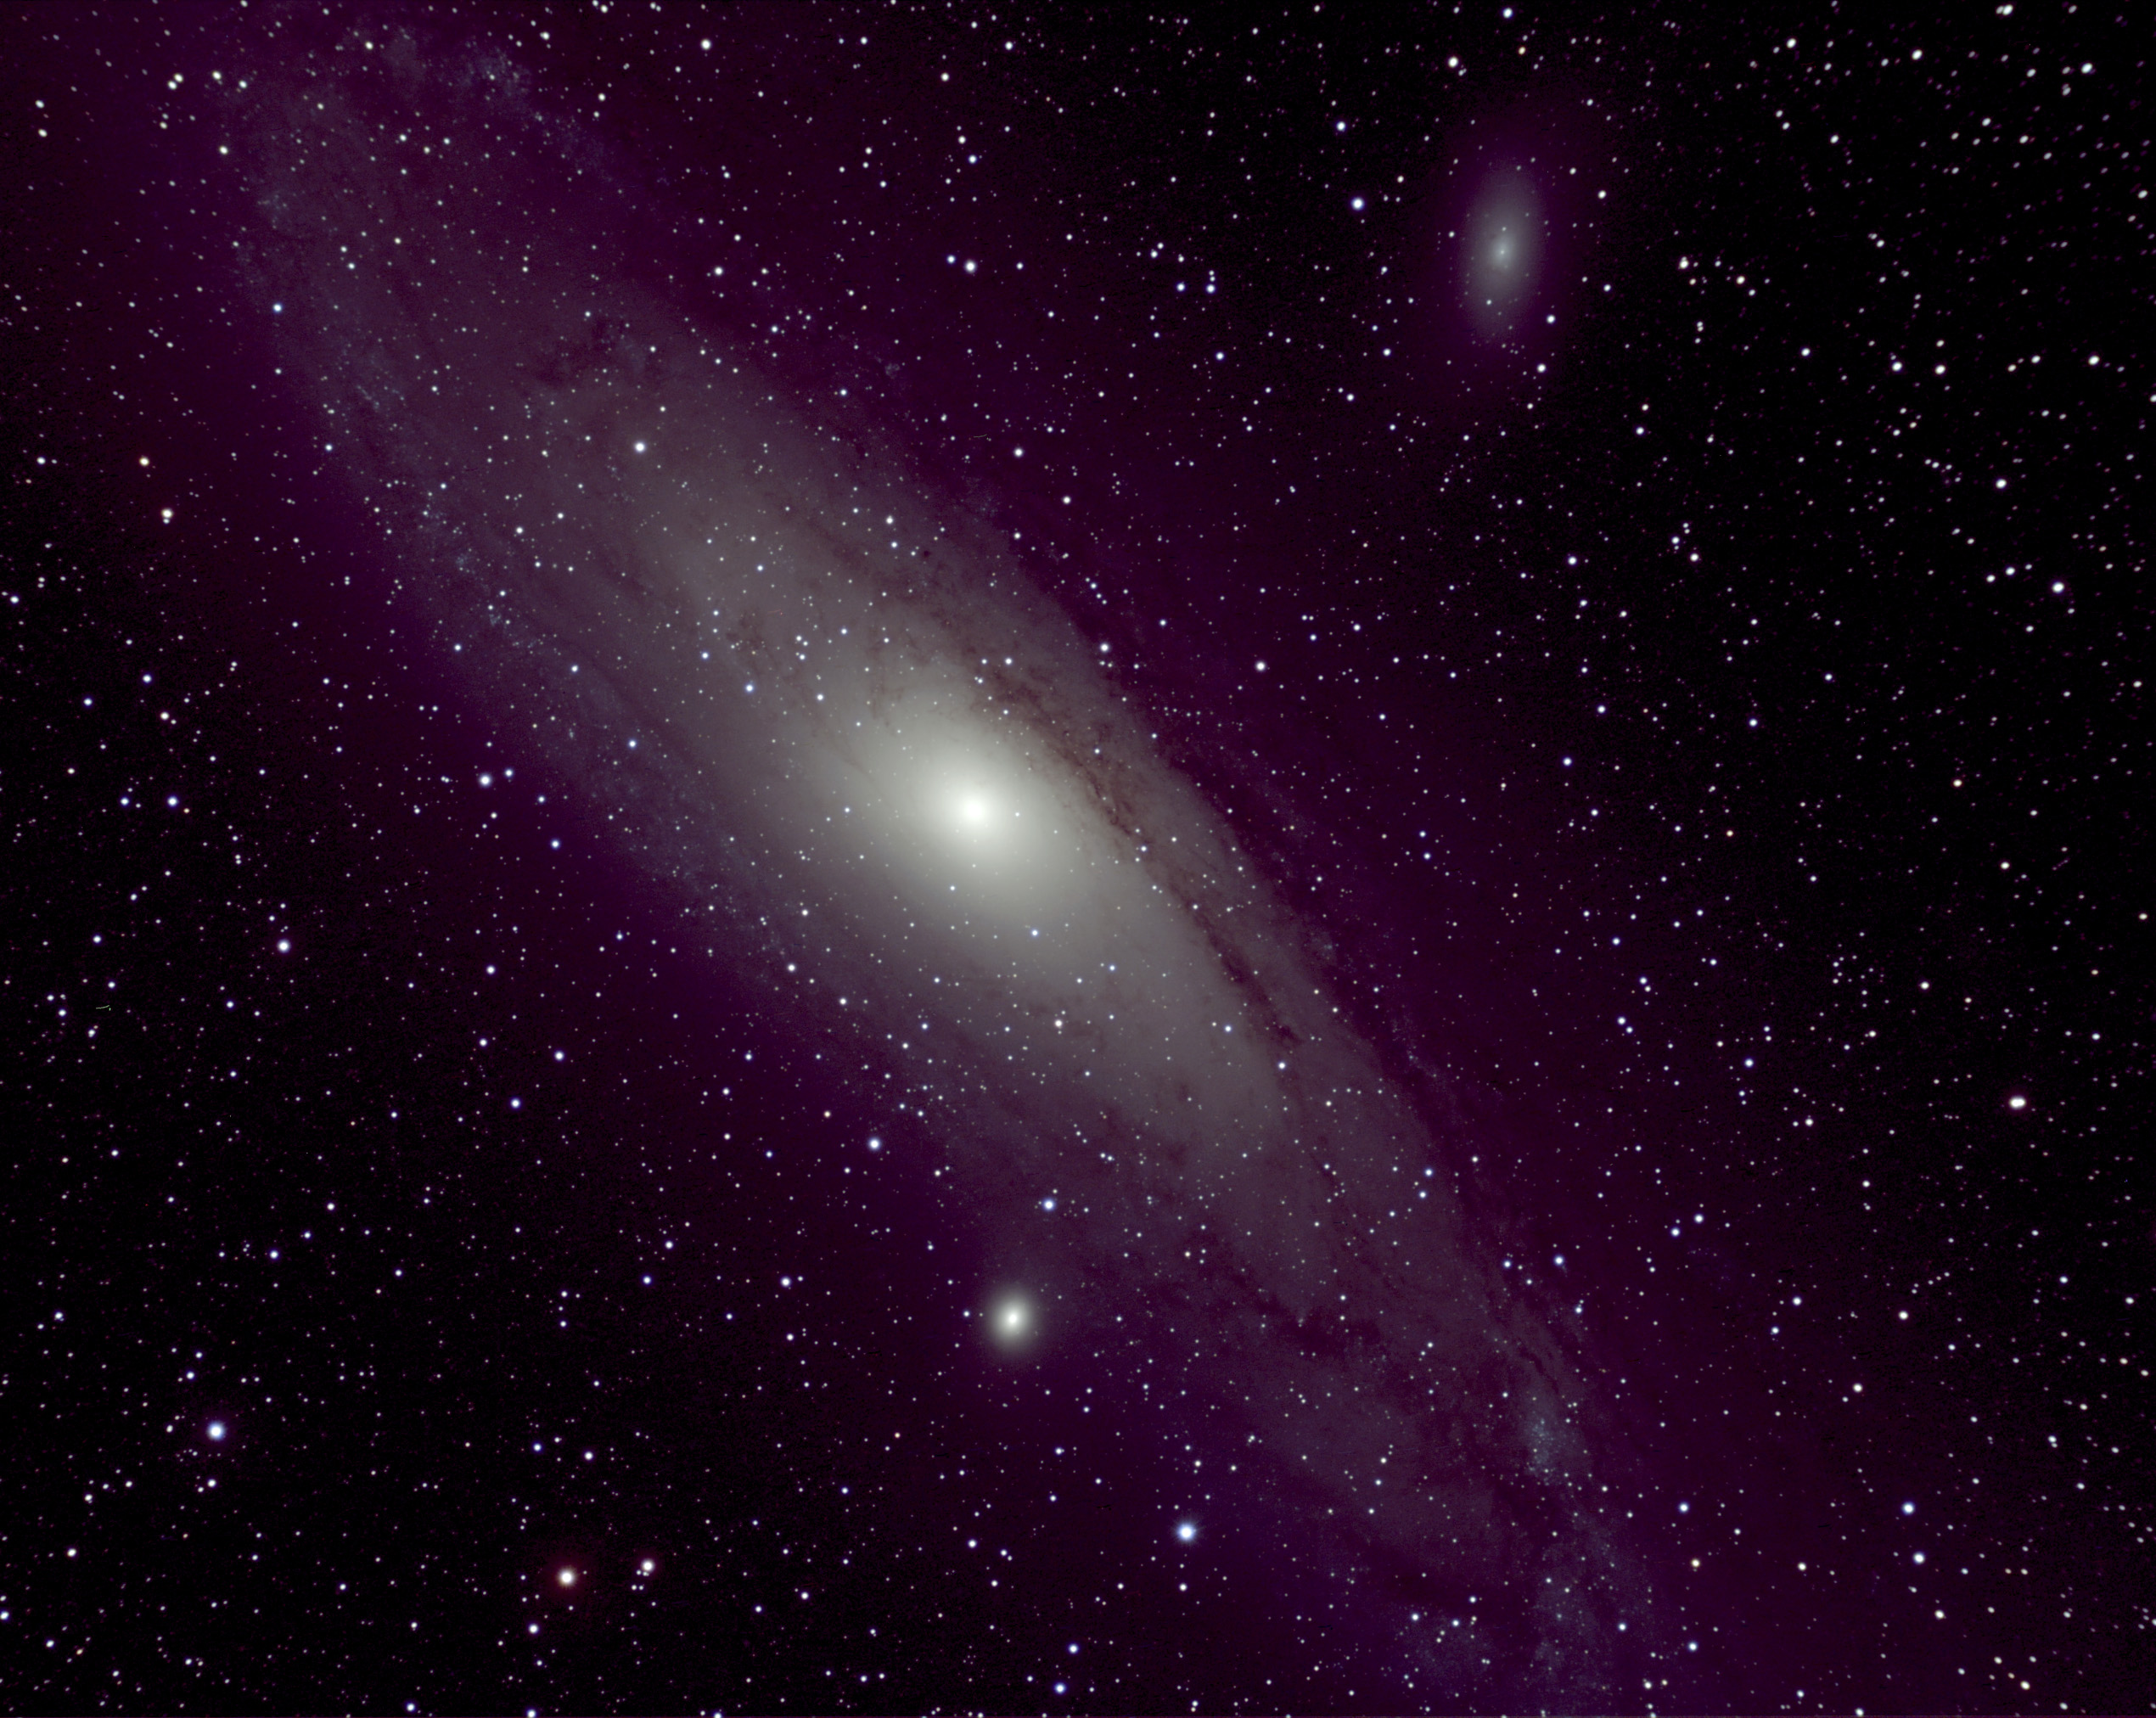 M31 in Andromeda This is a 92 minute (23x240) exposure of M31 through a 4" refractor. This shot is processed with 10 darks and 10 flats (and flats for darks). Guiding was done through the C-11 using the Orion autoguider. This shot is at the full resolution of the camera but cropped somewhat. Using maxim DL 5 I am able to process images and keep light and dark area intact (I was not able to do this with the basic version of Maxim DL that comes with the Orion imager). Compare this image to the one (above) taken on 17 September 2009 (this new image is definitely improved)!
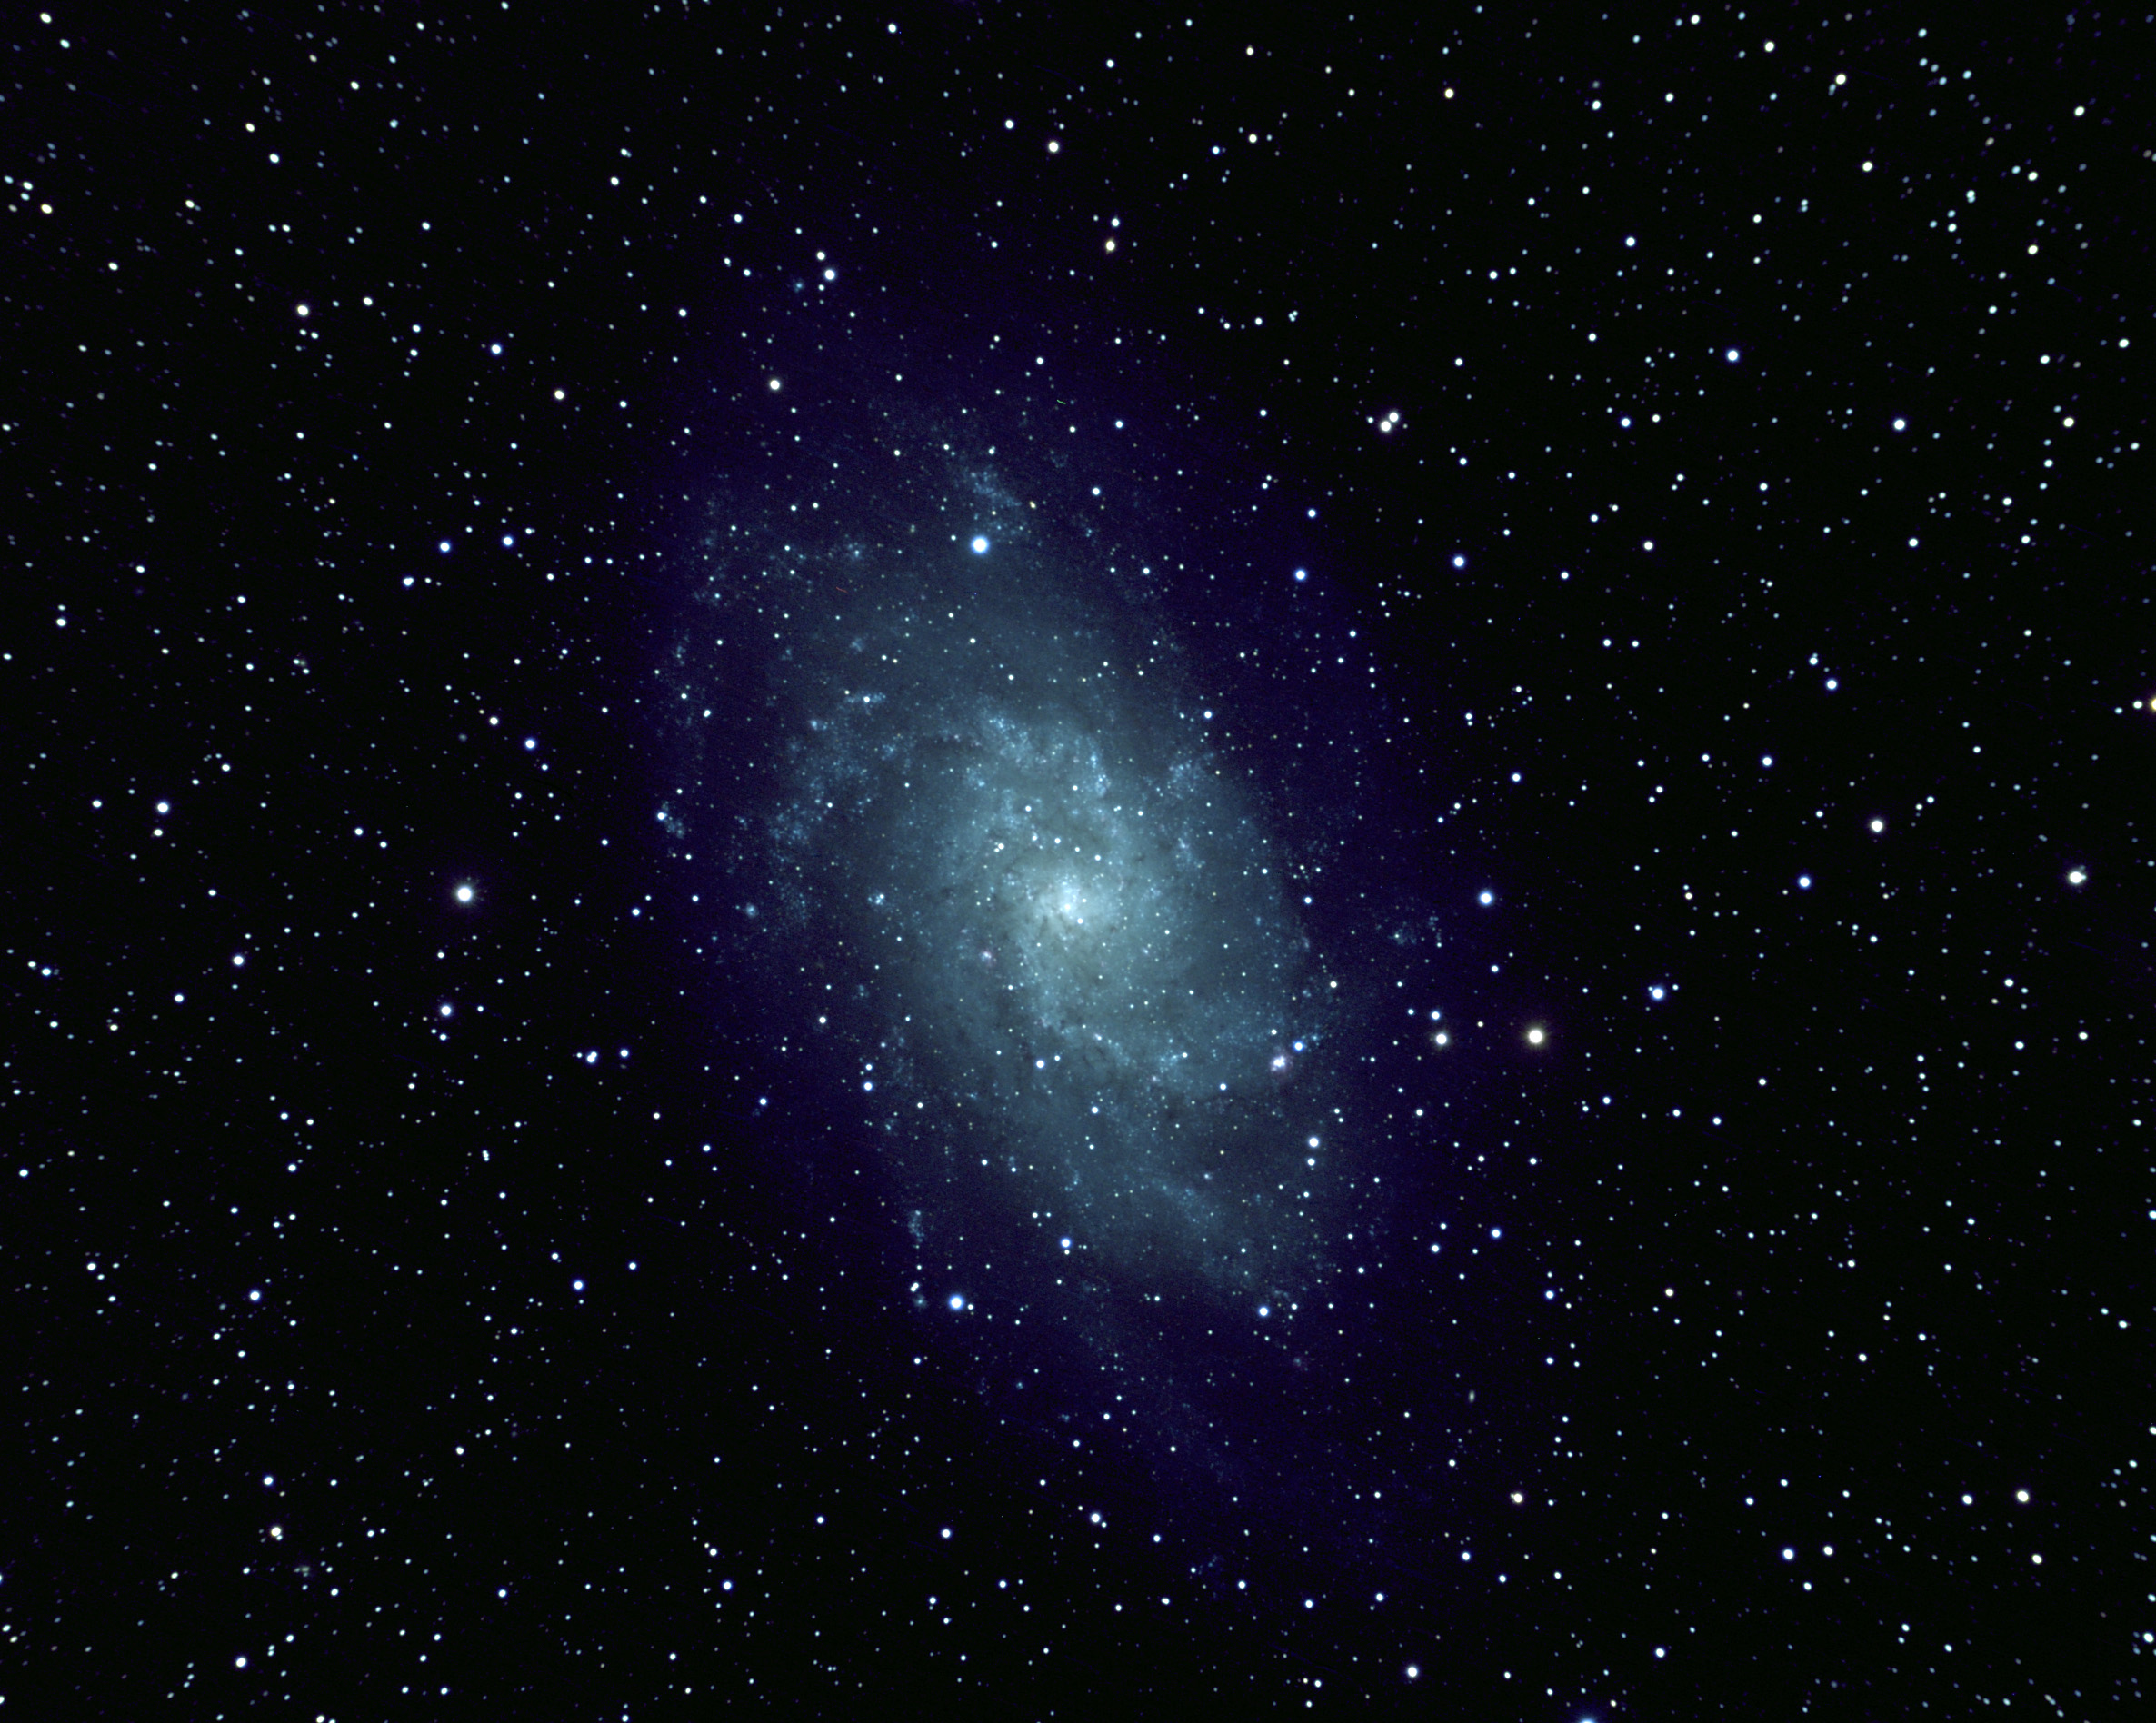 M33 in Triangulum This is a 220 minute (55x240) exposure of M33 through a 4" refractor. This shot is processed with 10 darks and 10 flats (and flats for darks). Guiding was done through the C-11 using the Orion autoguider. This shot is at the full resolution of the camera but cropped somewhat. The raw data for this image was captured while I was sleeping. Compare this image to the one I took of M33 on 19-20 September 2009 (this new one is defintely a better image)!
Tonight was not ideal, transparancy was "OK" but not really great. I worked some star clusters as they image satisfactorily in less than perfect skies (as compared to galaxies and nebulae). Most of the raw data was captured while I slept (got up at around 11pm to switch to NGC 1528 and then again around 2:30am to work M37, then around 5am to take darks.
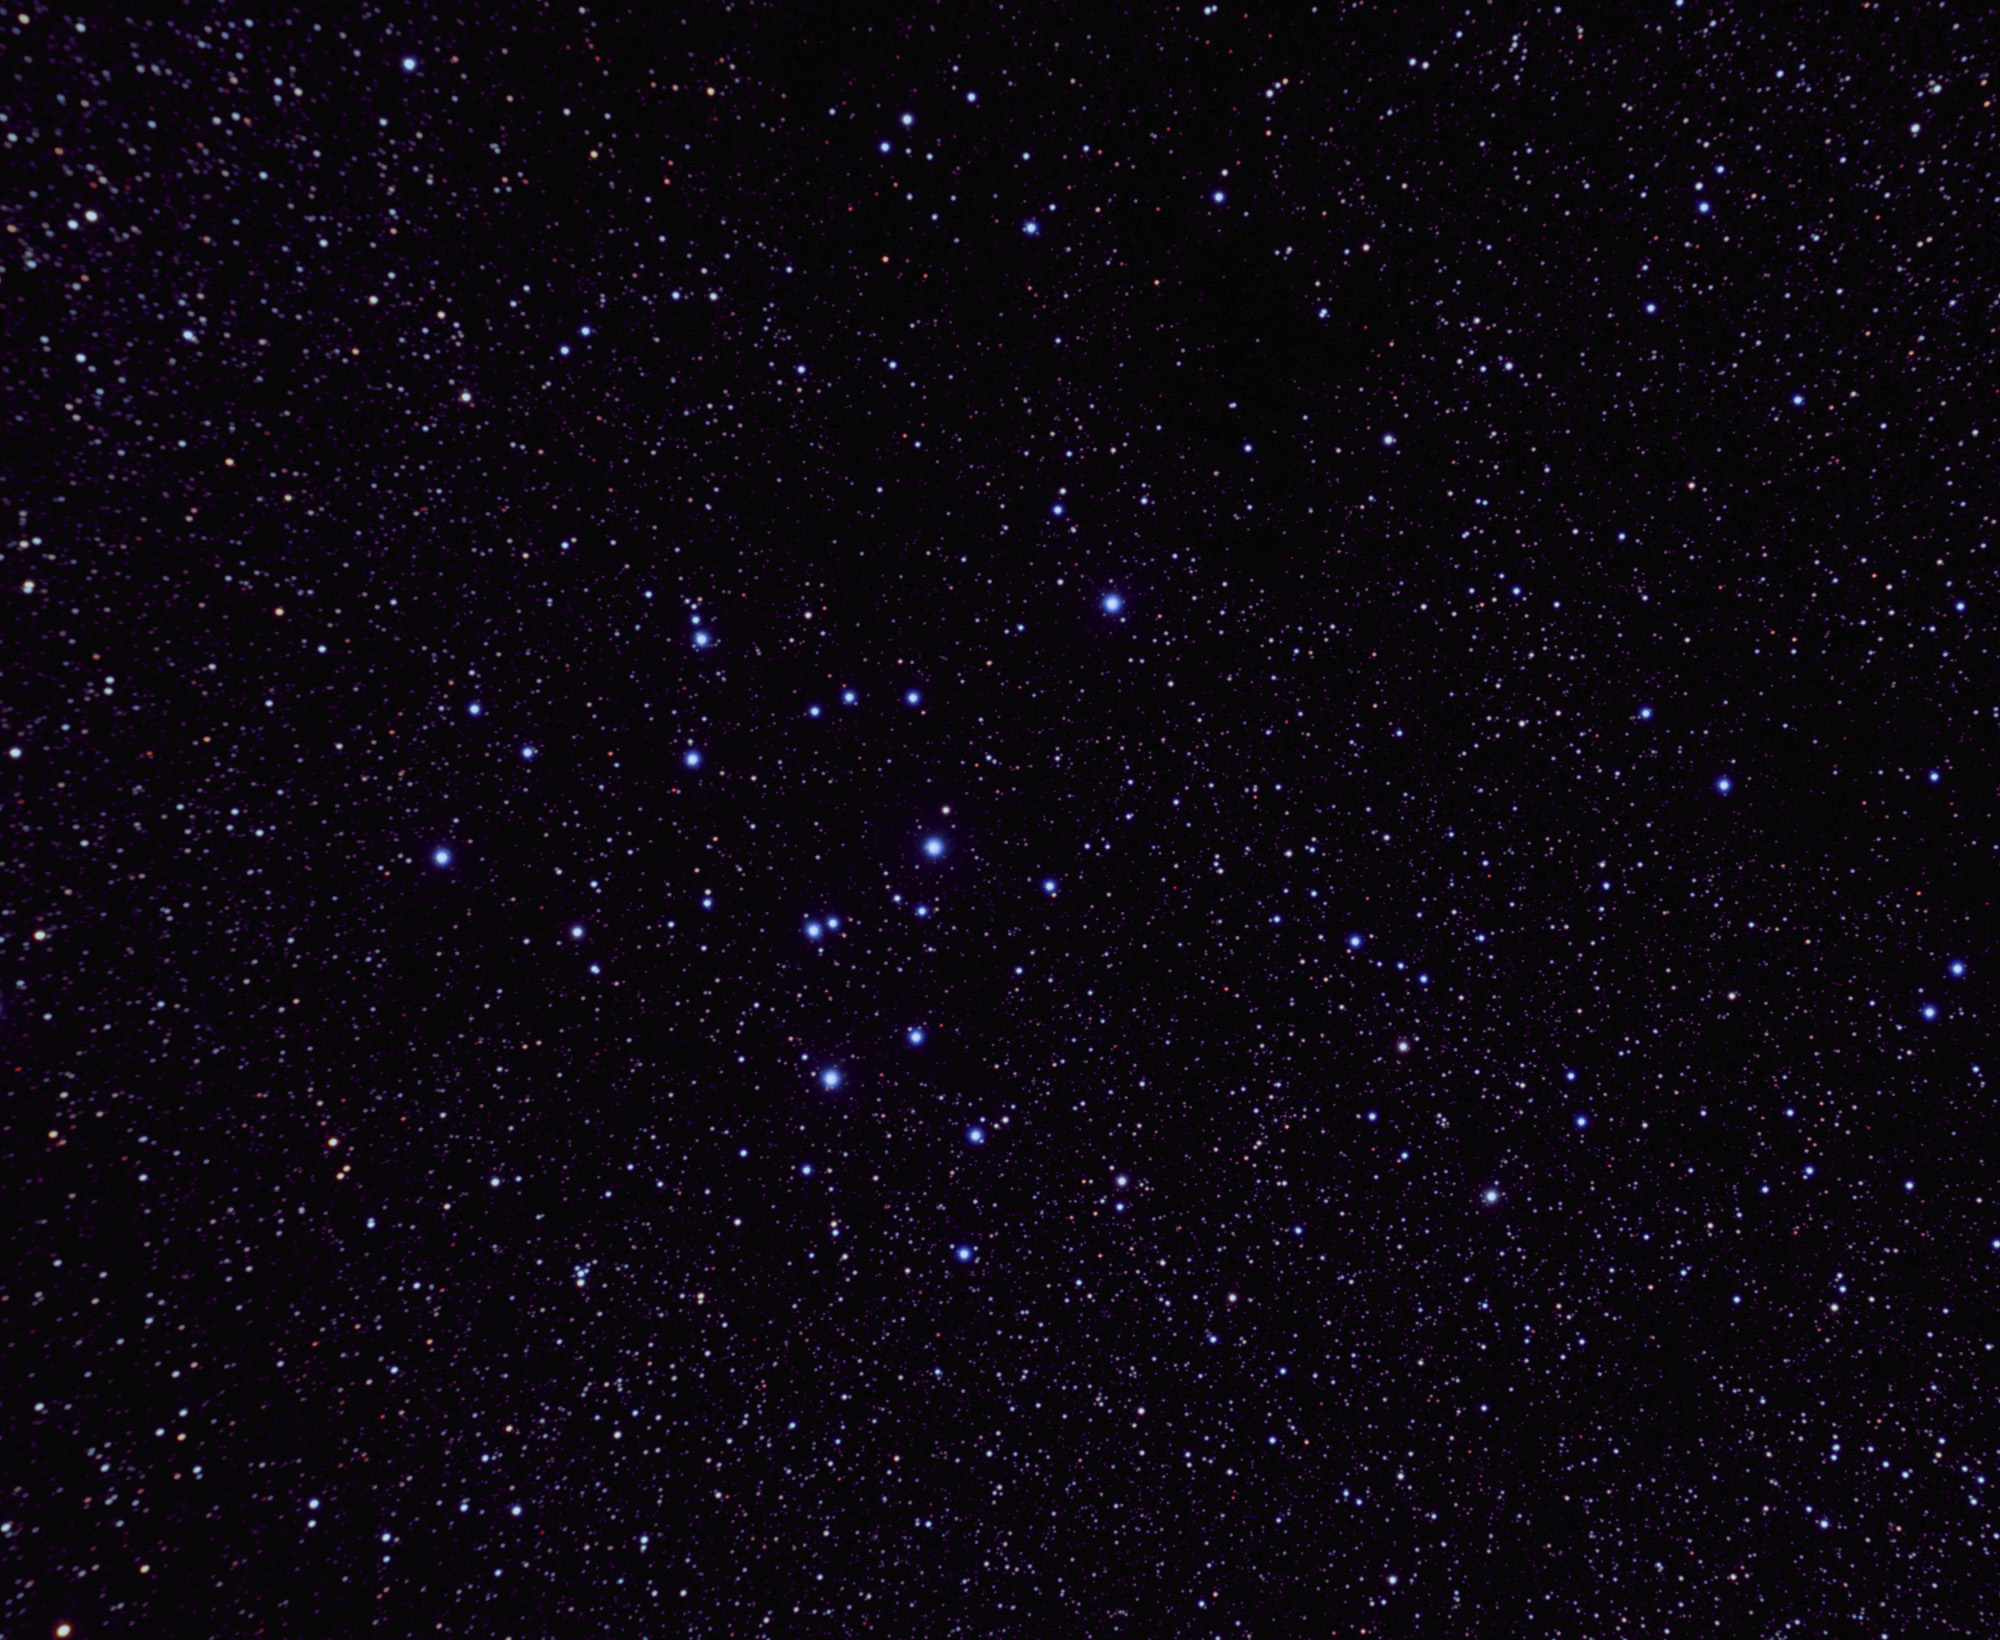 M39 in Cygnus Here's a 64 minute (16x240) exposure of star cluster M39. Taken with a 4" refractor. Processed with darks and flats (and flats for darks). The image is at the full resolution of the camera but it is cropped somewhat. Stars towards the left edge of the field are not nice and round (still have not had a chance to get the field flattener in place). Guiding was done through the C-11 with the Orion Autoguider. My last image of M39 was on 15 September 2008.
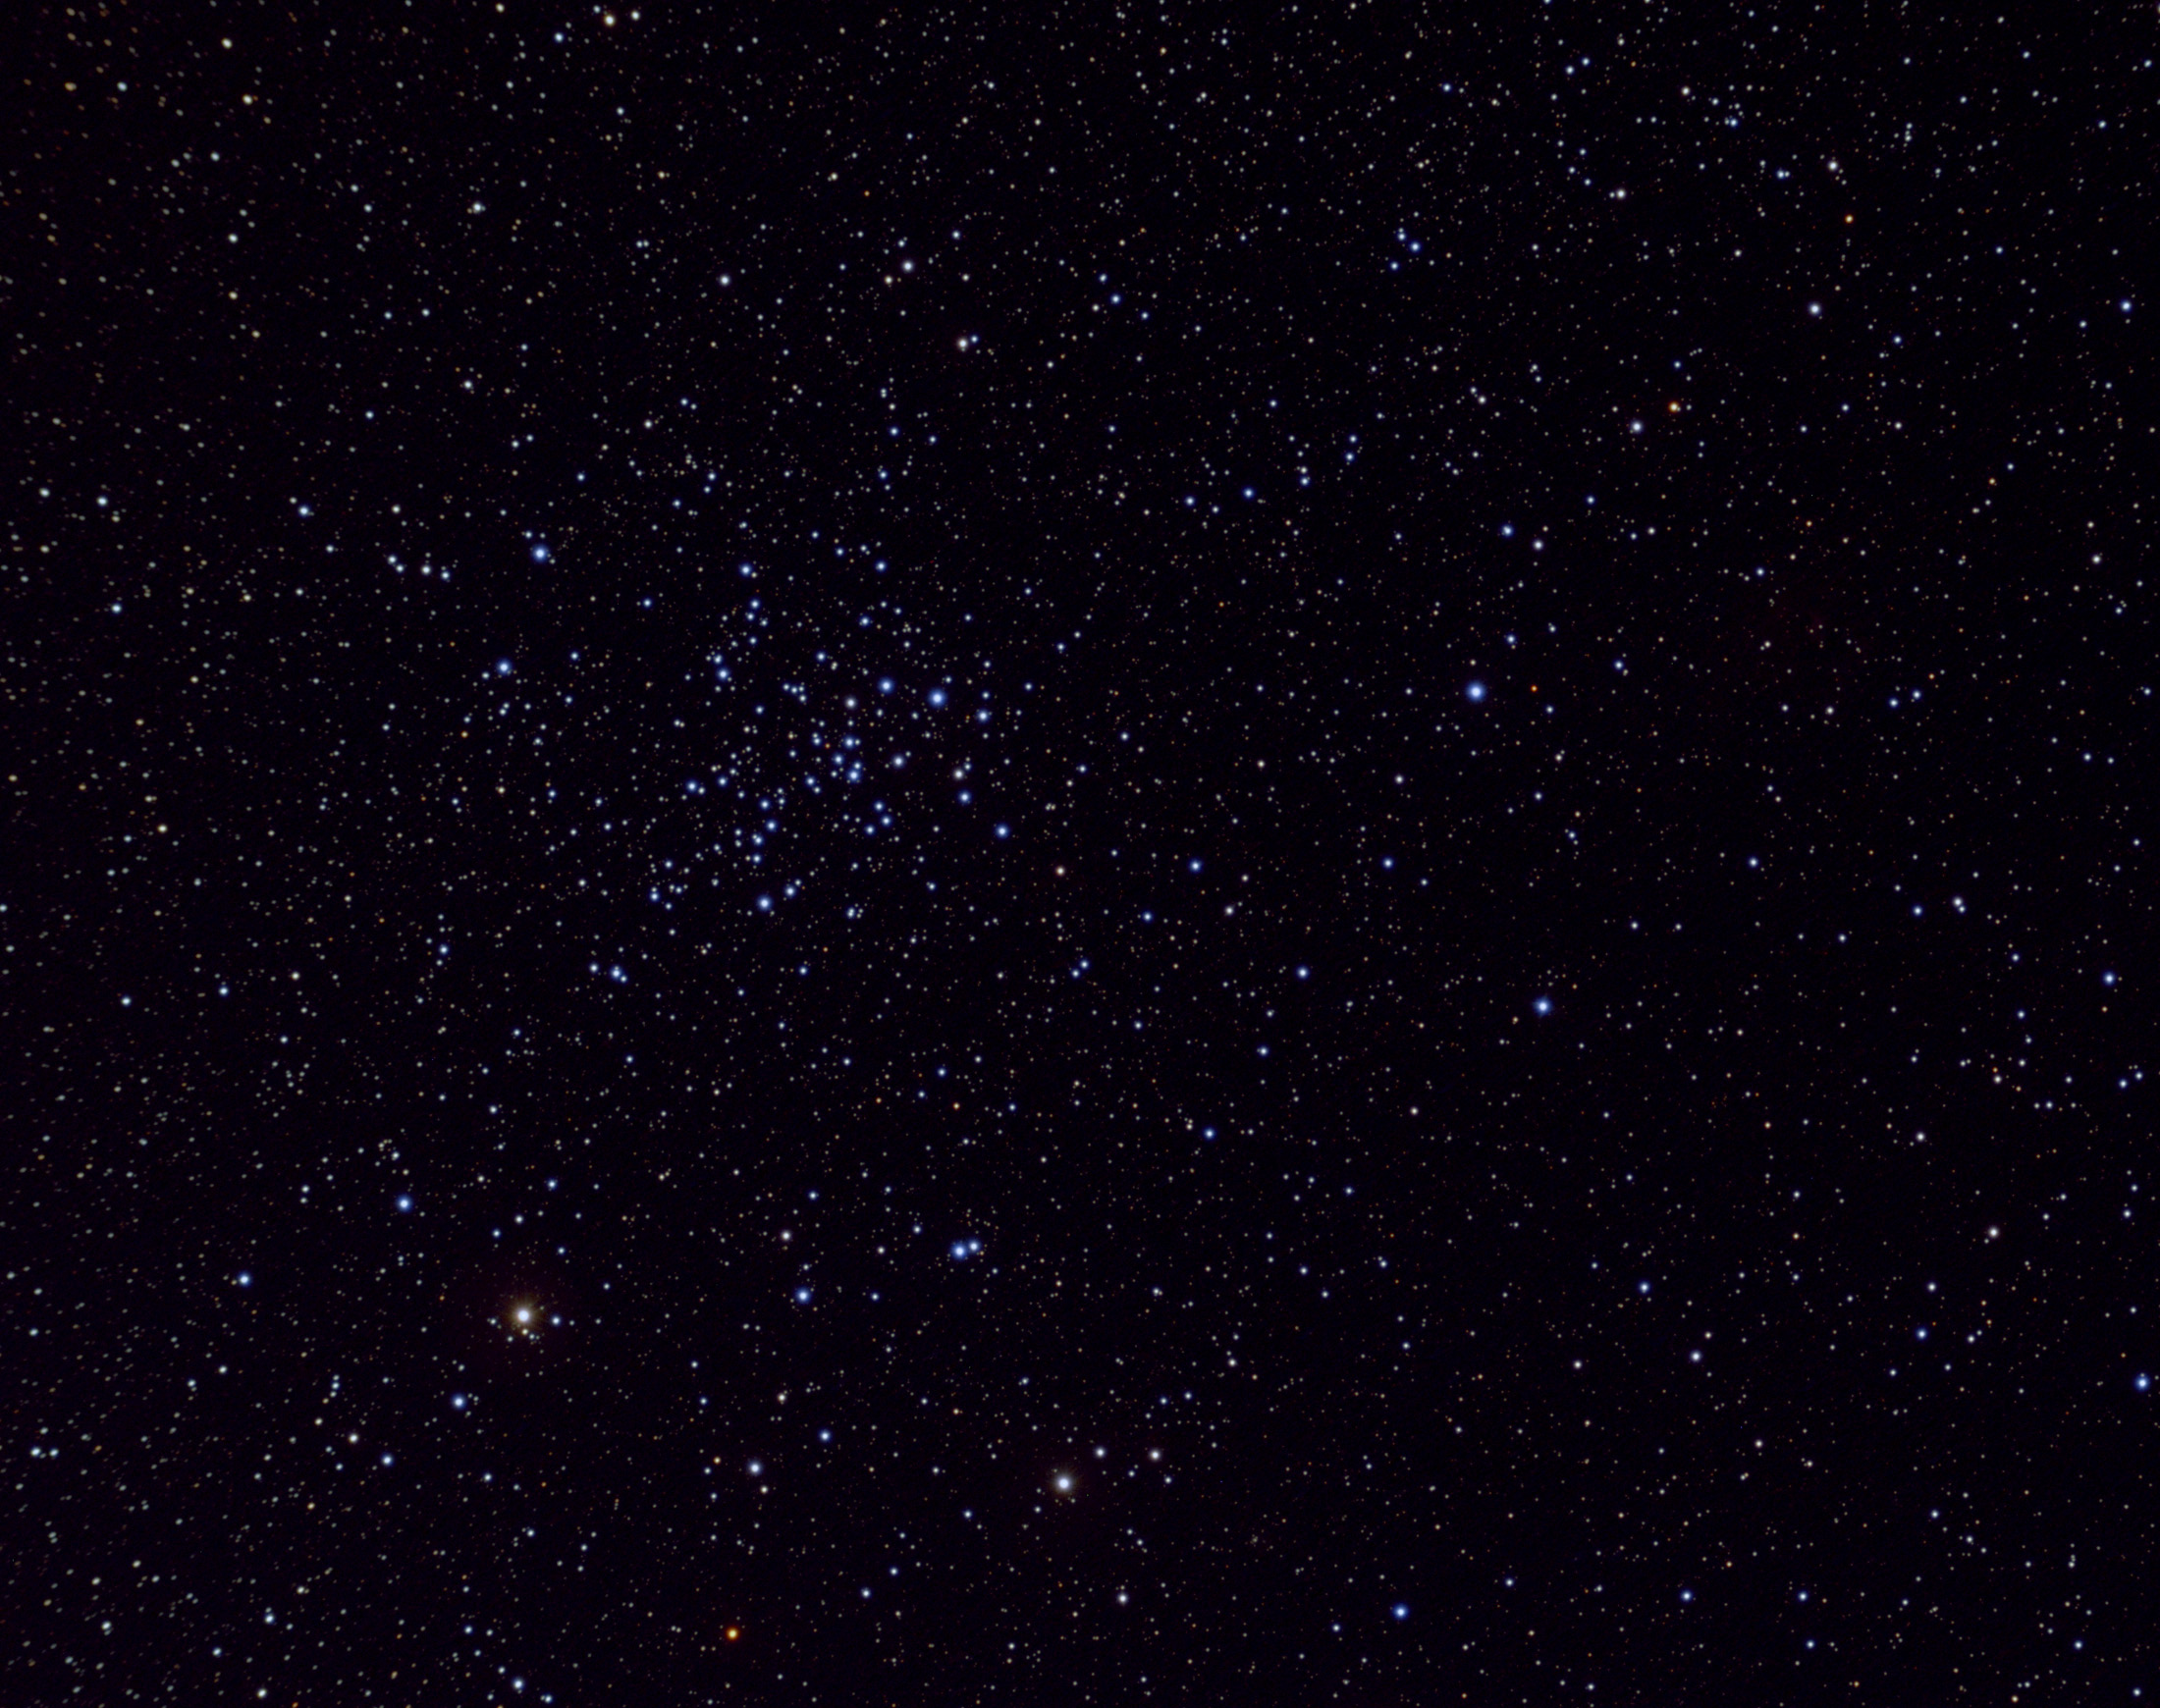 NGC 1528 in Perseus Here's an 80 minute (20x240) exposure of star cluster NGC 1528. Taken with a 4" refractor (665mm focal length). Processed with darks and flats (and flats for darks). The image is at the full resolution of the camera but it is cropped somewhat. Stars towards the left edge of the field are not nice and round (still have not had a chance to get the field flattener in place). Guiding was done through the C-11 with the Orion Autoguider. Note at the bottom of the image (left of center) there is a star with a very deep red color!
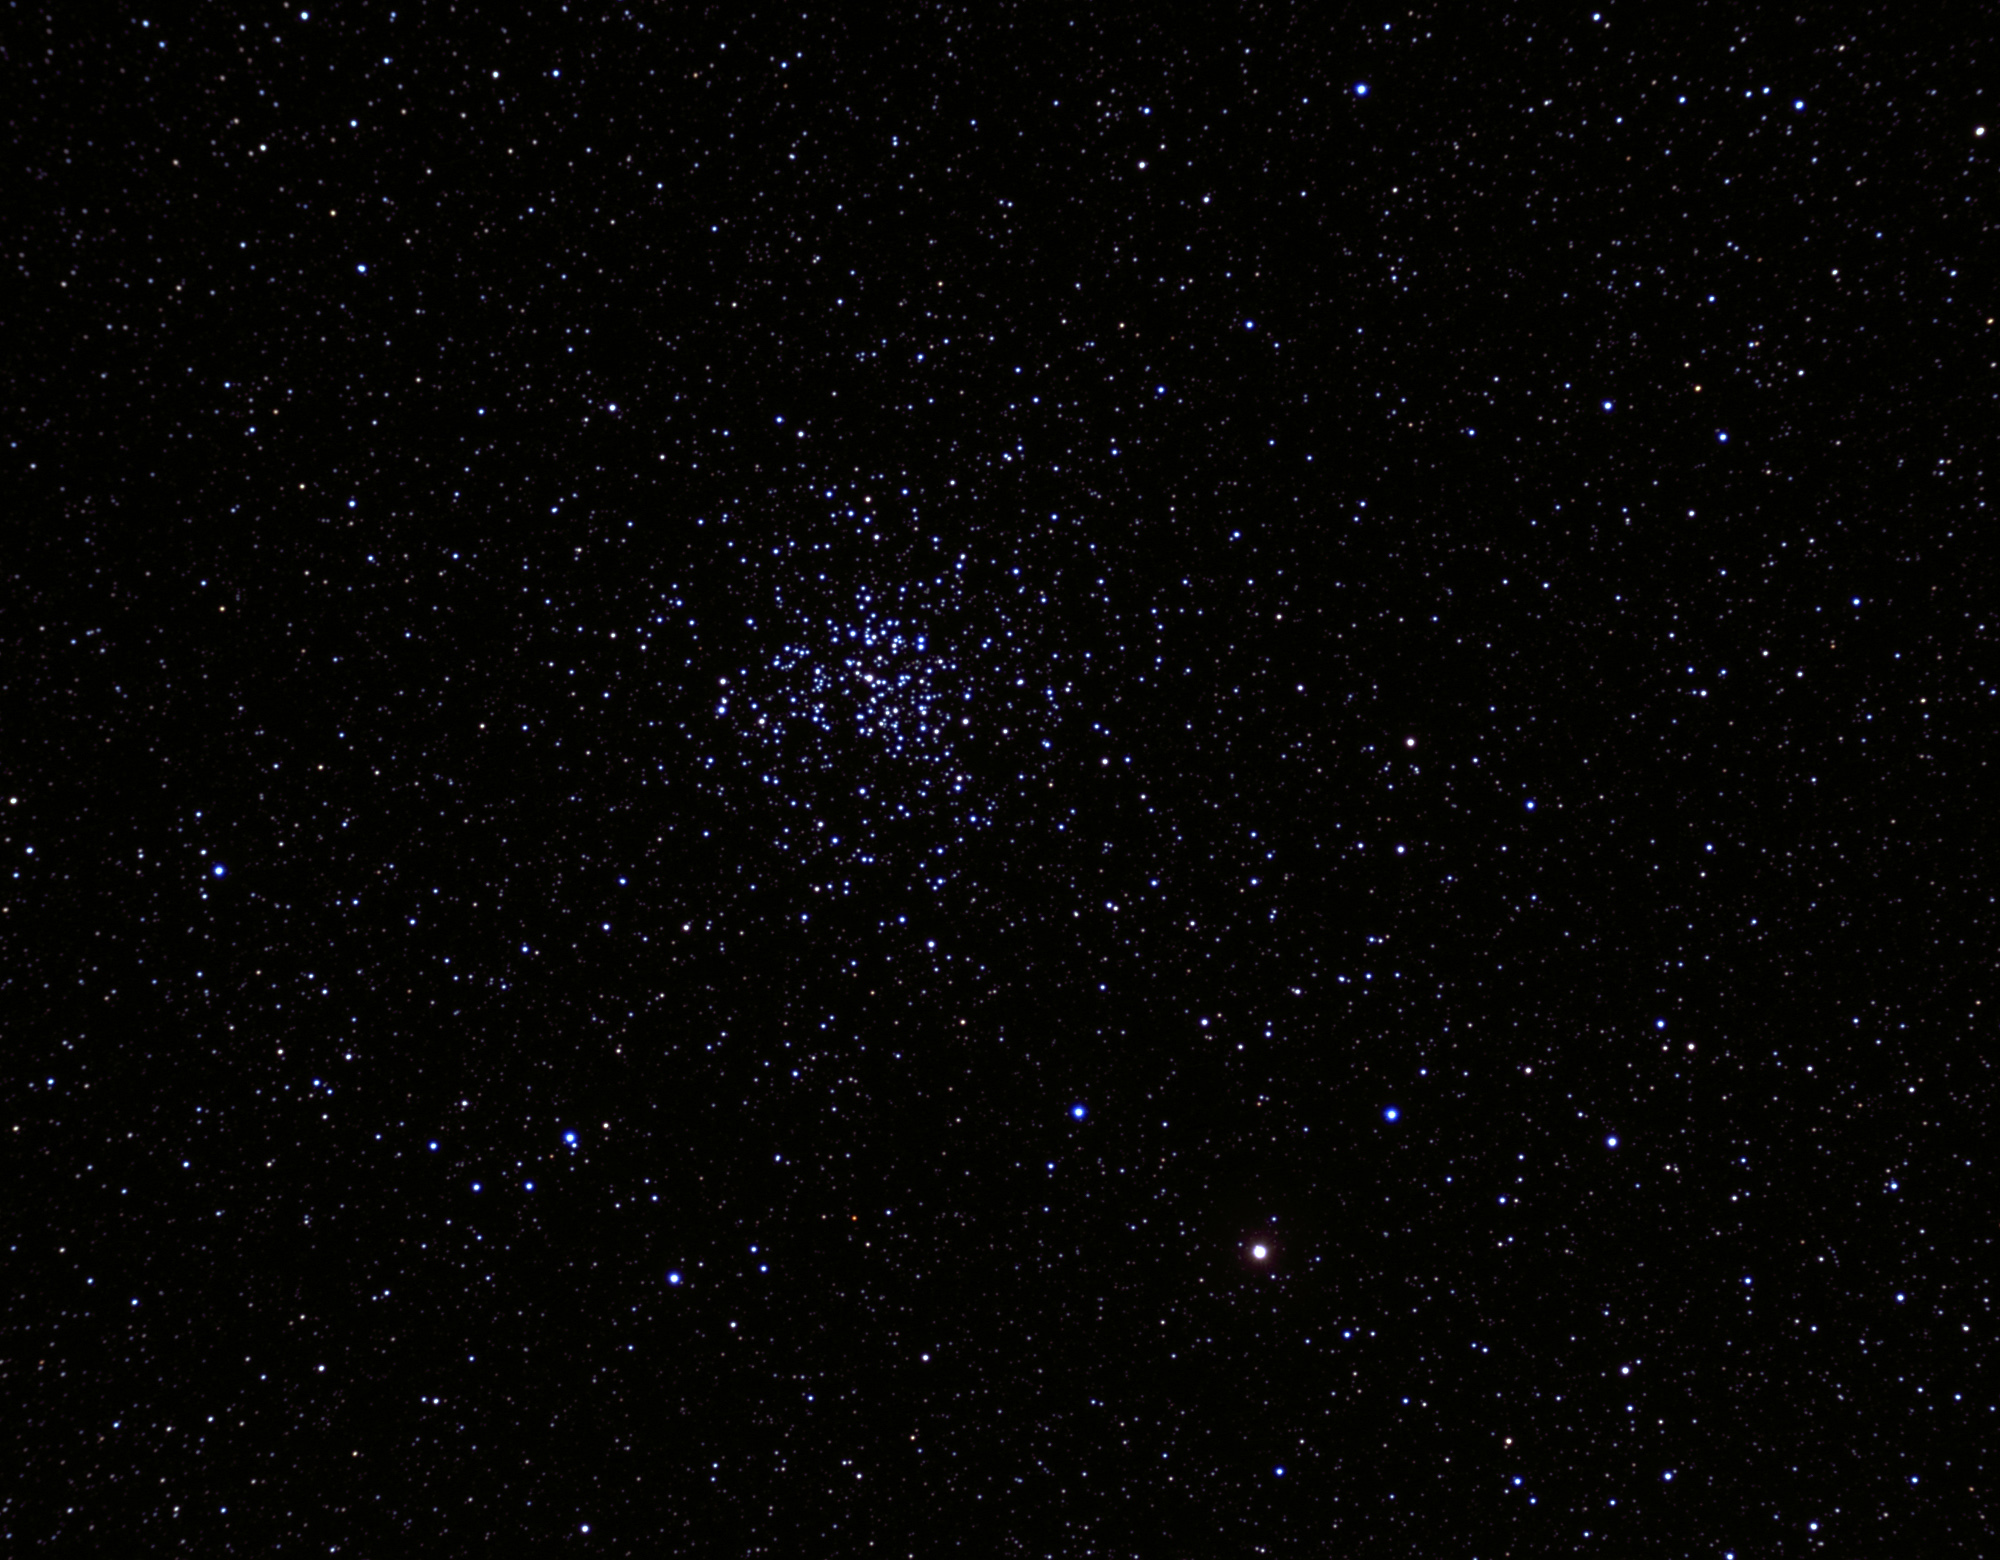 M37 in Auriga Here's a 156 minute (39x240) exposure of star cluster M37. Taken with a 4" refractor (665mm focal length). Processed with darks and flats (and flats for darks). The image is at the full resolution of the camera but it is cropped somewhat. Guiding was done through the C-11 with the Orion Autoguider. My last image of M37 was on 13 Feb 2009.
Tonight I had a few small scopes out for a quick look; I noticed that the seeing conditions were superb (I see conditions like this only once every few years around here). I went to get set up for imaging. However, software problems with my planetary imager fowled up the computer and cost me about 2 hours to restore. By the time I got things going again it started to cloud up! I managed to get one shot using the StarShoot Deep Space Imager (I don't normally use it for the Moon however it will work for that purpose). Later on, after I shut everything down, it started clearing again (however after the way thigns went earlier in the evening I took it as a sign to "go to bed".
 Lunar Close Up Here's a shot of the limb of the Moon taken with a Celestron 11 scope (focal length 2800mm). Exposure was 0.08 seconds, and the camera was set for color mode. Seeing had degraded somewhat by the time I got this shot. It is very rare (where I live) to have seeing that will allow detail to be held at this focal length (2800mm). I did not have time (due to clouds rapidly approaching) to get a Bahtinov mask quality focus (focus was done by eye as best I could).
It has been a tough year for imaging. Huge amounts of snow prevented me from getting to the observatory for about a month. Then lots of travel for work. Then very rainy and cloudy weather. And now a tornado! I finally had a chance to do one image on the evening of 31 May...
 M13 Here is my best shot of M13 to date. I reprocessed the raw data on 02 January 2012 (I have learned more about processing) and the result is the image shown (defintely better than the original one)! This is an 84 minute (21x240 seconds) shot of M13 taken through a Celestron 14 telescope. A Meade F3.3 focal reducer was used, making the focal length of the scope somewhere around 1400mm. Guiding was done using a Tasco 2.4" refractor and an Orion Autoguider. The image is reduced in scale and it is cropped slightly. Processed with darks and flats and darks for flats using Maxim DL. Final processing done in Photoshop. If you want to compare my originally processed image is here . If you compare them you will see a BIG improvement. Lesson taken: don't be too quick to delete raw data... you may be able to do a lot more with it later on as your skills progress!
Hurricane Irene came through here on 28 August and left over 1 million people (me included) in the dark between CT and RI. As a result the darkness of the sky was unlike anything I've seen since I was a kid. That miserable scourge of light pollution was mostly gone AND it was new Moon AND it was clear! I did run a generator to get power to the observatory and I managed to get 3 images.
 NGC 6791 Here's a 12 minute shot of the cluster NGC 6791 in Lyra. This cluster is fairly faint visually however the camera picks it up fairly well. Taken with a 4" refractor, also an Astro-Tech field flatenner is in the optical path. The image is at the full scale resolution of the camera but it is cropped. Processed with darks and flats and darks for flats using Maxim DL. Final processing done in Photoshop.
 NGC 6781 This is a 40 minute (total) shot of the planetry nebula NGC 6781 in Aquila. Taken with a 4" refractor and also an Astro-Tech field flattener is in the optical path. The image is at the full scale resolution of the camera but it is cropped. Processed with darks and flats and darks for flats using Maxim DL. Final processing done in Photoshop.
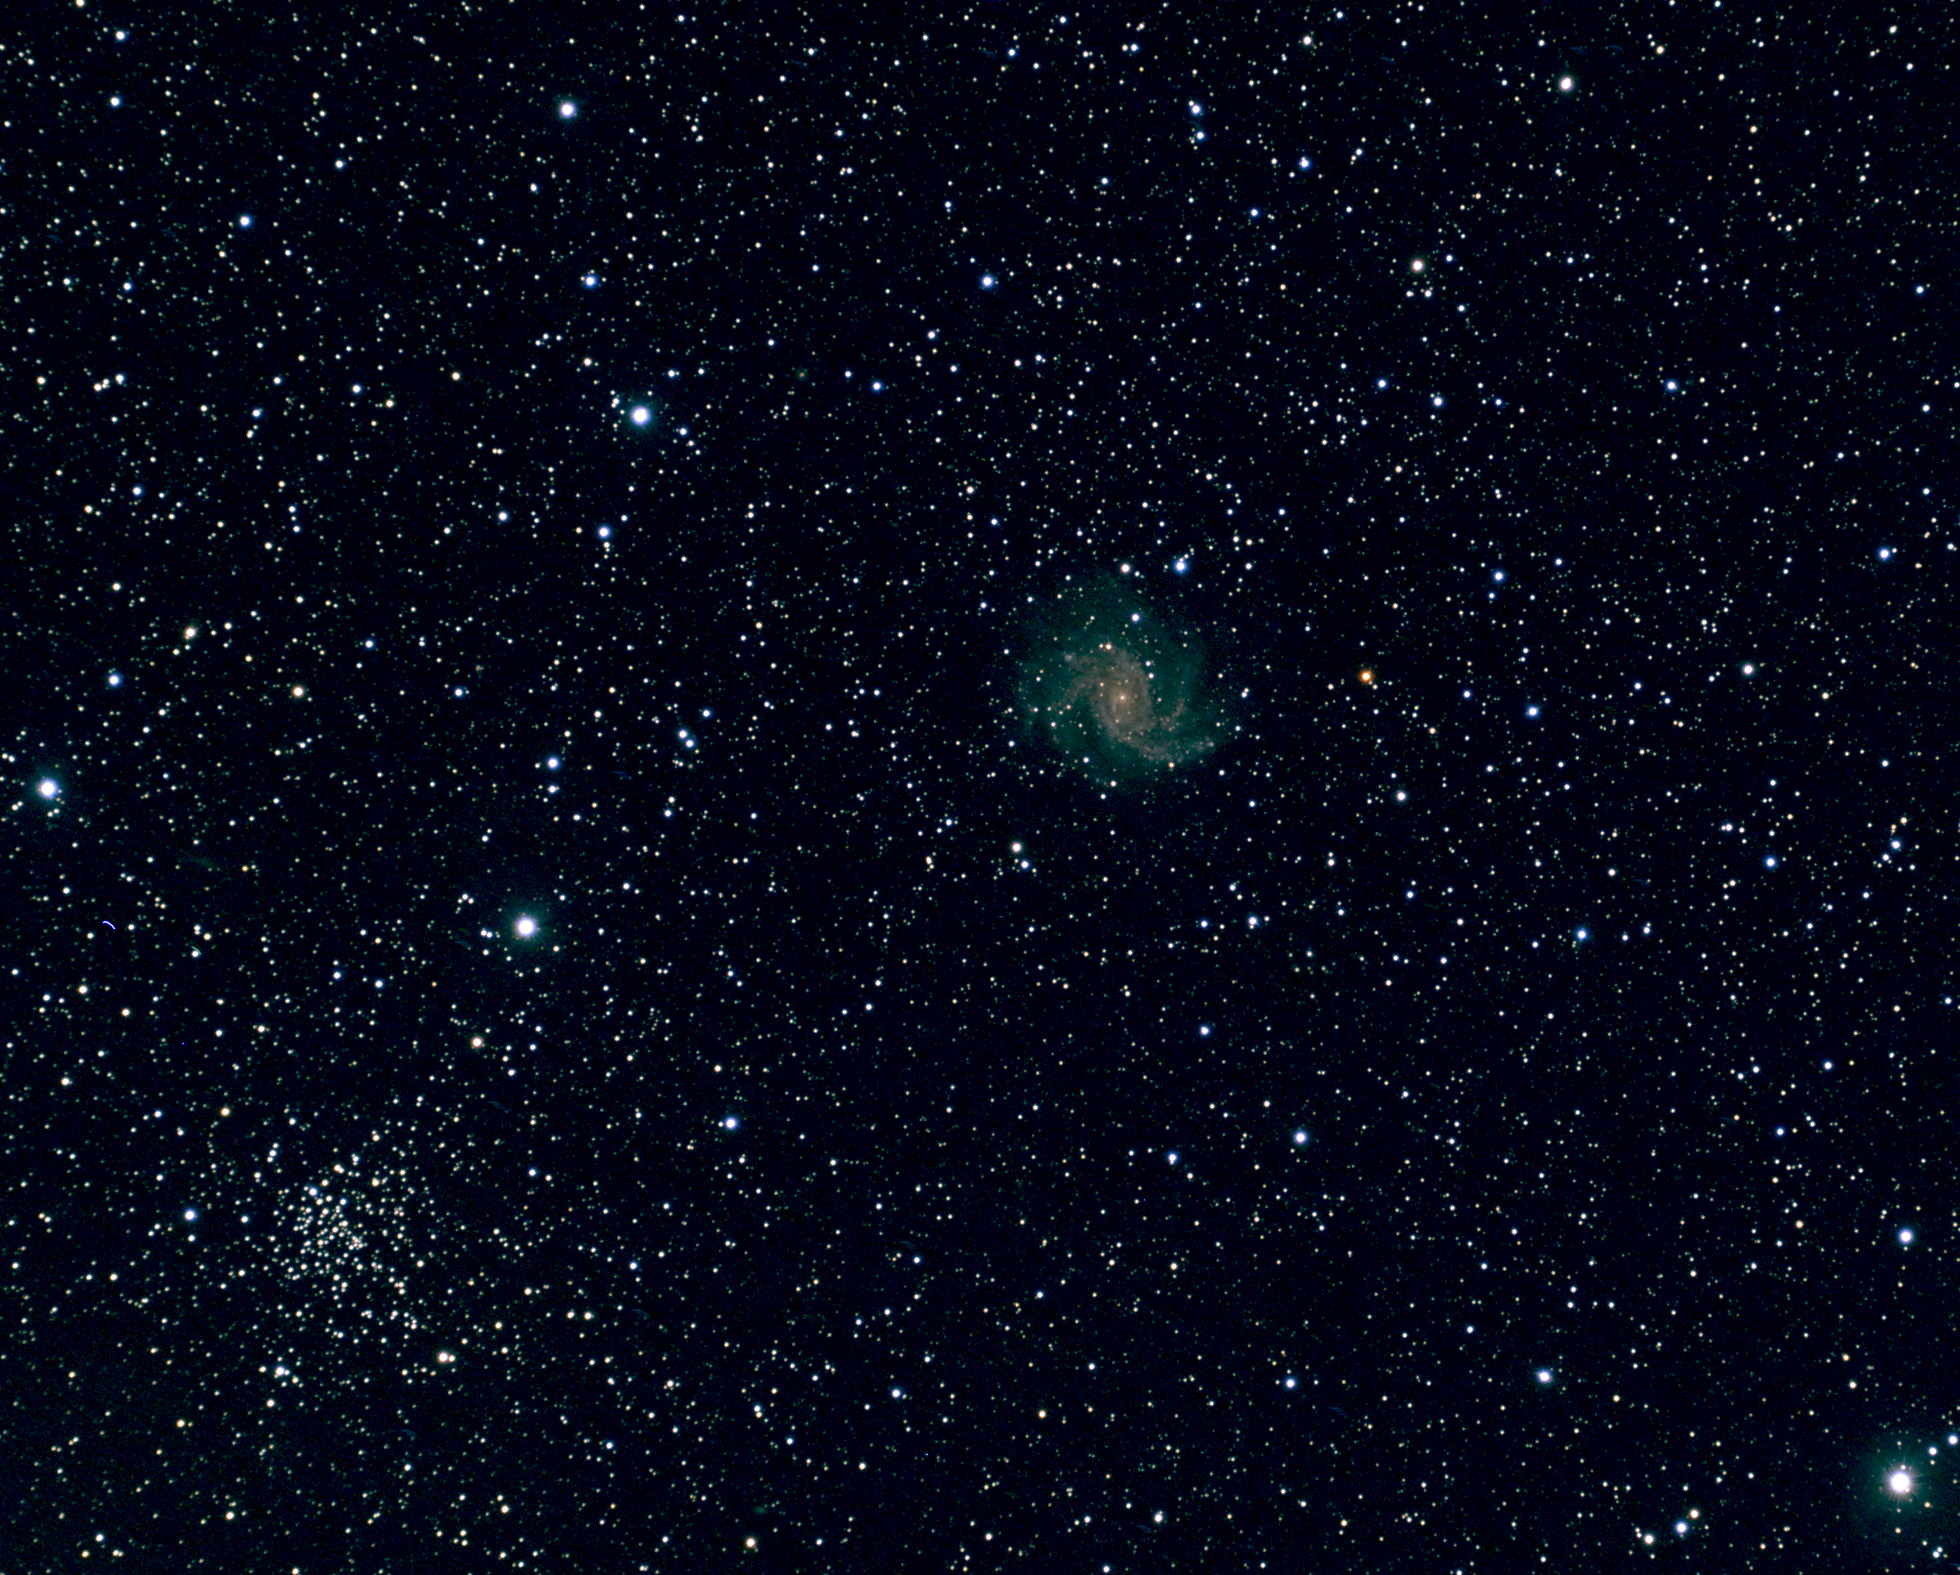 NGC 6946 This is a 72 minute (total) shot of the galaxy NGC 6946 in Cepheus. Also in the shot (but somwehat lesser quality due to being at the edge of the field of view) is cluster NGC . Taken with a 4" refractor and also an Astro-Tech field flattener is in the optical path. The image is at the full scale resolution of the camera but it is cropped. Processed with darks and flats and darks for flats using Maxim DL. Final processing done in Photoshop.
Lights were still out for around 100,000 people in the southeast CT area. Although not quite as good as the previous session, skies were still decent. I managed to get 4 images tonight.
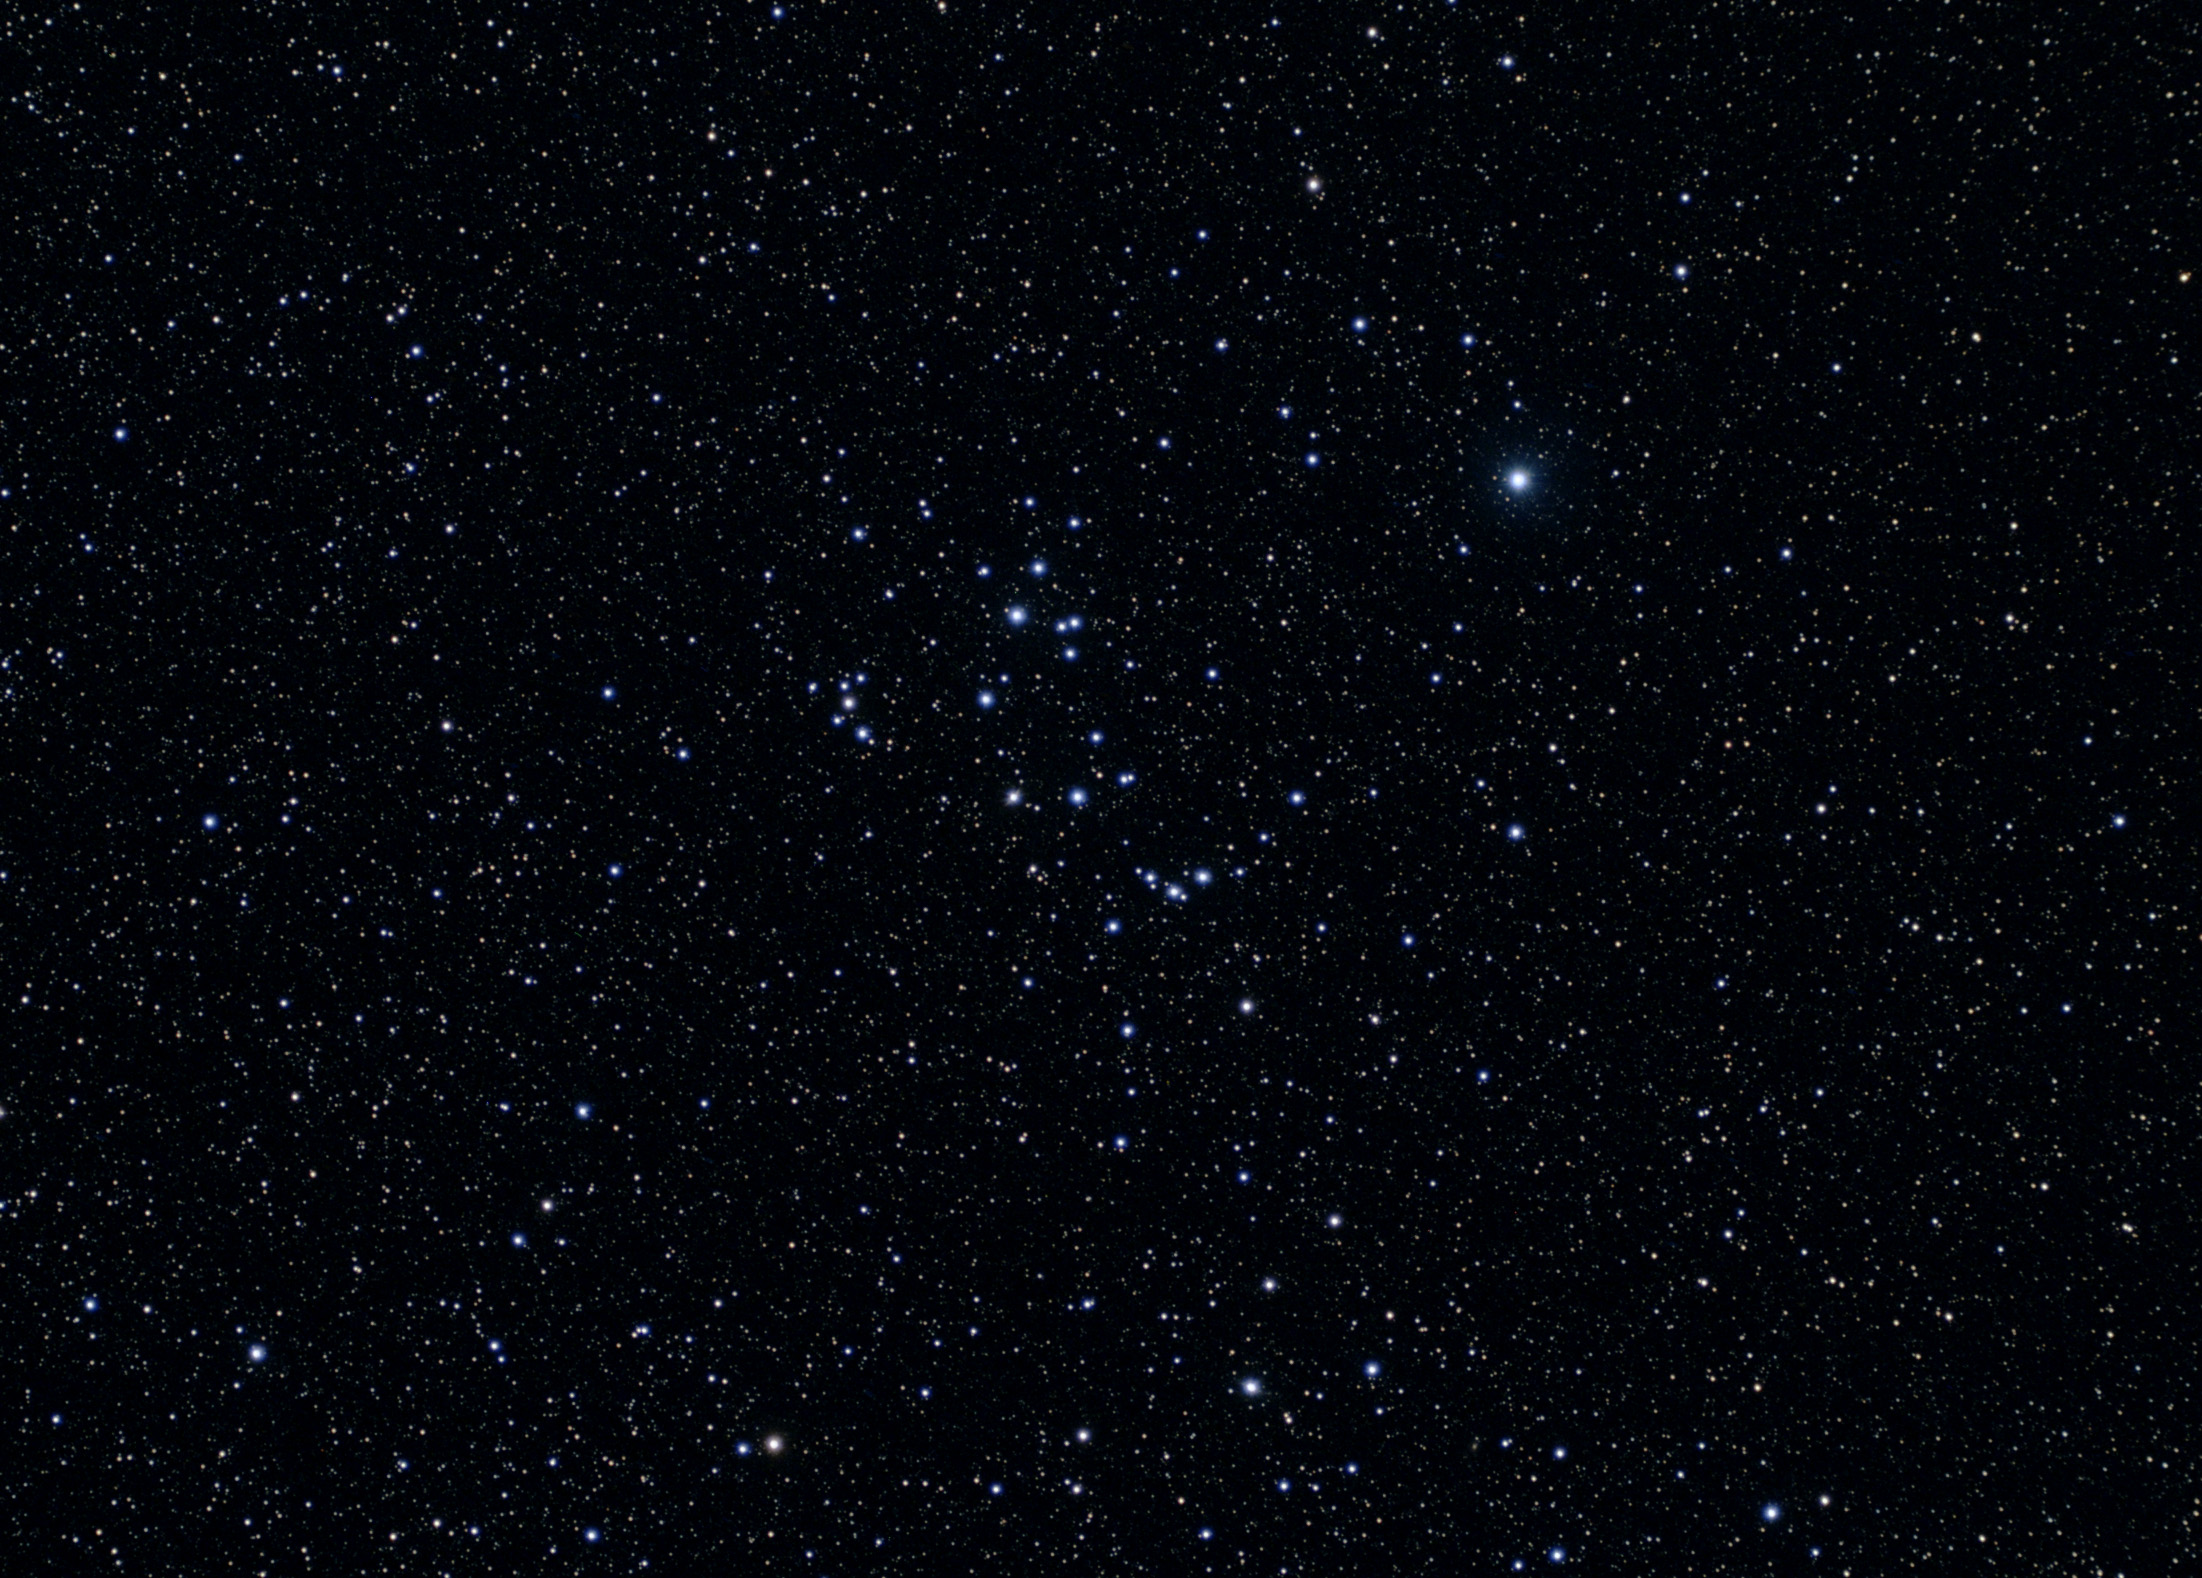 NGC 6633 Here's a 32 minute exposure (8x240 seconds) of the cluster NGC 6633 in Ophiuchus. This is a cluster I used to observe a lot as a kid with a 2.4" refractor. Taken with a 4" refractor, also an Astro-Tech field flatenner is in the optical path. The image is at the full scale resolution of the camera but it is cropped. Processed with darks and flats and darks for flats using Maxim DL. Final processing done in Photoshop.
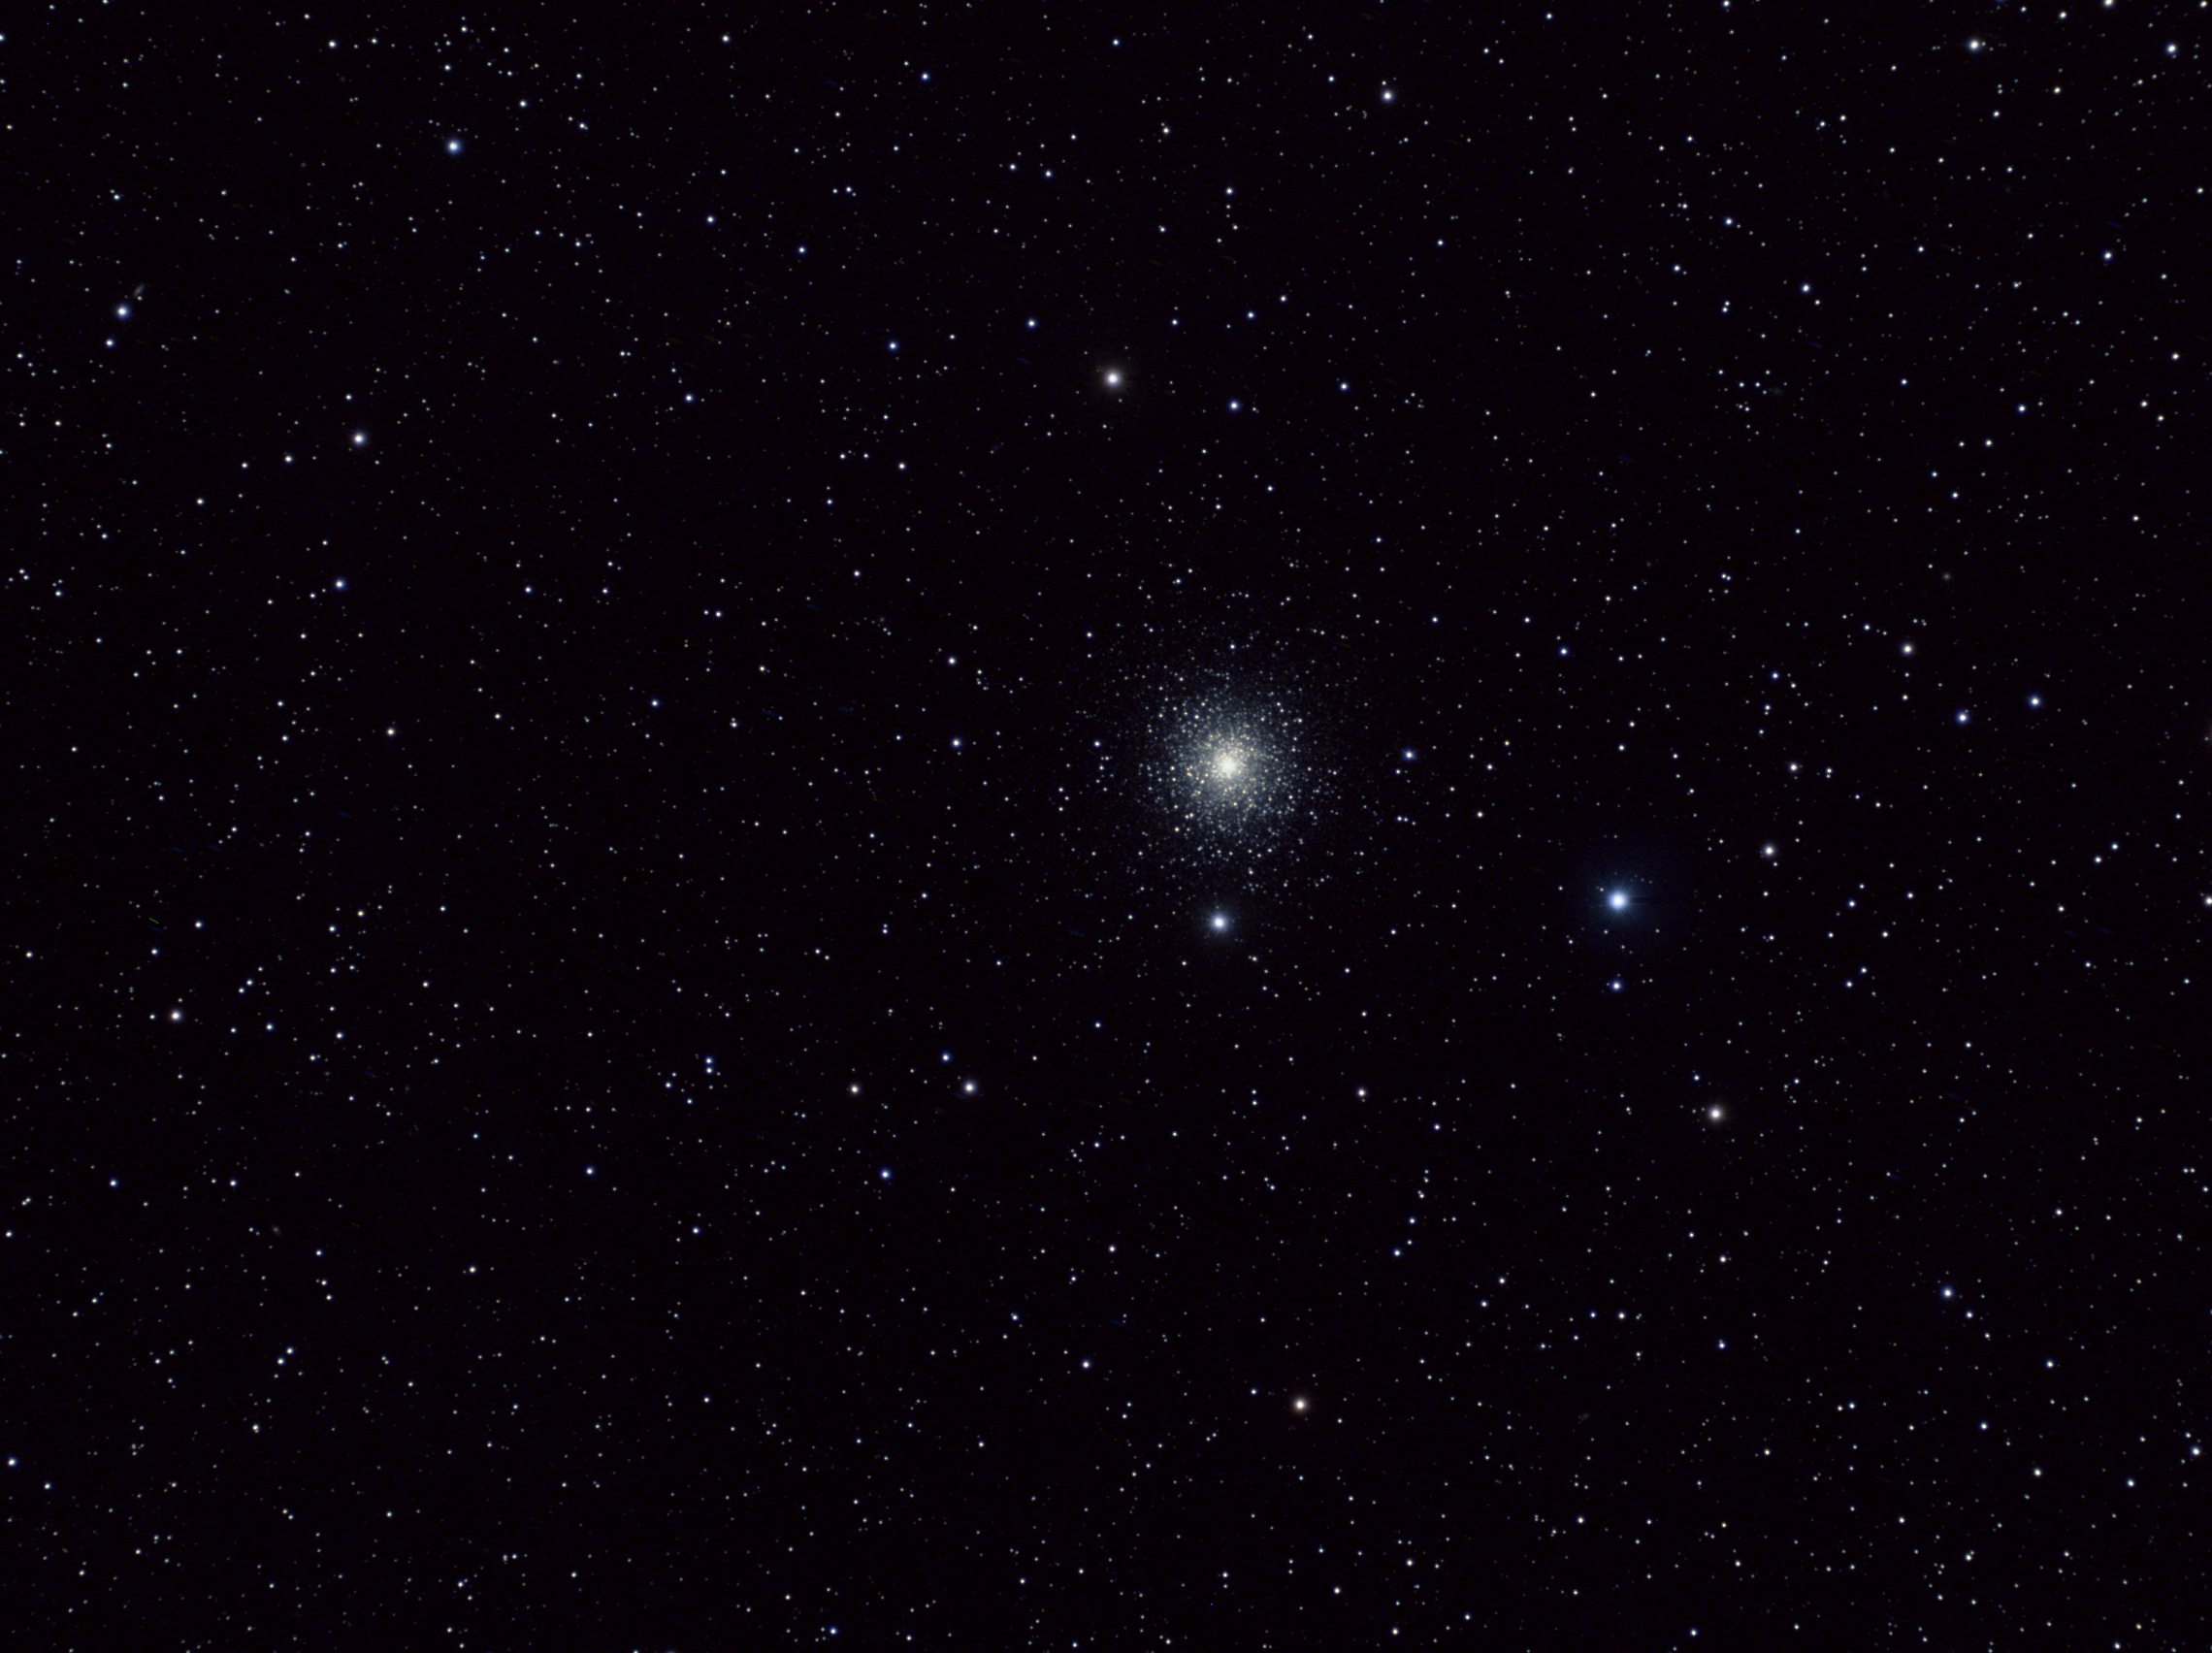 M15 Ths is a one hour (15x240 seconds) exposure of the globular cluster M15. Taken with a 4" refractor, also an Astro-Tech field flatenner is in the optical path. The image is at the full scale resolution of the camera but it is cropped. Processed with darks and flats and darks for flats using Maxim DL. Final processing done in Photoshop. Compare this image with the one I took on Second Night Images (30 August 2008) near the top of the page!
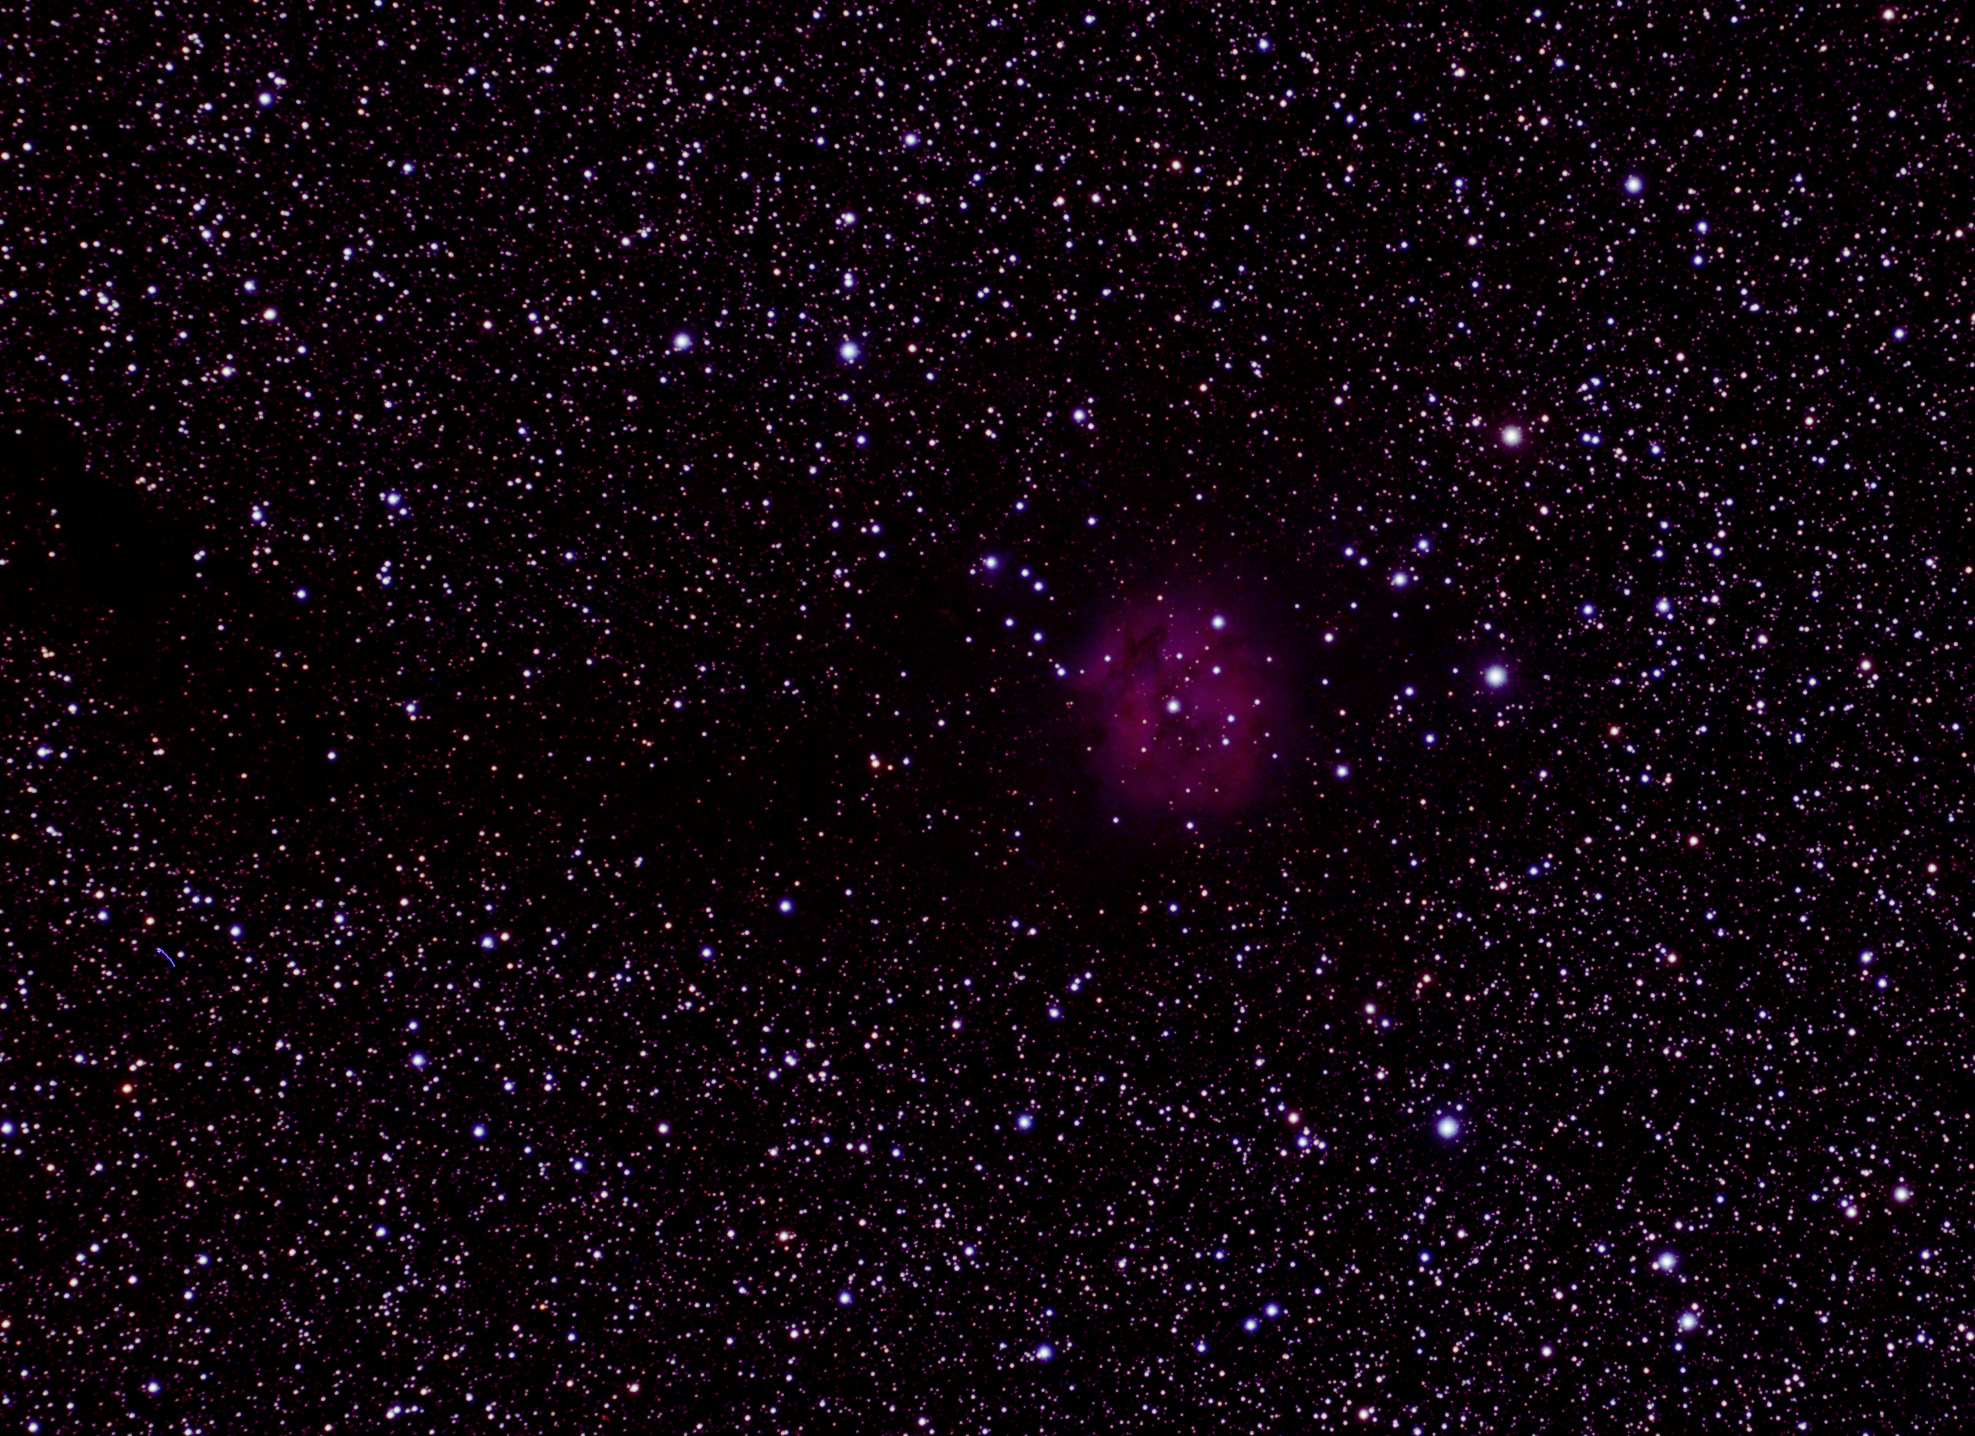 IC 5146 the "Cocoon" Nebula Here's a 3 hour exposure (45x240 seconds) of the Cocoon nebula. This object is fairly faint and takes a good long exposure for it to show well. Off to the left in the image you can see a dark nebula as well. Taken with a 4" refractor, also an Astro-Tech field flatenner is in the optical path. The image is at the full scale resolution of the camera but it is cropped. Processed with darks and flats and darks for flats using Maxim DL. Final processing done in Photoshop.
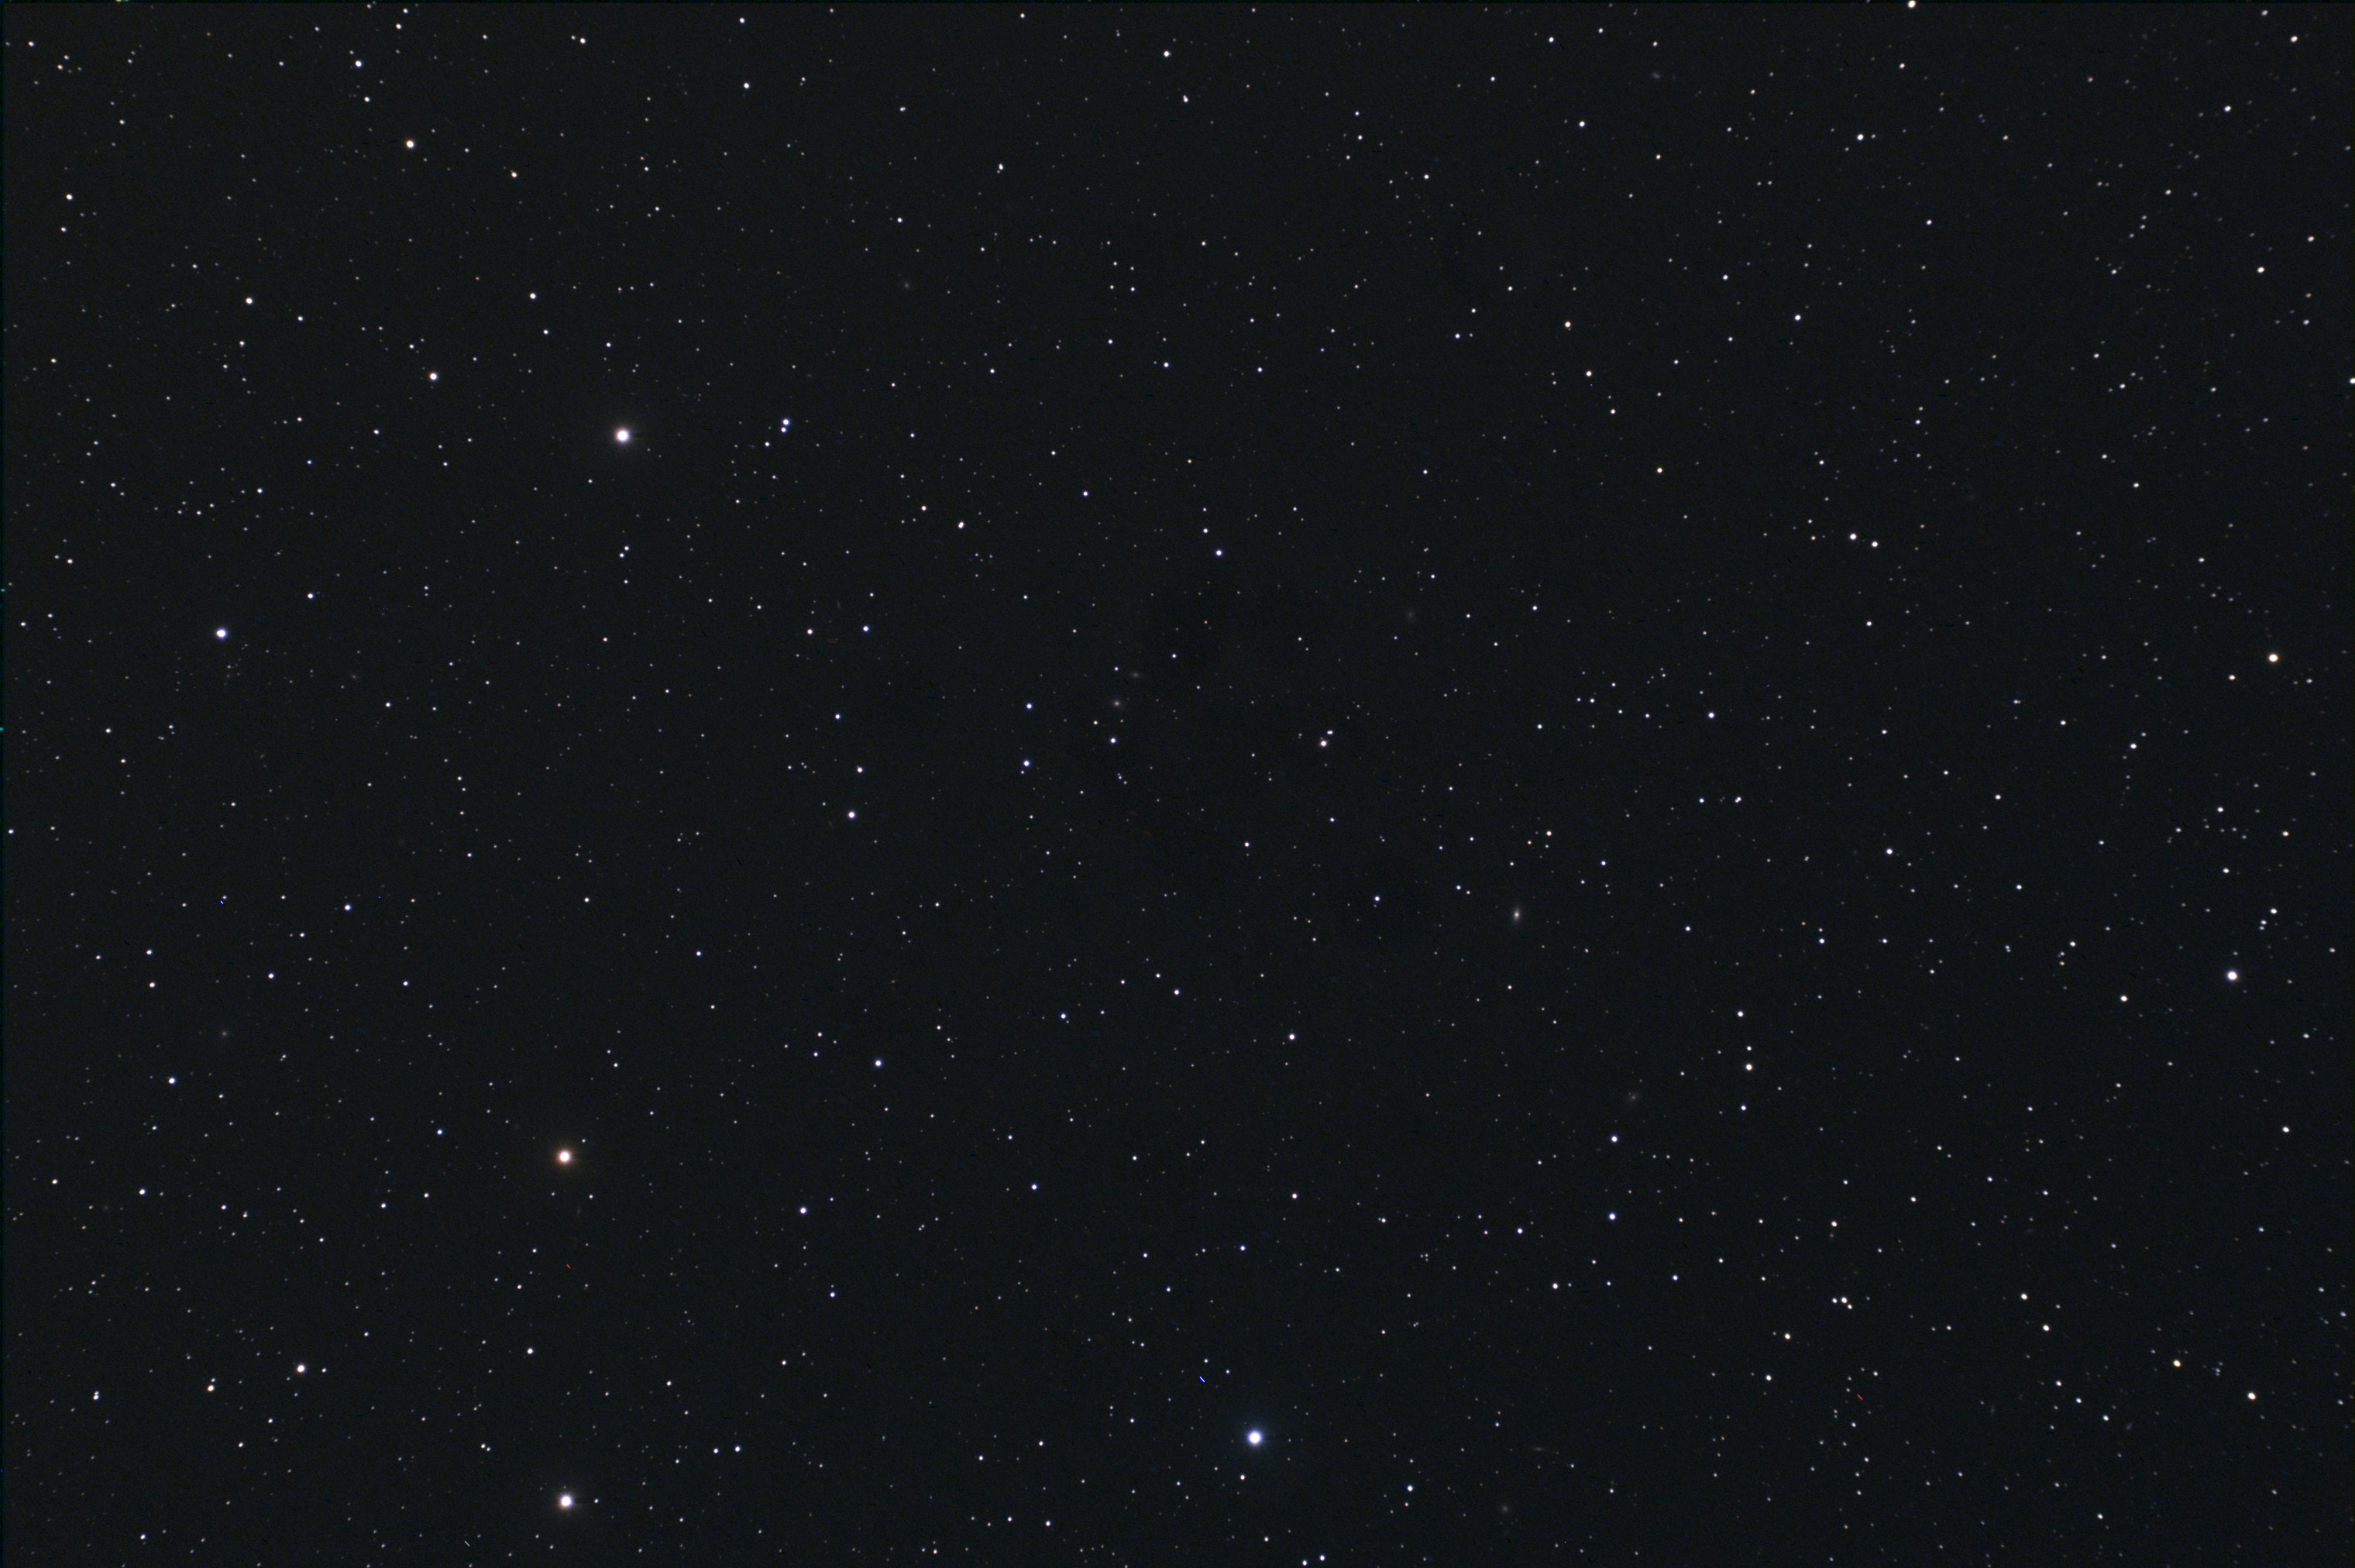 NGC 1 Ths is a 40 minute (10x240 seconds) exposure of the galaxy NGC1 and the surrounding field (in Pegasus). NGC1 is the brightest galaxy visible in this image. Taken with a 4" refractor, also an Astro-Tech field flatenner is in the optical path. The image is at the full scale resolution of the camera and a full frame (not cropped). Note that many other galaxies can be seen in this image. I always wanted to have an image of NCG1 and now I have it! Processed with darks and flats and darks for flats using Maxim DL. Final processing done in Photoshop.
Finally had a clear night with the Moon mostly out of the way. I managed to get 3 images tonight:
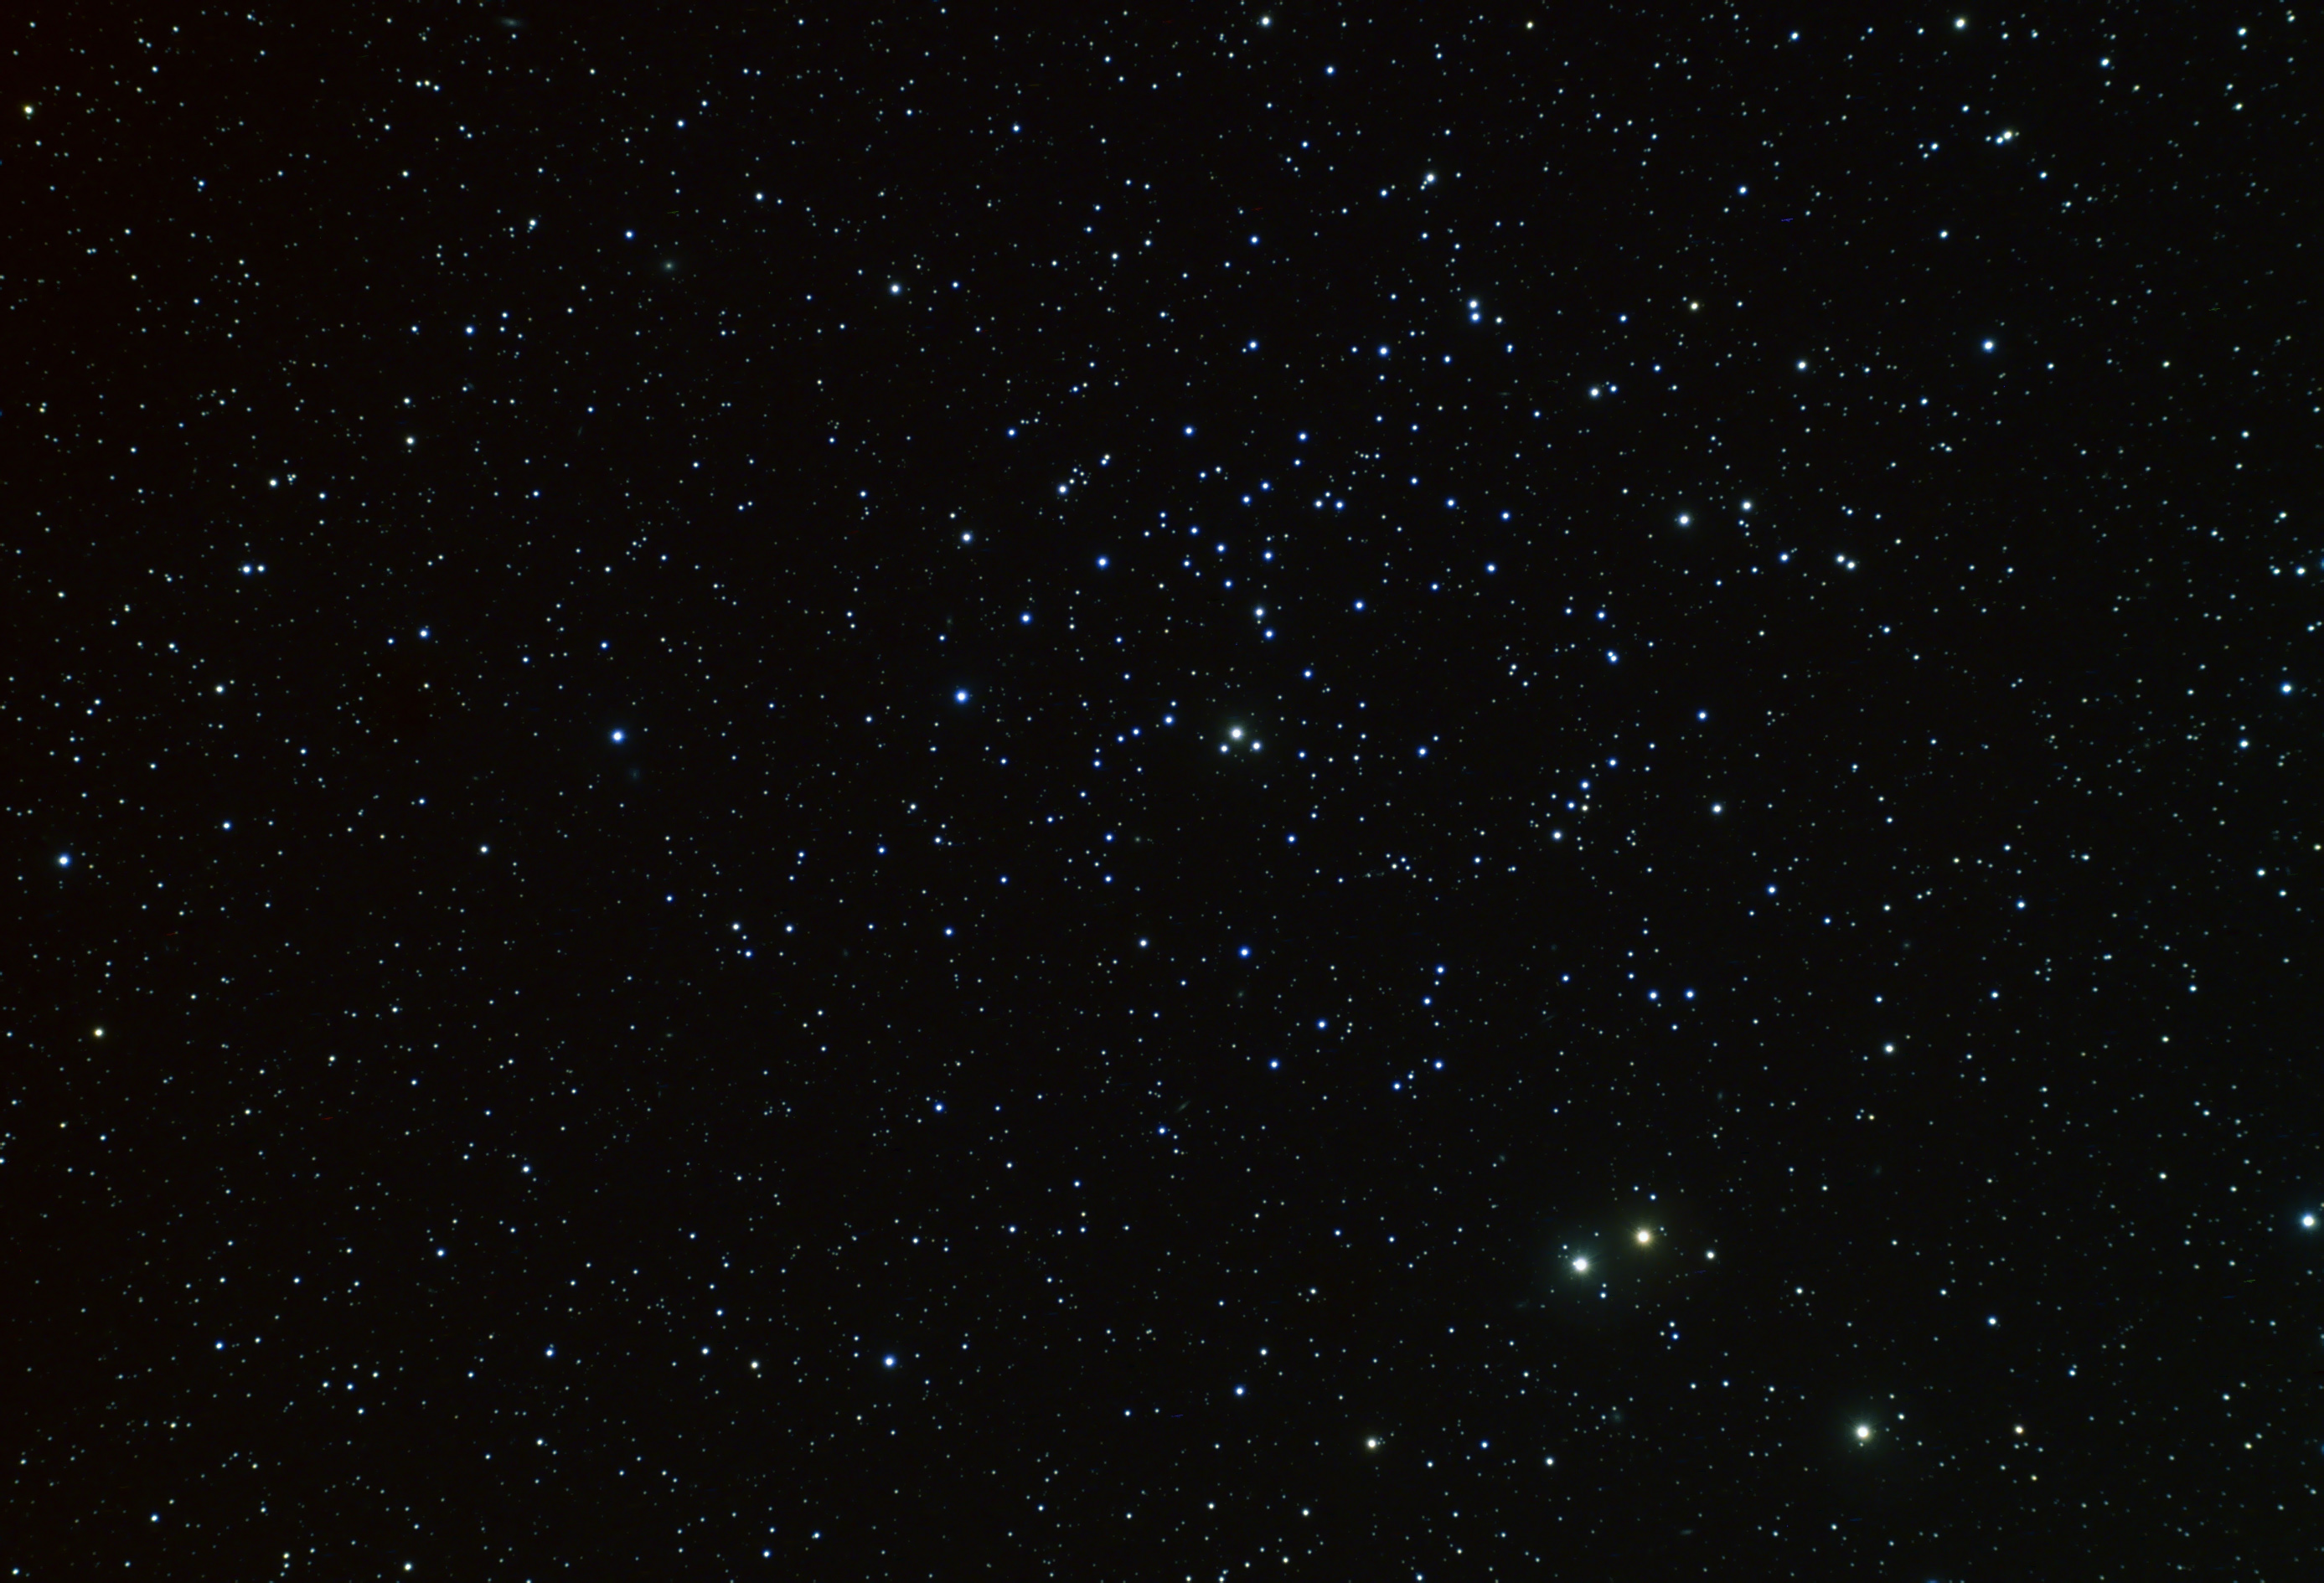 NGC 752 Here's a 108 minute exposure (27x240 seconds) of the cluster NGC 752 in Andromeda. This is a large cluster (best seen at very low power or in binoculars). A close inspection of this image reveals a significant number of background galaxies (some right in the cluster)! Taken with a 4" refractor, also an Astro-Tech field flatenner is in the optical path. The image is at the full scale resolution of the camera but it is cropped slightly. Processed with darks and flats and darks for flats using Maxim DL. Final processing done in Photoshop. Celestron C-14 was used for guiding with an Orion Autoguider.
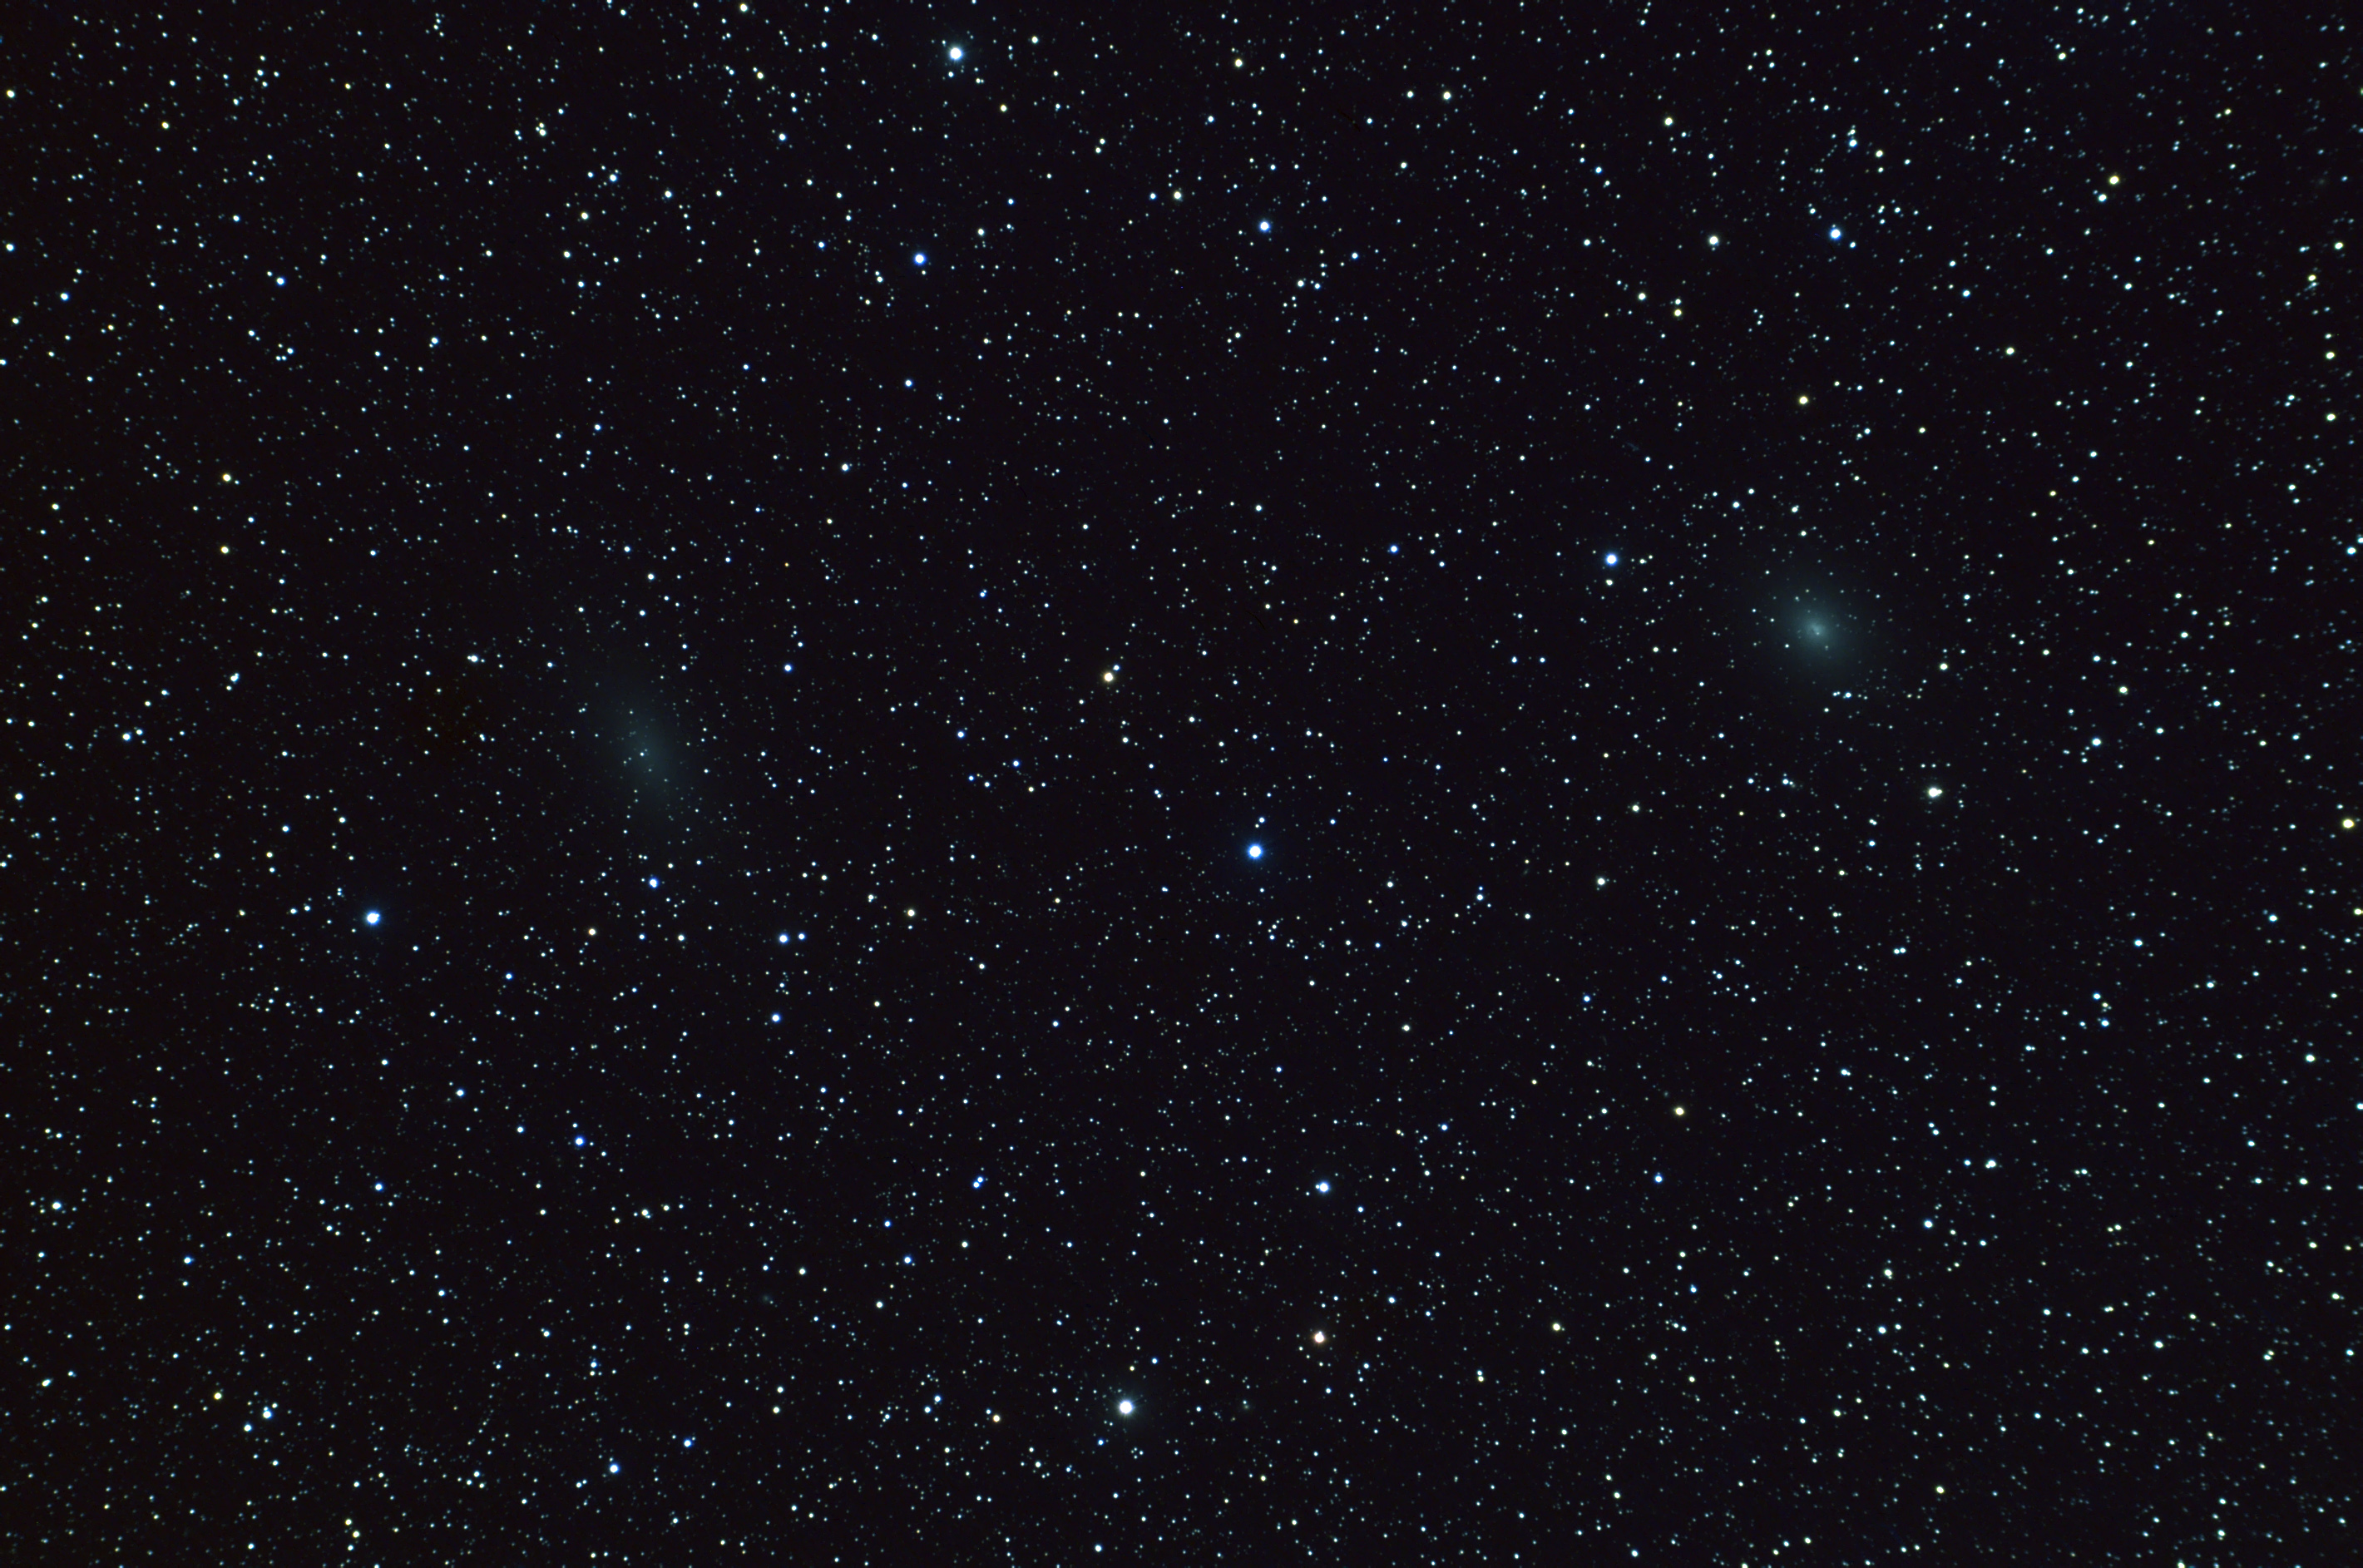 NGC 147 and 185 Here's a 156 minute exposure (39x240 seconds) of the galaxies NGC 147 (left) and NGC 185 (right) in Cassiopeia. These are both satellite galaxies of M31. A close inspection of this image reveals several other faint background galaxies. Taken with a 4" refractor, also an Astro-Tech field flatenner is in the optical path. The image is at the full scale resolution of the camera but it is cropped slightly. Processed with darks and flats and darks for flats using Maxim DL. Final processing done in Photoshop. Celestron C-14 was used for guiding with an Orion Autoguider.
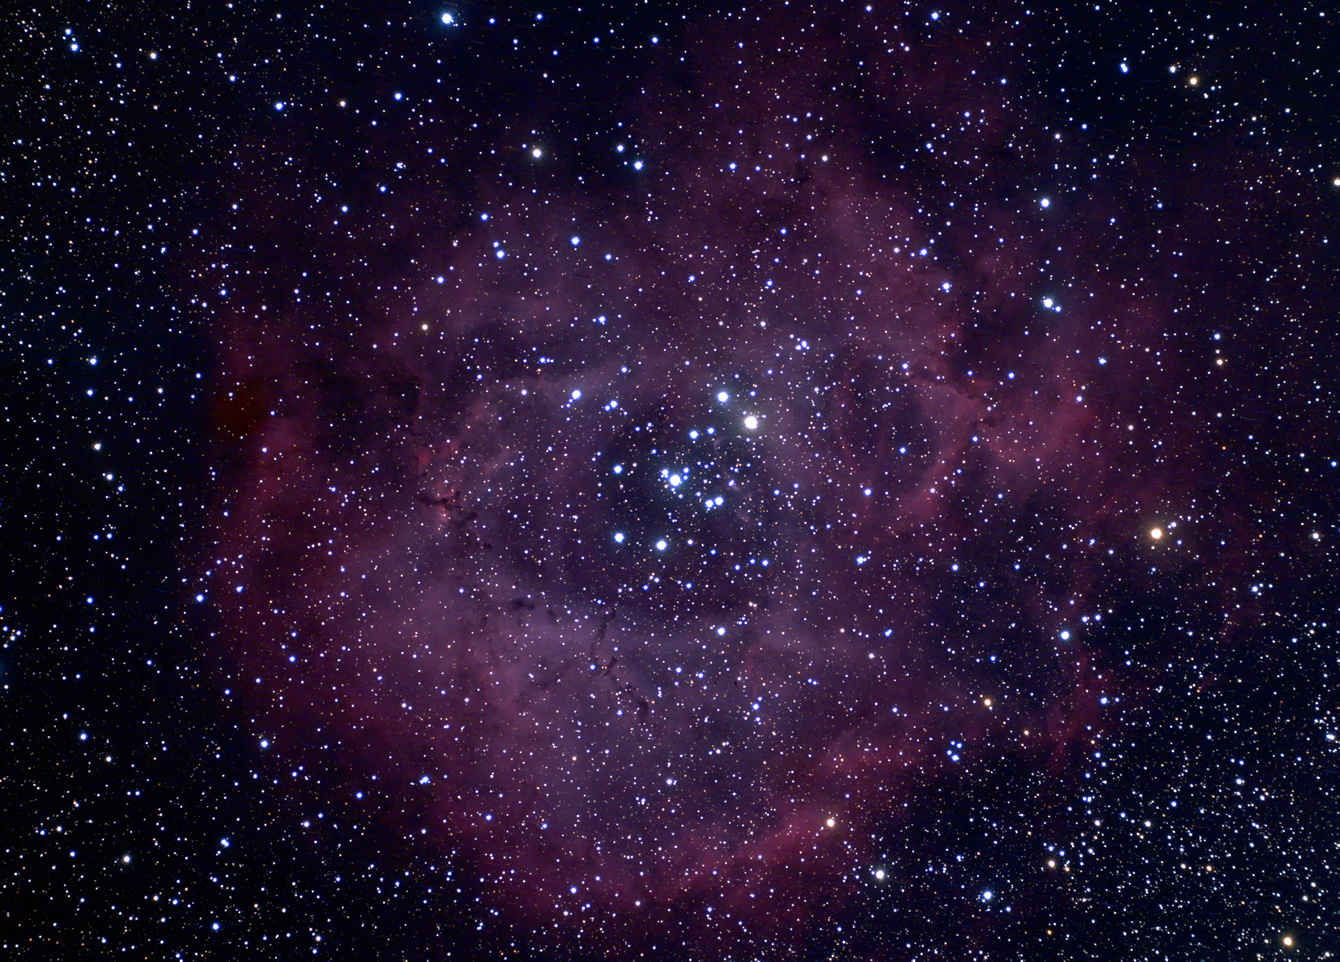 NGC 2244 Here's a 220 minute exposure (55x240 seconds) of the Rosette nebula in Monoceros. Taken with a 4" refractor, also an Astro-Tech field flatenner is in the optical path. The image is reduced to one half of full resolution of the camera but it is cropped slightly. You can see the full resolution version here . Processed with darks and flats and darks for flats using Maxim DL. Final processing done in Photoshop. Celestron C-14 was used for guiding with an Orion Autoguider.
Tonight started out very clear, however intermittent thin high clouds started coming in after around 10:30pm (and for the rest of the night). As a result the images I took later in the evening (and morning) are not as good as desired. I managed ot get 4 images tonight:
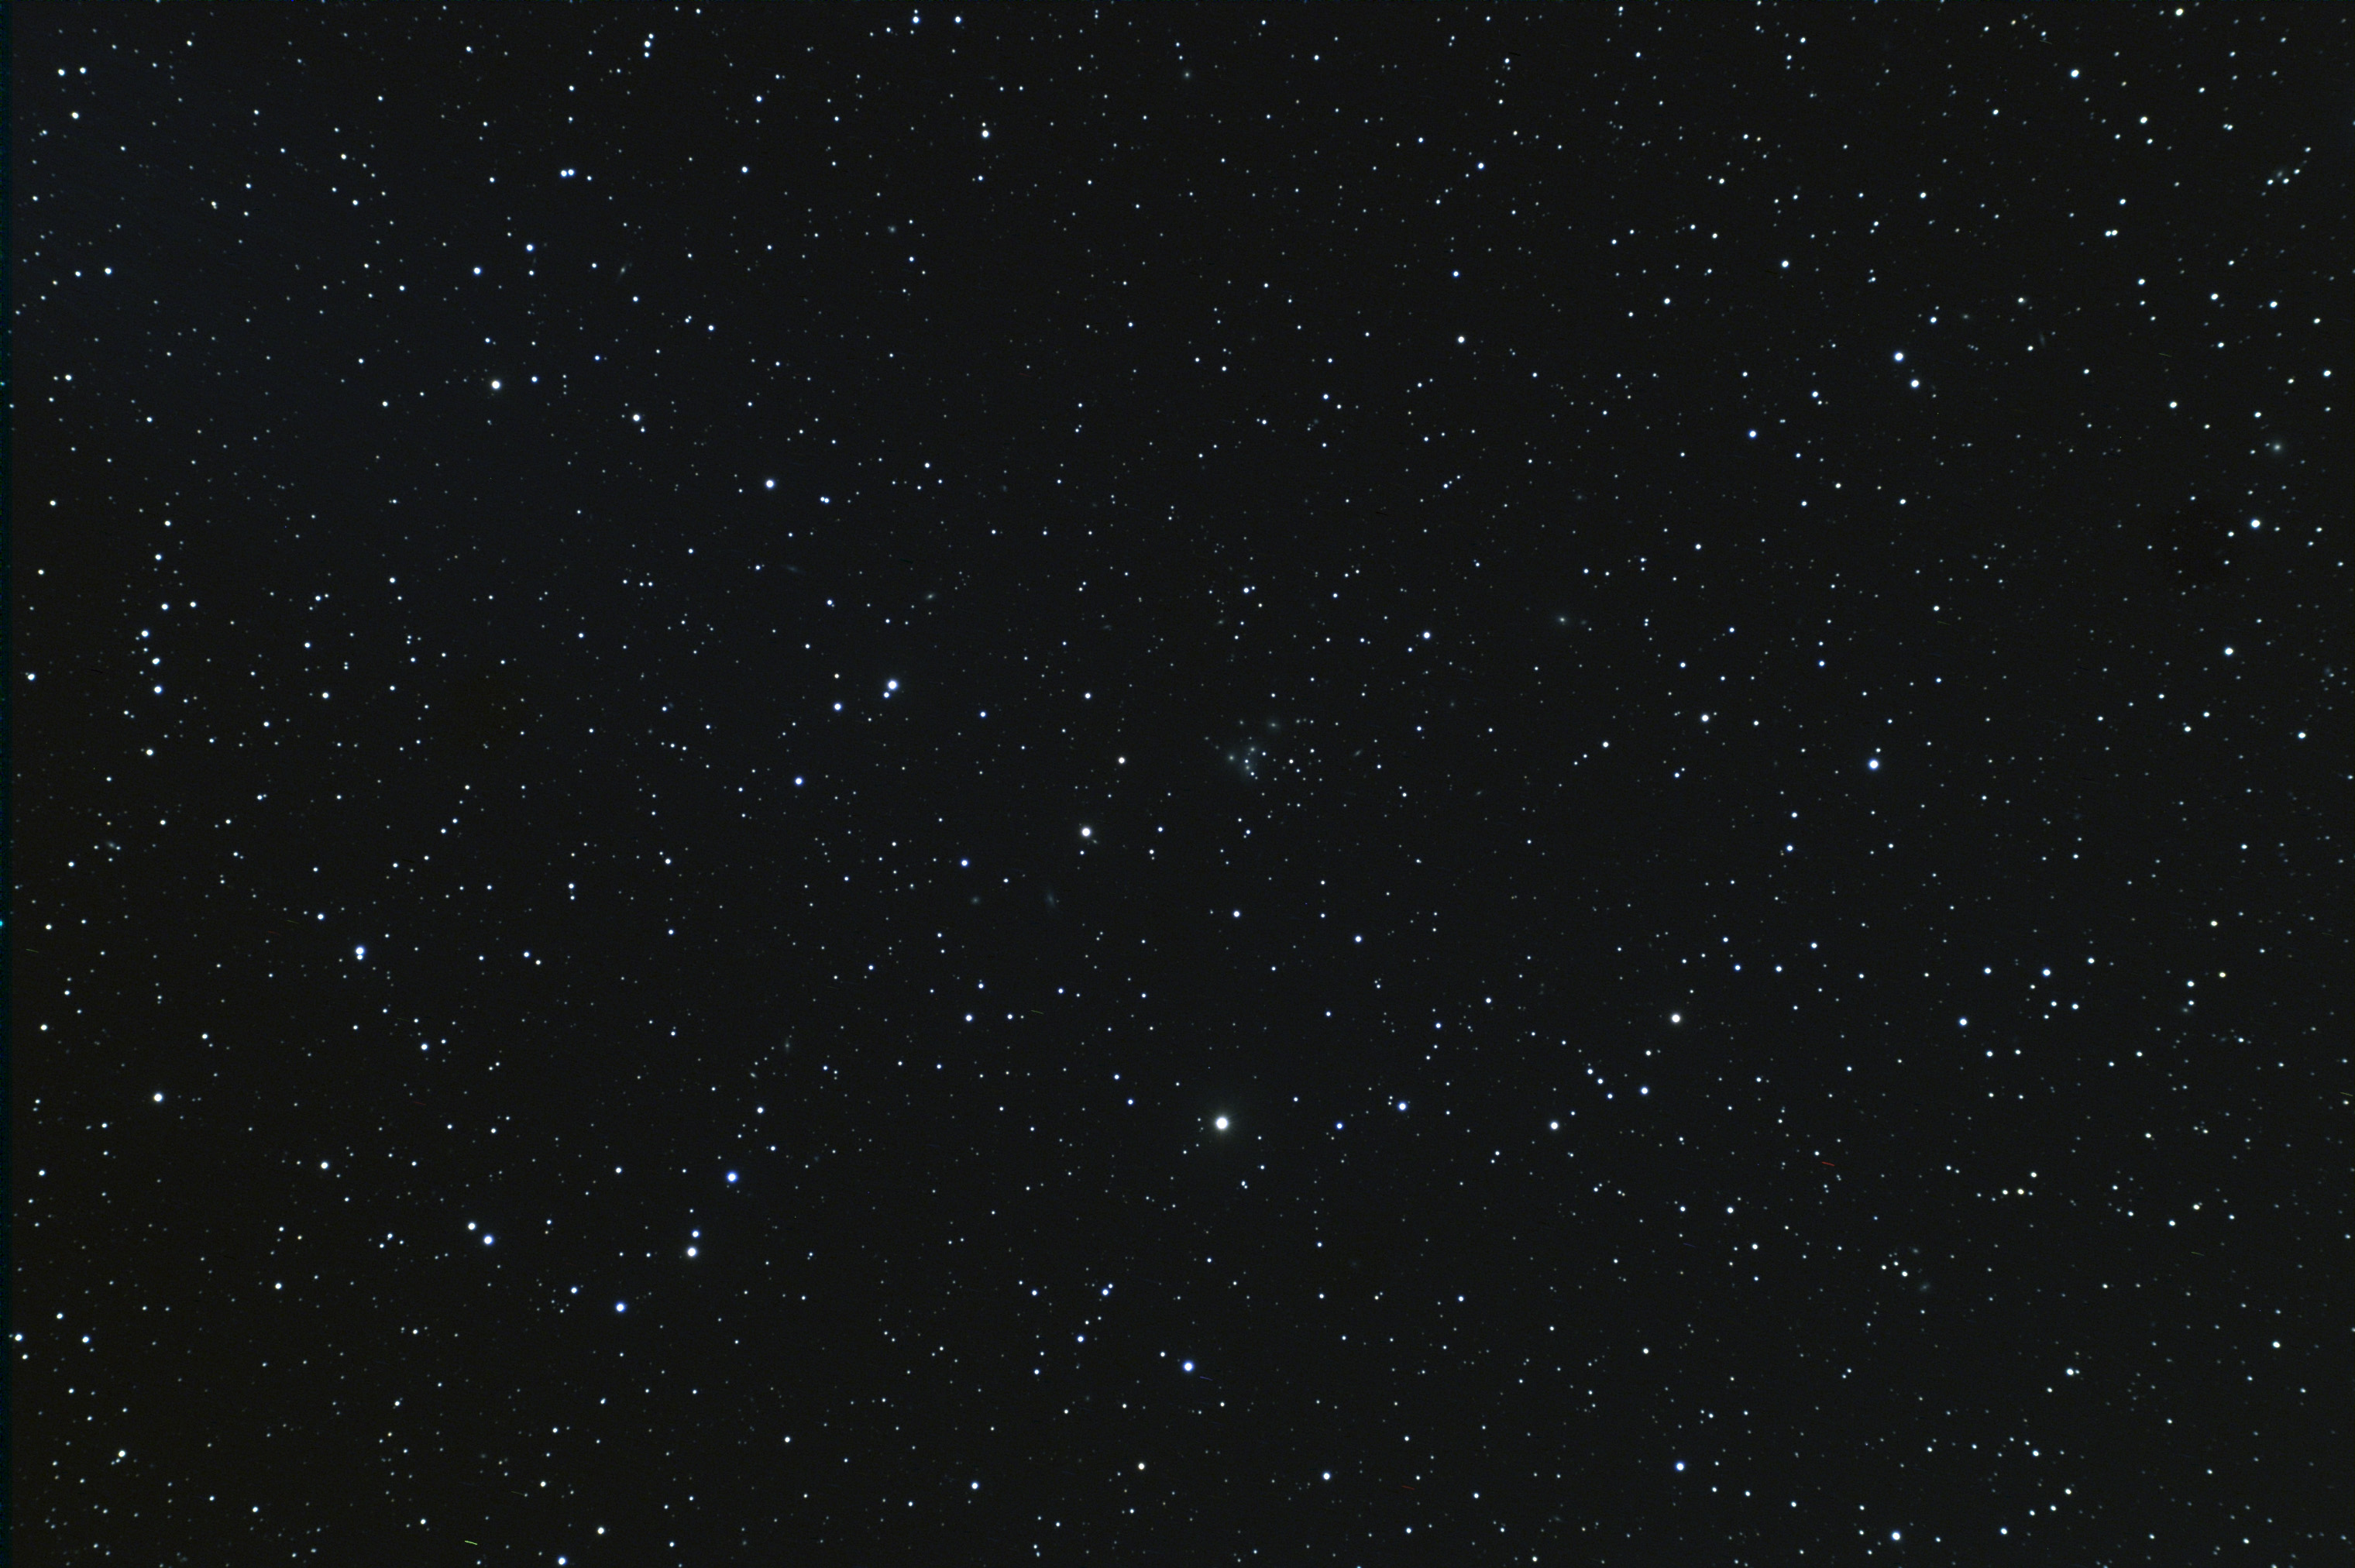 NGC 68 Here's a 84 minute exposure (21x240 seconds) of NGC 68 and the surroundng area. A close inspection of this image reveals a significant number of additional galaxies. Taken with a 4" refractor, also an Astro-Tech field flatenner is in the optical path. The image is at the full scale resolution of the camera. Processed with darks and flats and darks for flats using Maxim DL. Final processing done in Photoshop. Celestron C-14 was used for guiding with an Orion Autoguider.
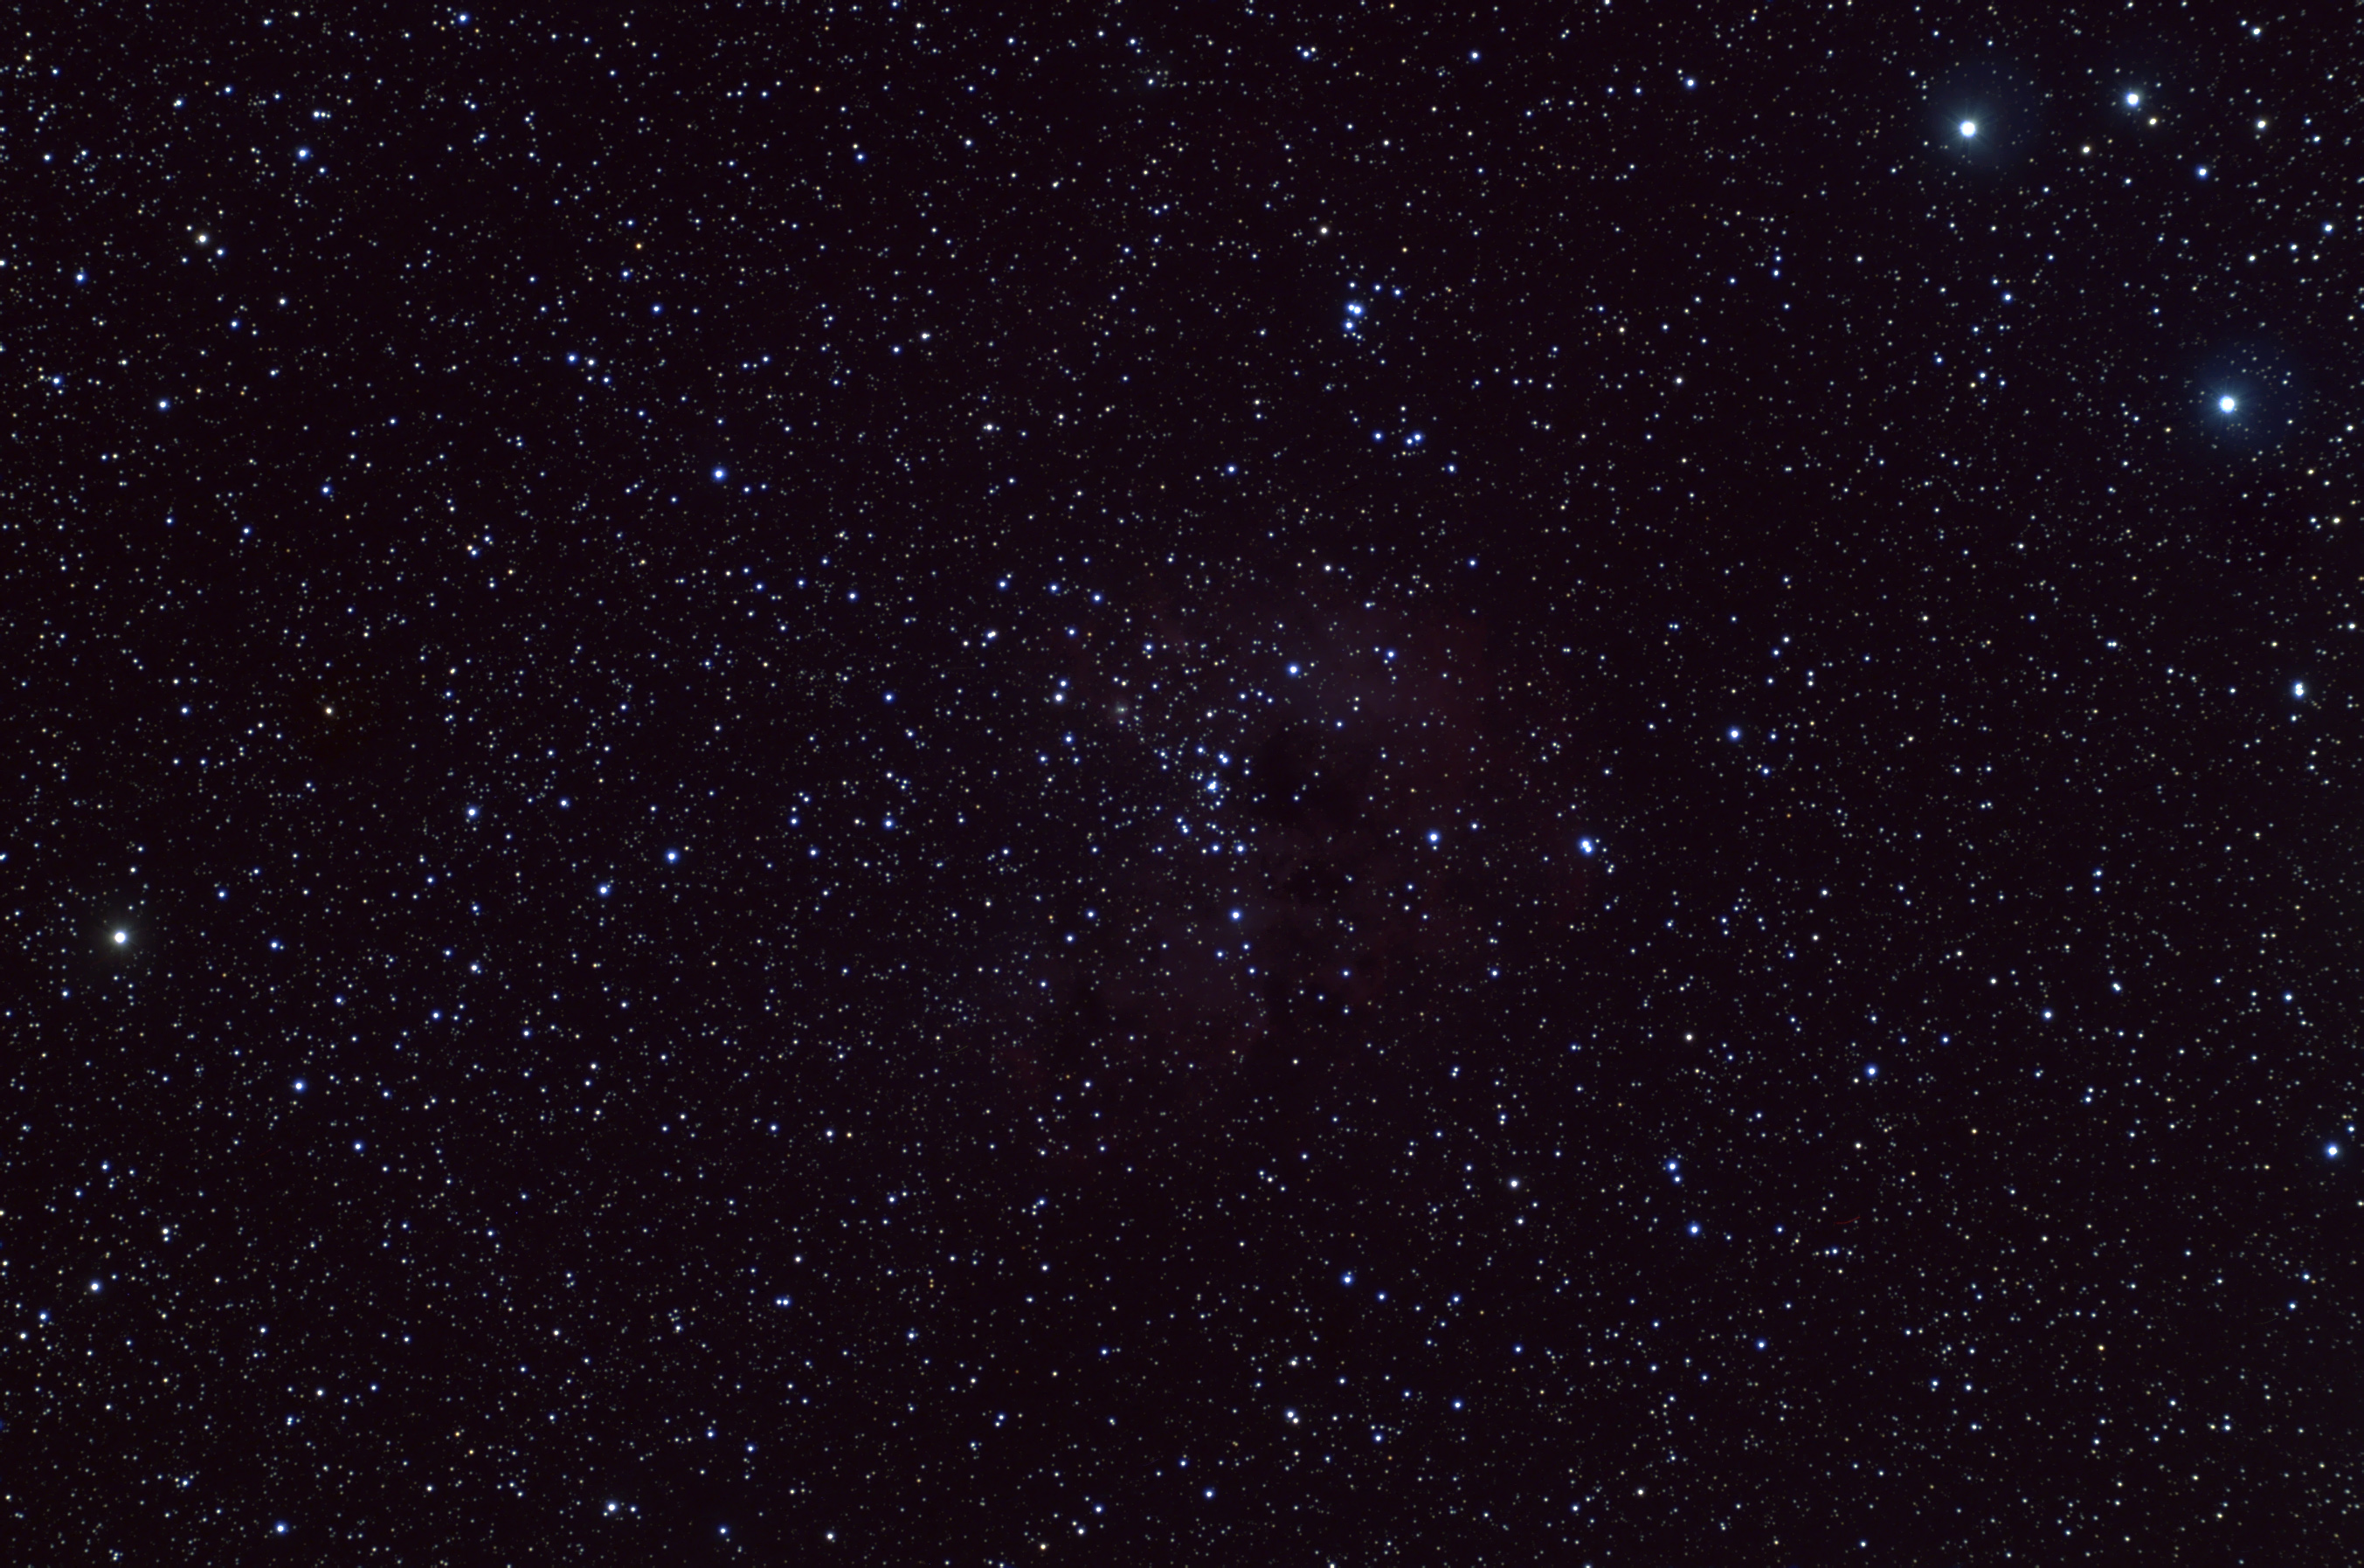 NGC 1823 Here's a 144 minute exposure (36x240 seconds) of cluster NGC 1823 in Auriga. The nebulosity associated with the cluster is faint but it can be seen in this image. Taken with a 4" refractor, also an Astro-Tech field flatenner is in the optical path. The image is at the full scale resolution of the camera but is cropped slightly. Processed with darks and flats and darks for flats using Maxim DL. Final processing done in Photoshop. Celestron C-14 was used for guiding with an Orion Autoguider.
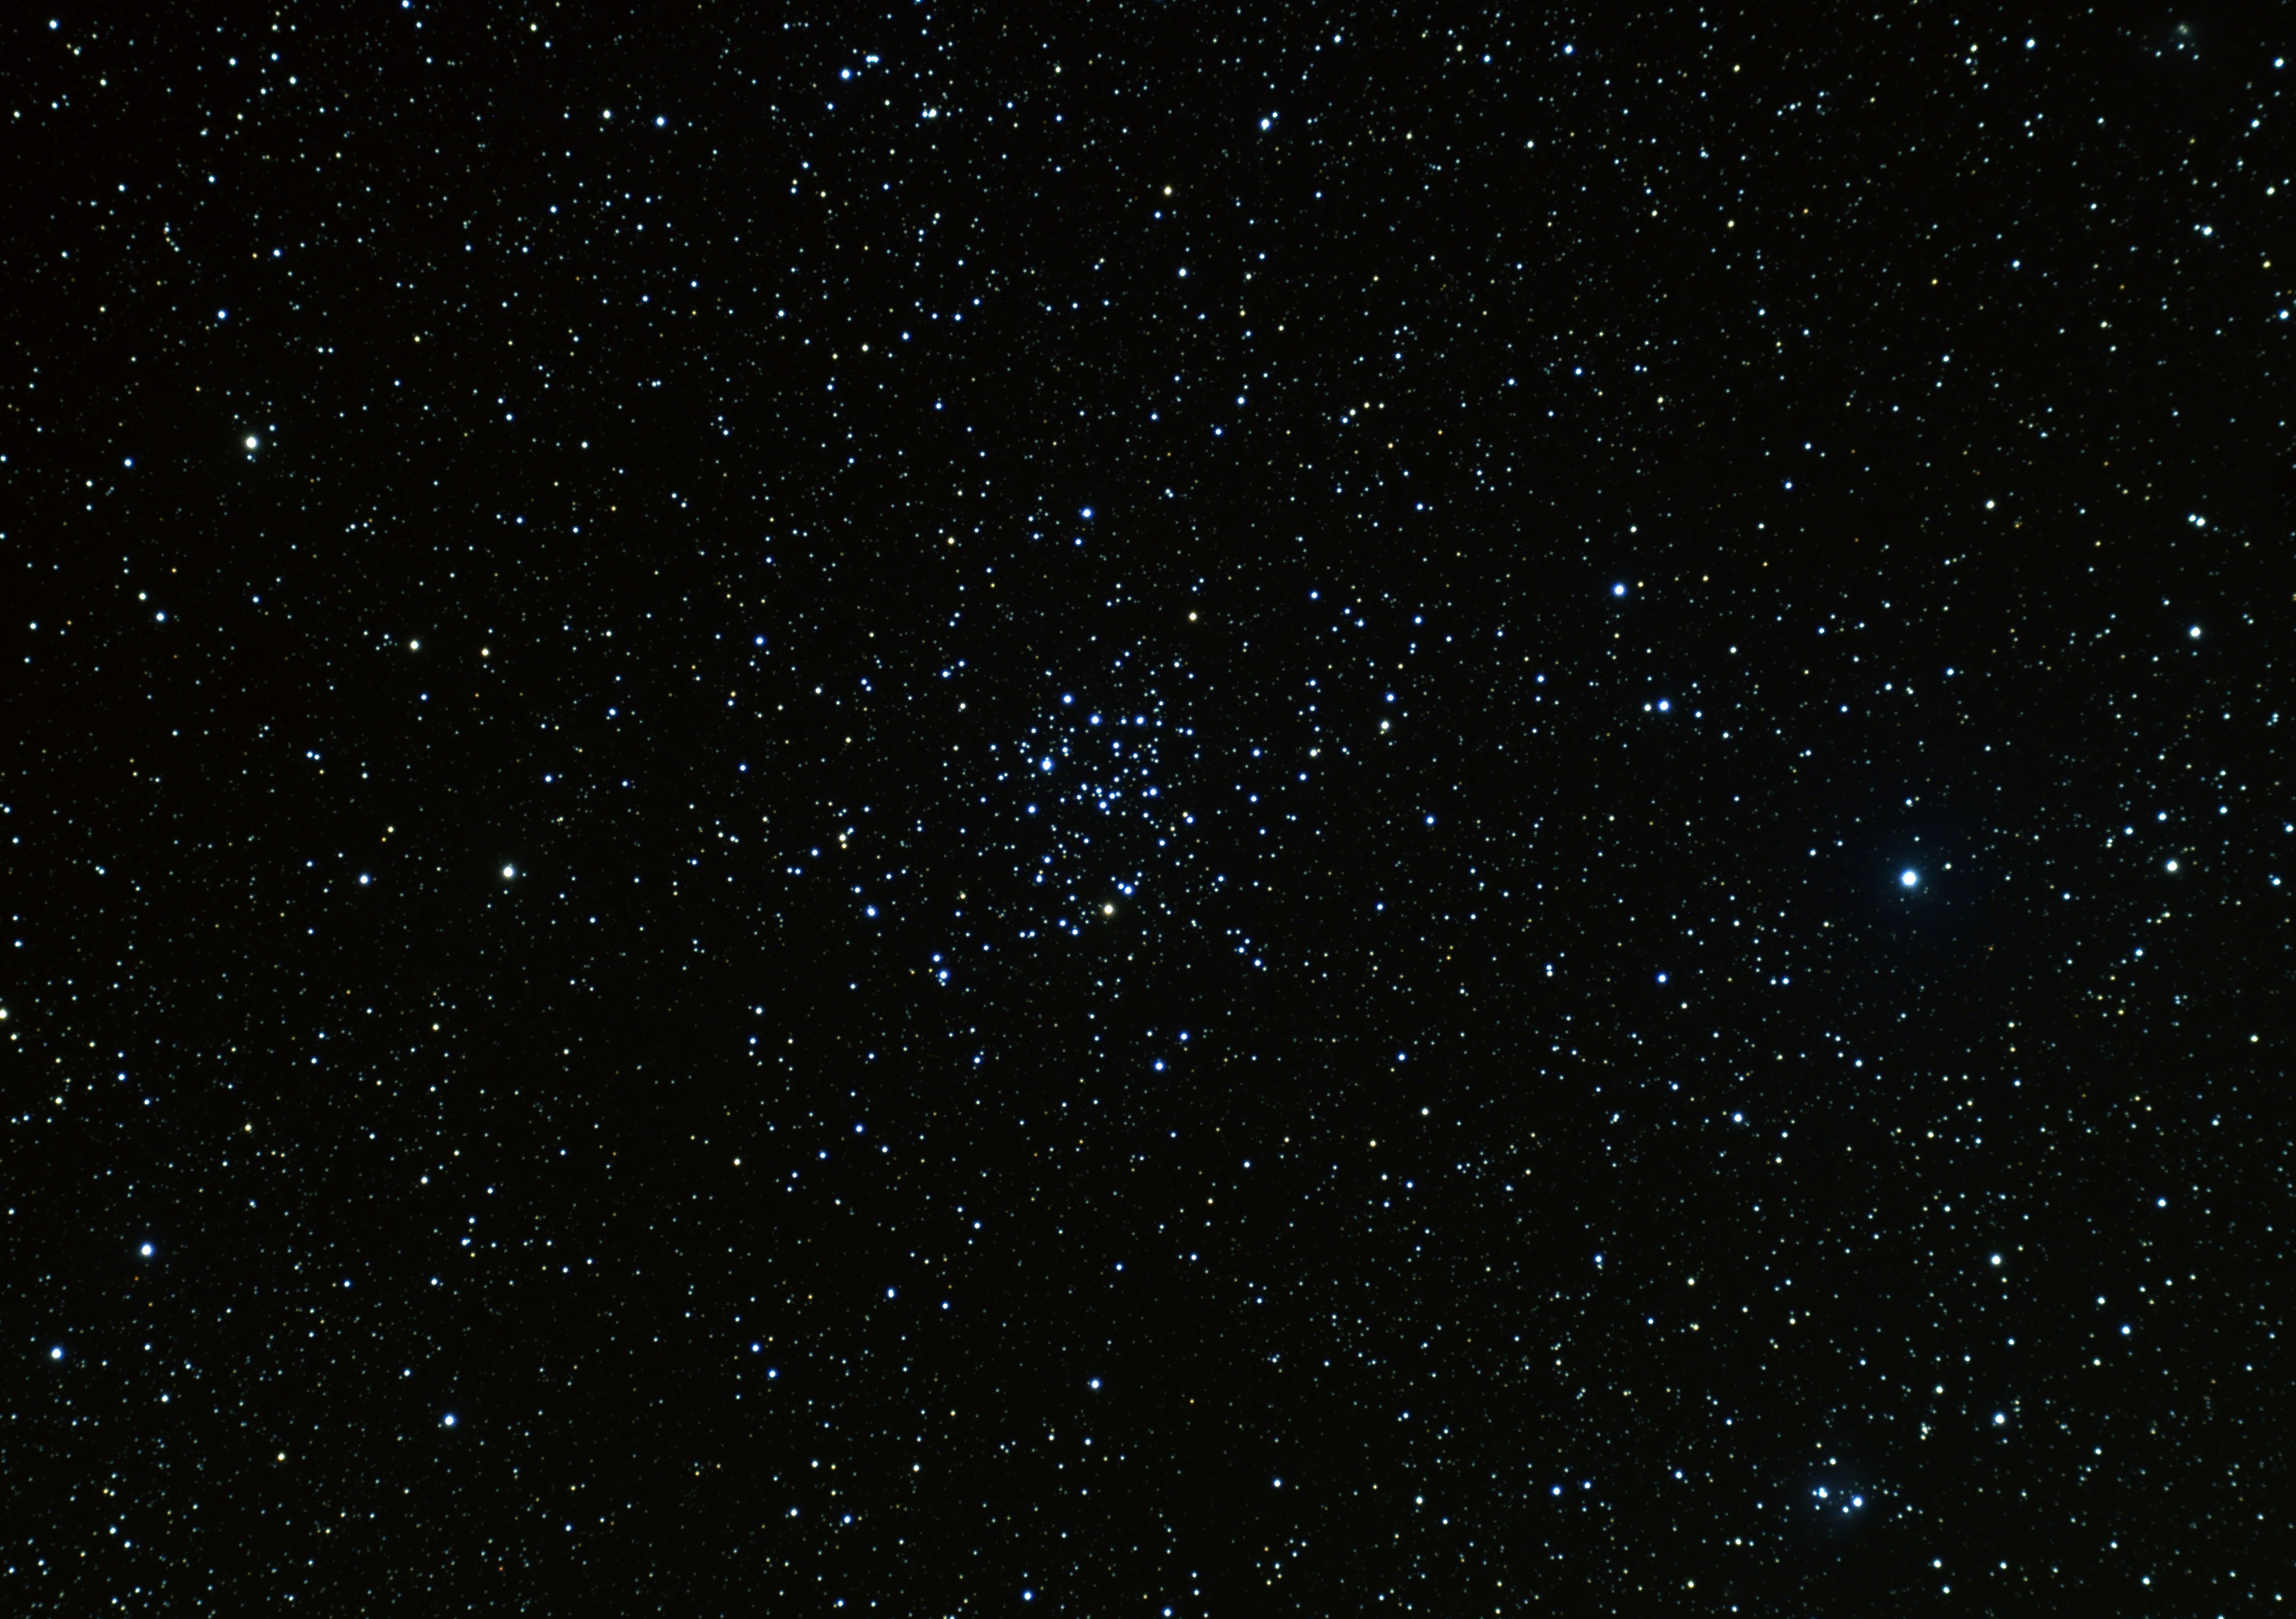 M50 Here's a 96 minute exposure (24x240 seconds) of cluster M50 in Monoceros. Taken with a 4" refractor, also an Astro-Tech field flatenner is in the optical path. The image is at the full scale resolution of the camera but is cropped slightly. Processed with darks and flats and darks for flats using Maxim DL. Final processing done in Photoshop. Celestron C-14 was used for guiding with an Orion Autoguider.
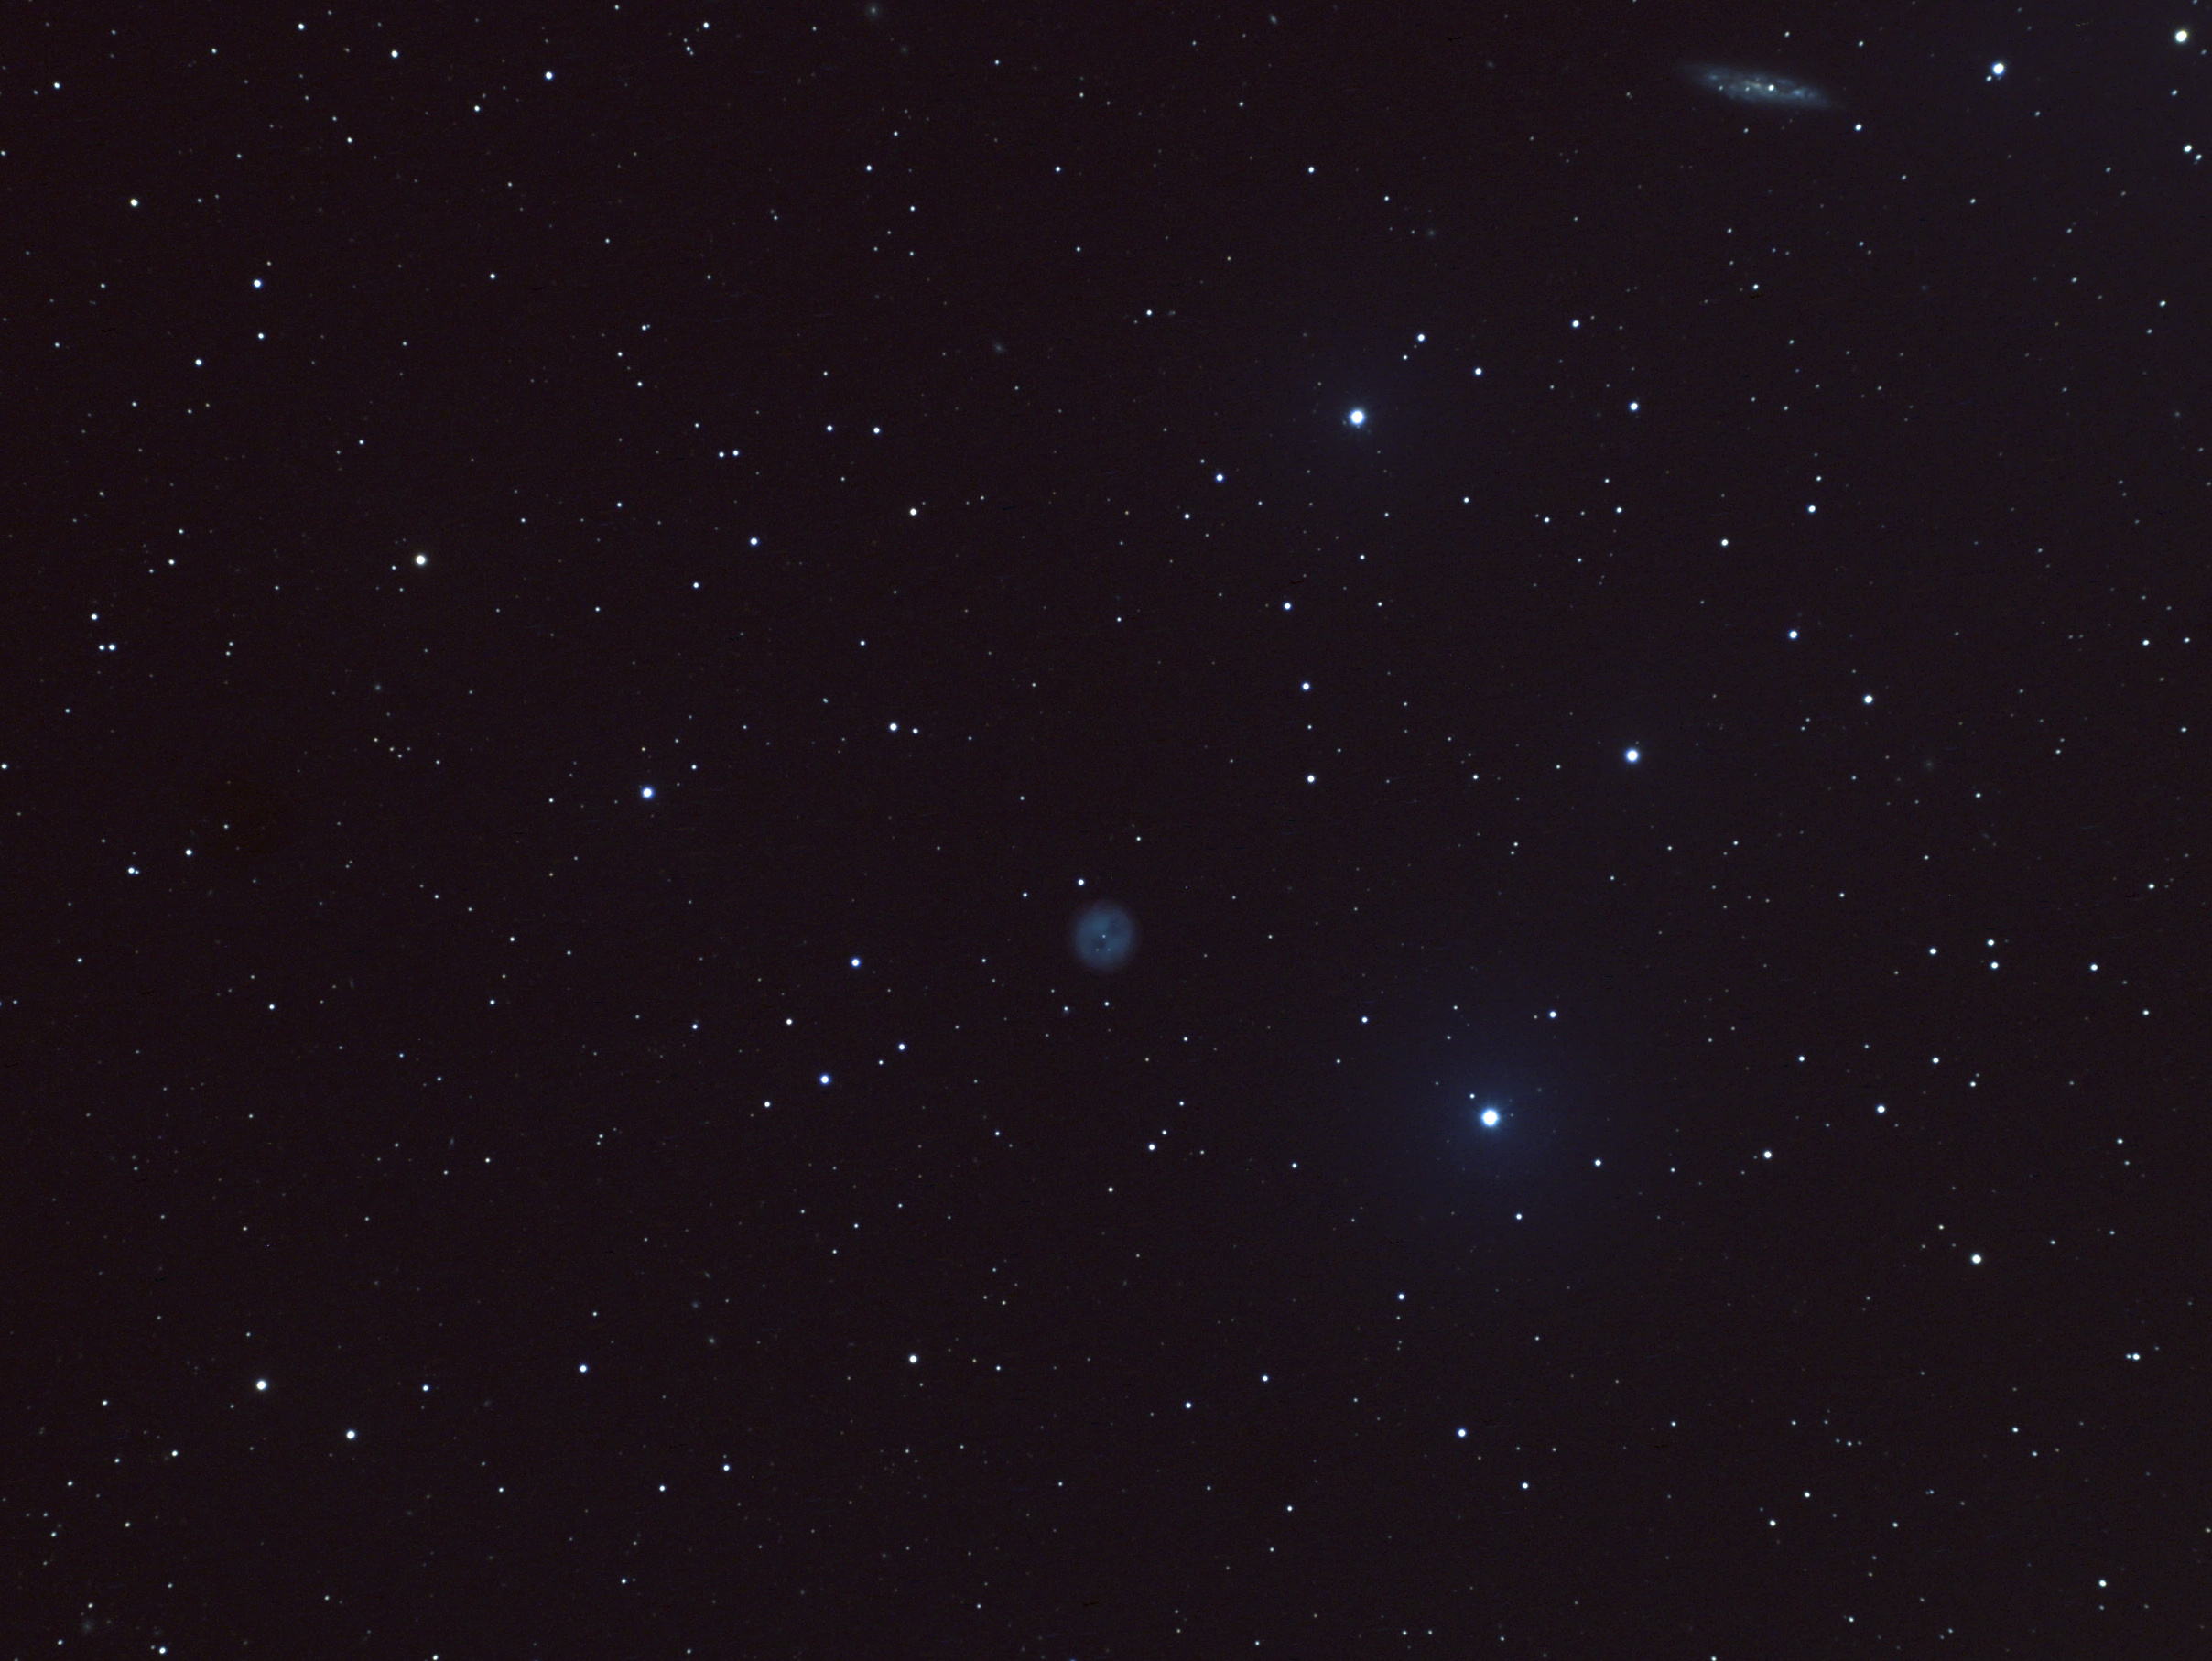 M97 Here's a 96 minute exposure (24x240 seconds) of Owl Nebula in Ursa Major. ALso seen at the upper right is the galaxy M108. The bright star to the lower right of M97 is SAO 27952 (magnitude 6.5). Conditions were marginal when this was taken and I had to throw out about 1/3 of the frames due to clouds. A close inspection of the image reveals a significant number of background galaxies. Taken with a 4" refractor, also an Astro-Tech field flatenner is in the optical path. The image is at the full scale resolution of the camera but is cropped slightly. Processed with darks and flats and darks for flats using Maxim DL. Final processing done in Photoshop. Celestron C-14 was used for guiding with an Orion Autoguider.
Tonight was nice and clear but very windy. I had problems with the wind jarring the scope (the dew cap on the C-14 is like a large scoop). When the wind knocked the scope off the guide star the autoguider wandered and a number of frames were ruined as a result. Due to this problem I had to throw out at least 2.5 hours worth of data from tonight. Despite the problems I was able to get 5 images.
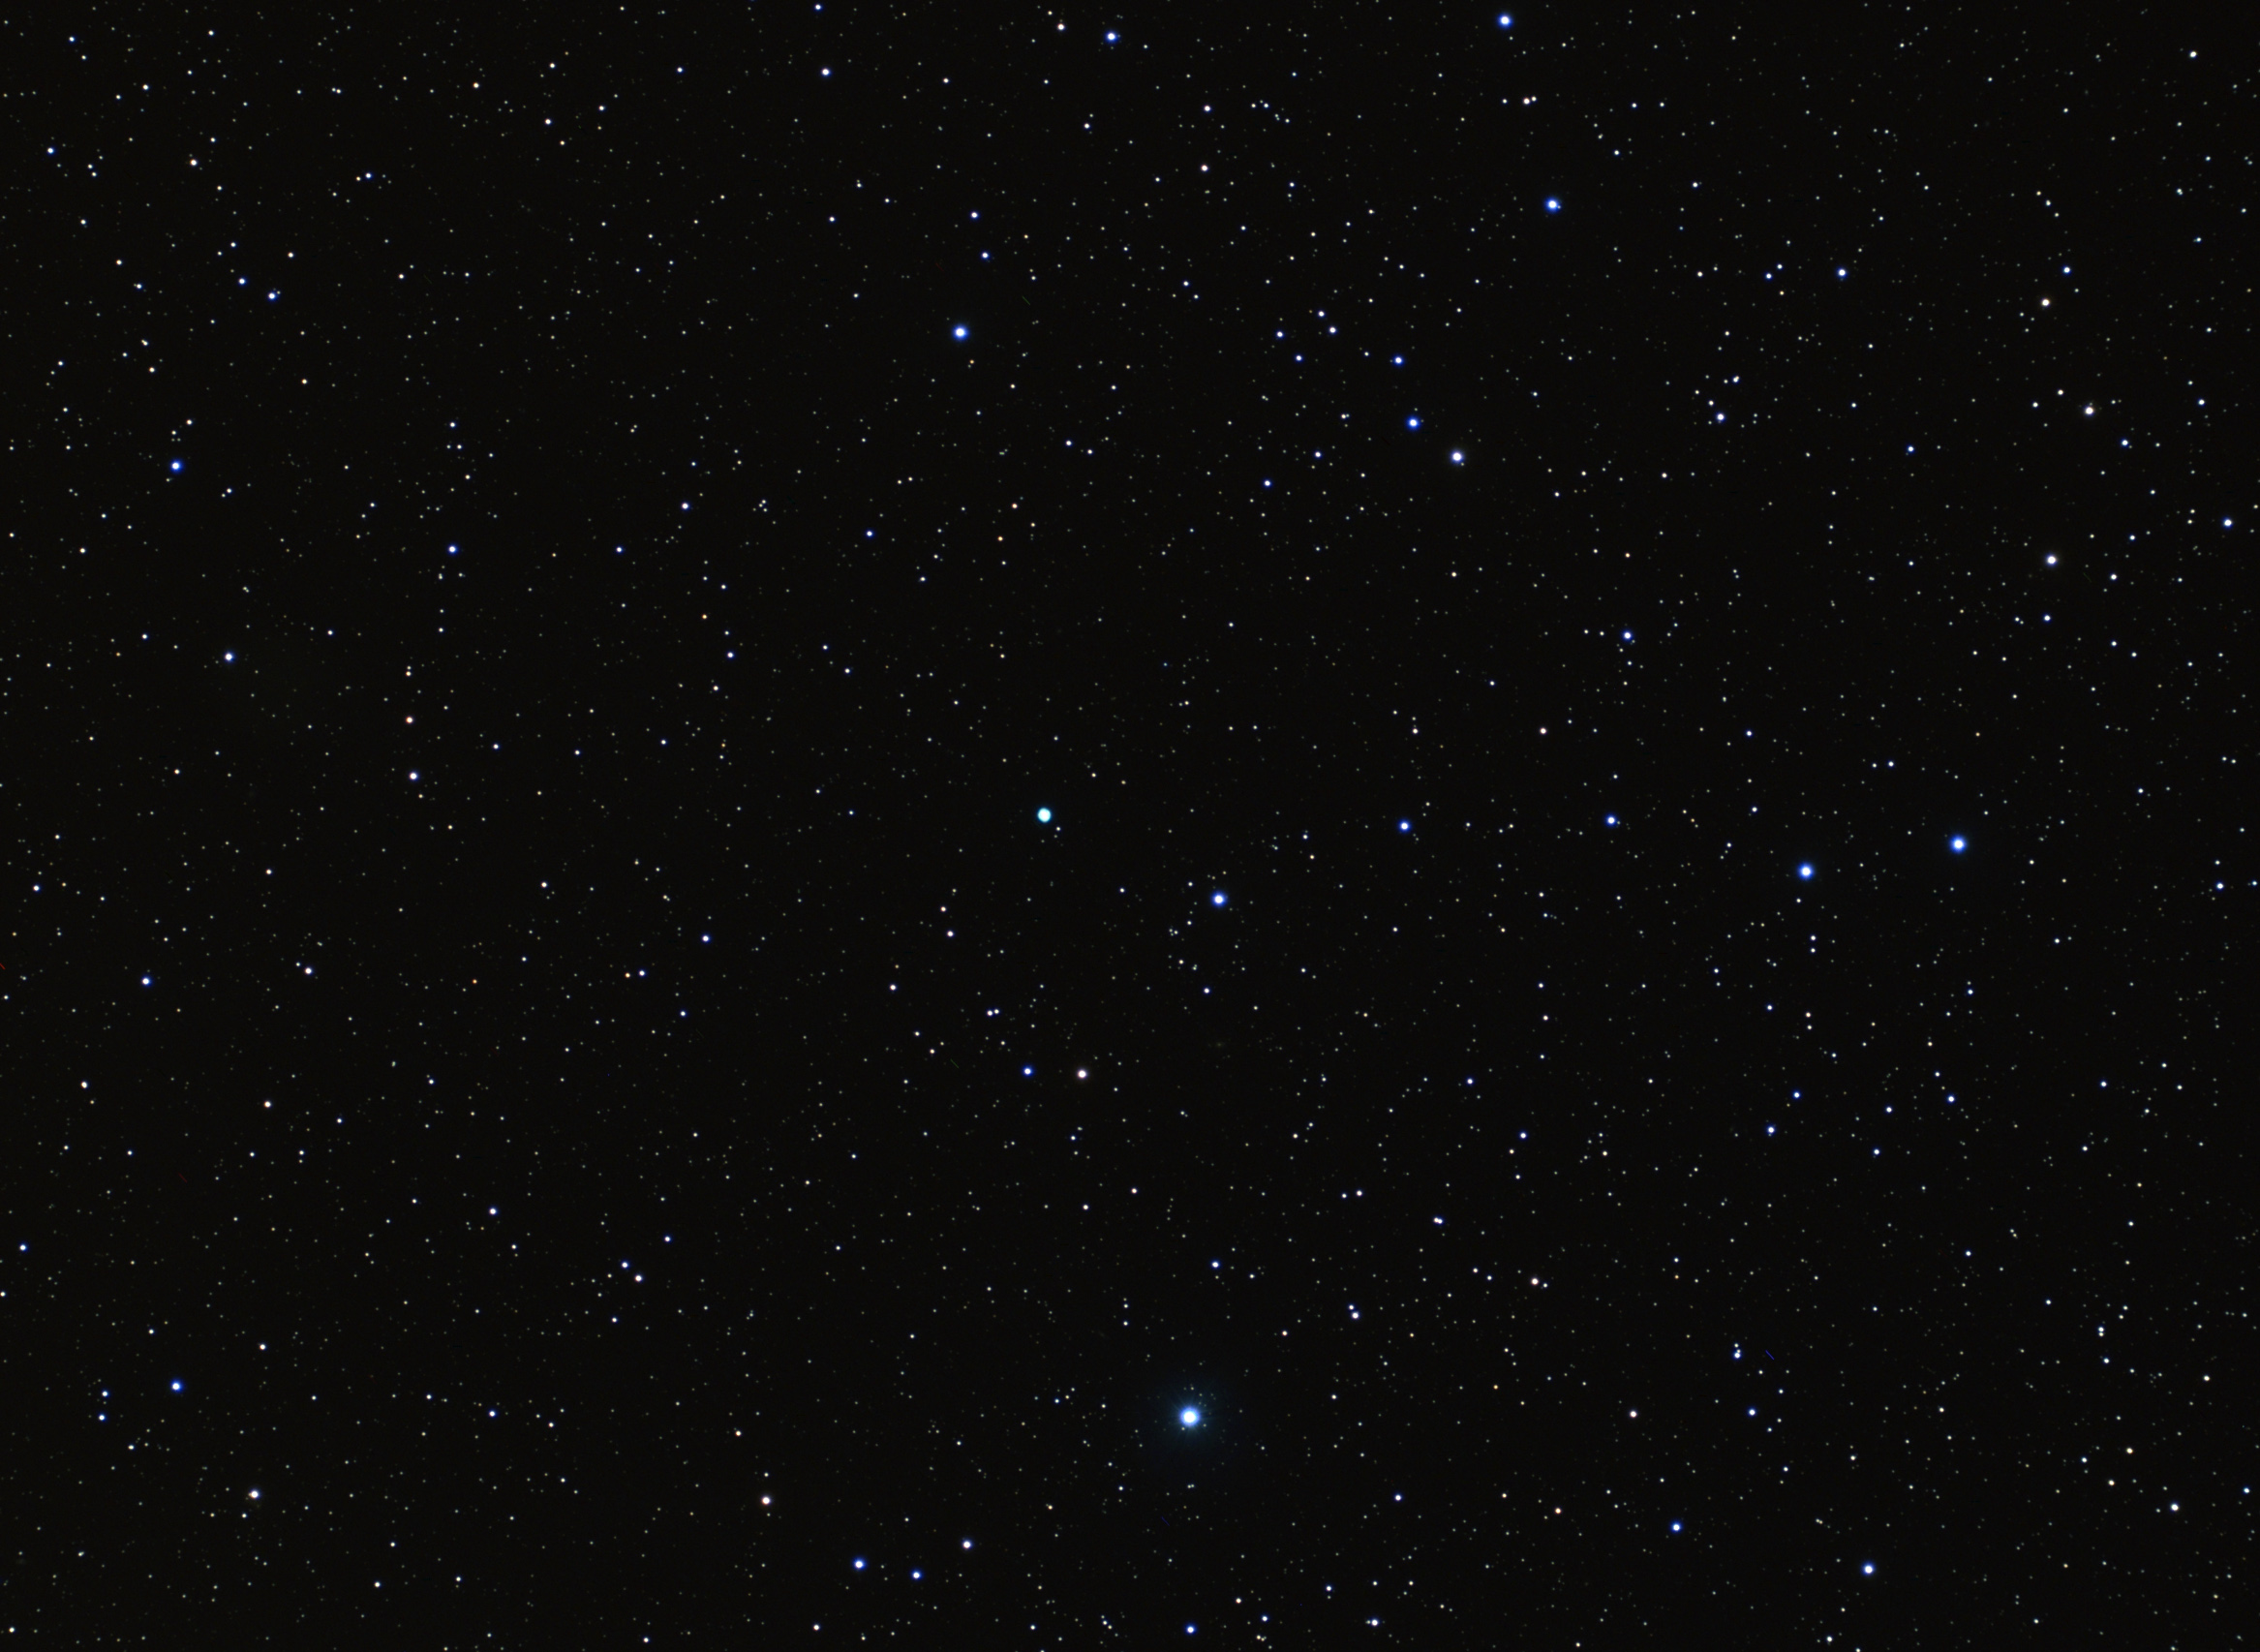 NGC 7662 Here's a one hour exposure (15x240 seconds) of planetary nebula NGC 7662 in Andromeda. This object is really too small for this focal length (665mm). I'll have to try it with the C-14 sometime. Taken with a 4" refractor, also an Astro-Tech field flatenner is in the optical path. The image is at the full scale resolution of the camera but it is cropped slightly. Processed with darks and flats and darks for flats using Maxim DL. Final processing done in Photoshop. Celestron C-14 was used for guiding with an Orion Autoguider.
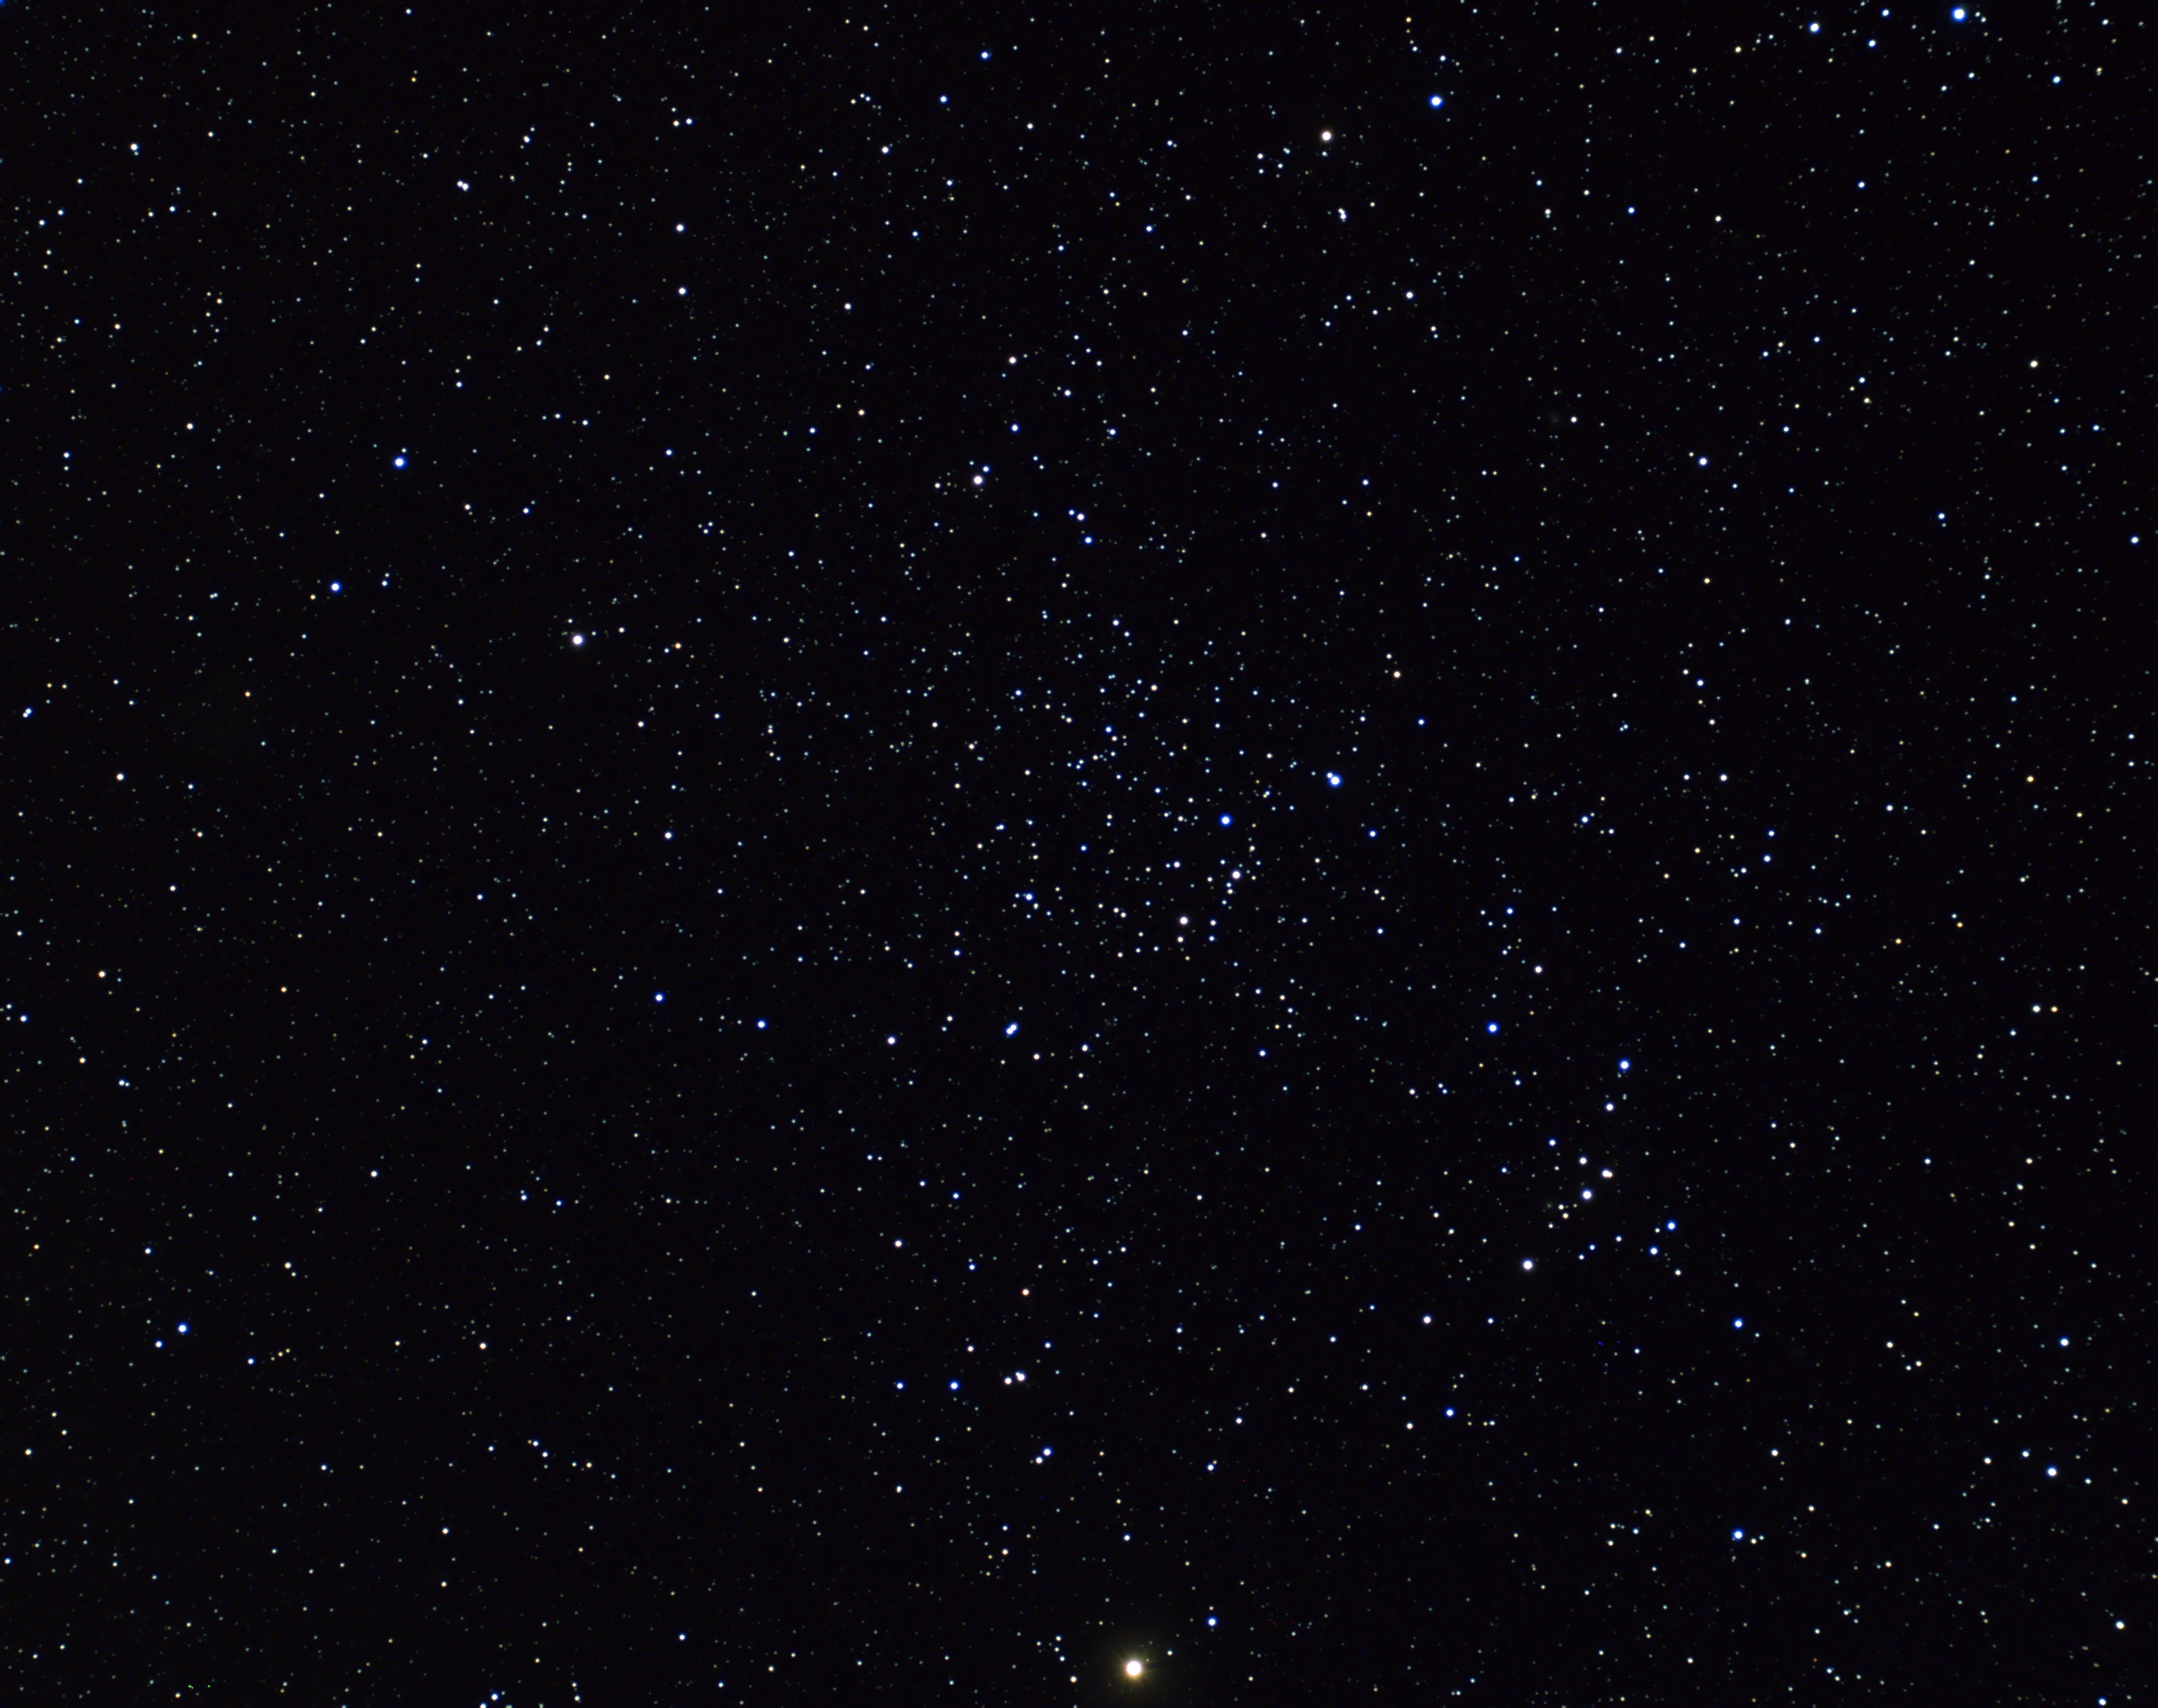 NGC 1817 and 1807 Here's a 36 minute exposure (9x240 seconds) of clusters NGC 1817 (left) and 1807 (right) in Taurus. Careful inspection reveals at least 2 background galaxies, one is right "in" NGC 1807. Taken with a 4" refractor, also an Astro-Tech field flatenner is in the optical path. The image is at the full scale resolution of the camera but it is cropped slightly. Processed with darks and flats and darks for flats using Maxim DL. Final processing done in Photoshop. Celestron C-14 was used for guiding with an Orion Autoguider.
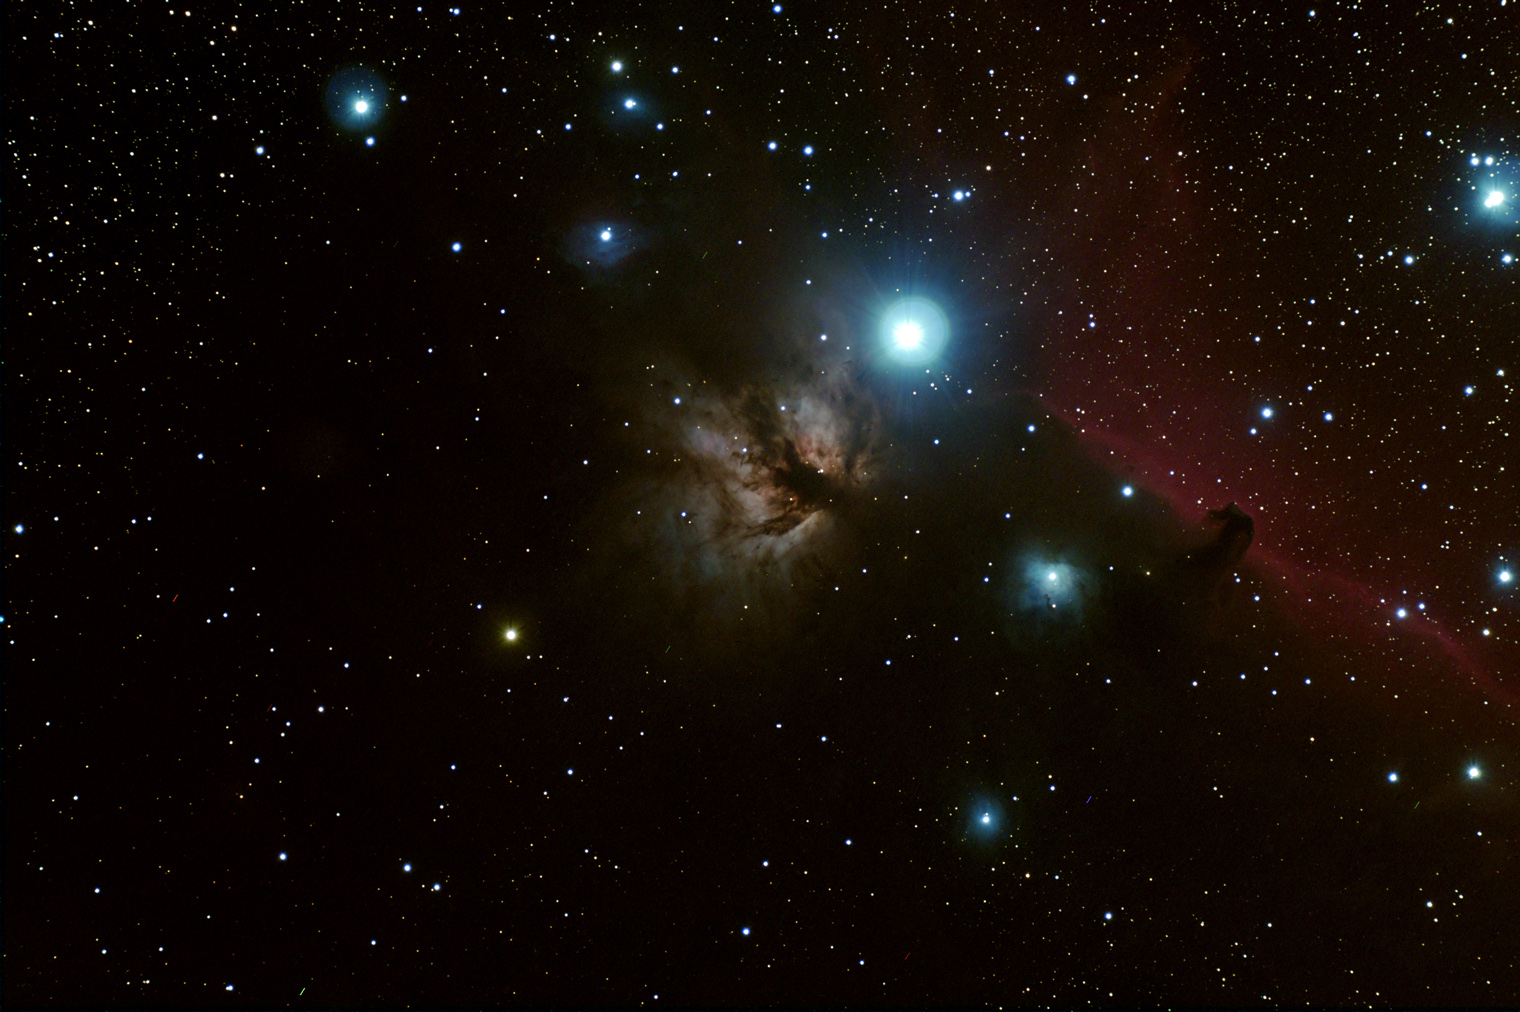 Flame Nebula Here's a 76 minute exposure (19x240 seconds) of the Flame Nebula in Orion. The Horsehead nebula is also visible. This is the image I lost a lot of data on due to wind. Taken with a 4" refractor, also an Astro-Tech field flatenner is in the optical path. The image is reduced to one half of full resolution of the camera but it is cropped slightly. You can see the full resolution version here . Processed with darks and flats and darks for flats using Maxim DL. Final processing done in Photoshop. Celestron C-14 was used for guiding with an Orion Autoguider.
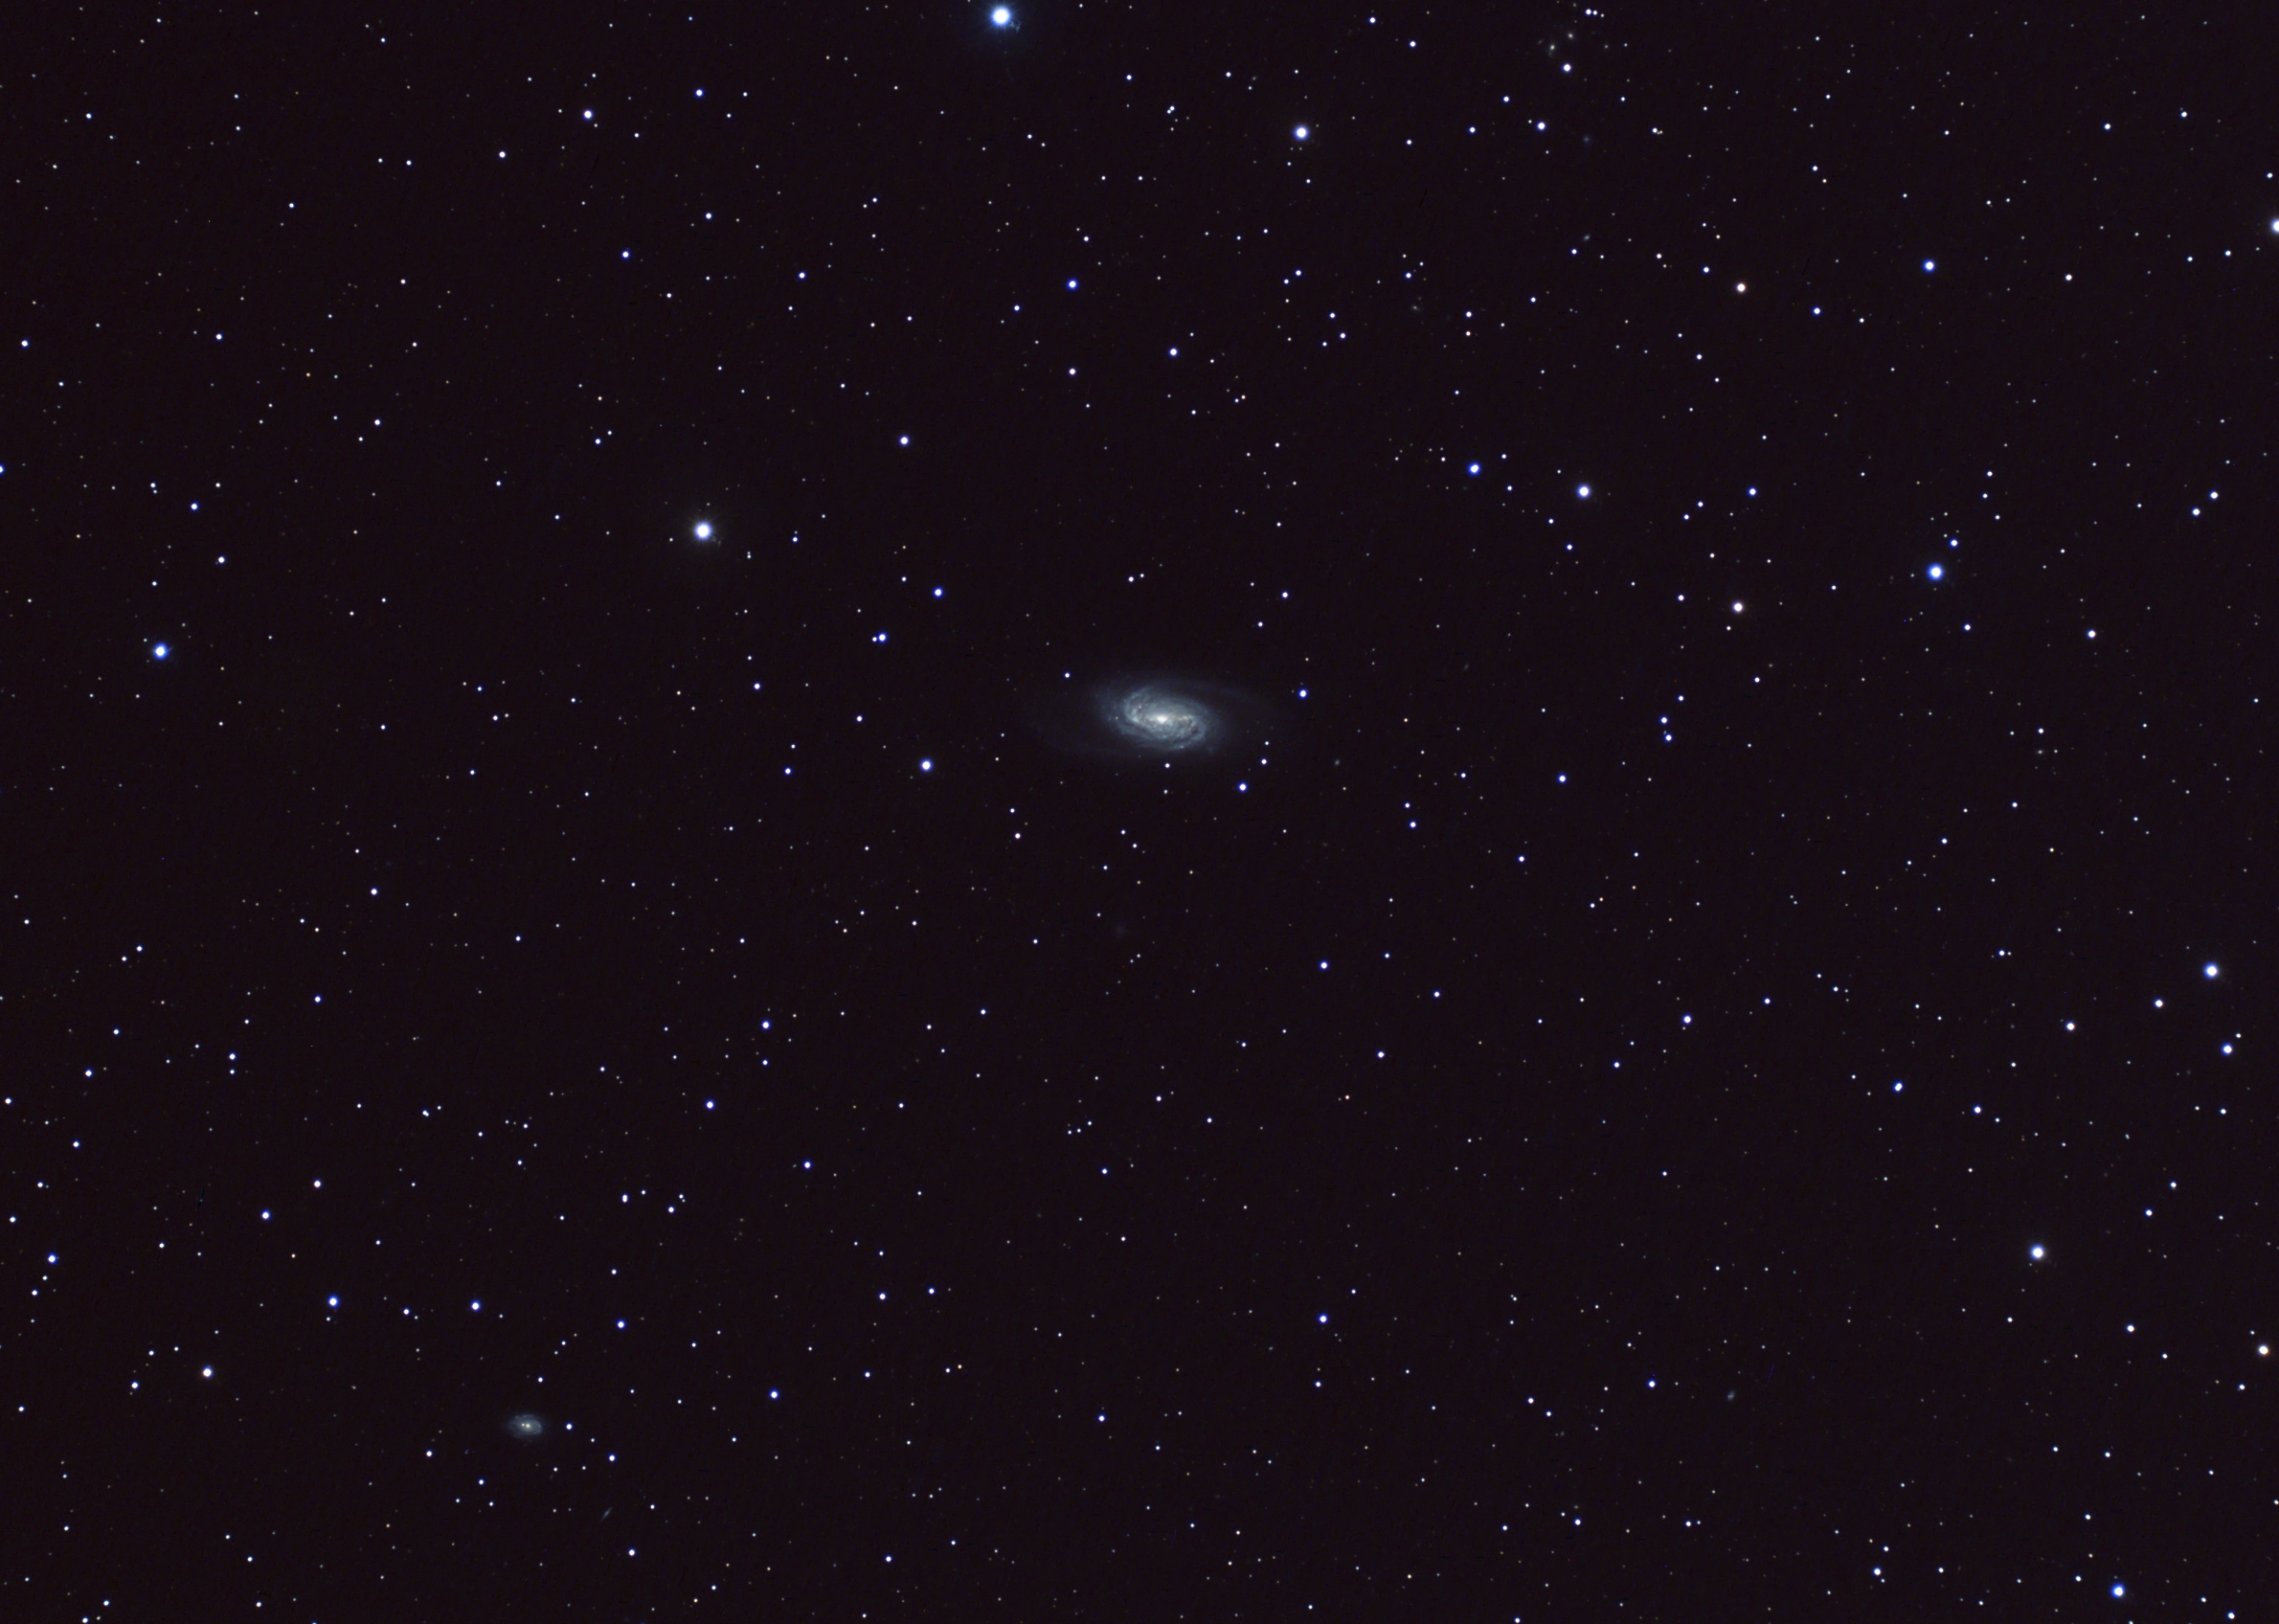 NGC 2905 Here's a 116 minute exposure (29x240 seconds) of galaxy NGC 2905 in Leo. Careful inspection reveals a number of other background galaxies (the bright one is NGC 2916). Taken with a 4" refractor, also an Astro-Tech field flatenner is in the optical path. The image is at the full scale resolution of the camera but it is cropped slightly. Processed with darks and flats and darks for flats using Maxim DL. Final processing done in Photoshop. Celestron C-14 was used for guiding with an Orion Autoguider.
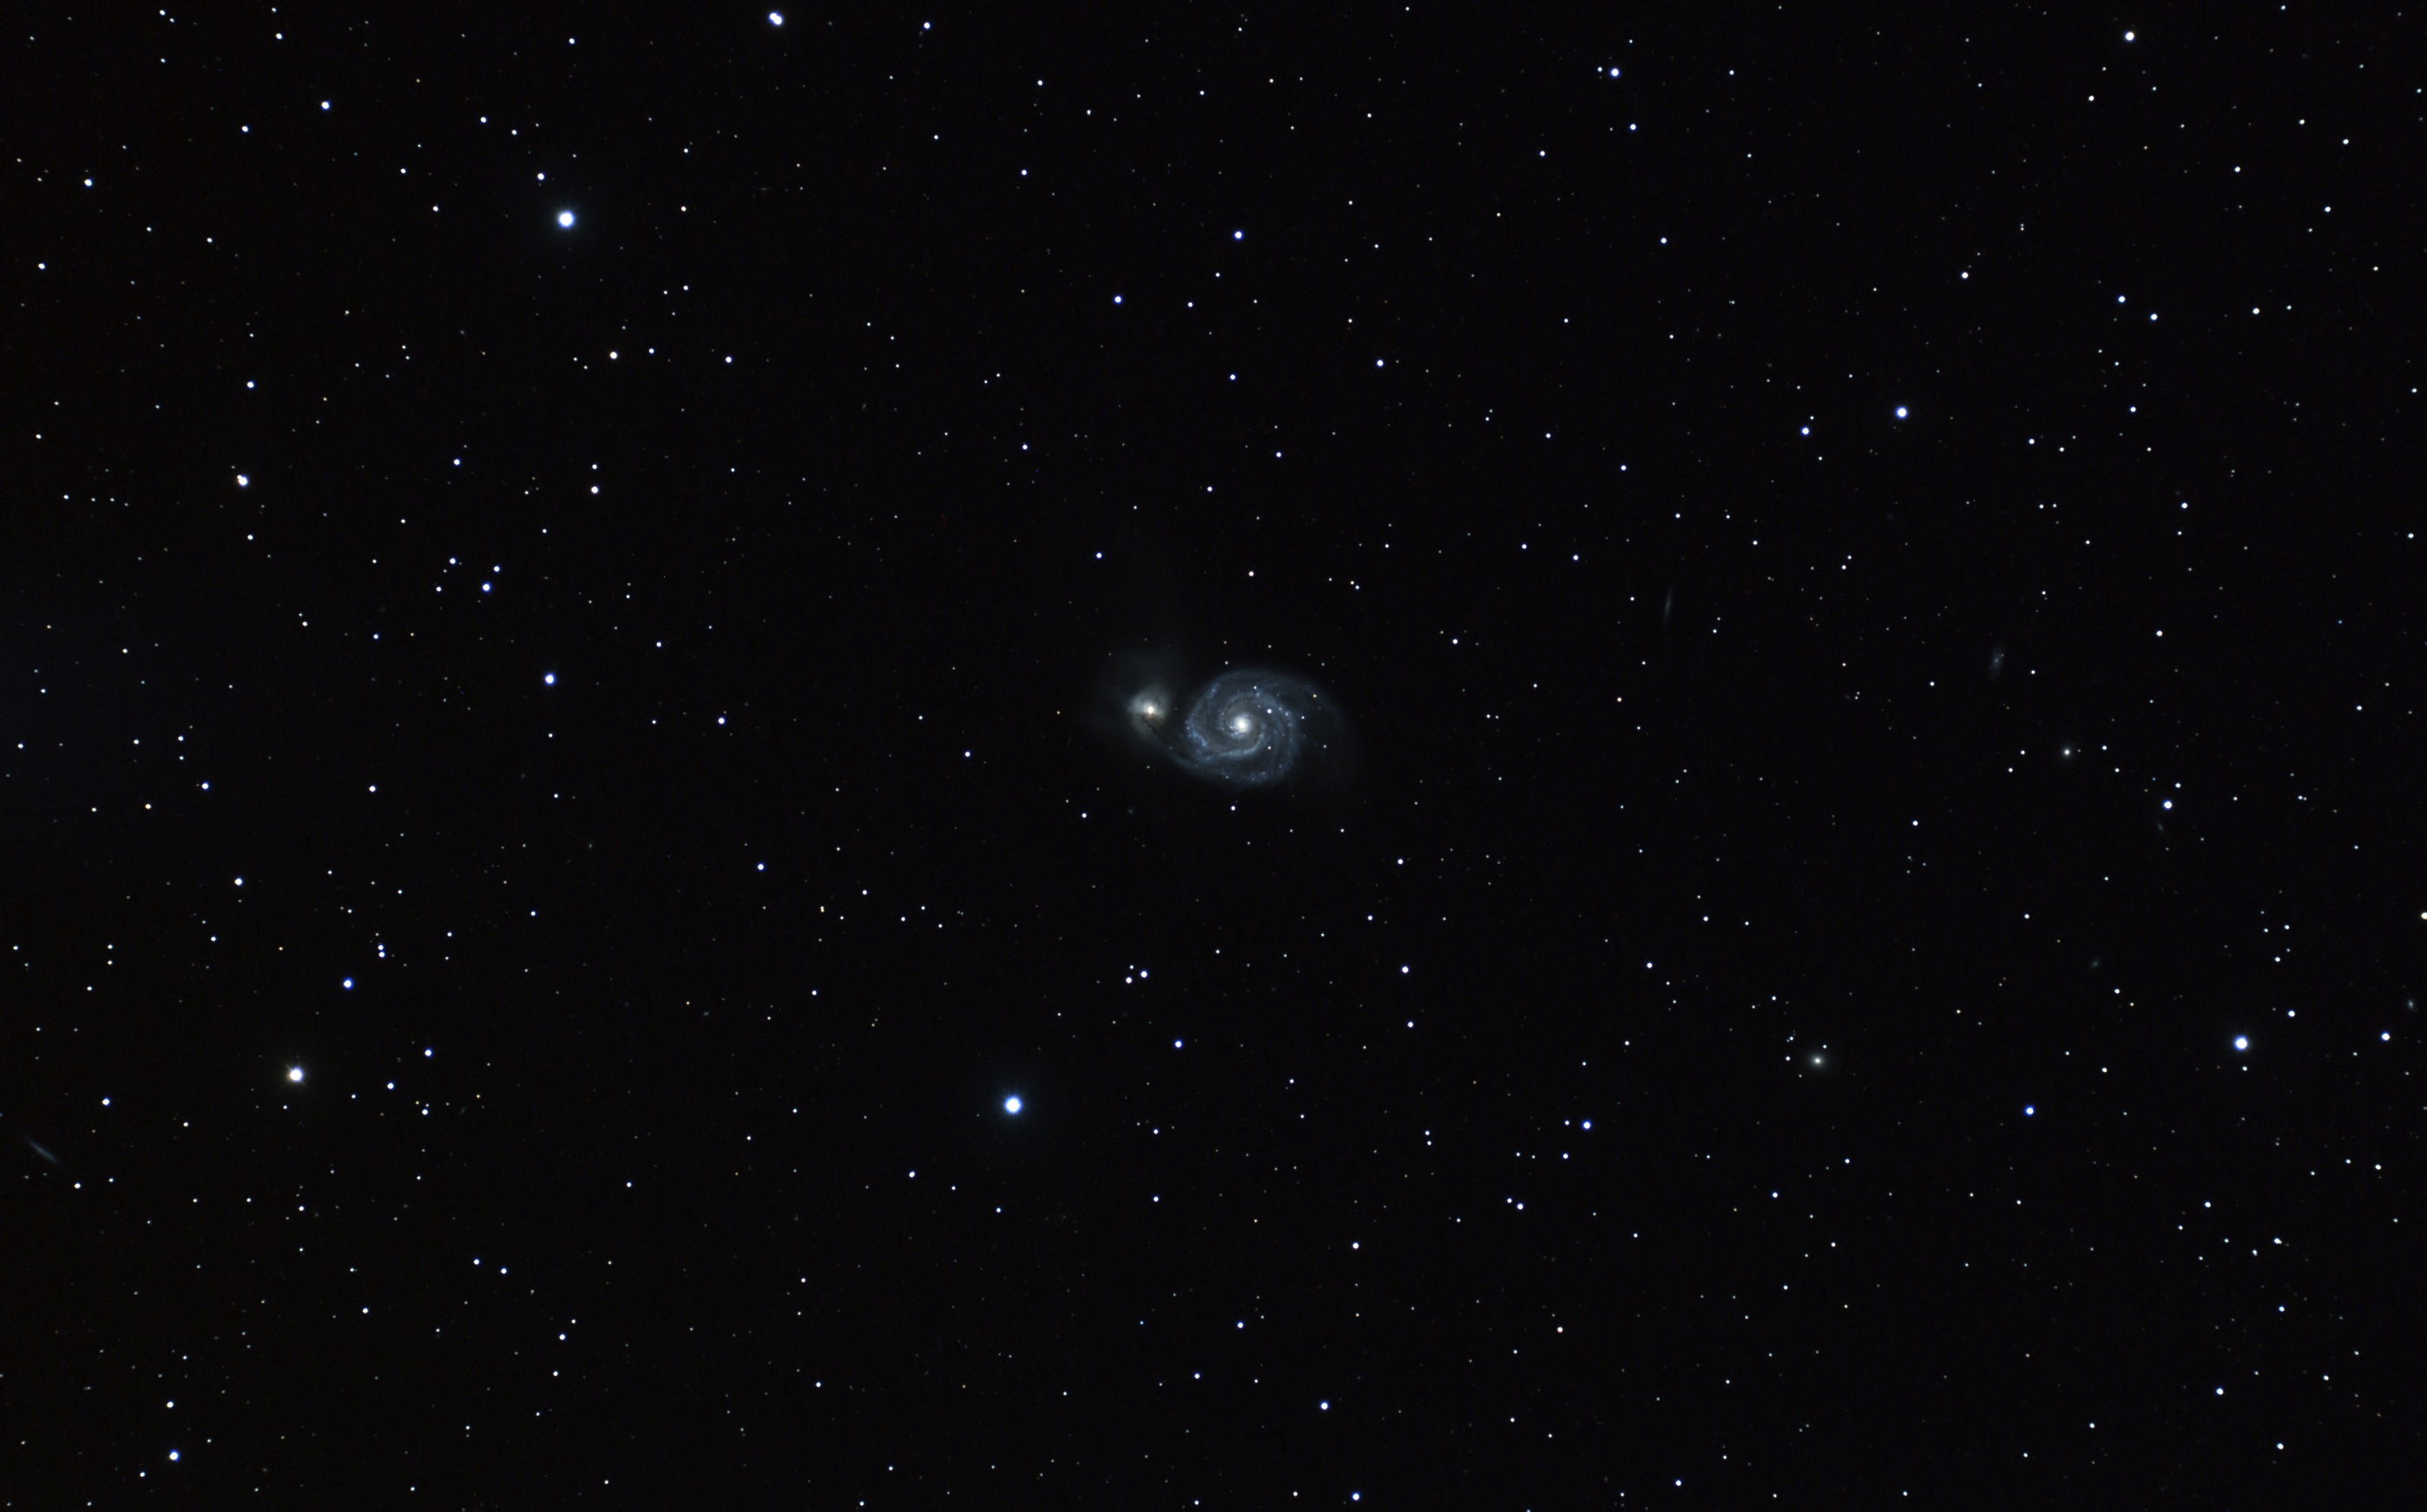 M51 Here's a 140 minute exposure (35x240 seconds) of galaxy M51 in Canes Venatici. Careful inspection reveals a number of other background galaxies. Taken with a 4" refractor, also an Astro-Tech field flatenner is in the optical path. The image is at the full scale resolution of the camera but it is cropped slightly. Processed with darks and flats and darks for flats using Maxim DL. Final processing done in Photoshop. Celestron C-14 was used for guiding with an Orion Autoguider.
The gibbous Moon was in the way in the evening so I worked clusters (they hold up will in Moonlight), once the Moon went down I got a deep exposure of M97..
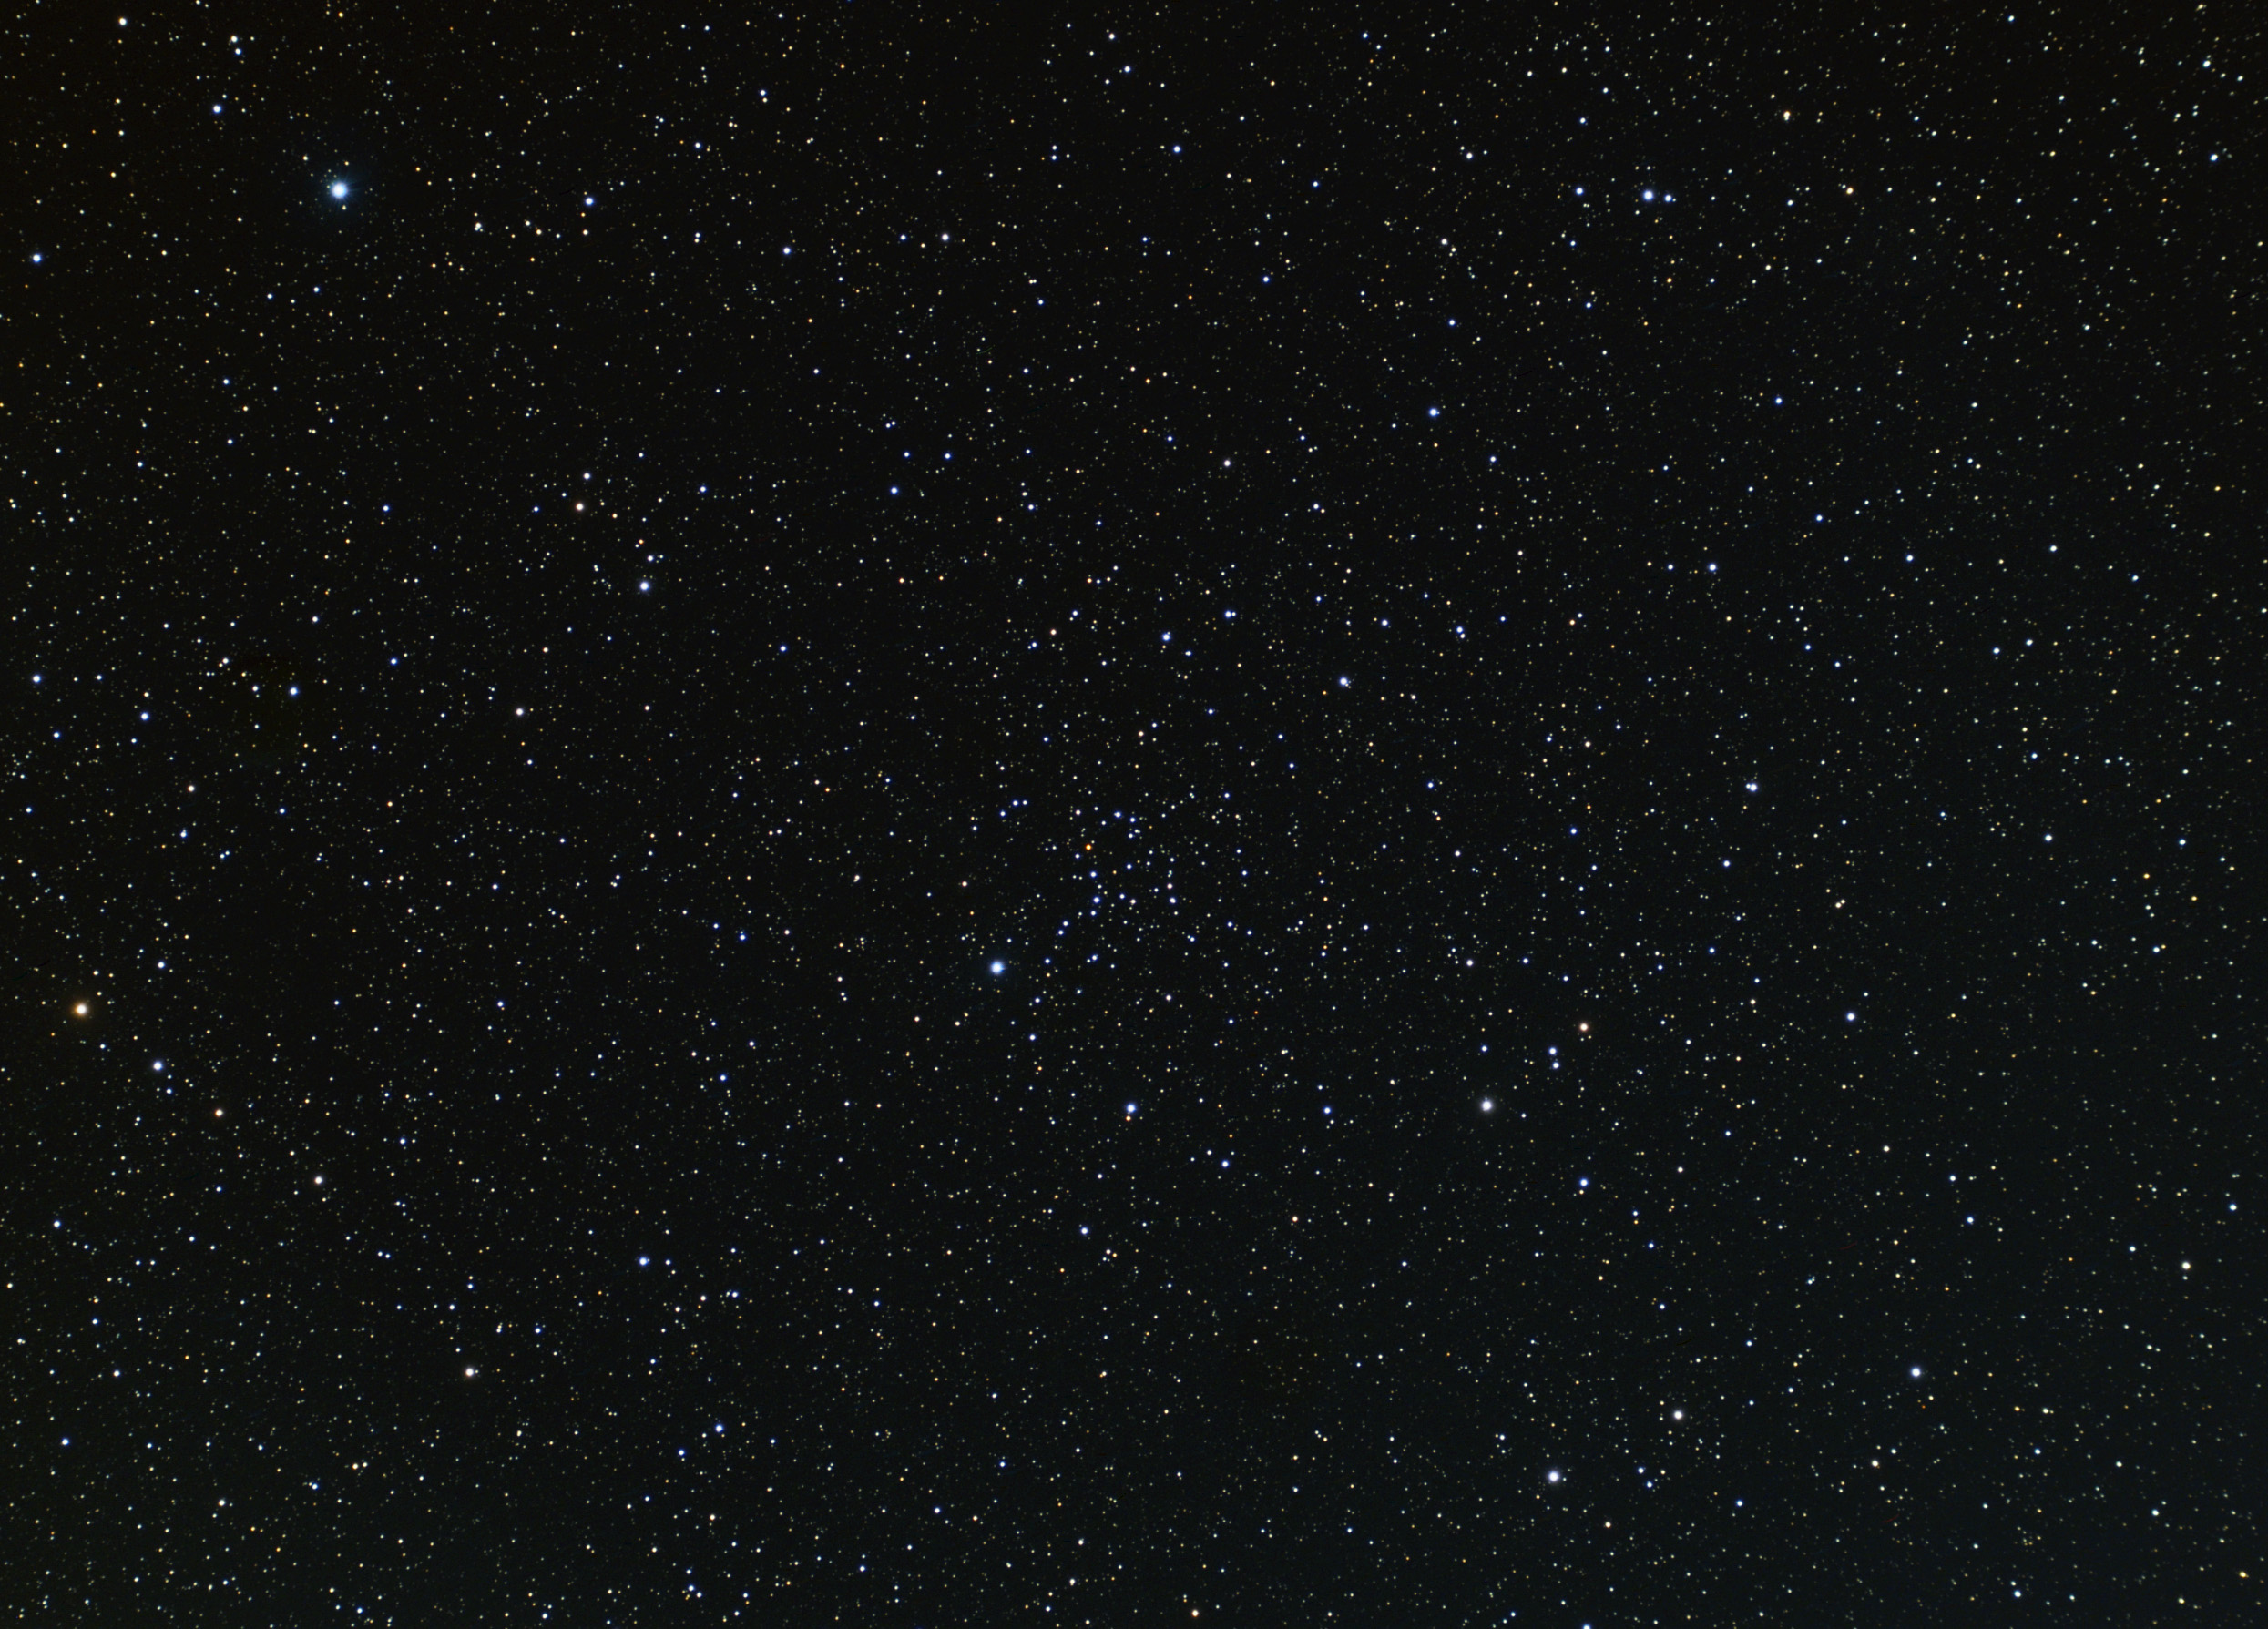 NGC 1664 Here's an 88 minute (22x240) exposure of the open cluster NGC 1664 in Auriga. Note the very orange star in the cluster (probably not a member). Taken with a 4" refractor, also an Astro-Tech field flatenner is in the optical path. The image is at the full scale resolution of the camera but it is cropped slightly. Processed with darks and flats and darks for flats using Maxim DL. Final processing done in Photoshop. Celestron C-14 was used for guiding with an Orion Autoguider. Temperature outside was around 10 degrees F.
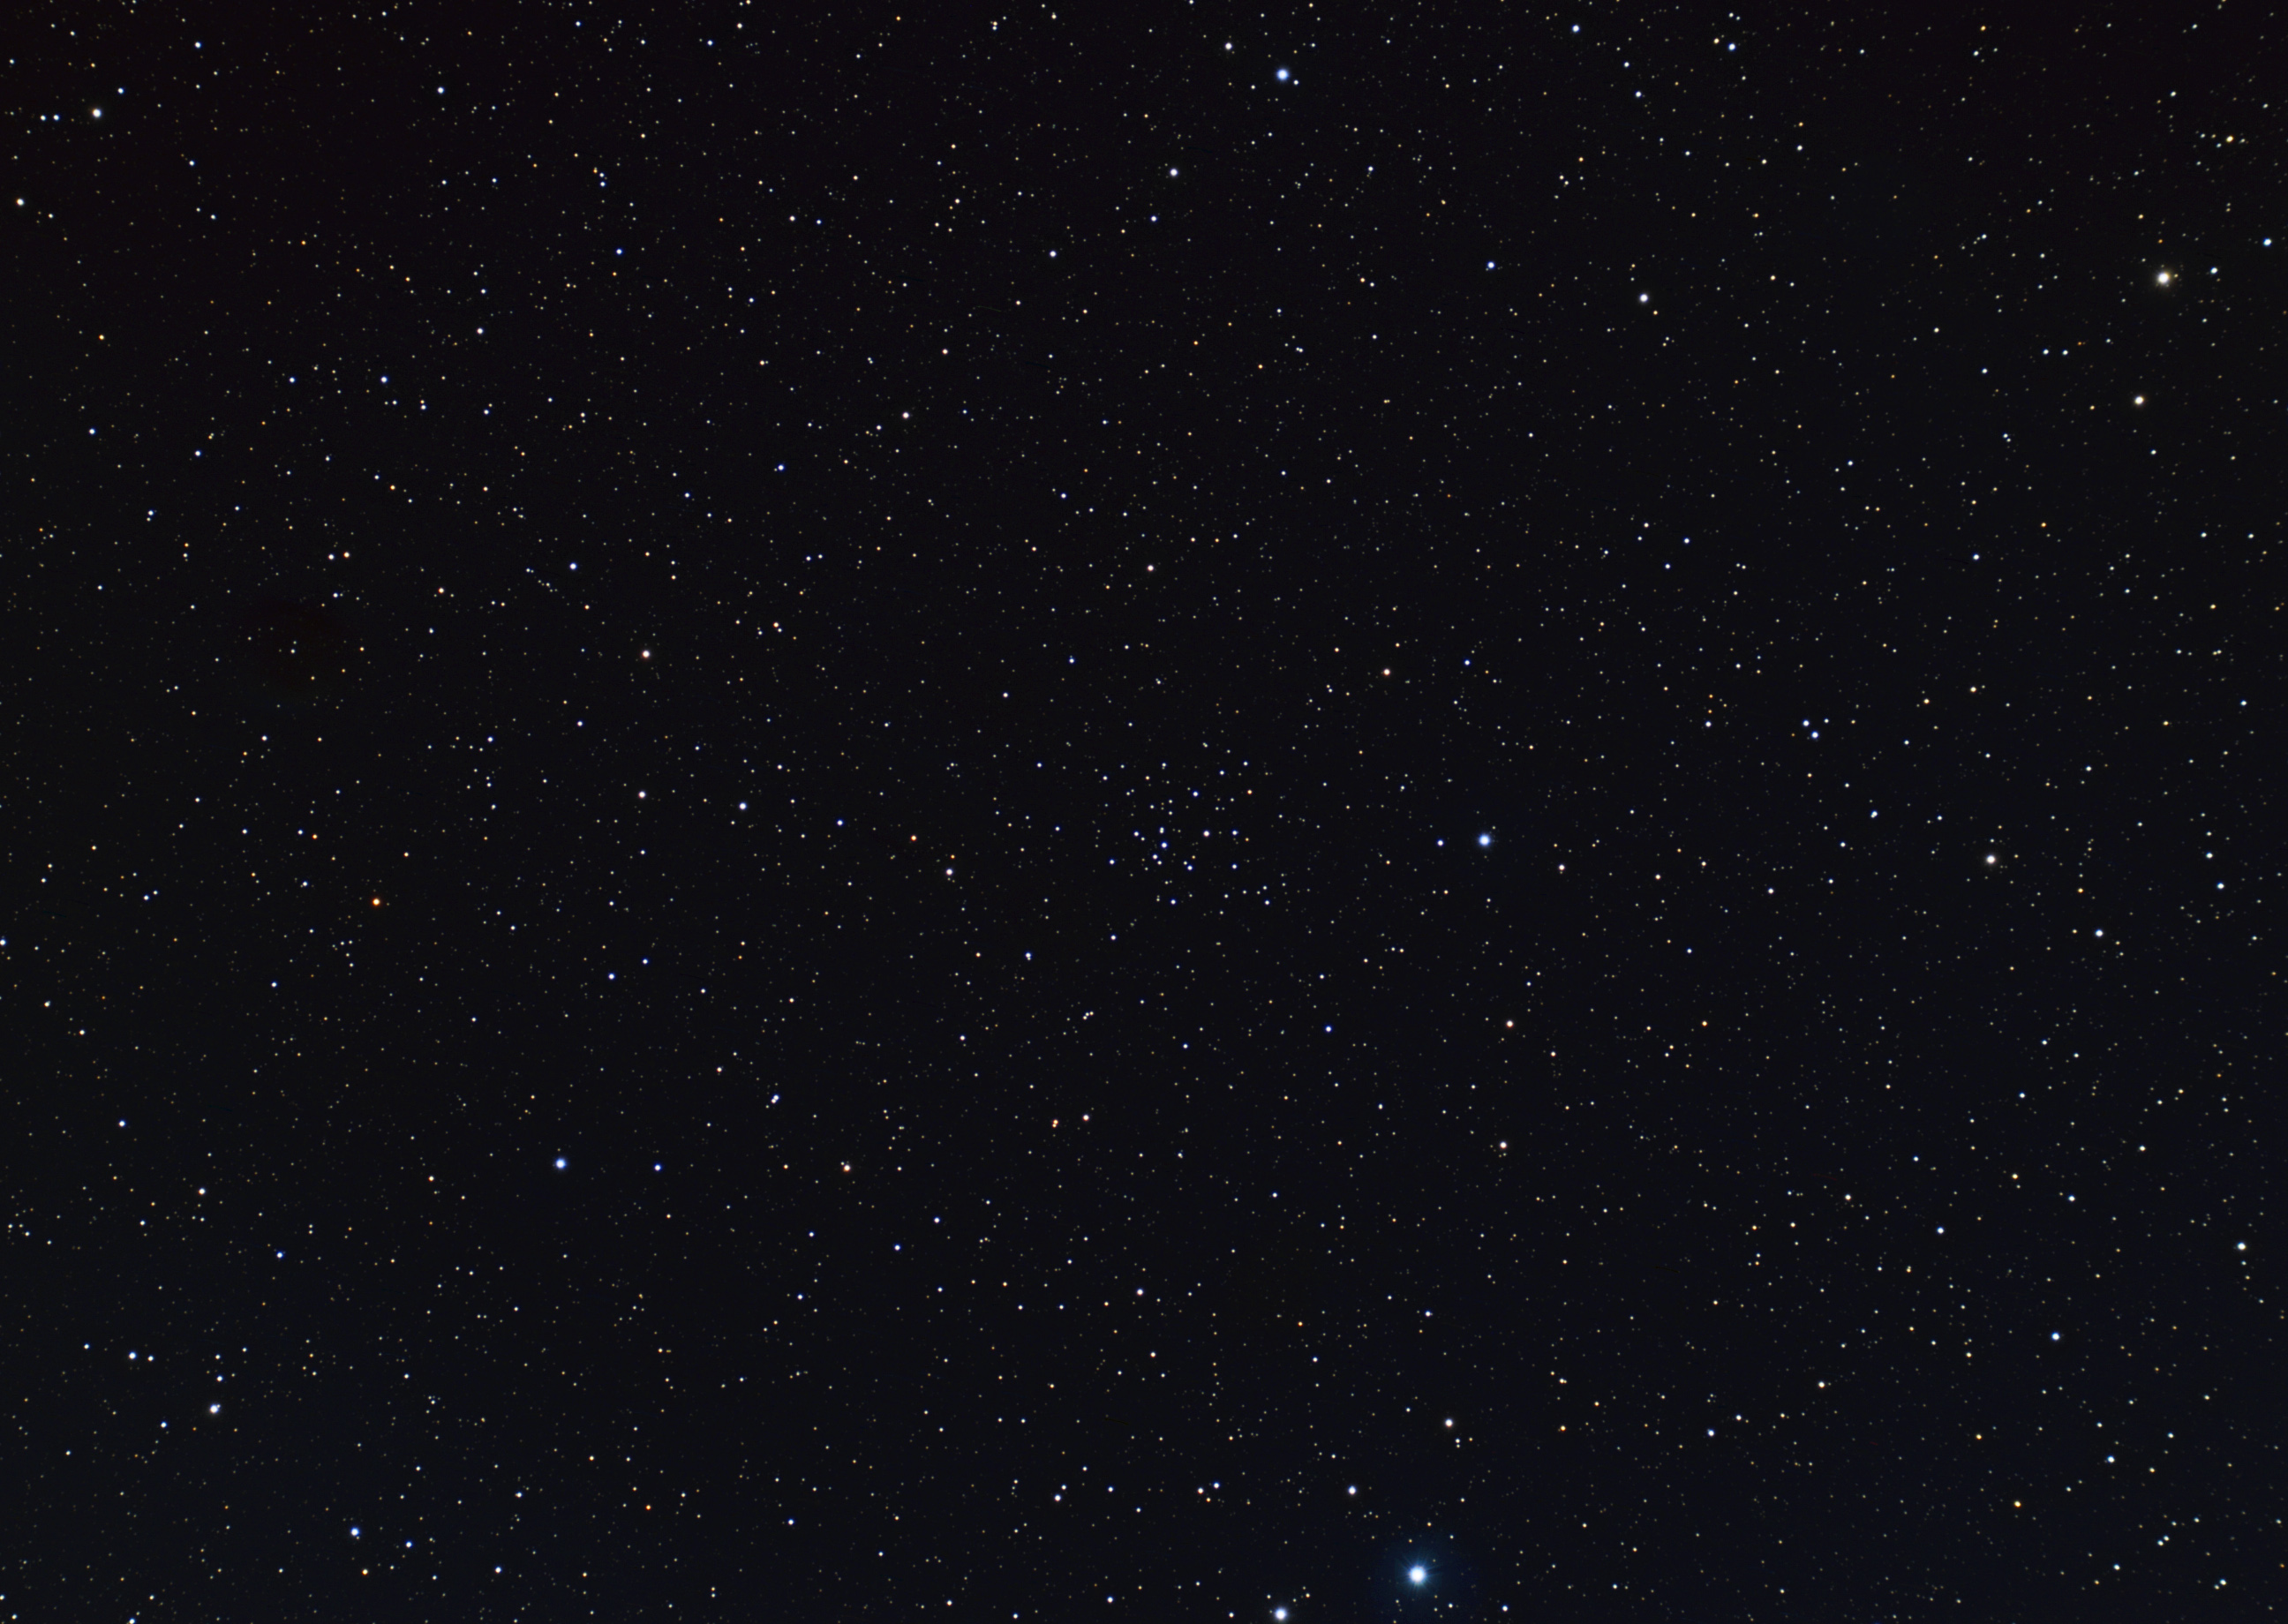 NGC 2215 Here's a 176 minute (44x240) exposure of the open cluster NGC 2215 in Monoceros. Taken with a 4" refractor, also an Astro-Tech field flatenner is in the optical path. The image is at the full scale resolution of the camera but it is cropped slightly. Processed with darks and flats and darks for flats using Maxim DL. Final processing done in Photoshop. Celestron C-14 was used for guiding with an Orion Autoguider. Temperature outside was around 10 degrees F.
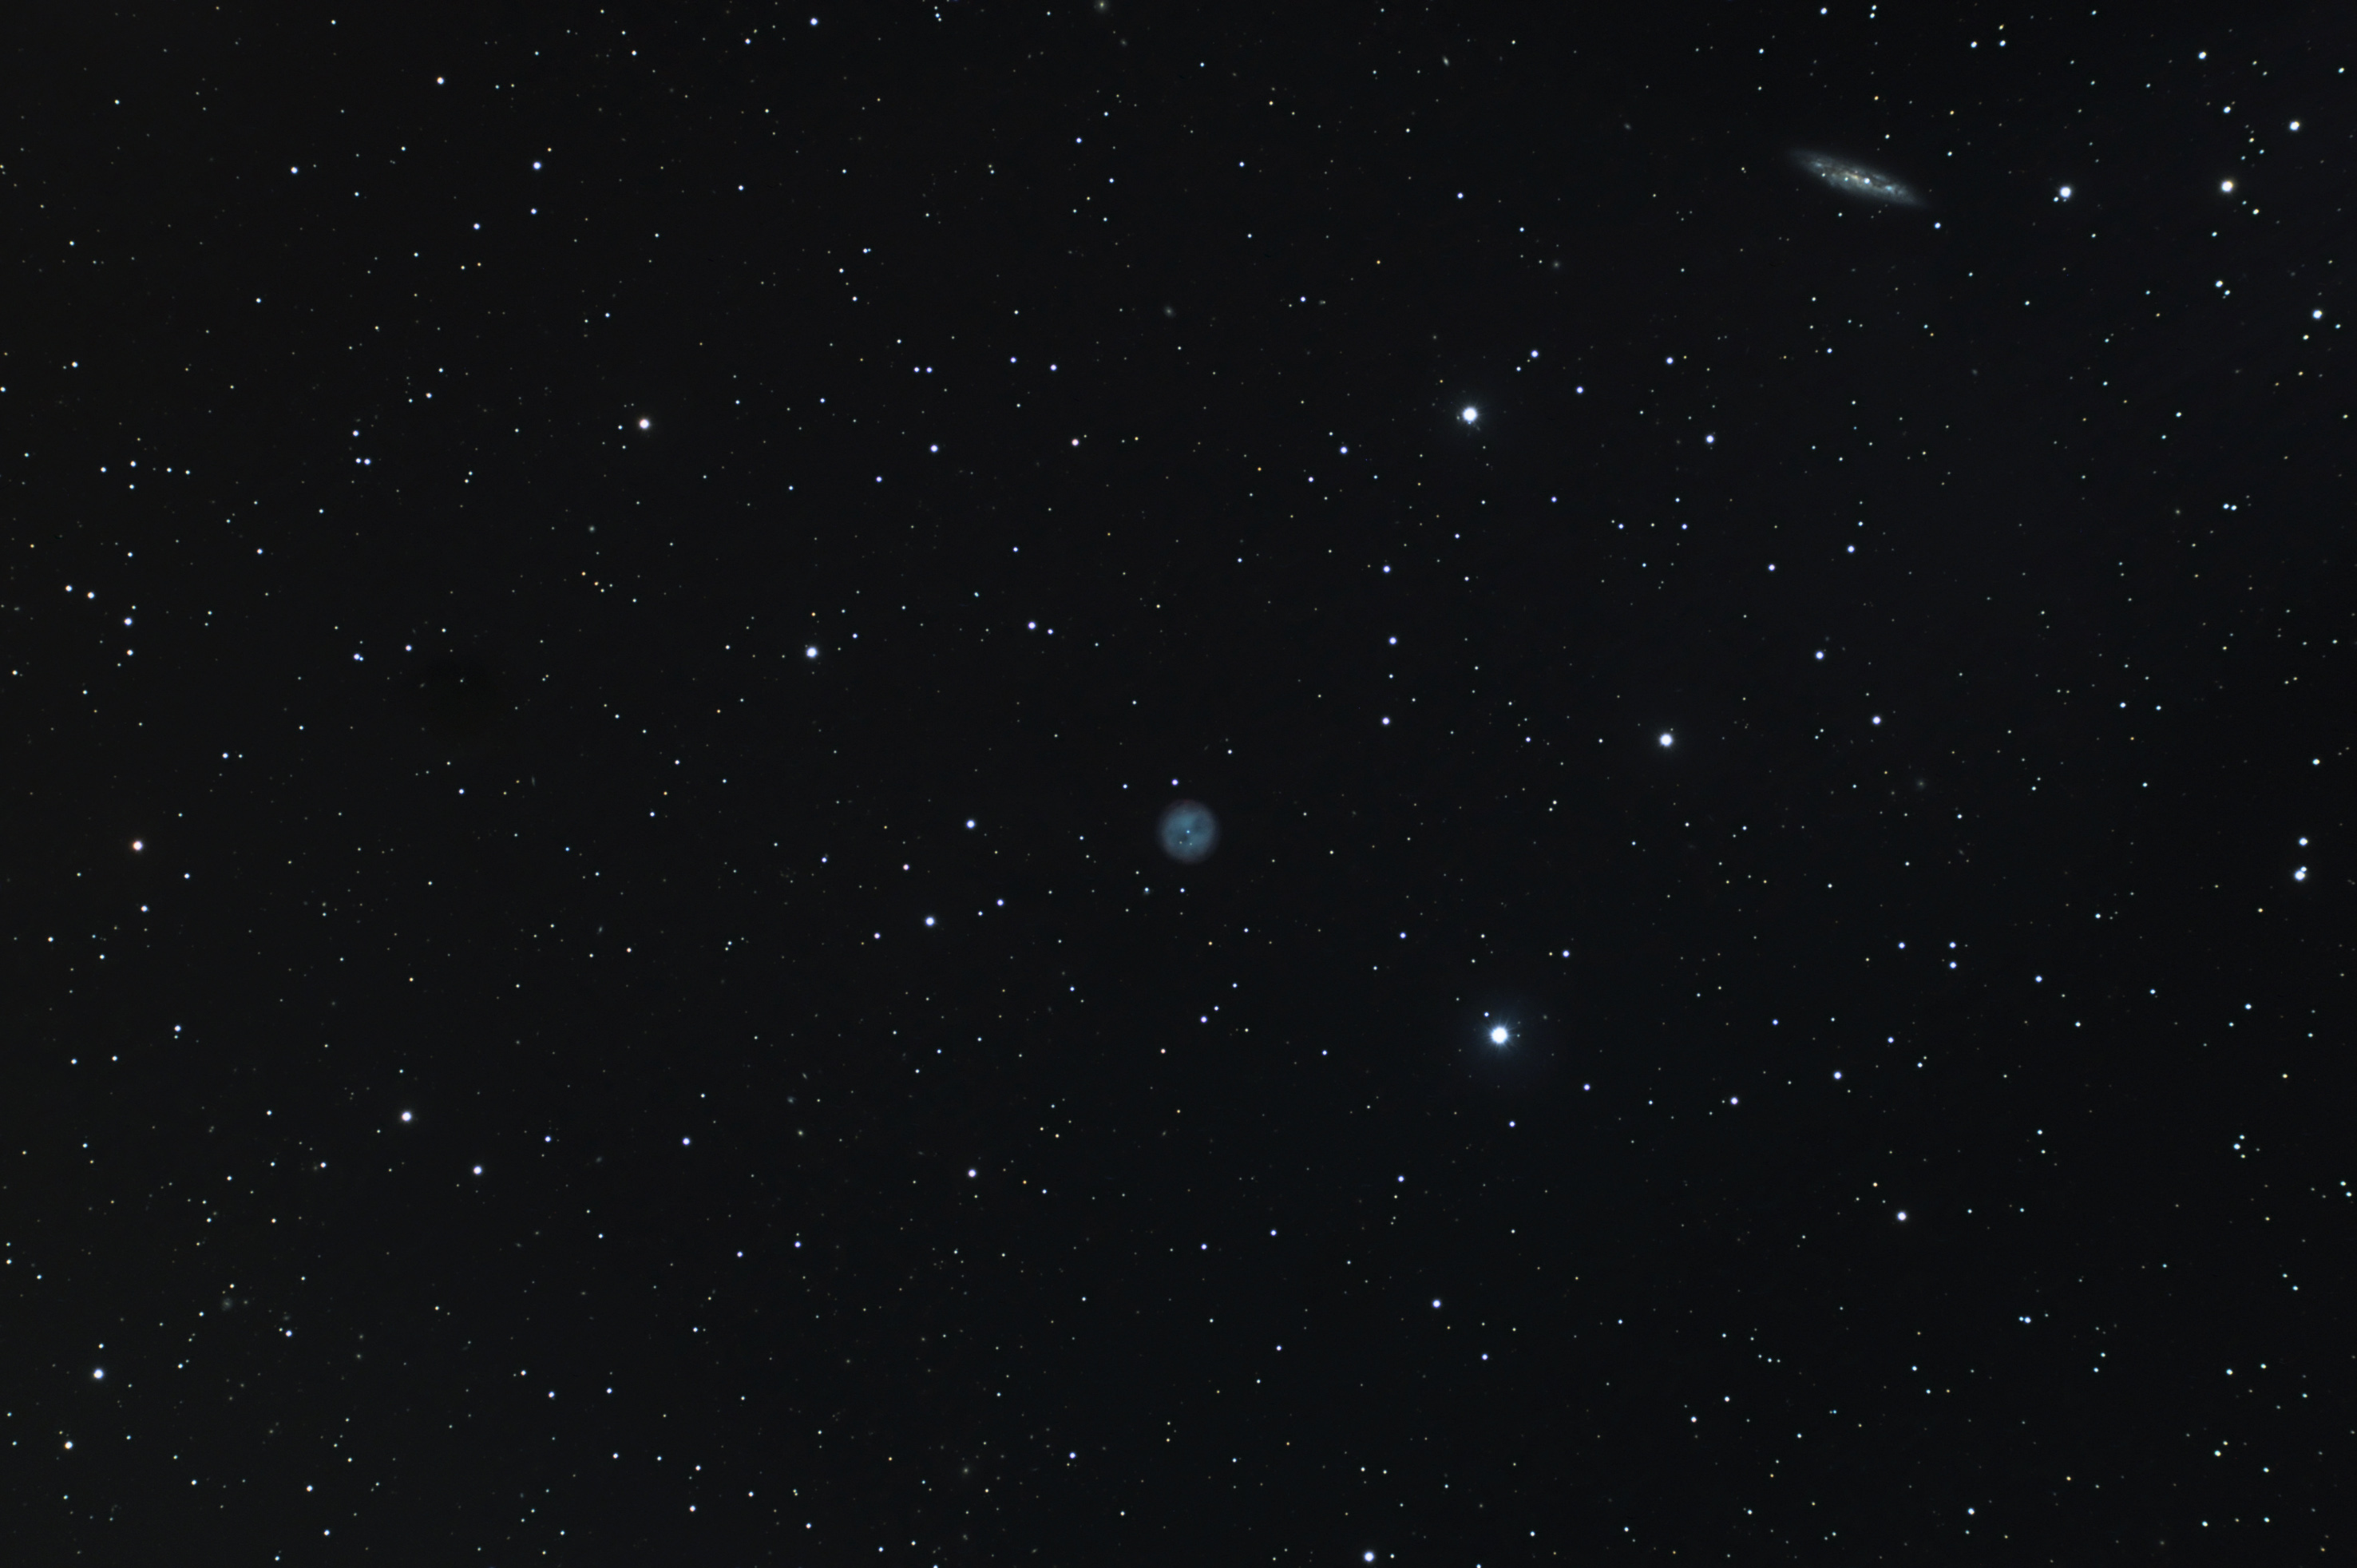 M97, Owl Nebula (and M108) Here's a 256 minute (64x240) exposure of the Owl Nebula (M97) in Ursa Major. Also visible at the upper right of this frame is galaxy M108. This image is significantly deeper than the one I took on 26 December 2011 (that night there was haze and the exposure was not as long). This new image shows many more faint background galaxies. I checked some of the galaxies using Sky Safari 3 and this image easily picking up galaxies that are around magnitude 17.5 (about 45,000 times fainter than the naked eye can see). One example is galaxy PGC 2490291. It's a small faint sliver of light just to the upper right of the Owl (about one "Owl" diamter and about at 12:30 o'clock), this galaxy is magnitude 17.63 (dimmensions of 0.5 x 0.2 arc minutes). Taken with a 4" refractor, also an Astro-Tech field flatenner is in the optical path. The image is at the full scale resolution of the camera but it is cropped slightly. Processed with darks and flats and darks for flats using Maxim DL. Final processing done in Photoshop. Celestron C-14 was used for guiding with an Orion Autoguider. Temperature outside was around 5 degrees F. This is my best image of M97 to date.
This session consisted of early morning imaging on the 15th, then evening imaging on the 15th, followed by early mornig imaging on the 16th. There was a fat waning quarter Moon to deal with in the morning, despite it I got several images in the morning hours.
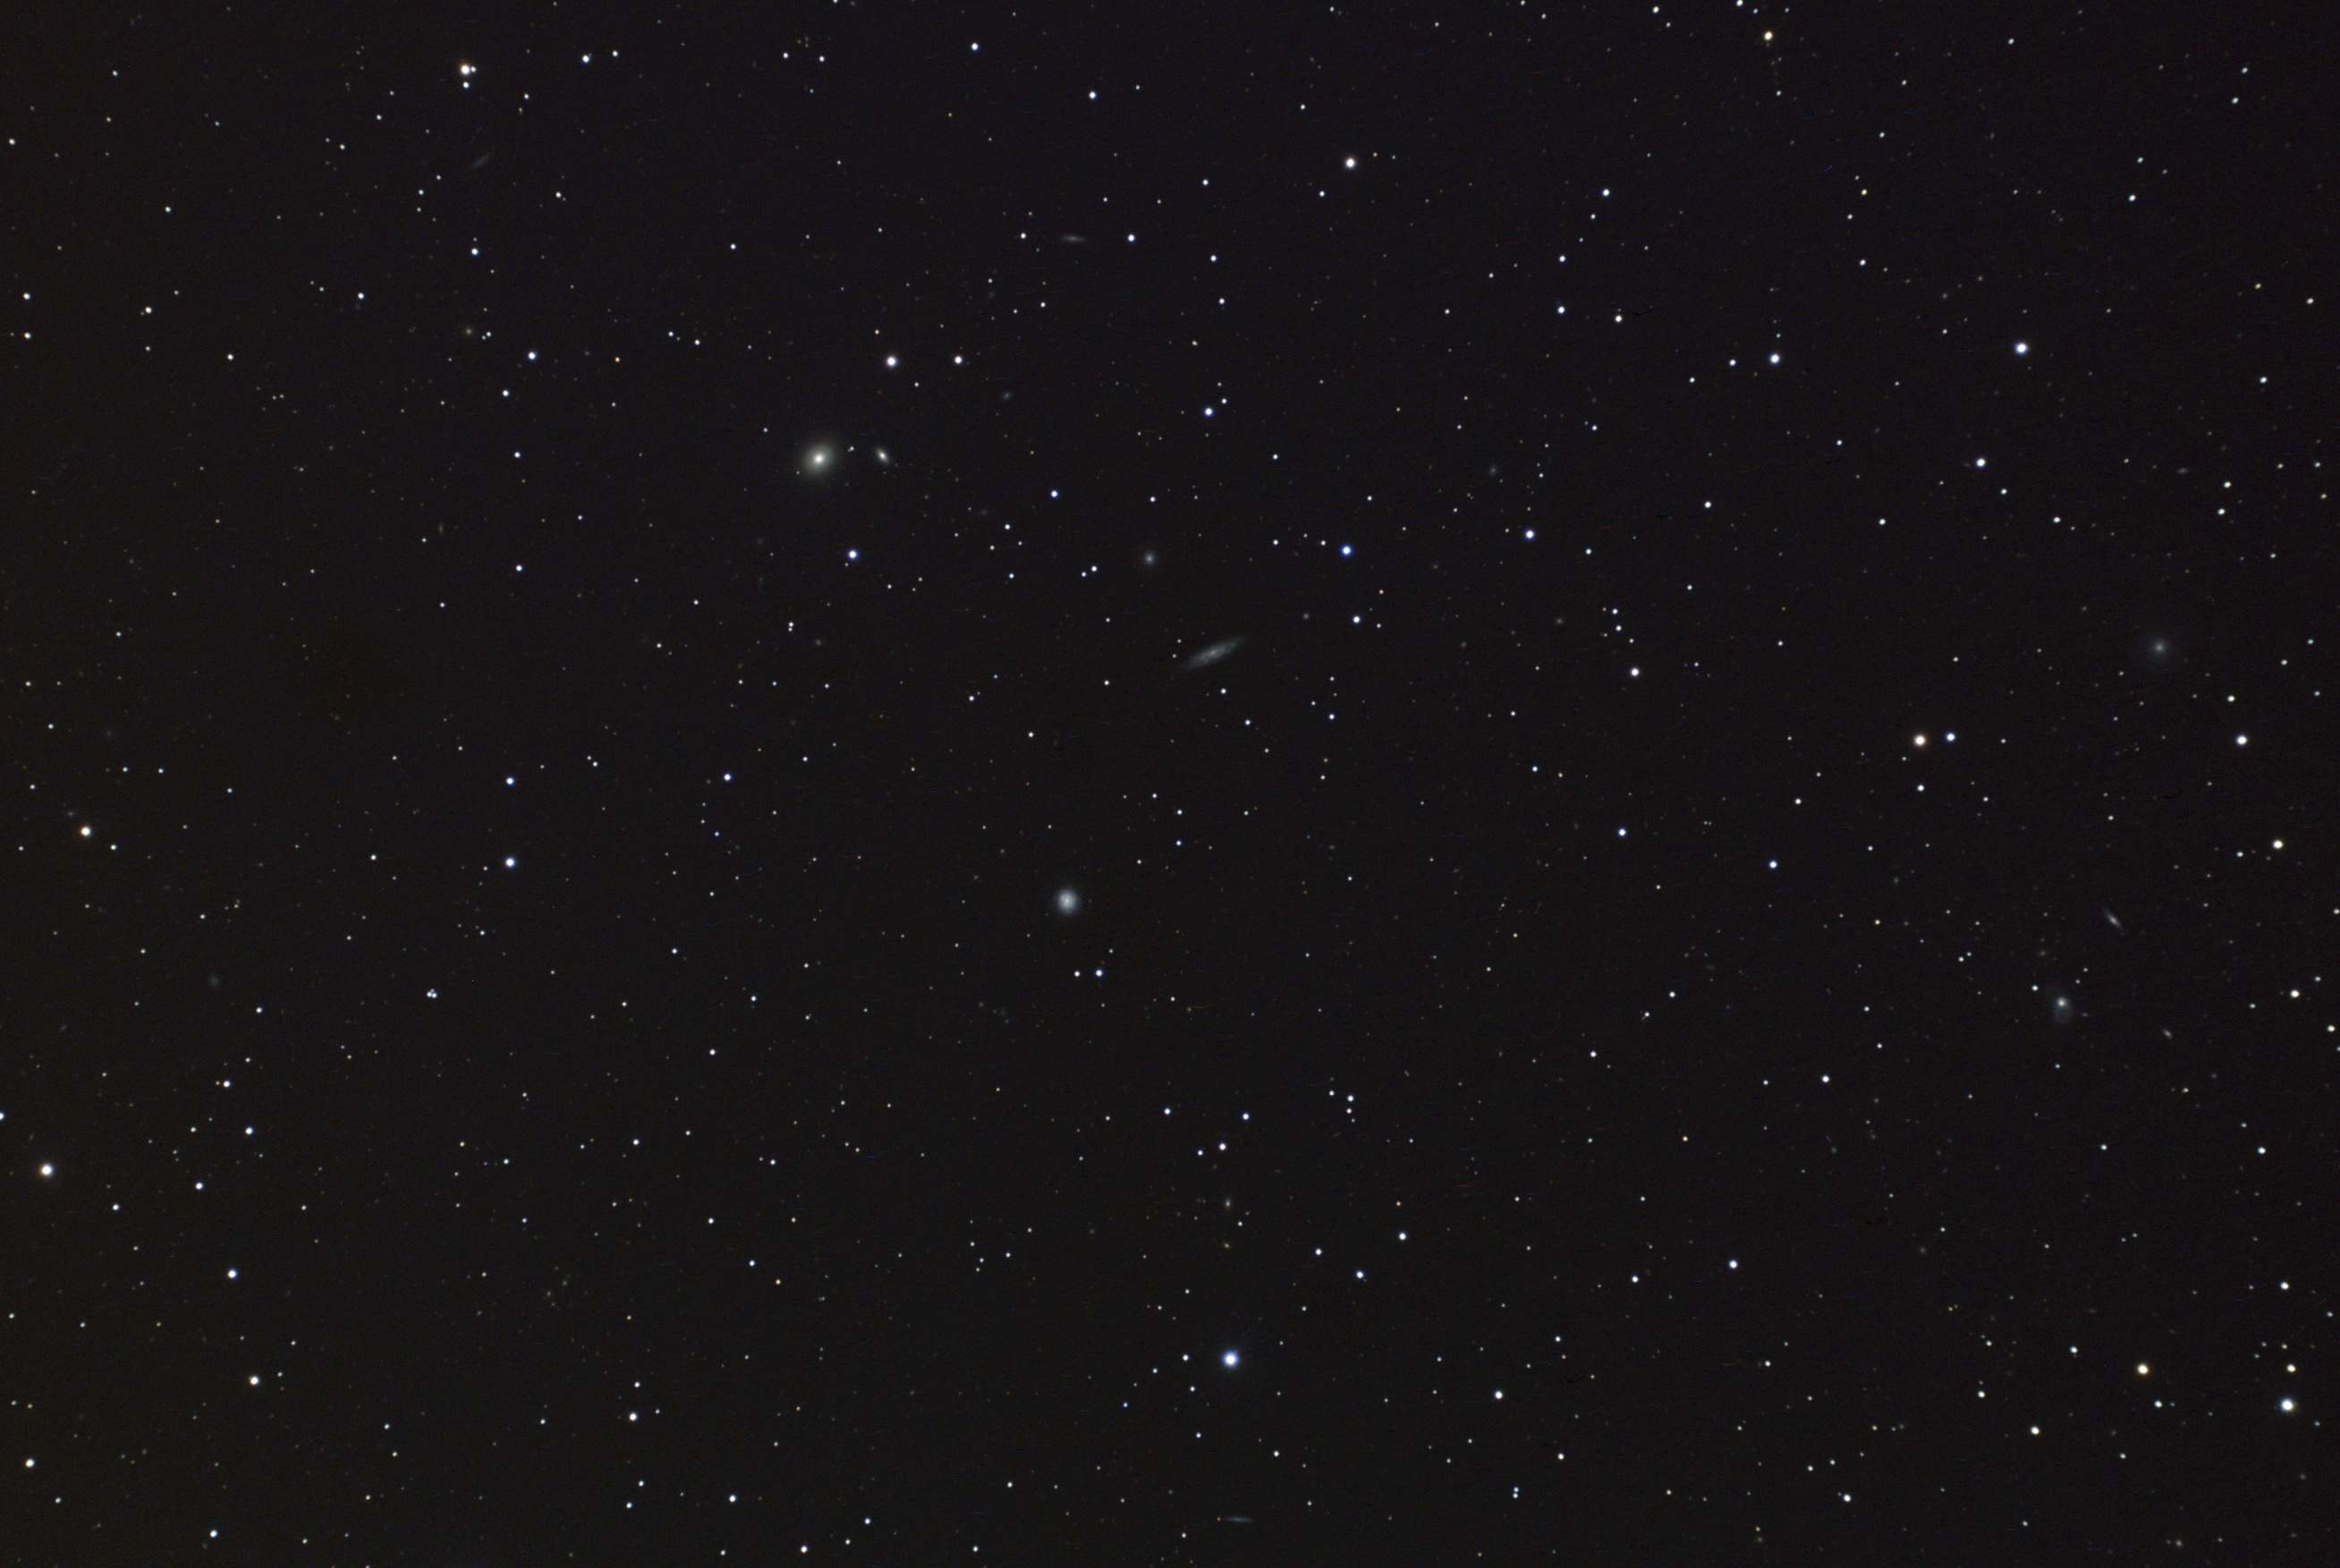 NGC 3972 region This is a 3 hour (45x240) exposure of the NGC 3972 region in Ursa Major. NGC 3972 is the elongated galaxy in the image. It forms a right triangle with 2 other bright galaxies, NGC3998 is the bright round one to the upper left and NGC 3982 is the bright (but small and tight) spiral galaxy to the lower left. A slew of other galaxies are visible in this image, the faintest ones are around magnitude 17.5. In the lower right area of this image is a galaxy that at first looks like a comet, this is NGC 3921. Taken with a 4" refractor, also an Astro-Tech field flatenner is in the optical path. The image is at the full scale resolution of the camera but it is cropped slightly. Processed with darks and flats and darks for flats using Maxim DL. Final processing done in Photoshop. Celestron C-14 was used for guiding with an Orion Autoguider.
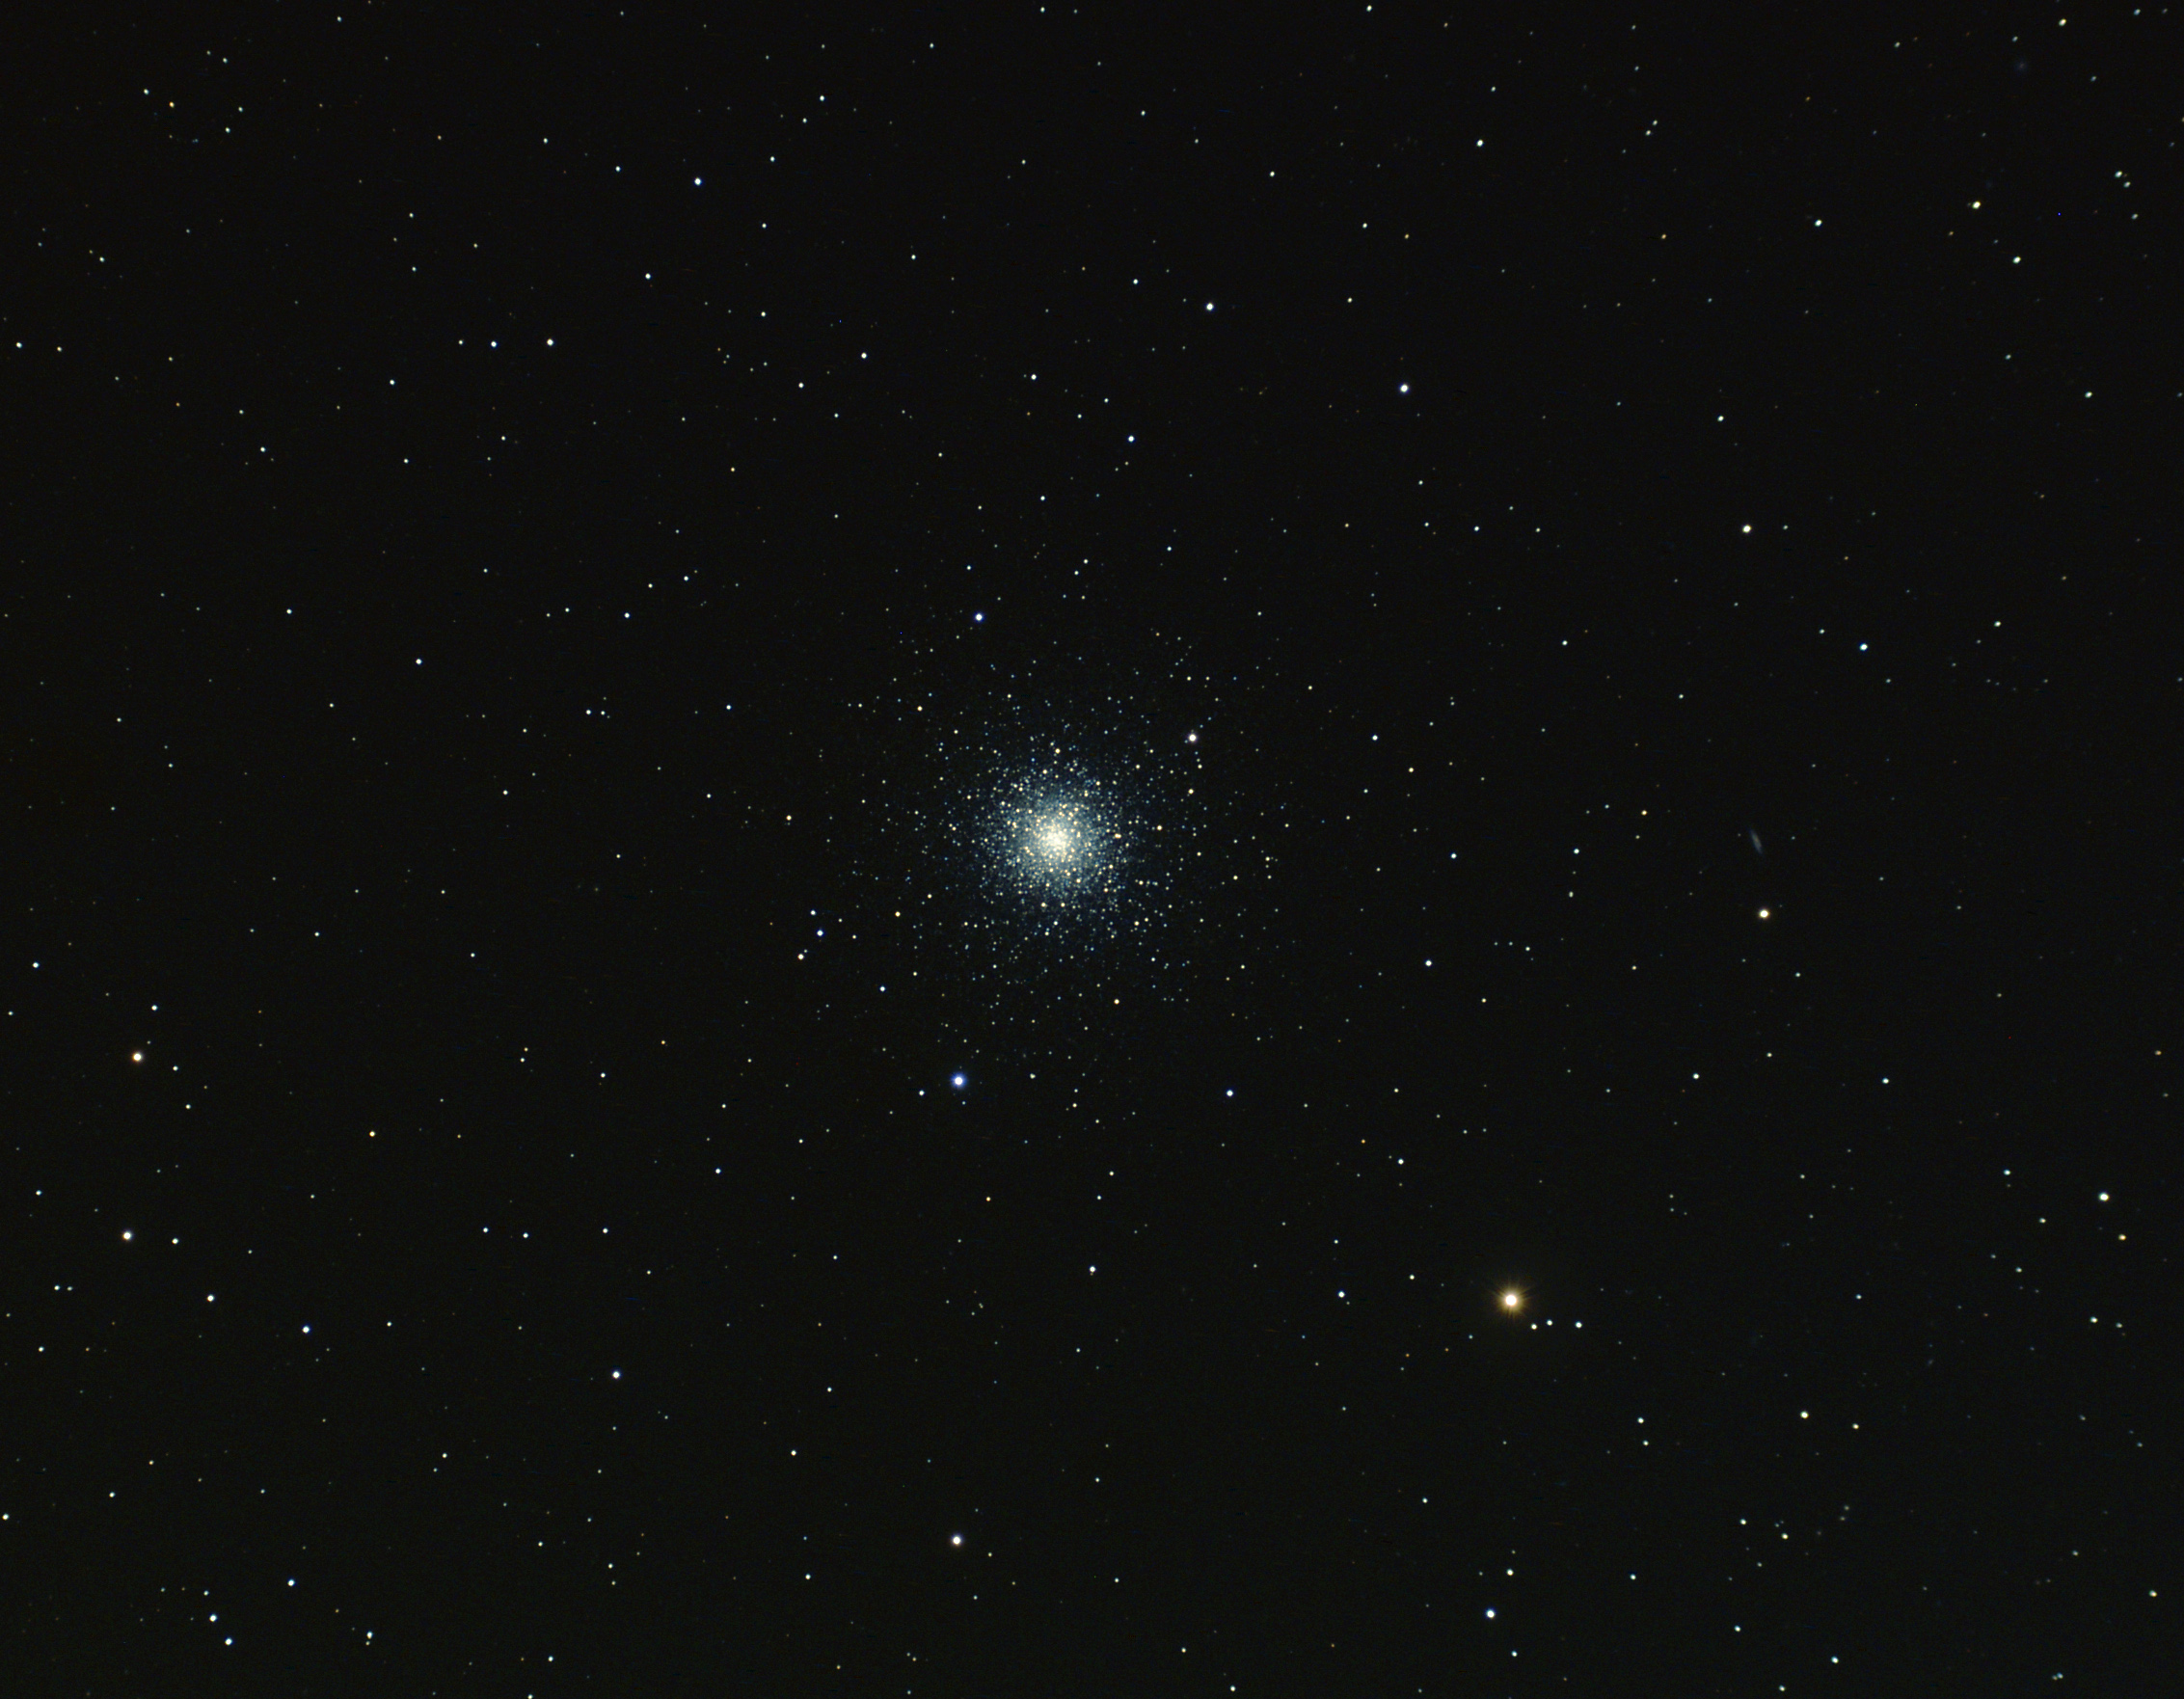 M3 Here is a 56 minute exposure (14x240) of the globular cluster M3 in Canes Venatici. I still had some "dark time" after imaging NGC 3972, but not a ton of time so I got this image of M3. The slender galaxy to the right of M3 is 14.4 magnitude NGC 5263. Taken with a 4" refractor, also an Astro-Tech field flatenner is in the optical path. The image is at the full scale resolution of the camera but it is cropped slightly. Processed with darks and flats and darks for flats using Maxim DL. Final processing done in Photoshop. Celestron C-14 was used for guiding with an Orion Autoguider.
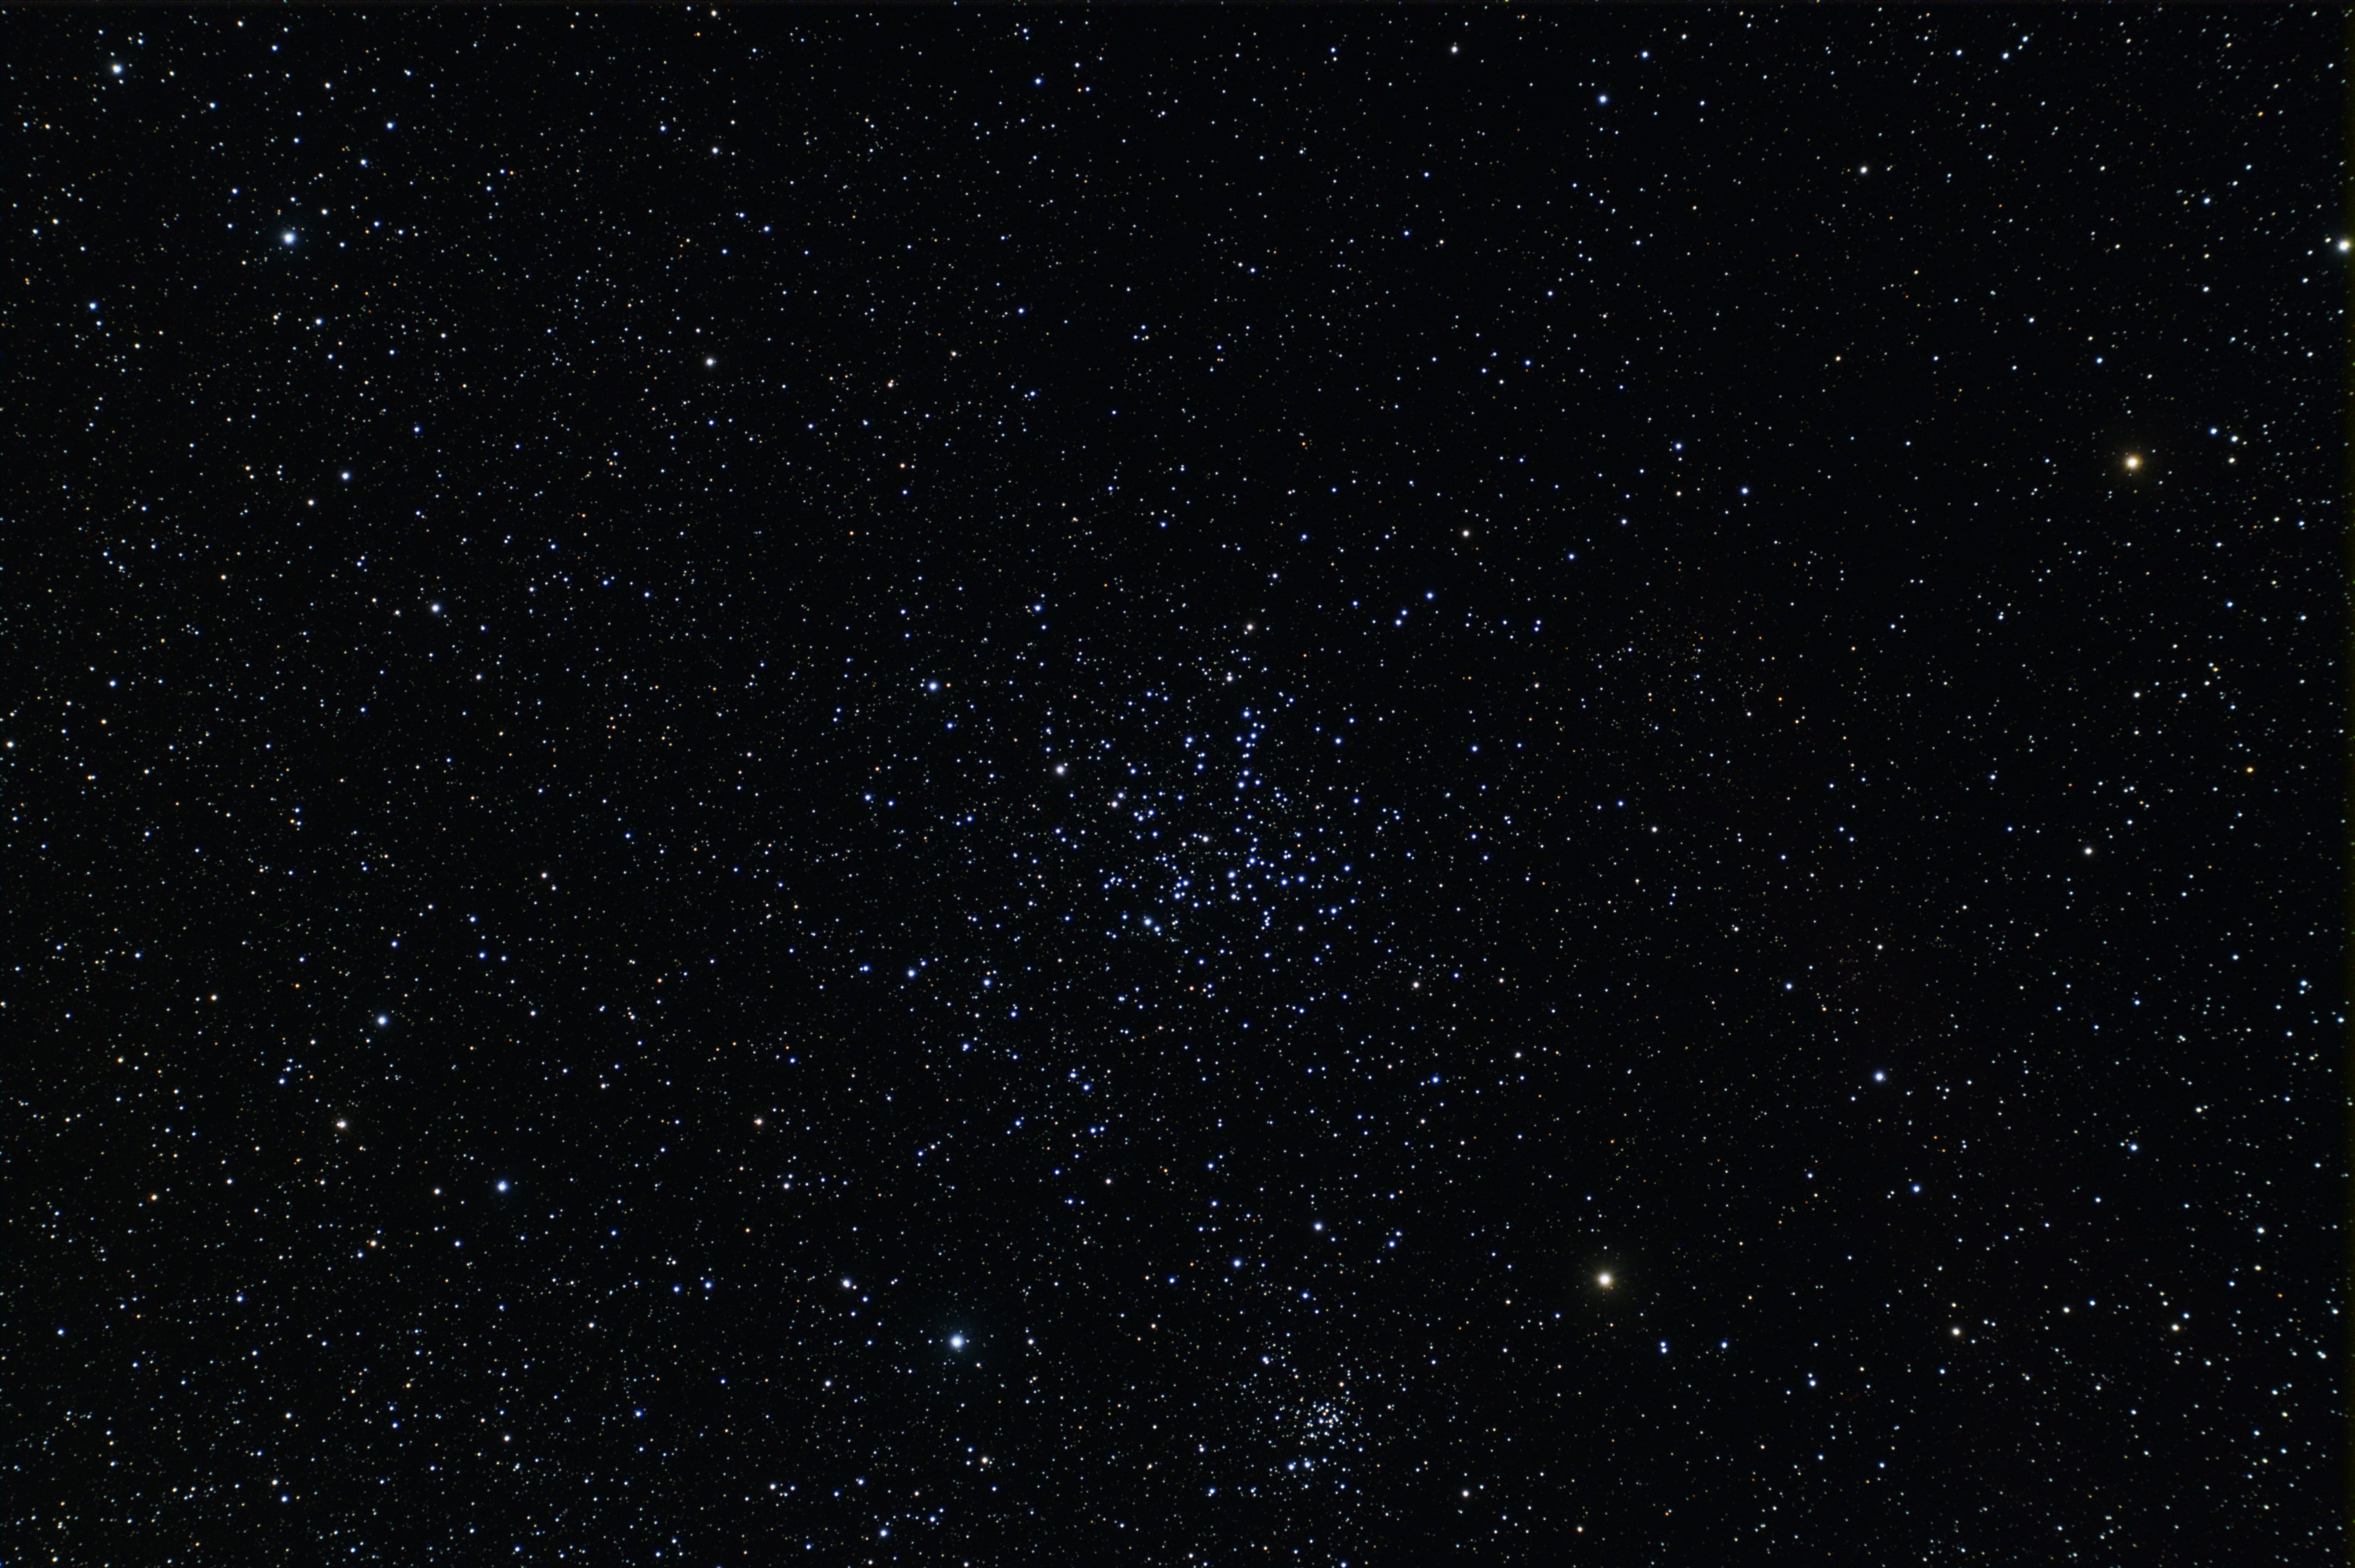 M38 Here is a 128 minute exposure (32x240) of the open cluster M38 in Auriga. Just below M38 is smaller and more compact open cluster NGC 1907. Taken with a 4" refractor, also an Astro-Tech field flatenner is in the optical path. The image is at the full scale resolution of the camera but it is cropped slightly. Processed with darks and flats and darks for flats using Maxim DL. Final processing done in Photoshop. Celestron C-14 was used for guiding with an Orion Autoguider.
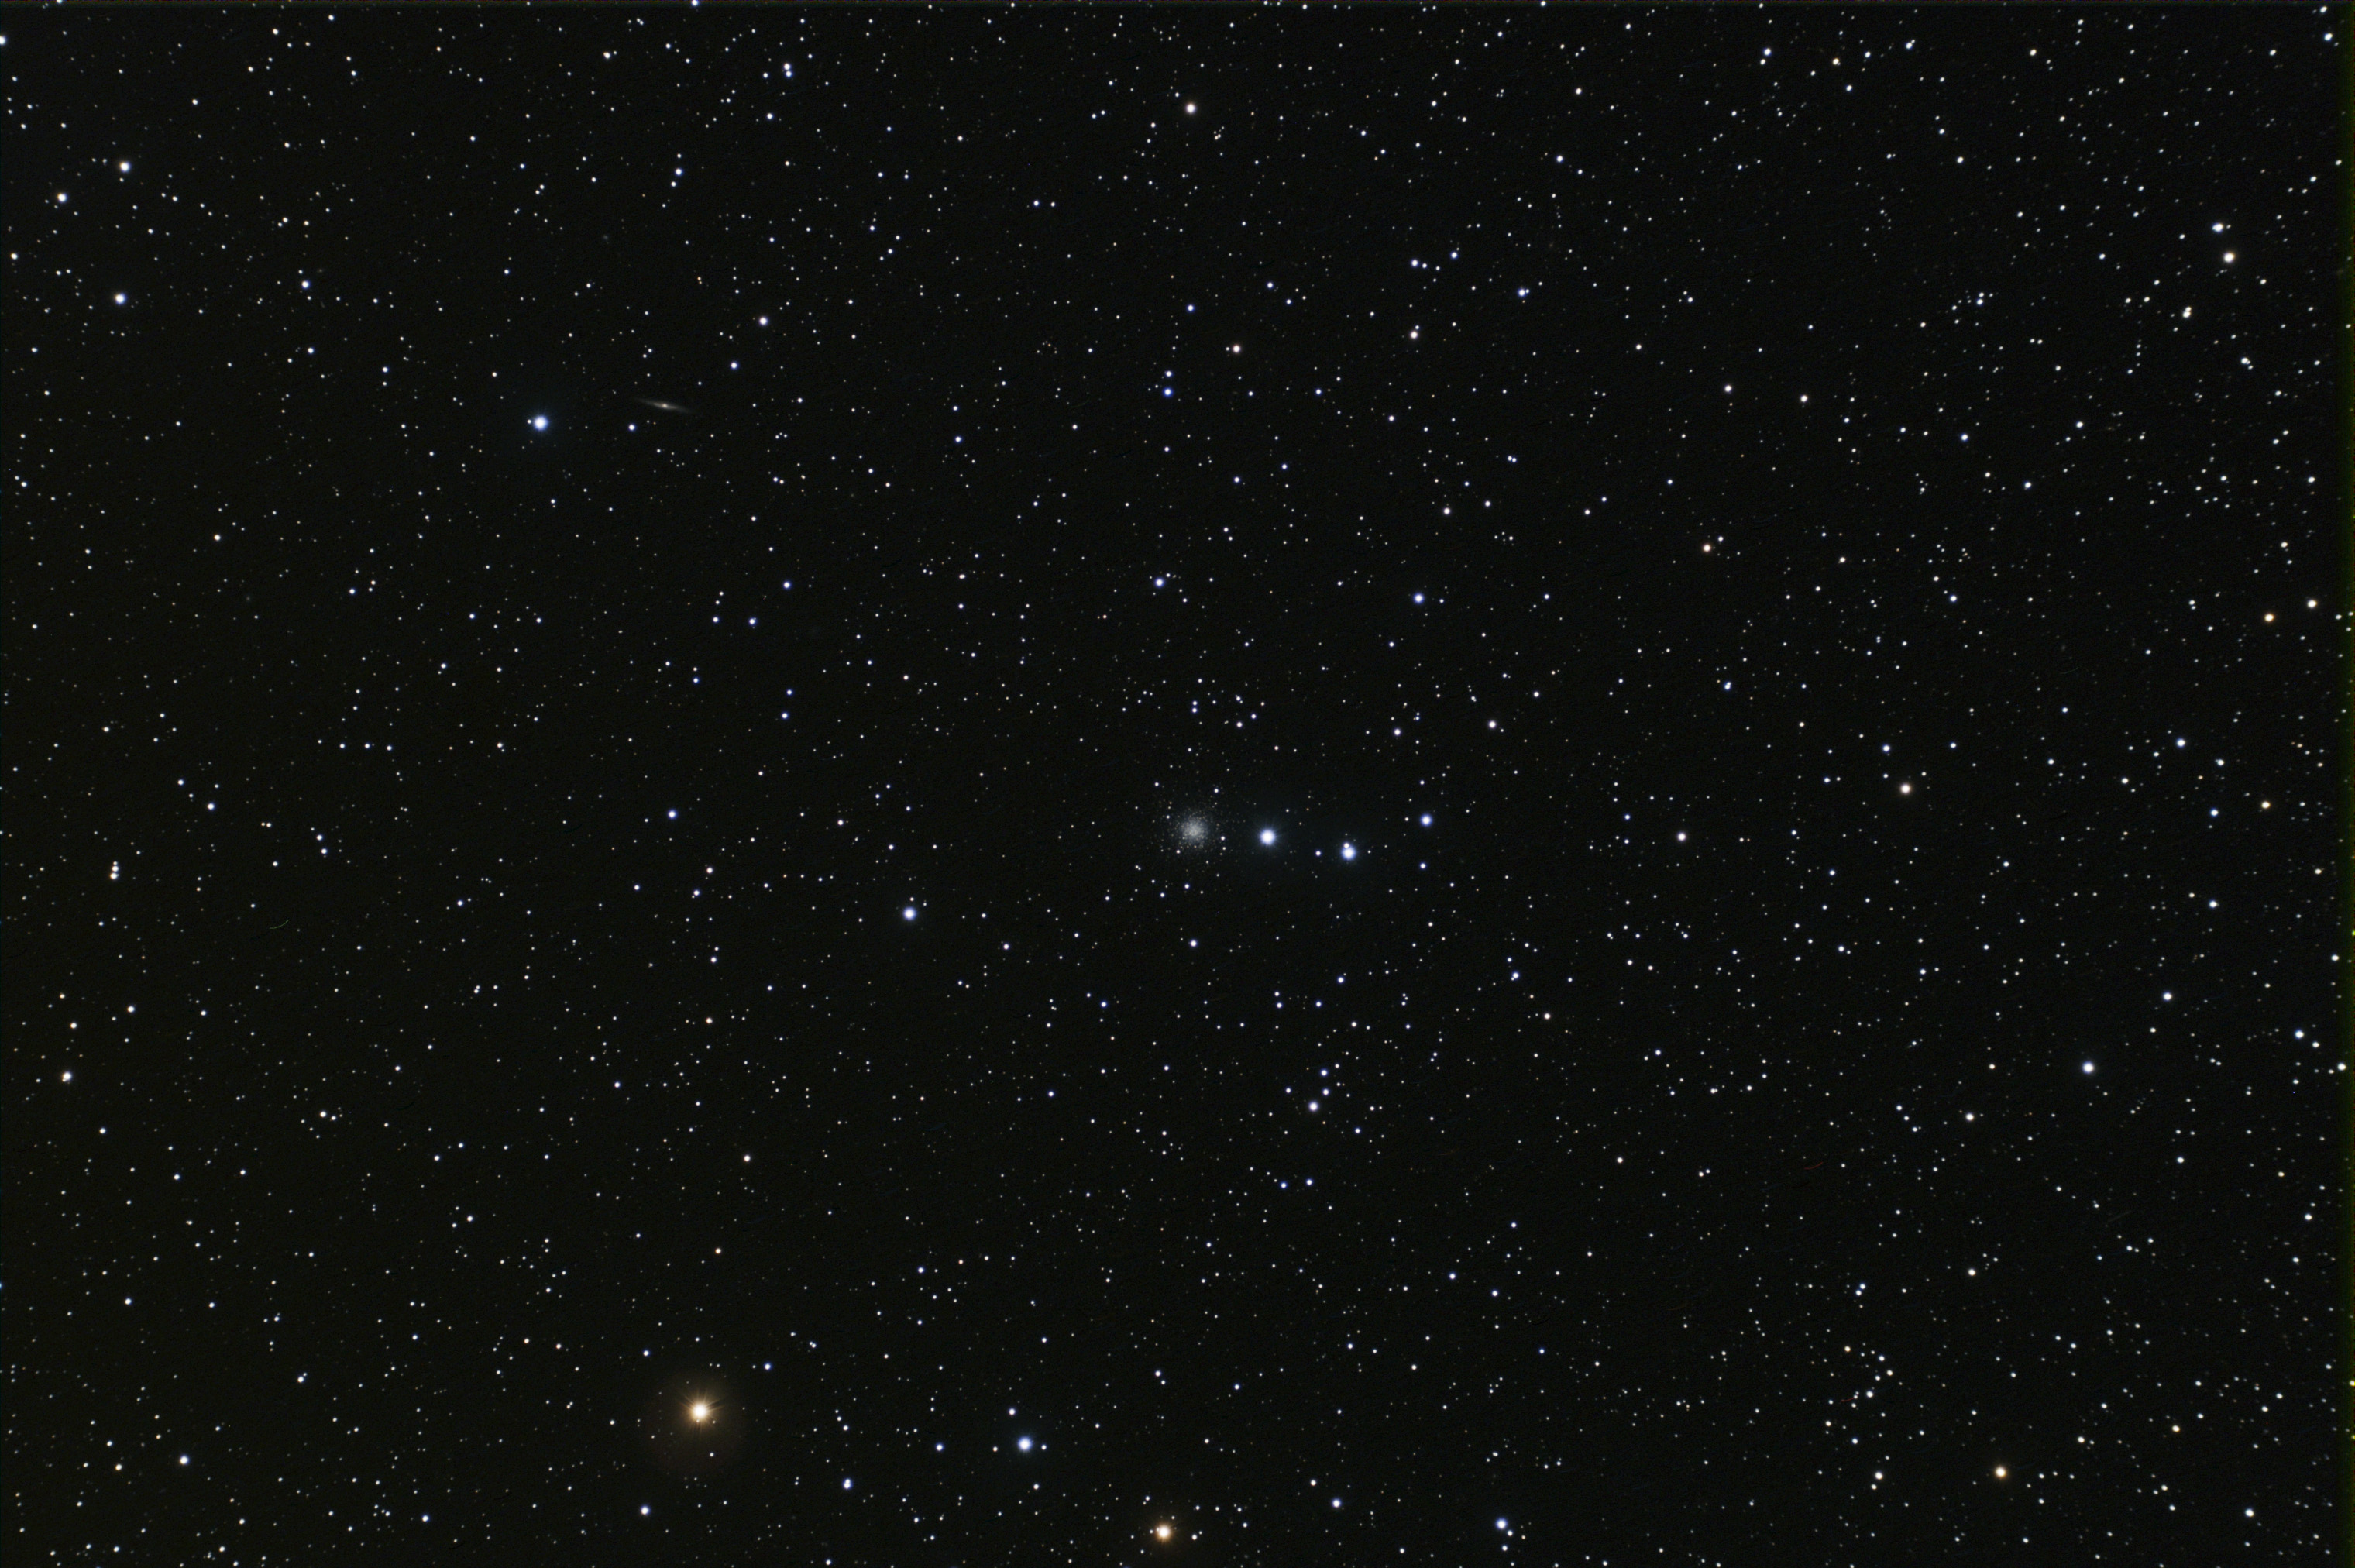 NGC 2419 Here is a 136 minute exposure (34x240) of the so called "intergalactic" globular cluster NGC 2419 in Lynx. This cluster is the unique for our galaxy as it is located farther from the center of the galaxy than any other (known) globular cluster. Also easily visible in this image is galaxy NGC 2424 (to the upper left of NGC 2419). Taken with a 4" refractor, also an Astro-Tech field flatenner is in the optical path. The image is at the full scale resolution of the camera but it is cropped slightly. Processed with darks and flats and darks for flats using Maxim DL. Final processing done in Photoshop. Celestron C-14 was used for guiding with an Orion Autoguider.
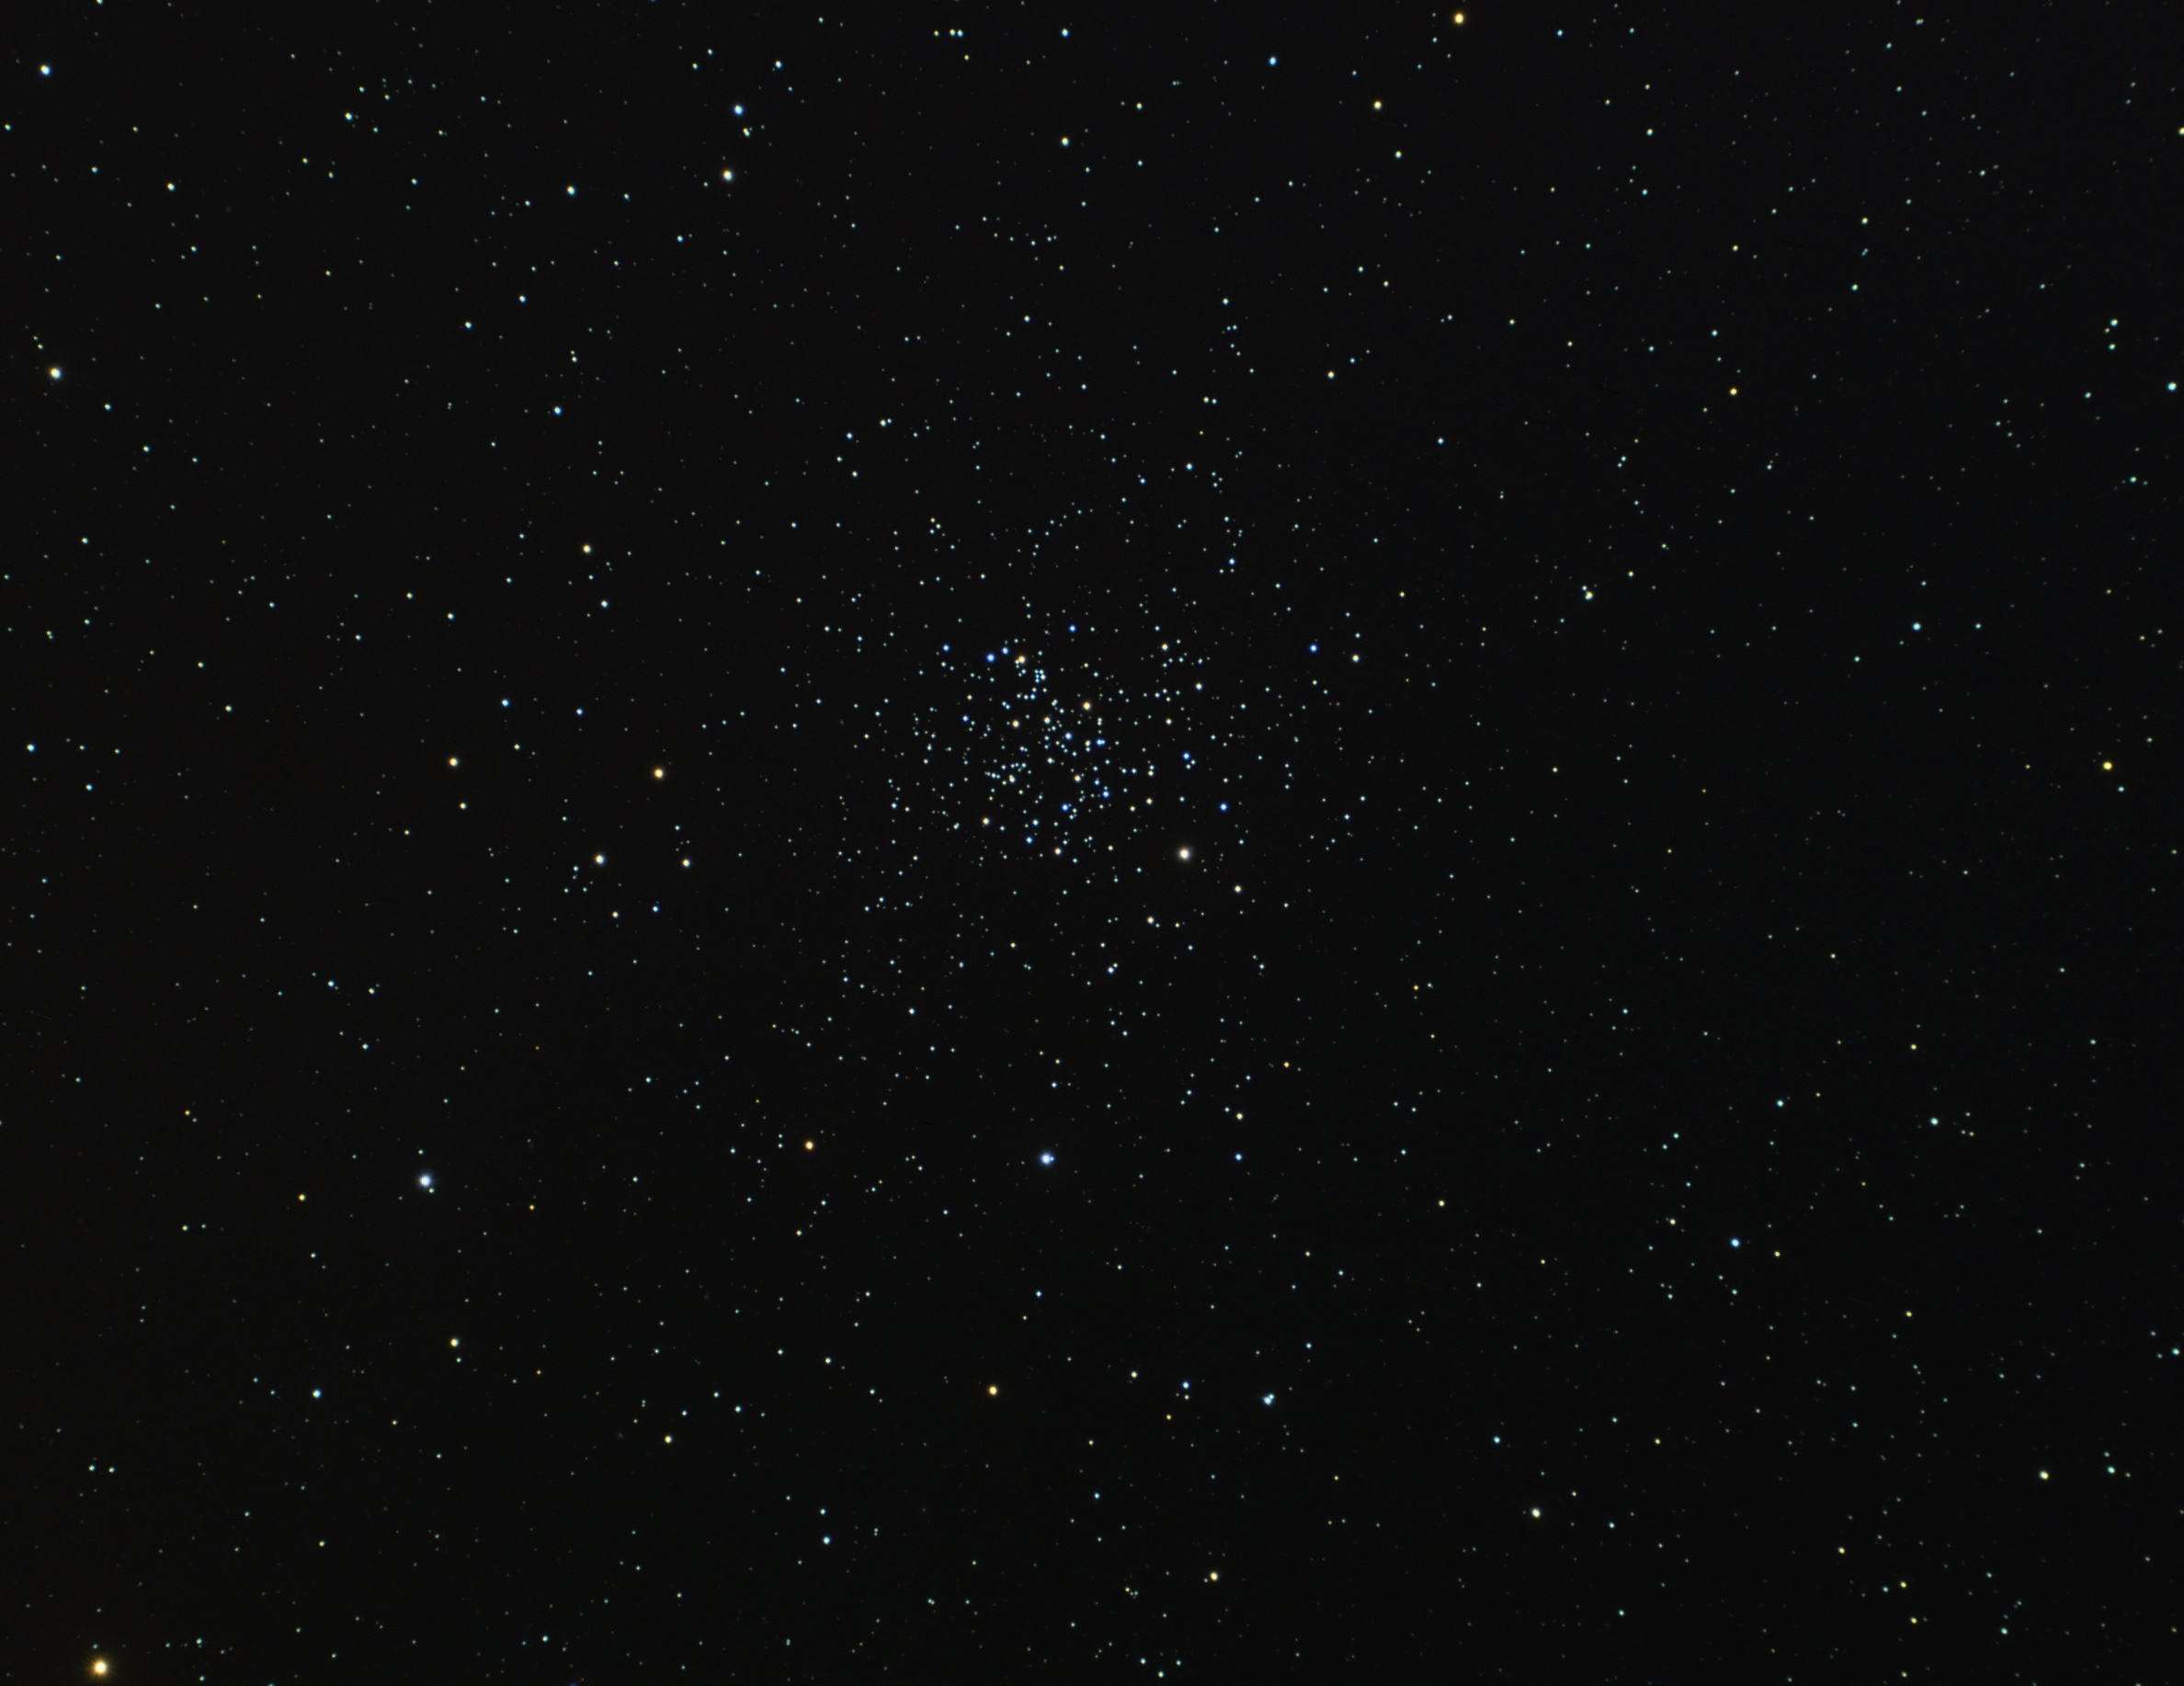 M67 This is just over a 4 hour exposure (61x240) exposure of the open cluster M67 in Cancer. Taken with a 4" refractor, also an Astro-Tech field flatenner is in the optical path. An alternate version of the image (processed to add diffraction spikes and a bit more contrast) is here . The image is at the full scale resolution of the camera but it is cropped slightly. Processed with darks and flats and darks for flats using Maxim DL. Final processing done in Photoshop. Celestron C-14 was used for guiding with an Orion Autoguider.
Tonight started out cloudy, cleared up to very good skies, then about 45 minutes into my imaging it clouded over completely. I did not get as much data as I had hoped (2 hours worth) but I got enough for a satisfactory image.
 NGC 2264 This is a 52 minute (13x240) exposure of the NGC 2264 ("Christmas Tree Cluster") region. I had really hoped to get more data (to bring out nebulosity more clearly) however clouds caused cease of operations. Better than nothing I guess. Taken with a 4" refractor, also an Astro-Tech field flatenner is in the optical path. The image was reduced in scale somewhat to help quell noise, it is also cropped slightly from full scale. Processed with darks and flats and darks for flats using Maxim DL. Final processing done in Photoshop. Celestron C-14 was used for guiding with an Orion Autoguider.
Another night with a short window of clear skies. I managed to get an image of cluster NGC 2169 in Orion..
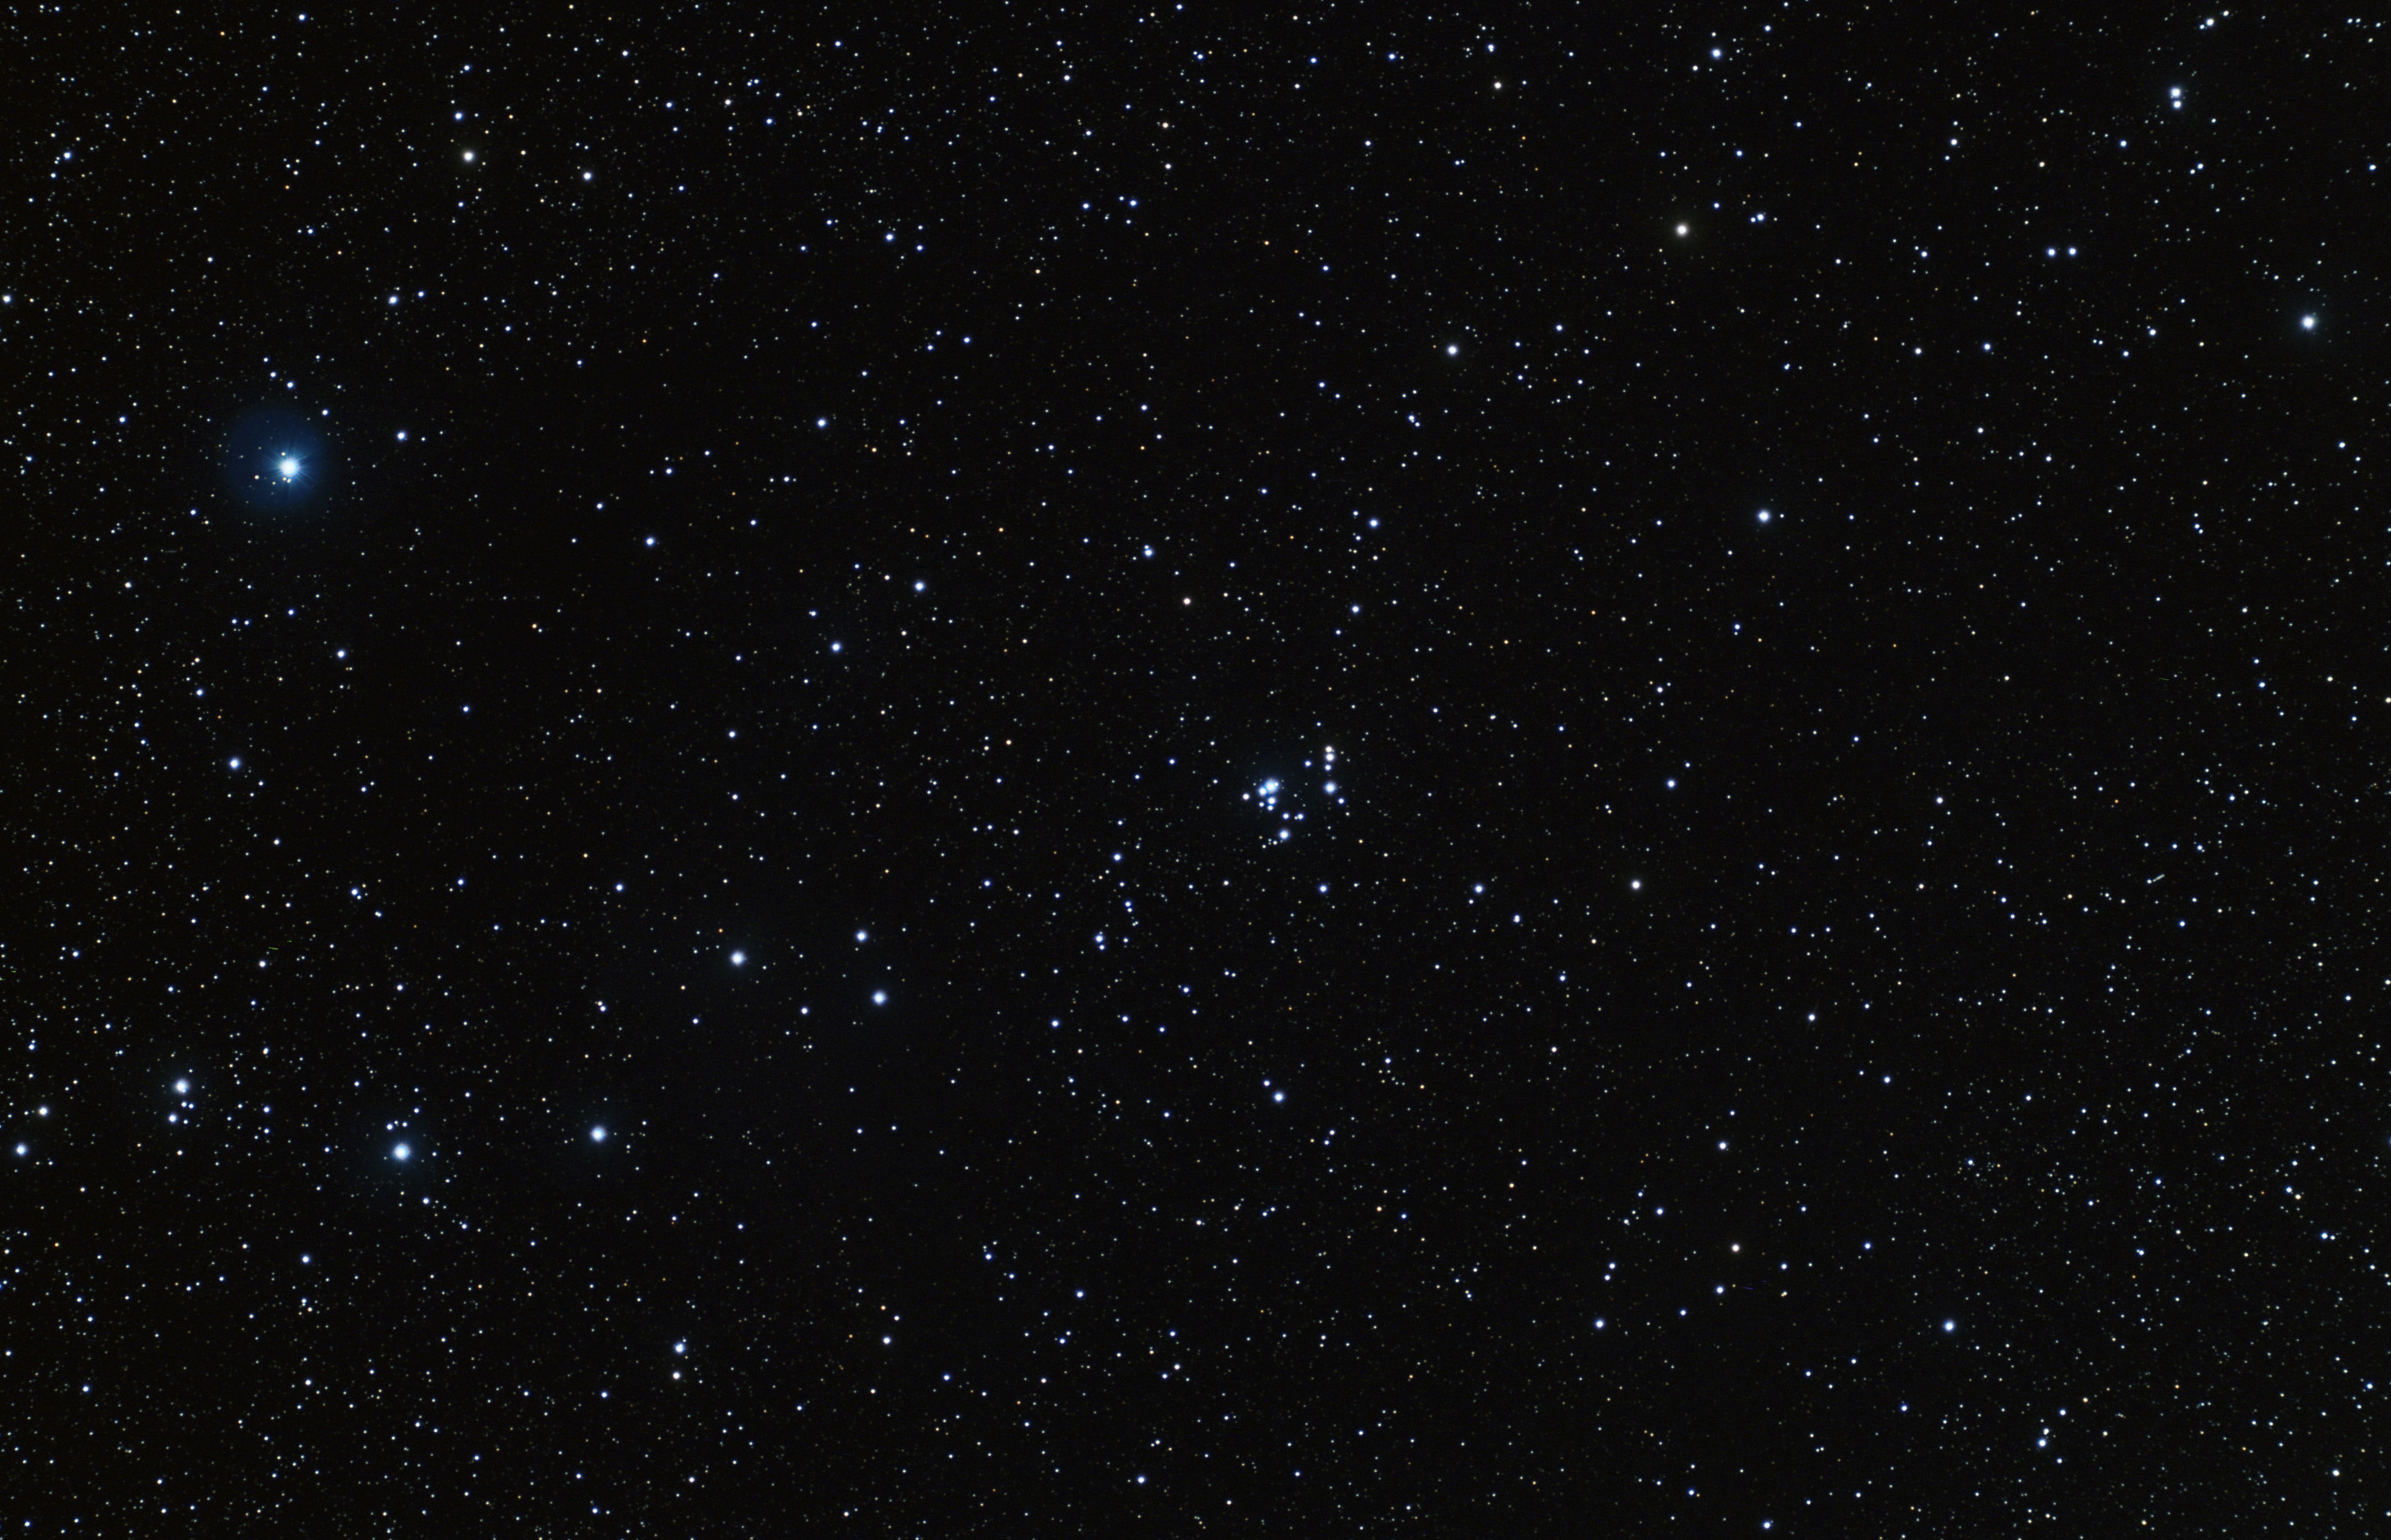 NGC 2169 This is a 80 minute (20x240) exposure of cluster NGC 2169. The bright star at left is Xi Orion, magnitude 4.5. Taken with a 4" refractor, also an Astro-Tech field flatenner is in the optical path.THe image is at the full resolution of the camera and it is cropped slightly. Temp was 36 degrees at time of imaging. Processed with darks and flats and darks for flats using Maxim DL. Final processing done in Photoshop. Celestron C-14 was used for guiding with an Orion Autoguider.
The weatherman said "Clouds with a chance of flurries" tonight, in reality it's clear (I'll take it!) so I set things up once again and managed to get 2 images...
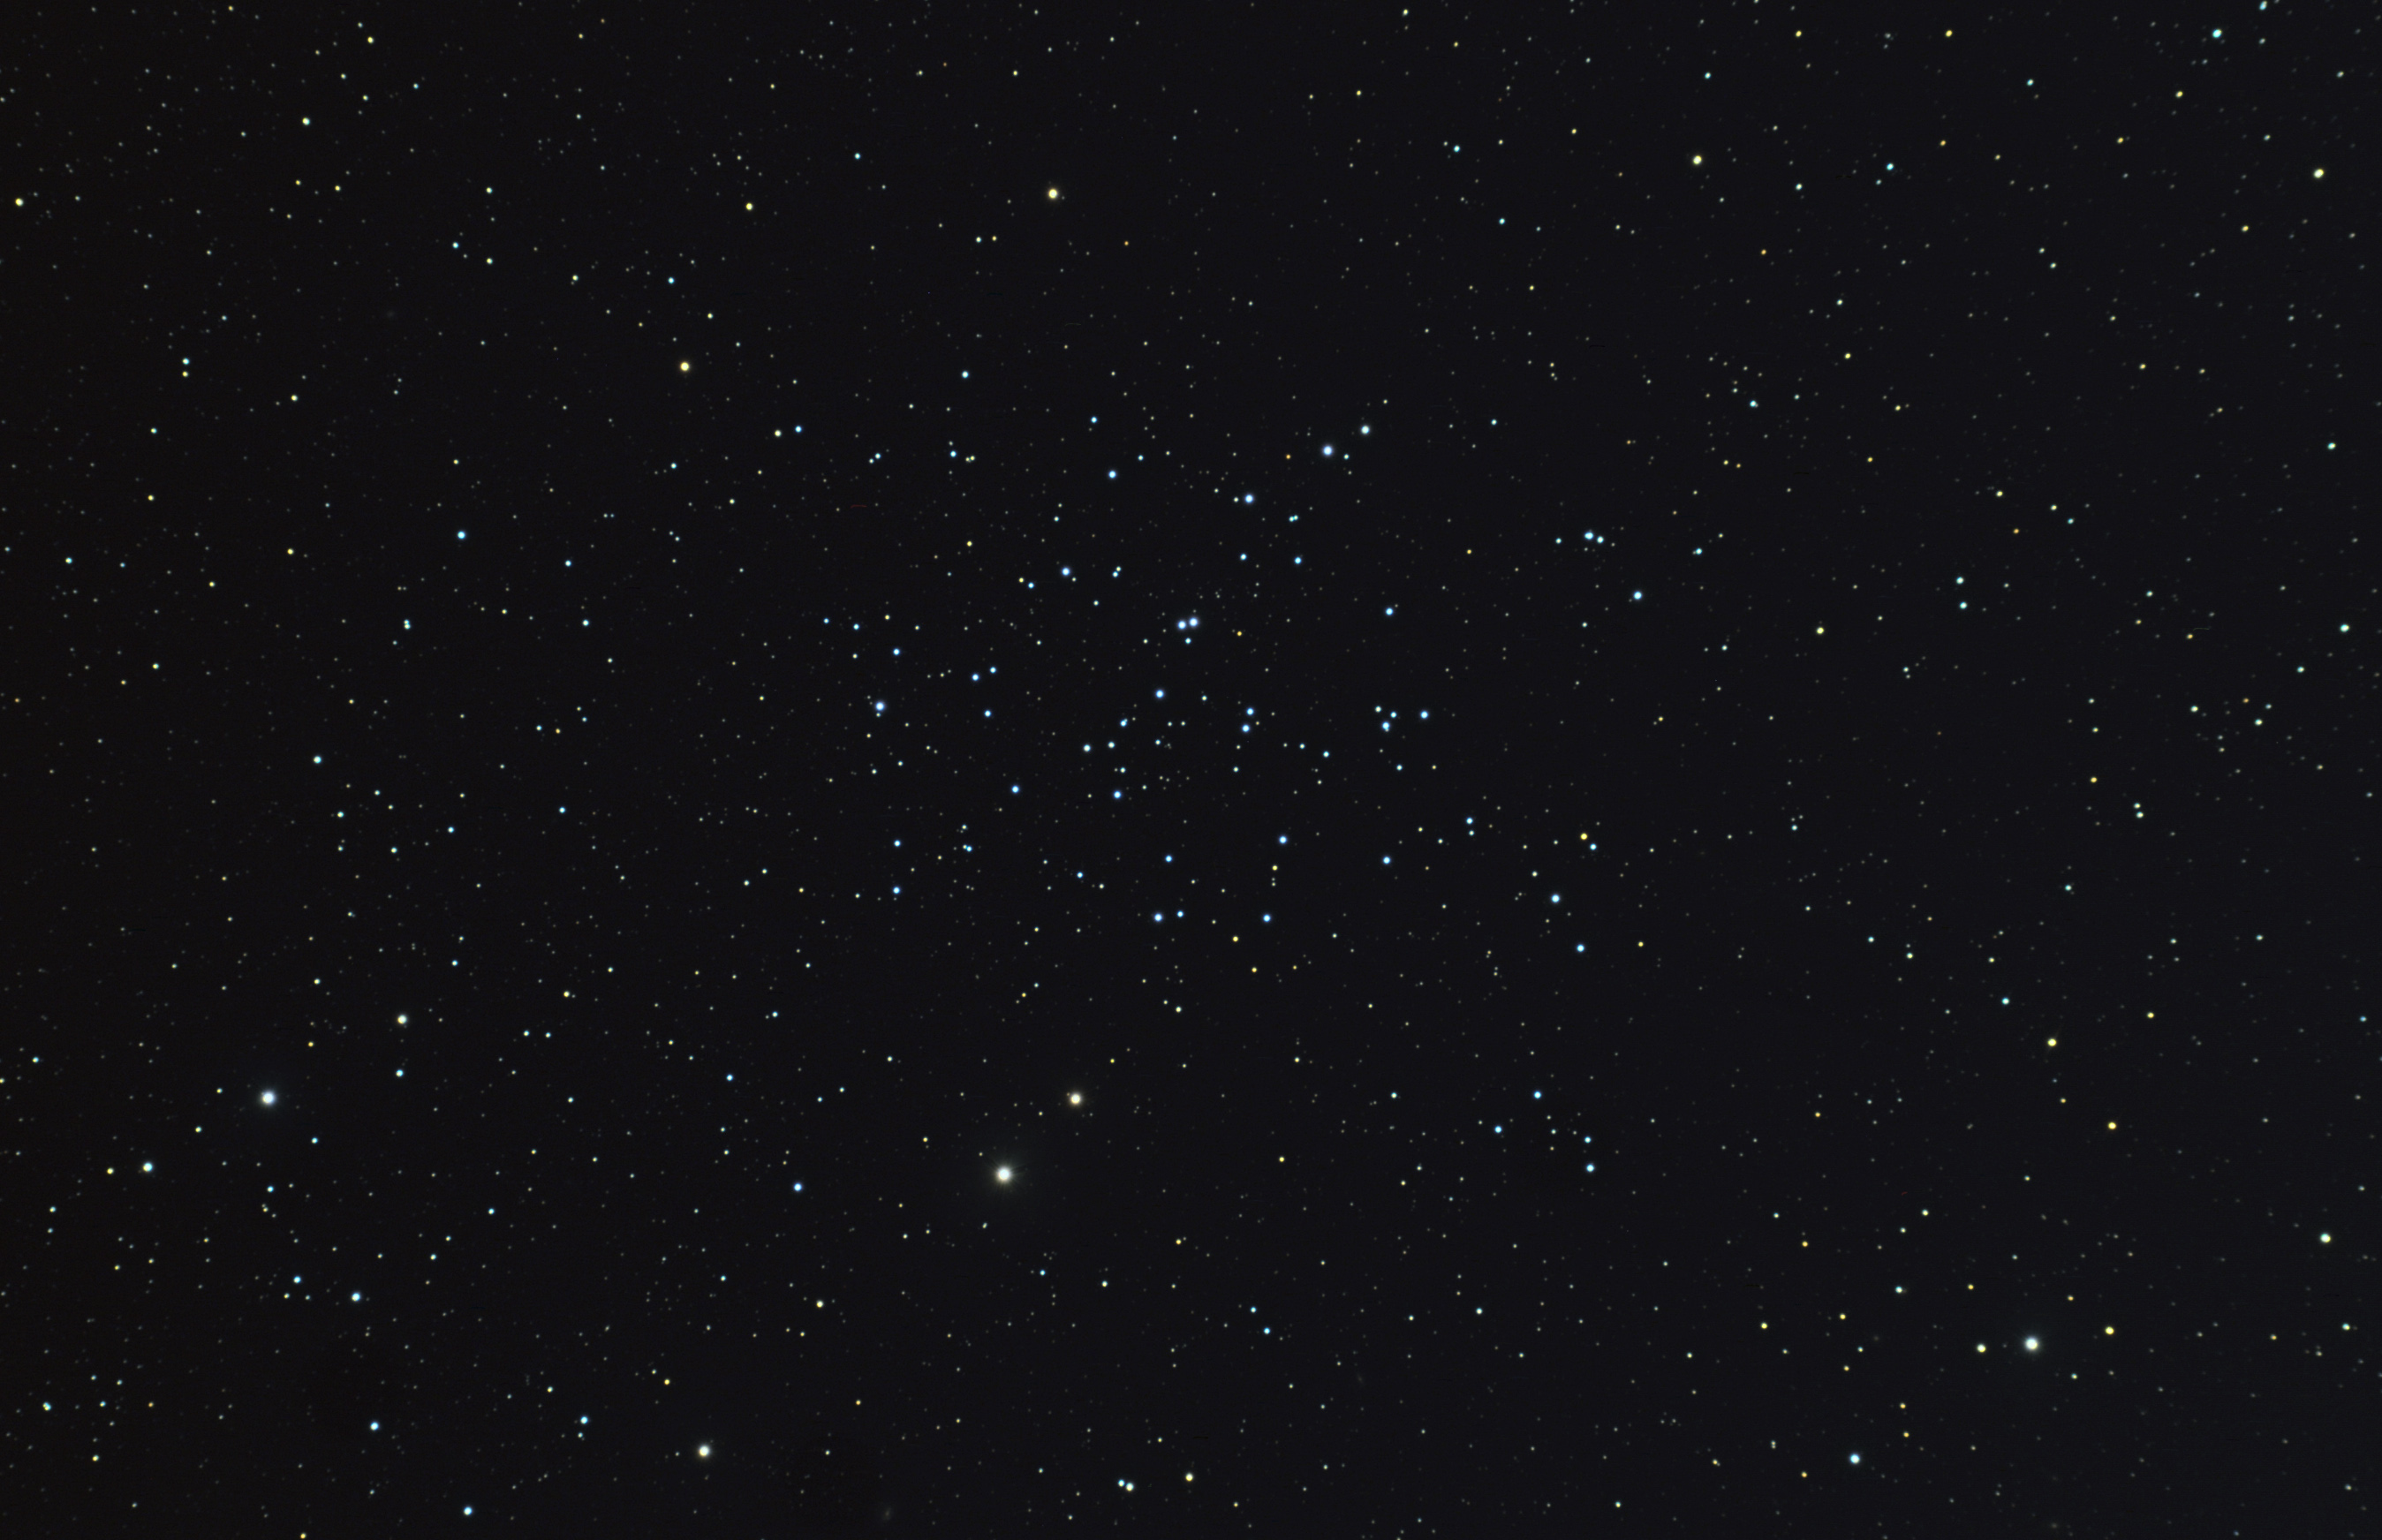 NGC 1647 This is a 88 minute (22x240) exposure of cluster NGC 1647 in Taurus. This is a large cluster (well seen in binoculars). Taken with a 4" refractor, also an Astro-Tech field flatenner is in the optical path. This image is at the full resolution of the camera and it is cropped slightly. A careful look will reveal at least half a dozen background galaxies. A little left of center along the bottom of the image is galaxy UGC 3157 (magnitude 15.6). This image was taken with a 40% moon in the sky. Temp was 32 degrees at time of imaging. Processed with darks and flats and darks for flats using Maxim DL. Final processing done in Photoshop. Celestron C-14 was used for guiding with an Orion Autoguider.
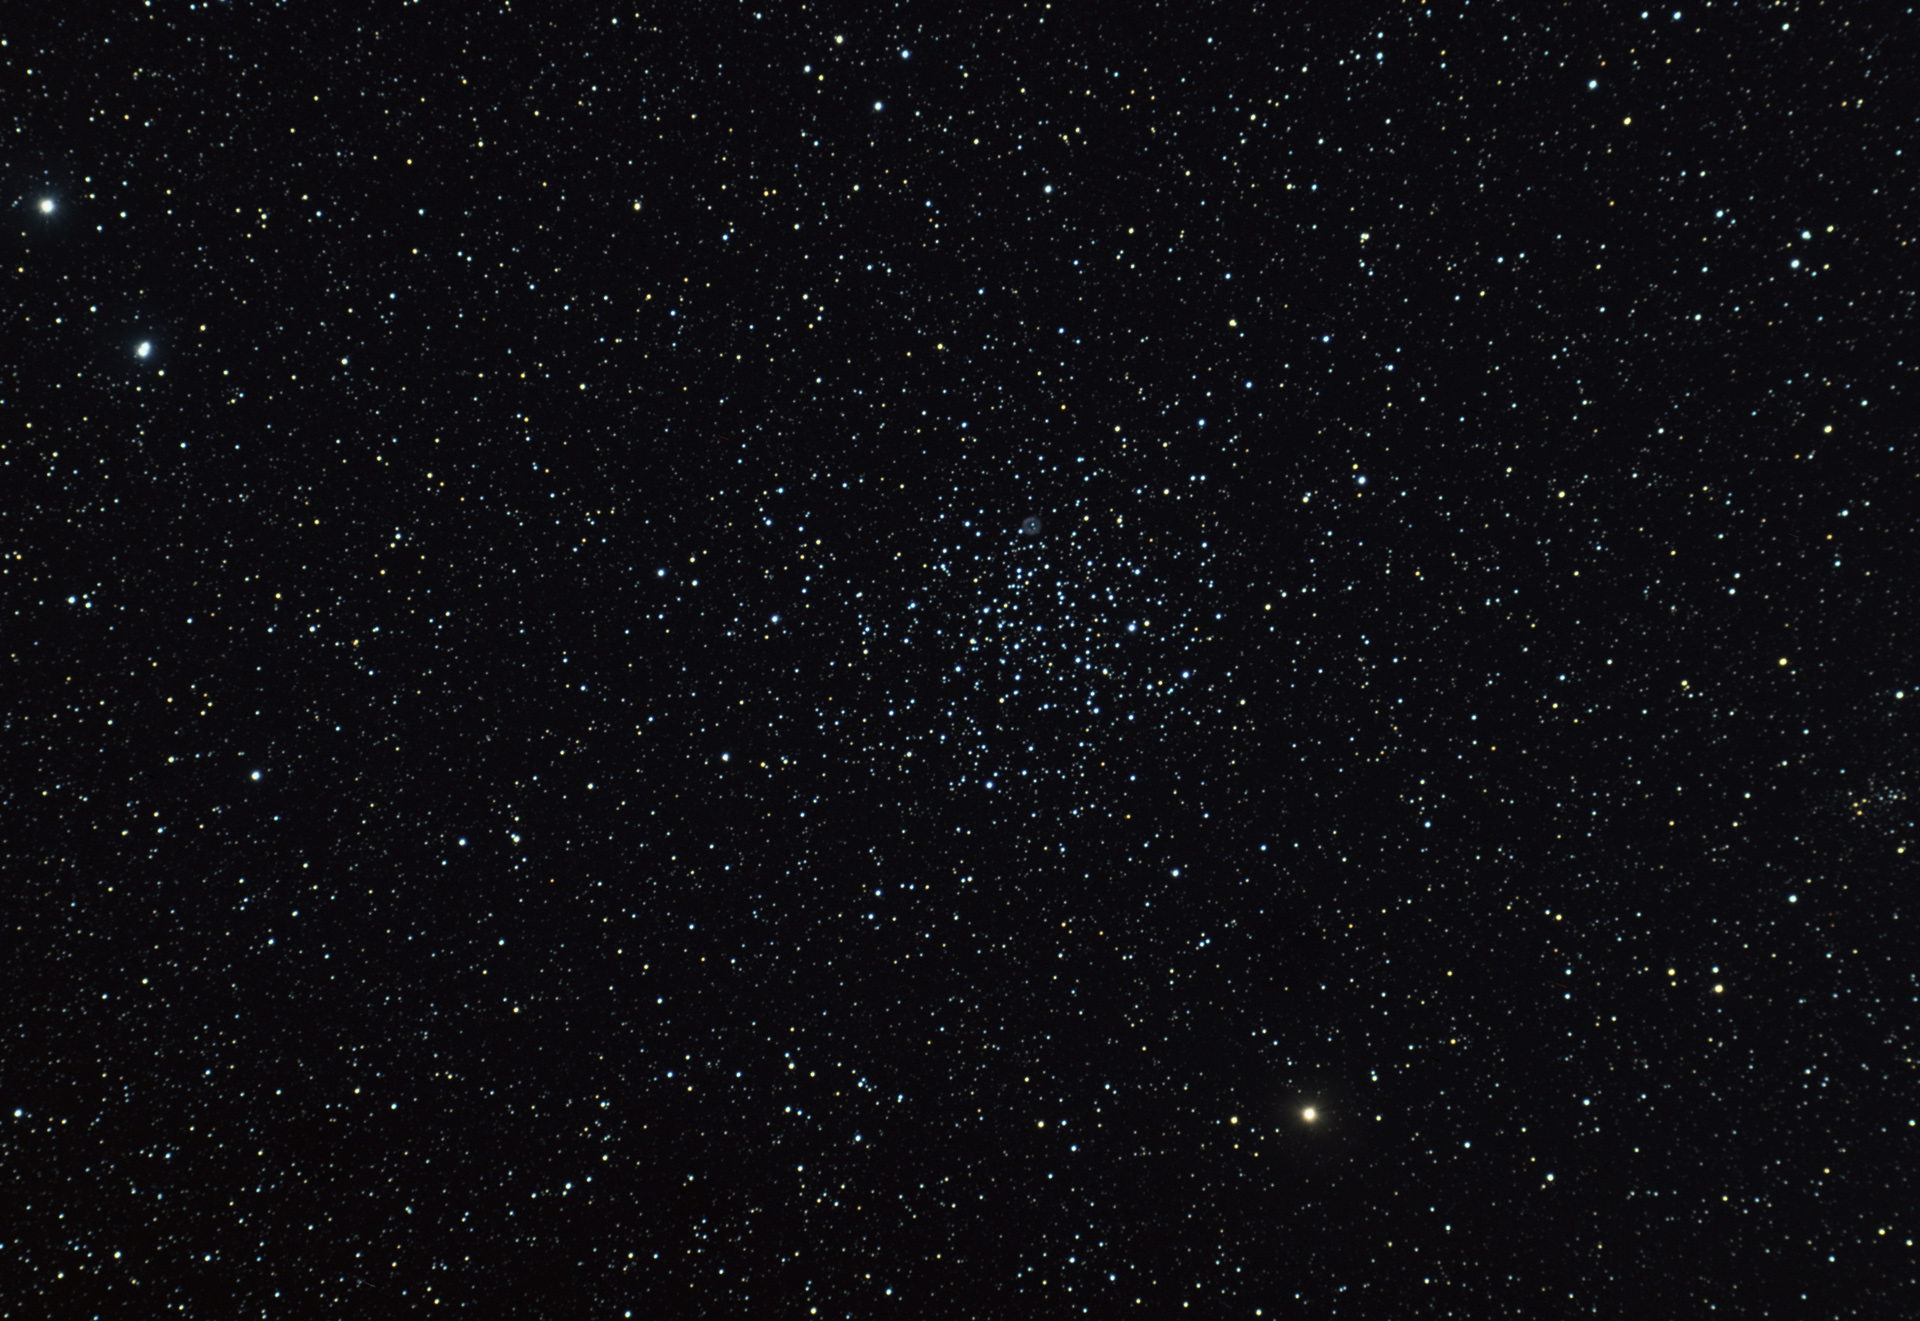 M46 and NGC 2438 This is a 92 minute (23x240) exposure of cluster M46 in Puppis, also visible is planetary nebula NGC 2438. Taken with a 4" refractor, also an Astro-Tech field flatenner is in the optical path. This image is reduced in scale somewhat (to 1920 pixels wide) as seeing down at that latitude is not so great here and the full scale image was a bit soft. THe image is also cropped slightly. This image was taken with a 40% moon in the sky. Temp was 30 degrees at time of imaging. Processed with darks and flats and darks for flats using Maxim DL. Final processing done in Photoshop. Celestron C-14 was used for guiding with an Orion Autoguider.
Conditions started out marginal and degraded to "hideous" (high thin clouds and 60% moonlight) but I managed to get 3 images...
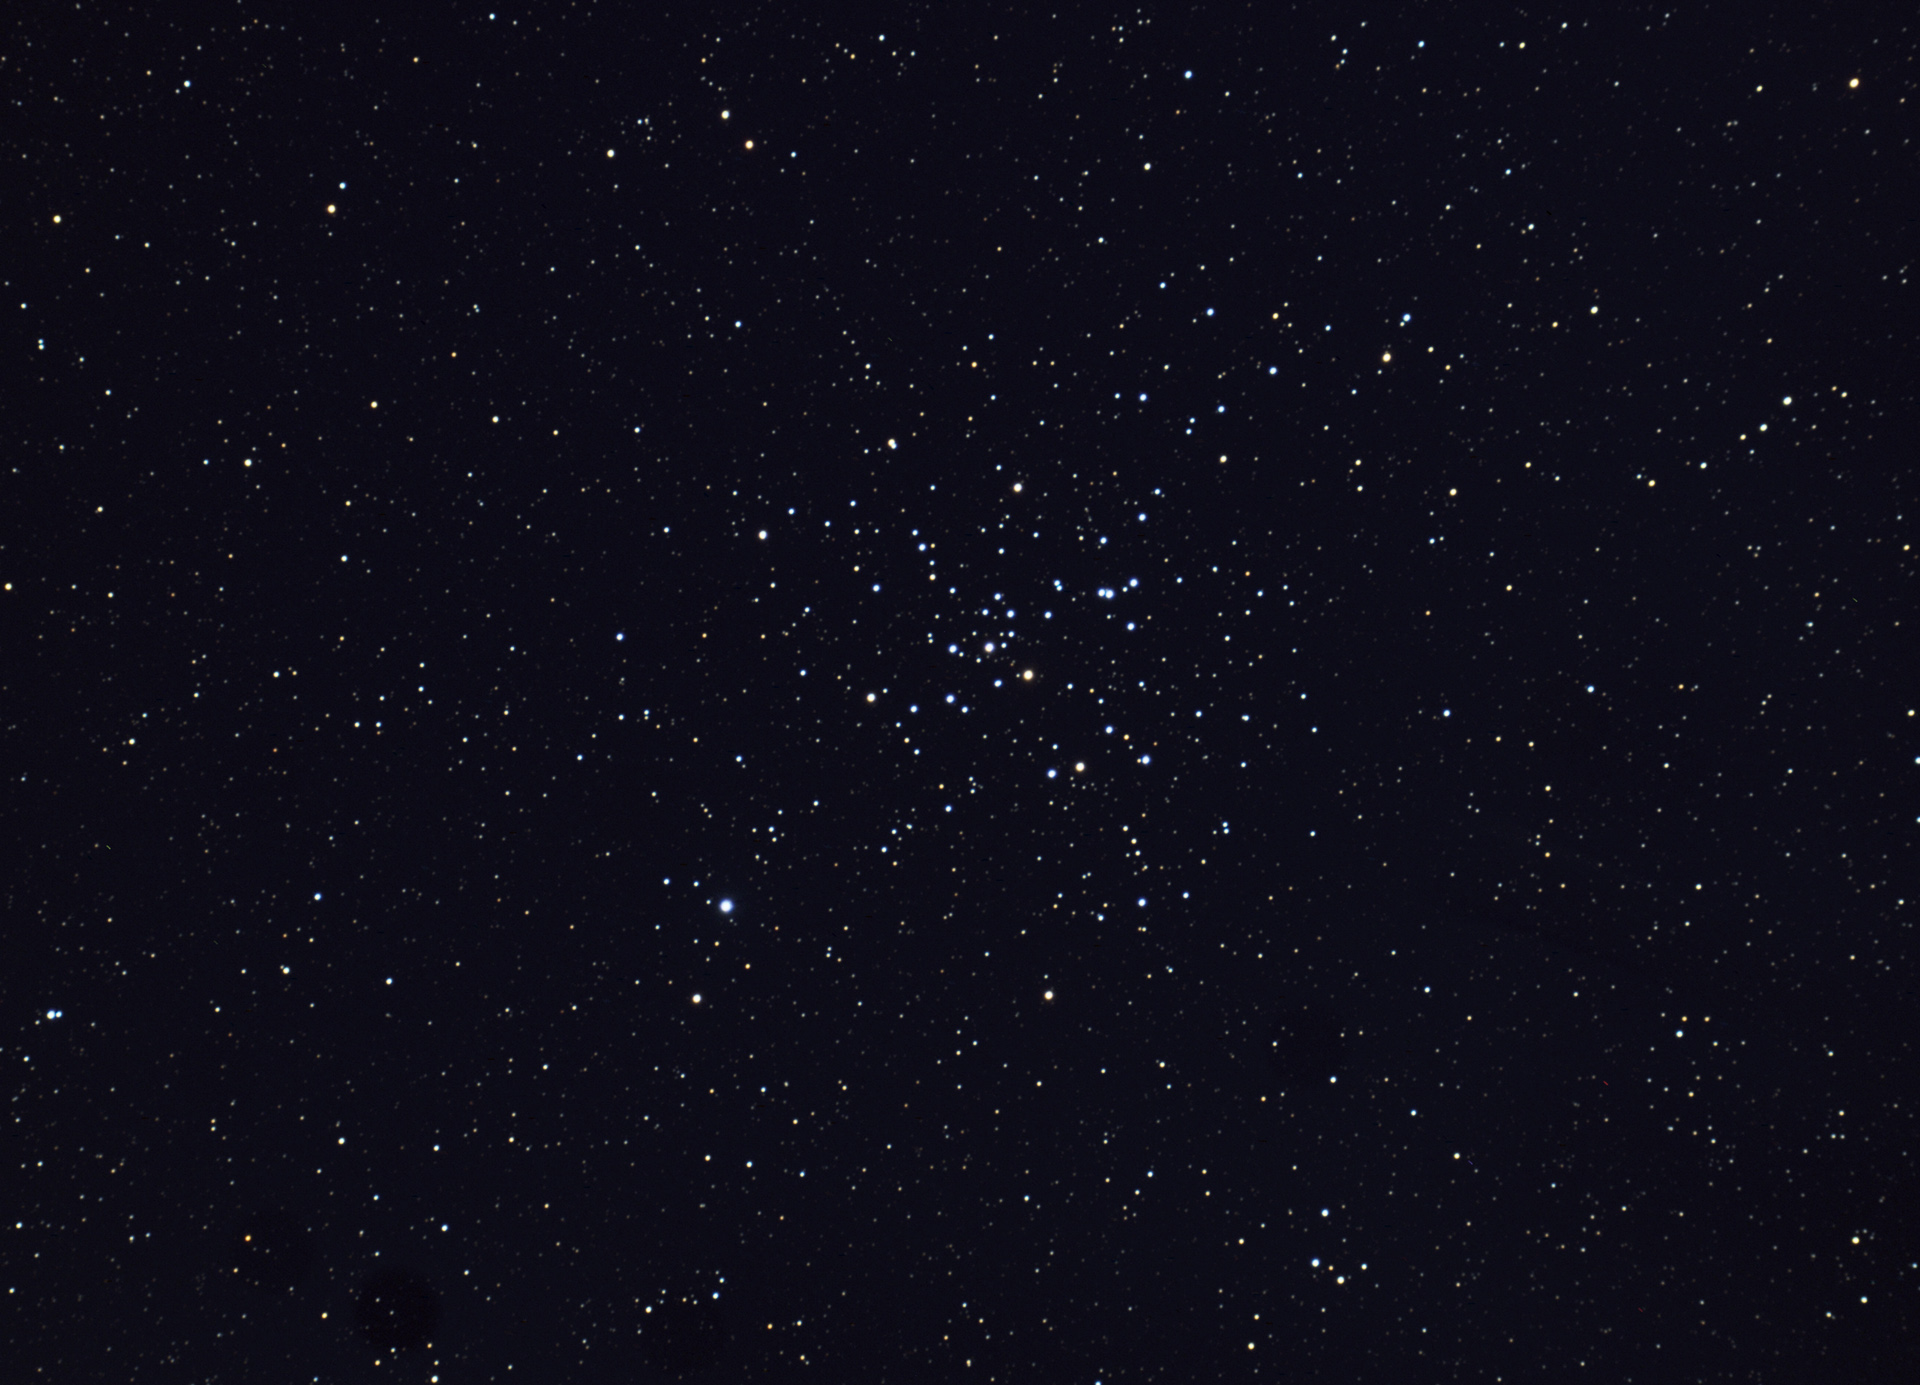 M41 This is a 40 minute (10x240) exposure of cluster M41 in Canis Major. Taken with a 4" refractor, also an Astro-Tech field flatenner is in the optical path. I only had a short (45 minute) "window" to get this cluster due to trees to my south. Due to lousy seeing at this low altitude this image was reduced in size (to 1920 pixels wide). It is also cropped somewhat. Temp was around 40 degrees at time of imaging. Processed with darks and flats and darks for flats using Maxim DL. Final processing done in Photoshop. Celestron C-14 was used for guiding with an Orion Autoguider.
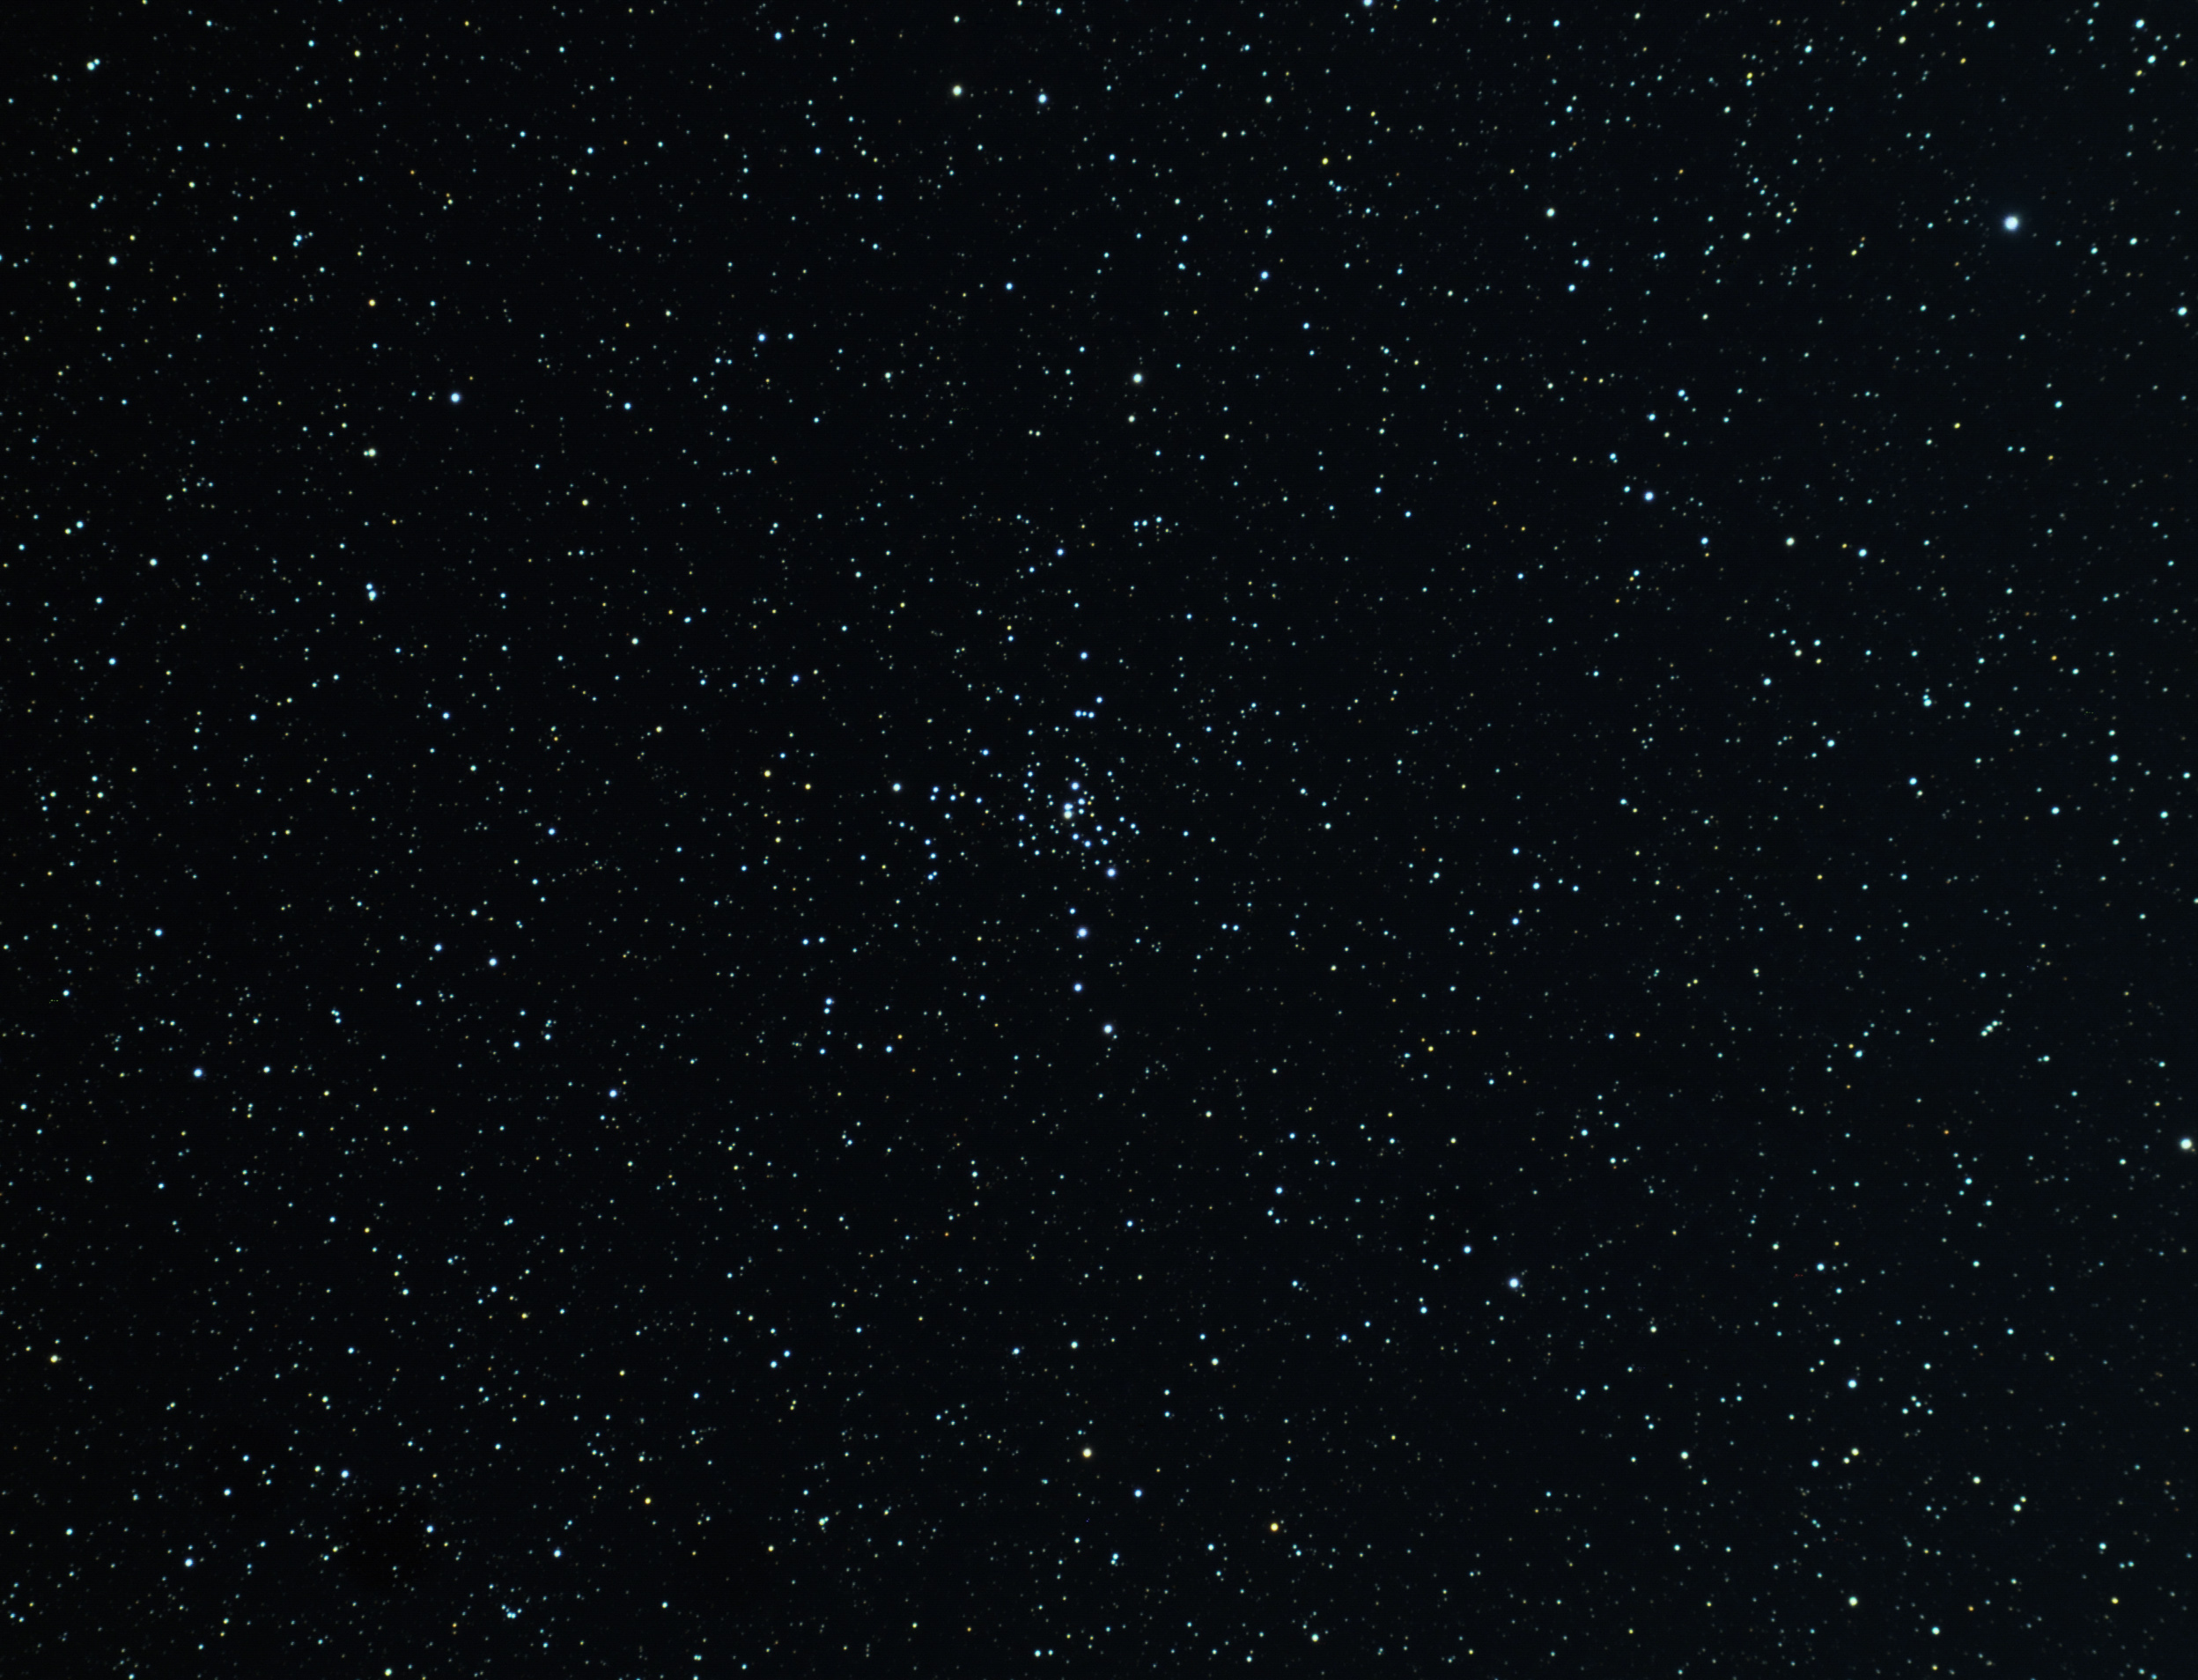 NGC 2301 This is a 28 minute (7x240) exposure of cluster NGC 2301 in Monoceros. Taken with a 4" refractor, also an Astro-Tech field flatenner is in the optical path. This image is at the full resolution of the camera and it is cropped slightly. Temp was around 40 degrees at time of imaging. Processed with darks and flats and darks for flats using Maxim DL. Final processing done in Photoshop. Celestron C-14 was used for guiding with an Orion Autoguider.
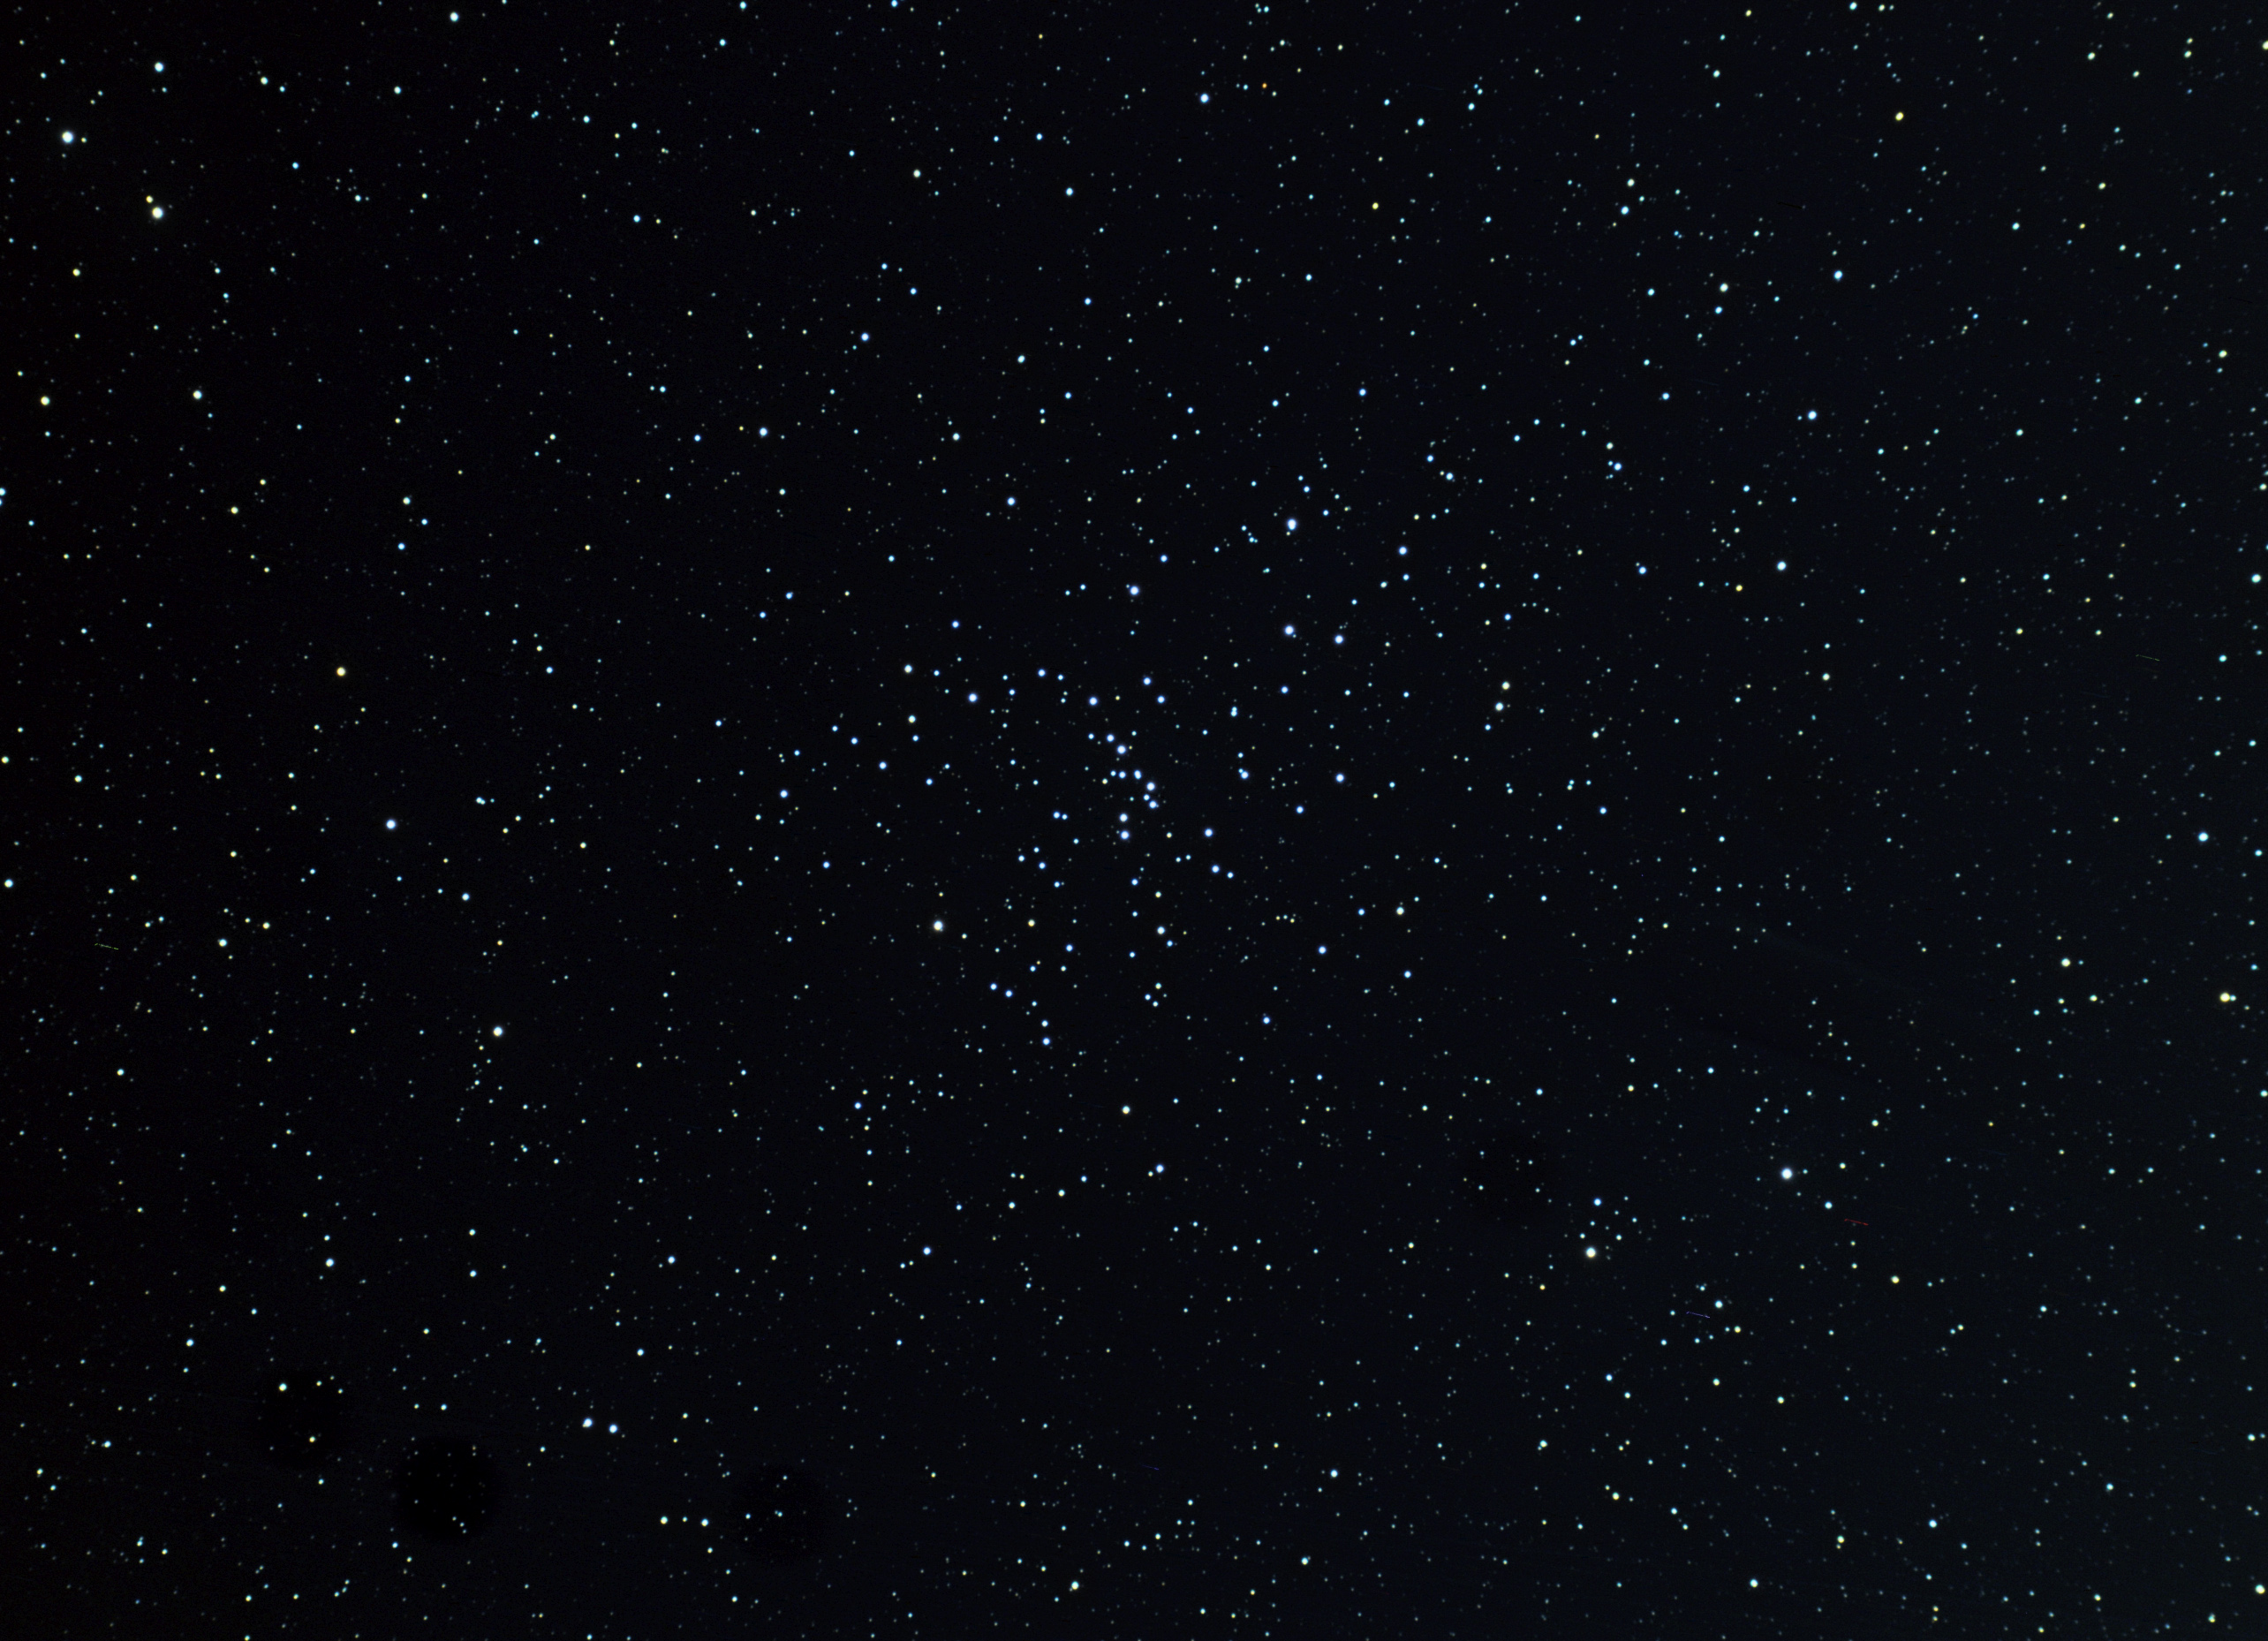 M48 This is a 108 minute (27x240) exposure of cluster M48 in Hydra. Conditions were quite terrible when this was taken, I'm surprised it came out as well as it did (limiting magnitide was maybe 3.5). Taken with a 4" refractor, also an Astro-Tech field flatenner is in the optical path. This image is at the full resolution of the camera and it is cropped slightly. Temp was around 37 degrees at time of imaging. Processed with darks and flats and darks for flats using Maxim DL. Final processing done in Photoshop. Celestron C-14 was used for guiding with an Orion Autoguider.
It was clear all day, clear at dusk and soon after dark it went from pretty decent (despite a very fat Moon) to completely useless (clouds). I only managed to get 20 minutes on one cluster.
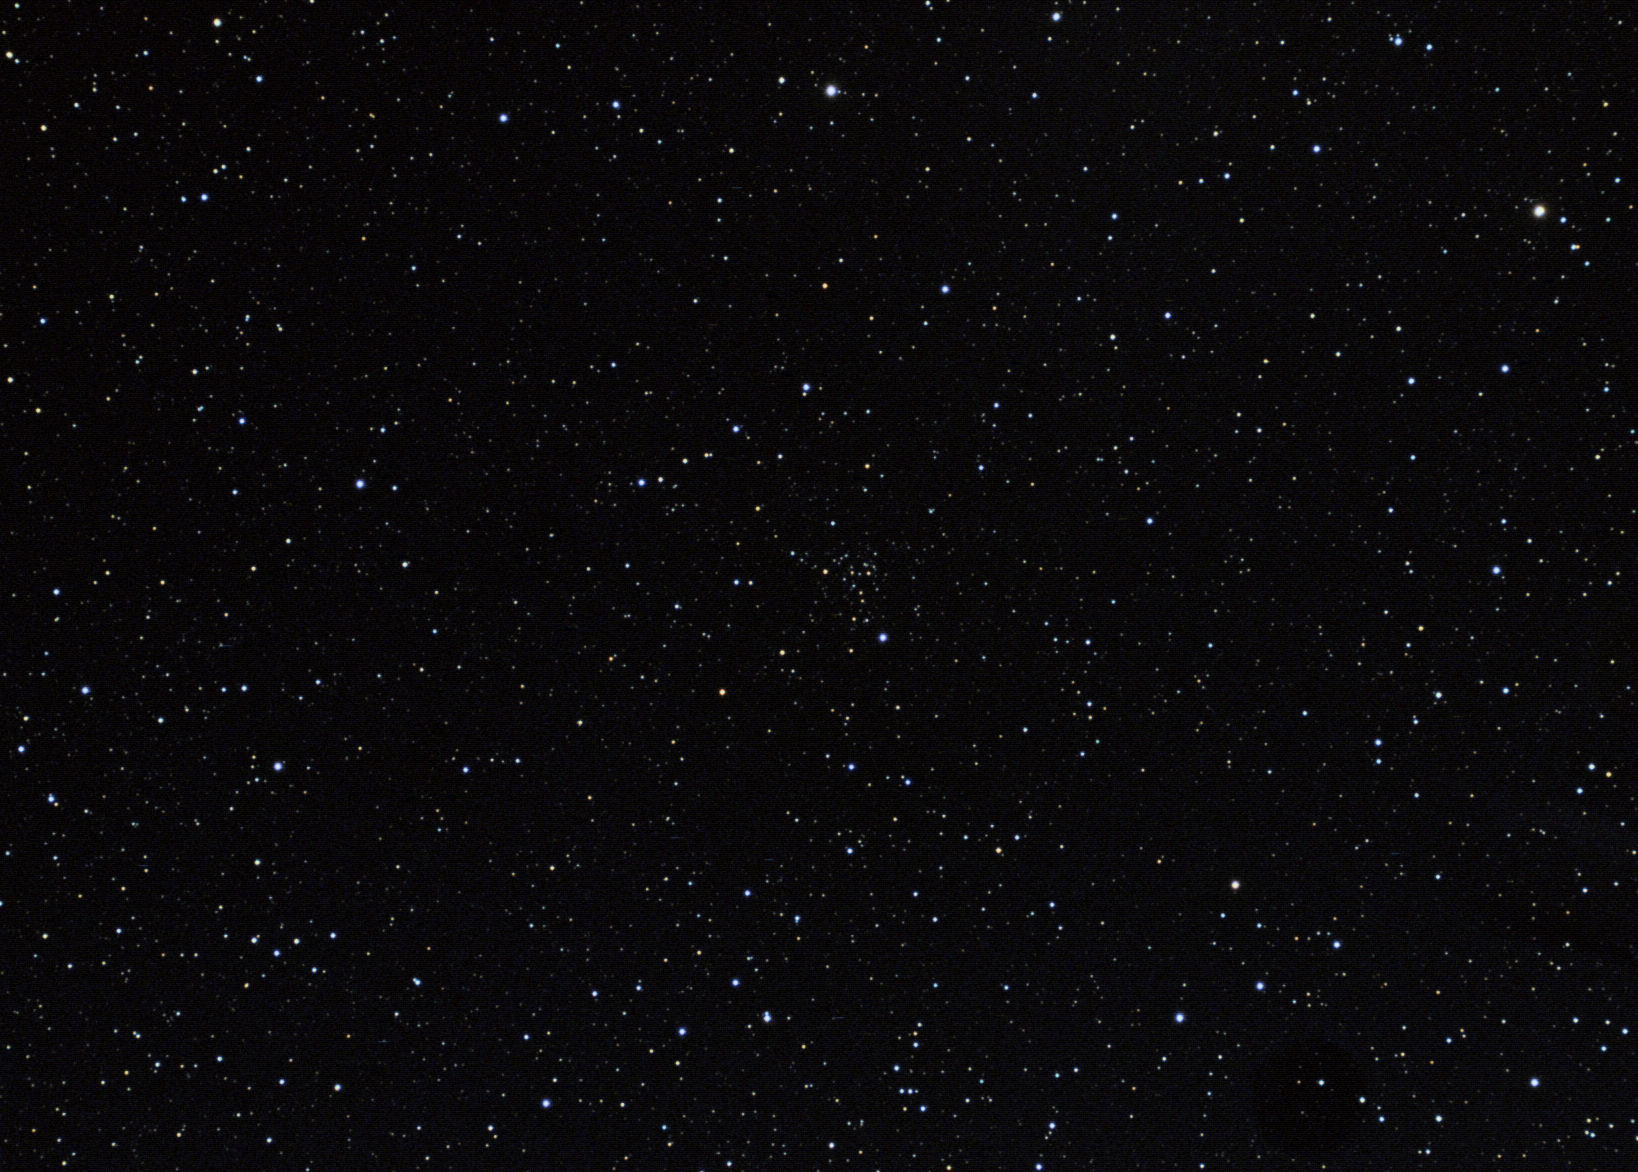 NGC 1883 This is a 20 minute (5x240) exposure of cluster NGC 1883 in Auriga. Taken with a 4" refractor, also an Astro-Tech field flatenner is in the optical path. This is a pretty small and relatively inconspicuous cluster. This image is at the full resolution of the camera but it is cropped significantly. Temp was around 32 degrees at time of imaging. Processed with darks and flats and darks for flats using Maxim DL. Final processing done in Photoshop. Celestron C-14 was used for guiding with an Orion Autoguider.
I managed to get 1 image tonight...
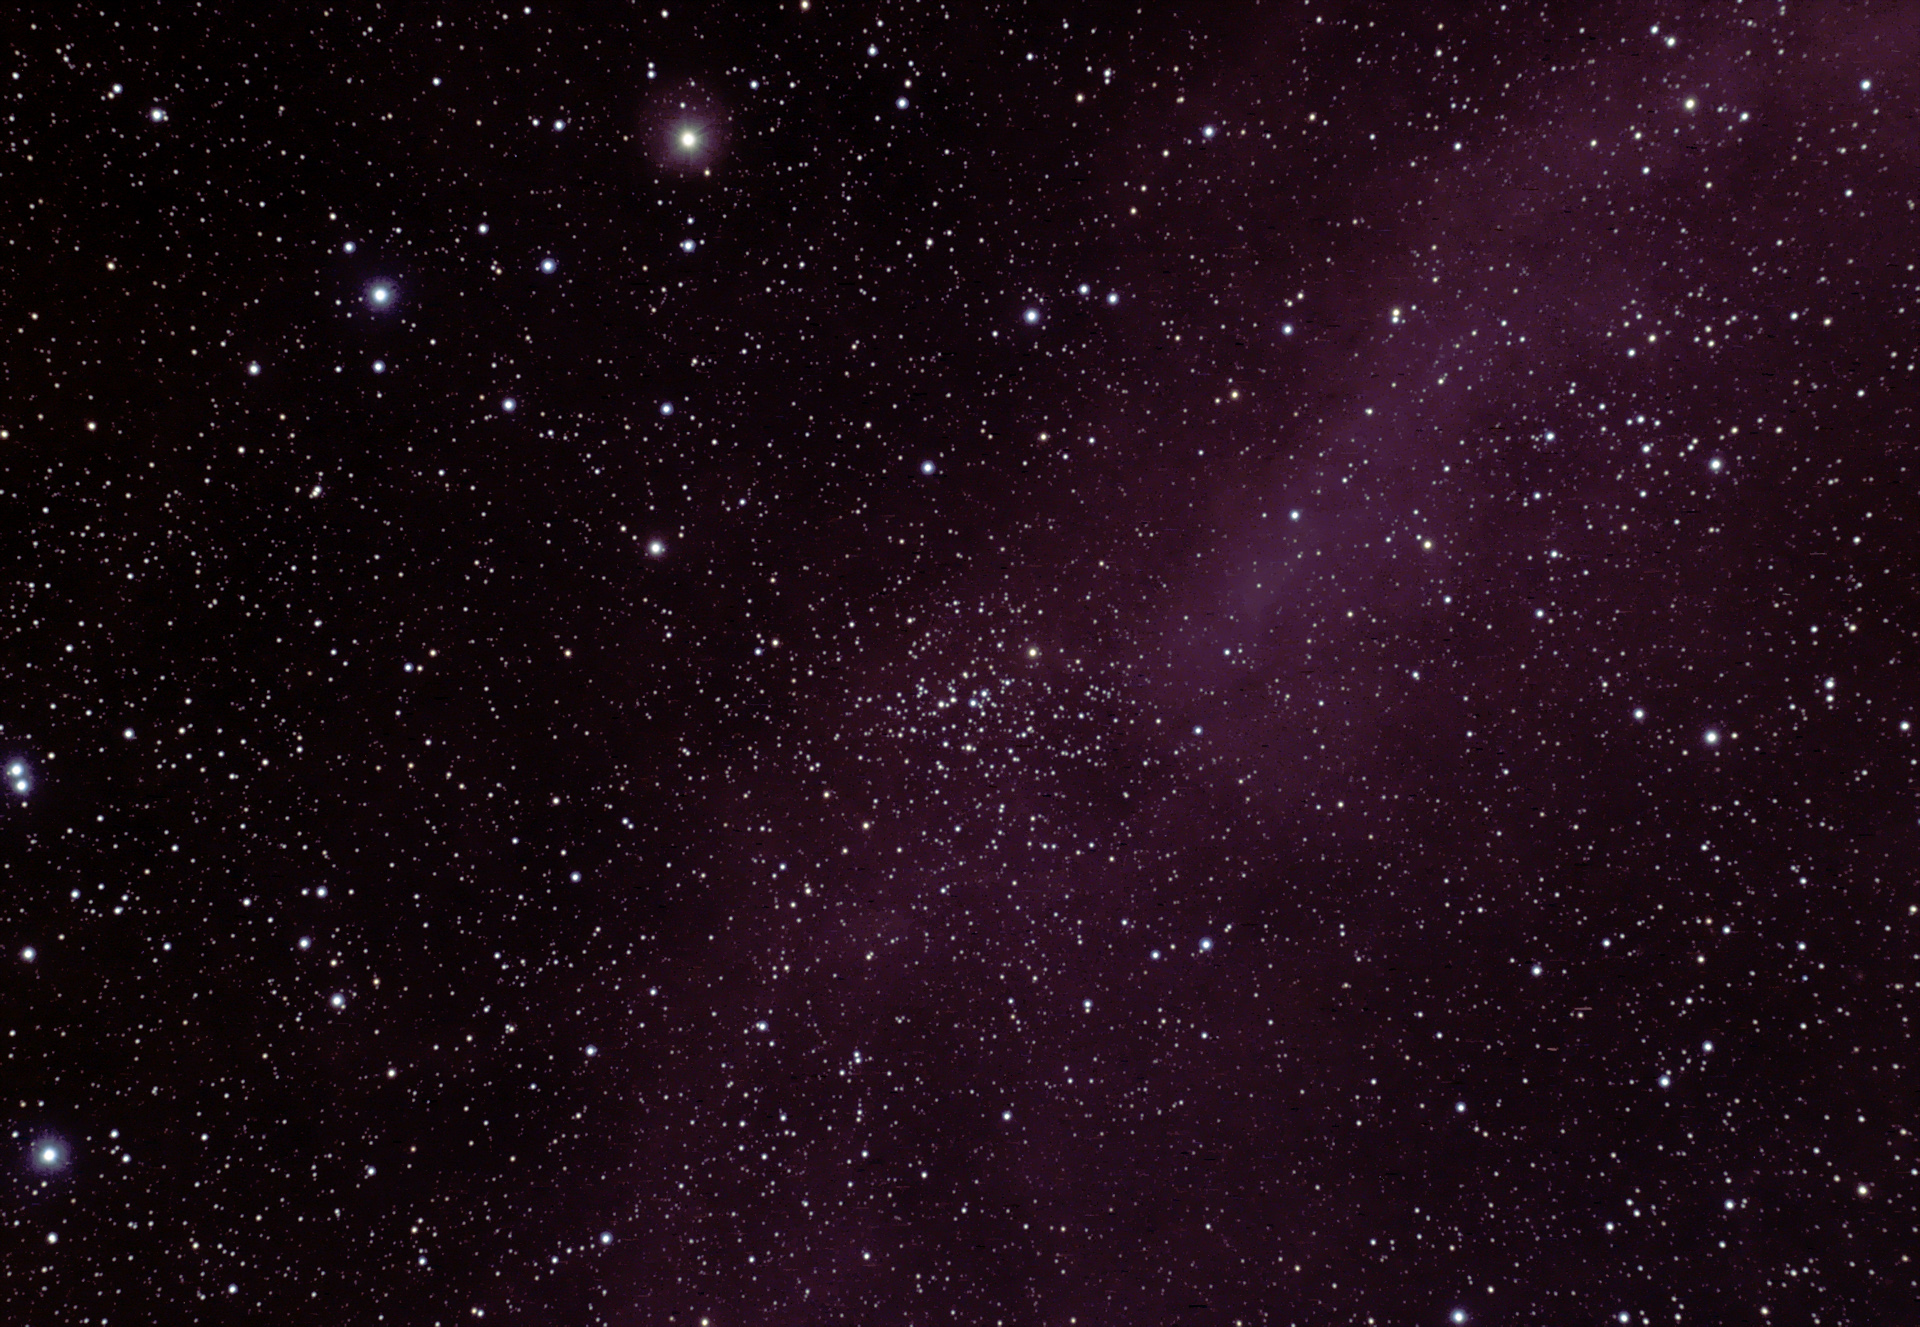 NGC 2112 This is a 176 minute (44x240) exposure of cluster NGC 2112 in Orion. Taken with a 4" refractor, also an Astro-Tech field flatenner is in the optical path. When the images first started coming in (I was in the house) I said "Damned clouds coming in again". Then I realized I was actually picking up a portion of Barnard's Loop! They were clouds but not from Earth! THis image is cropped somewhat and reduced slightly in image scale. Processed with darks and flats and darks for flats using Maxim DL. Final processing done in Photoshop. Celestron C-14 was used for guiding with an Orion Autoguider.
Conditions varied tonight... most of the time it was pretty clear but from time to time some thin hazy clouds came and went. I managed to get data for 4 images from evening to dawn.
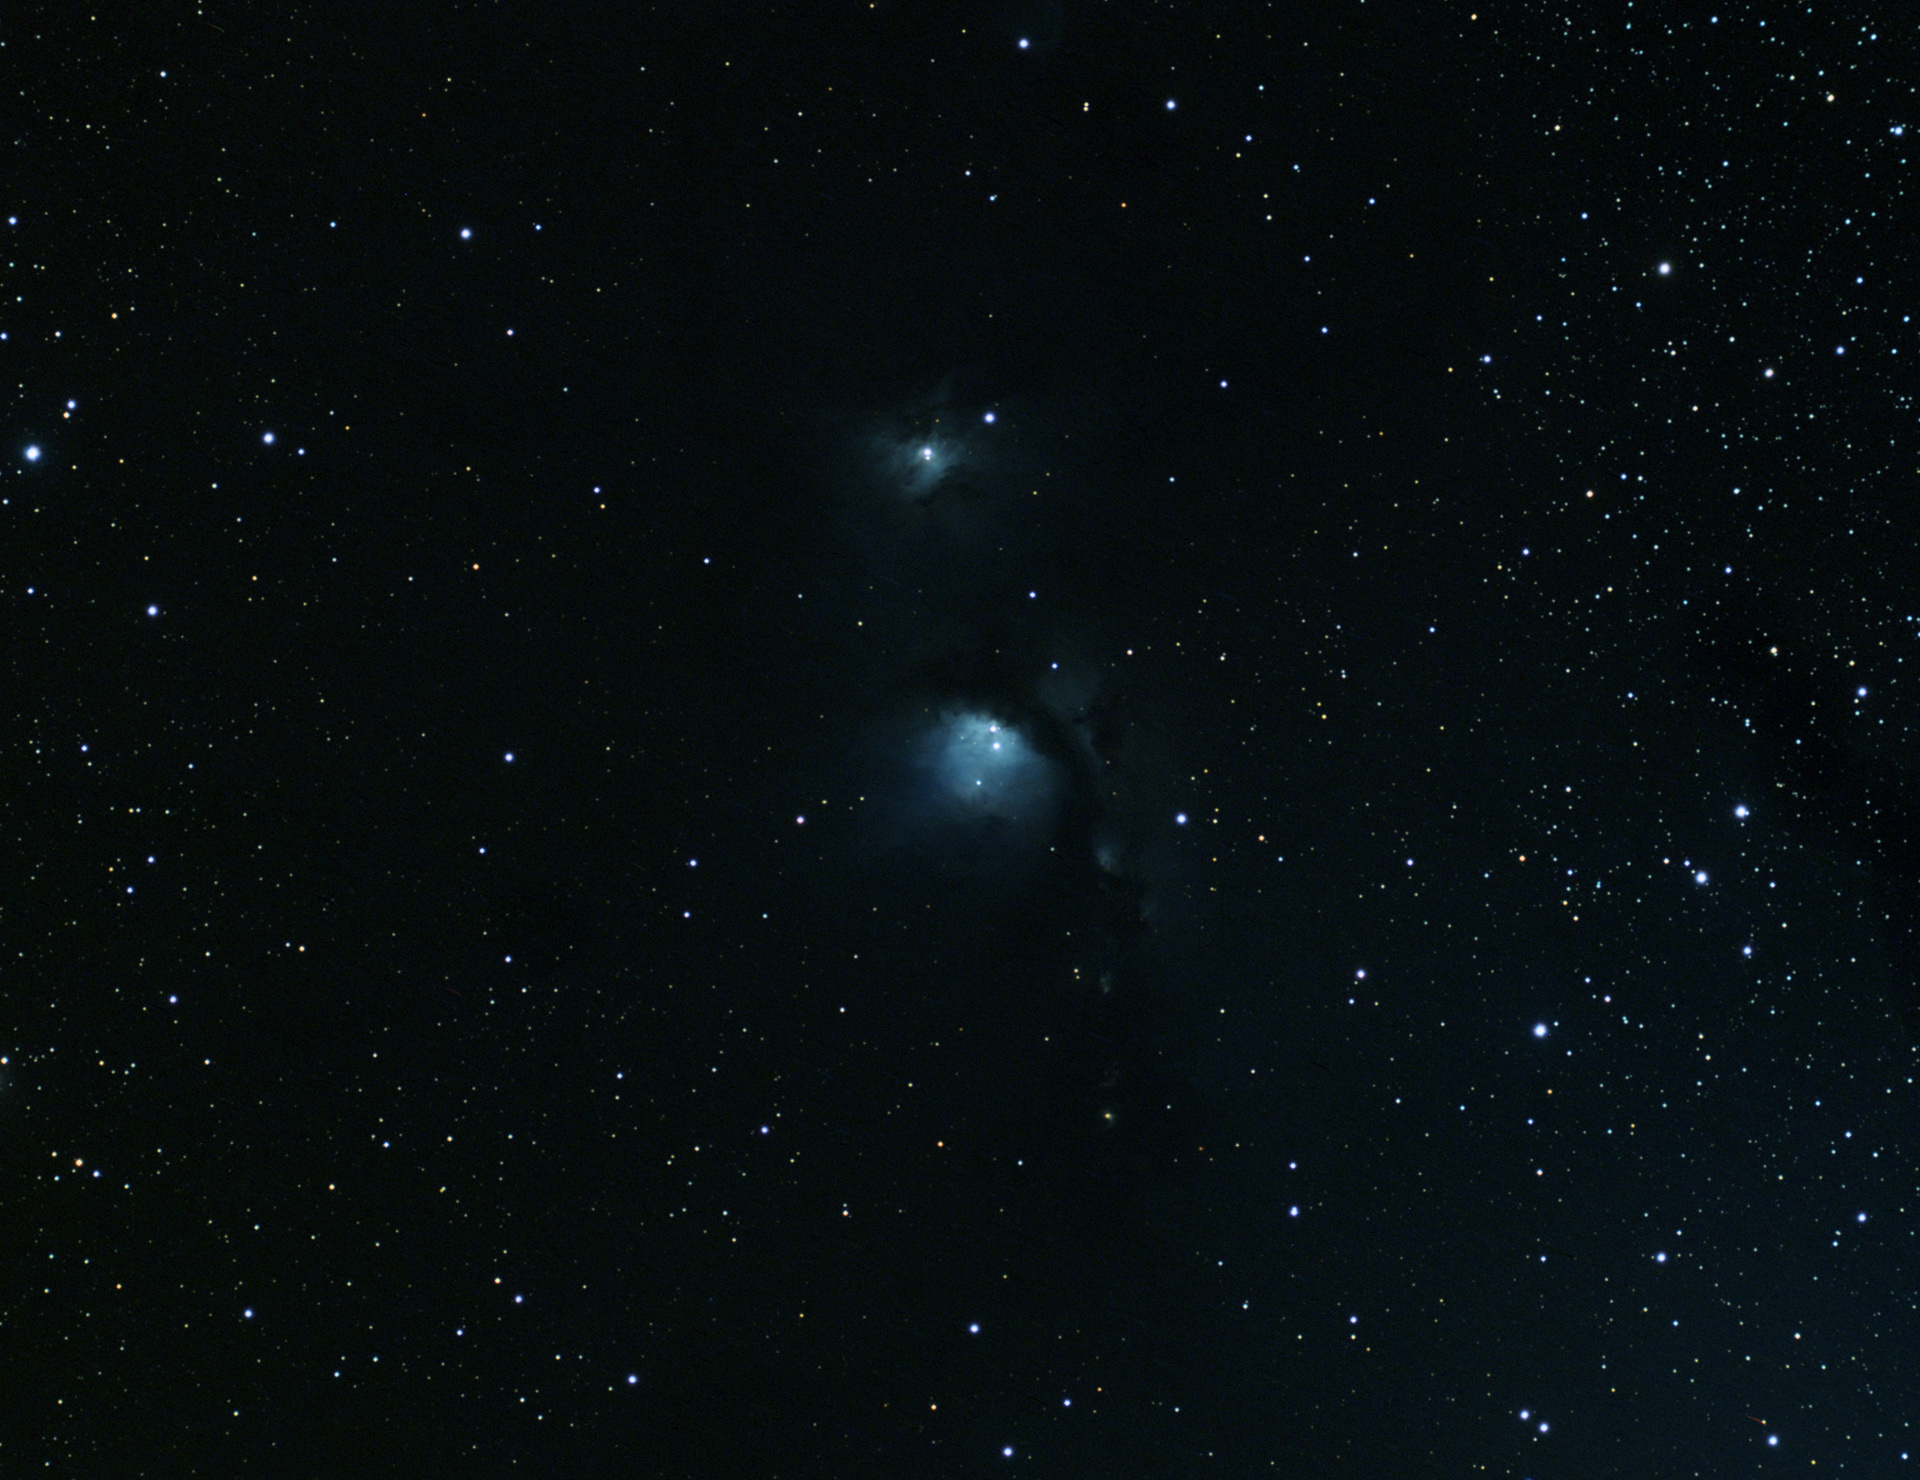 M78 This is a 100 minute (25x240) exposure of nebula M78 in Orion. Taken with a 4" refractor, also an Astro-Tech field flatenner is in the optical path. THis image is cropped somewhat and reduced signifcantly in image scale. M78 and the surrounding field has a lot of faint background structure and I really need to get more exposure on this object (however I am satisfied with this image for the time being). Processed with darks and flats and darks for flats using Maxim DL. Final processing done in Photoshop. Celestron C-14 was used for guiding with an Orion Autoguider.
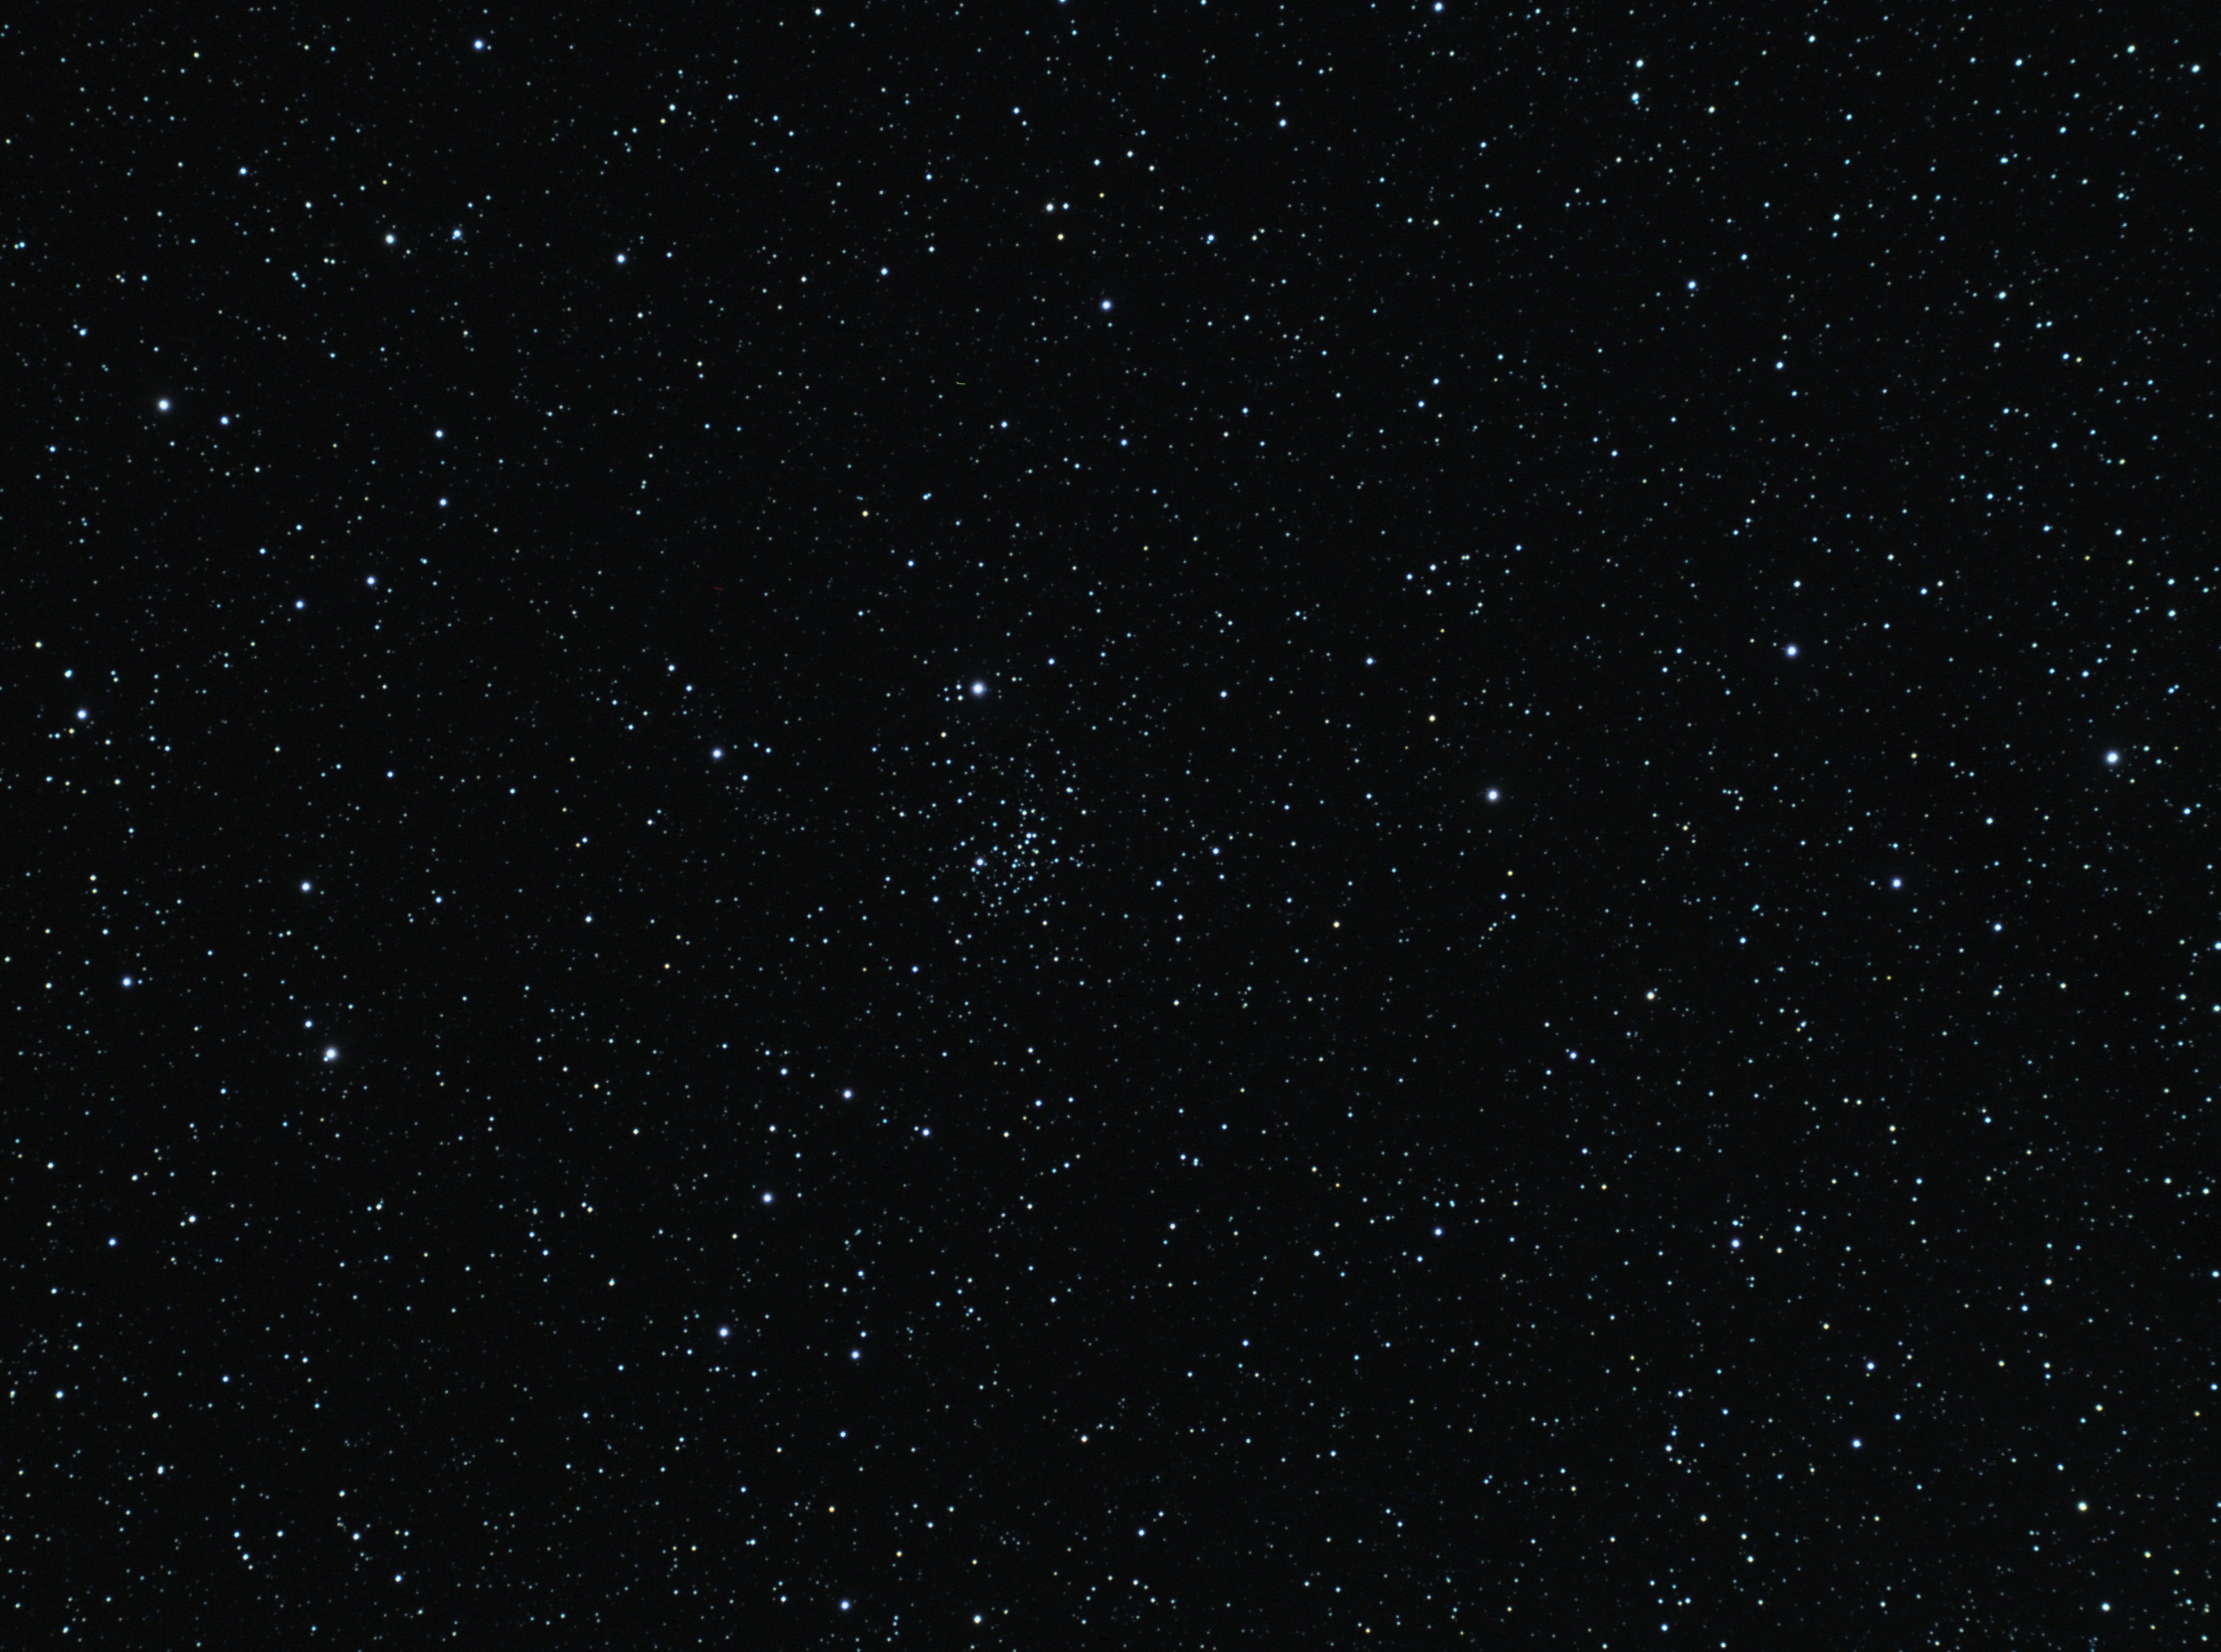 NGC 2355 Here is a 56 minute (14x240) exposure of cluster NGC 2355 in Gemini. Taken with a 4" refractor, also an Astro-Tech field flatenner is in the optical path. This image is cropped slighlty and is at the full resolution of the camera. Processed with darks and flats and darks for flats using Maxim DL. Final processing done in Photoshop. Celestron C-14 was used for guiding with an Orion Autoguider.
 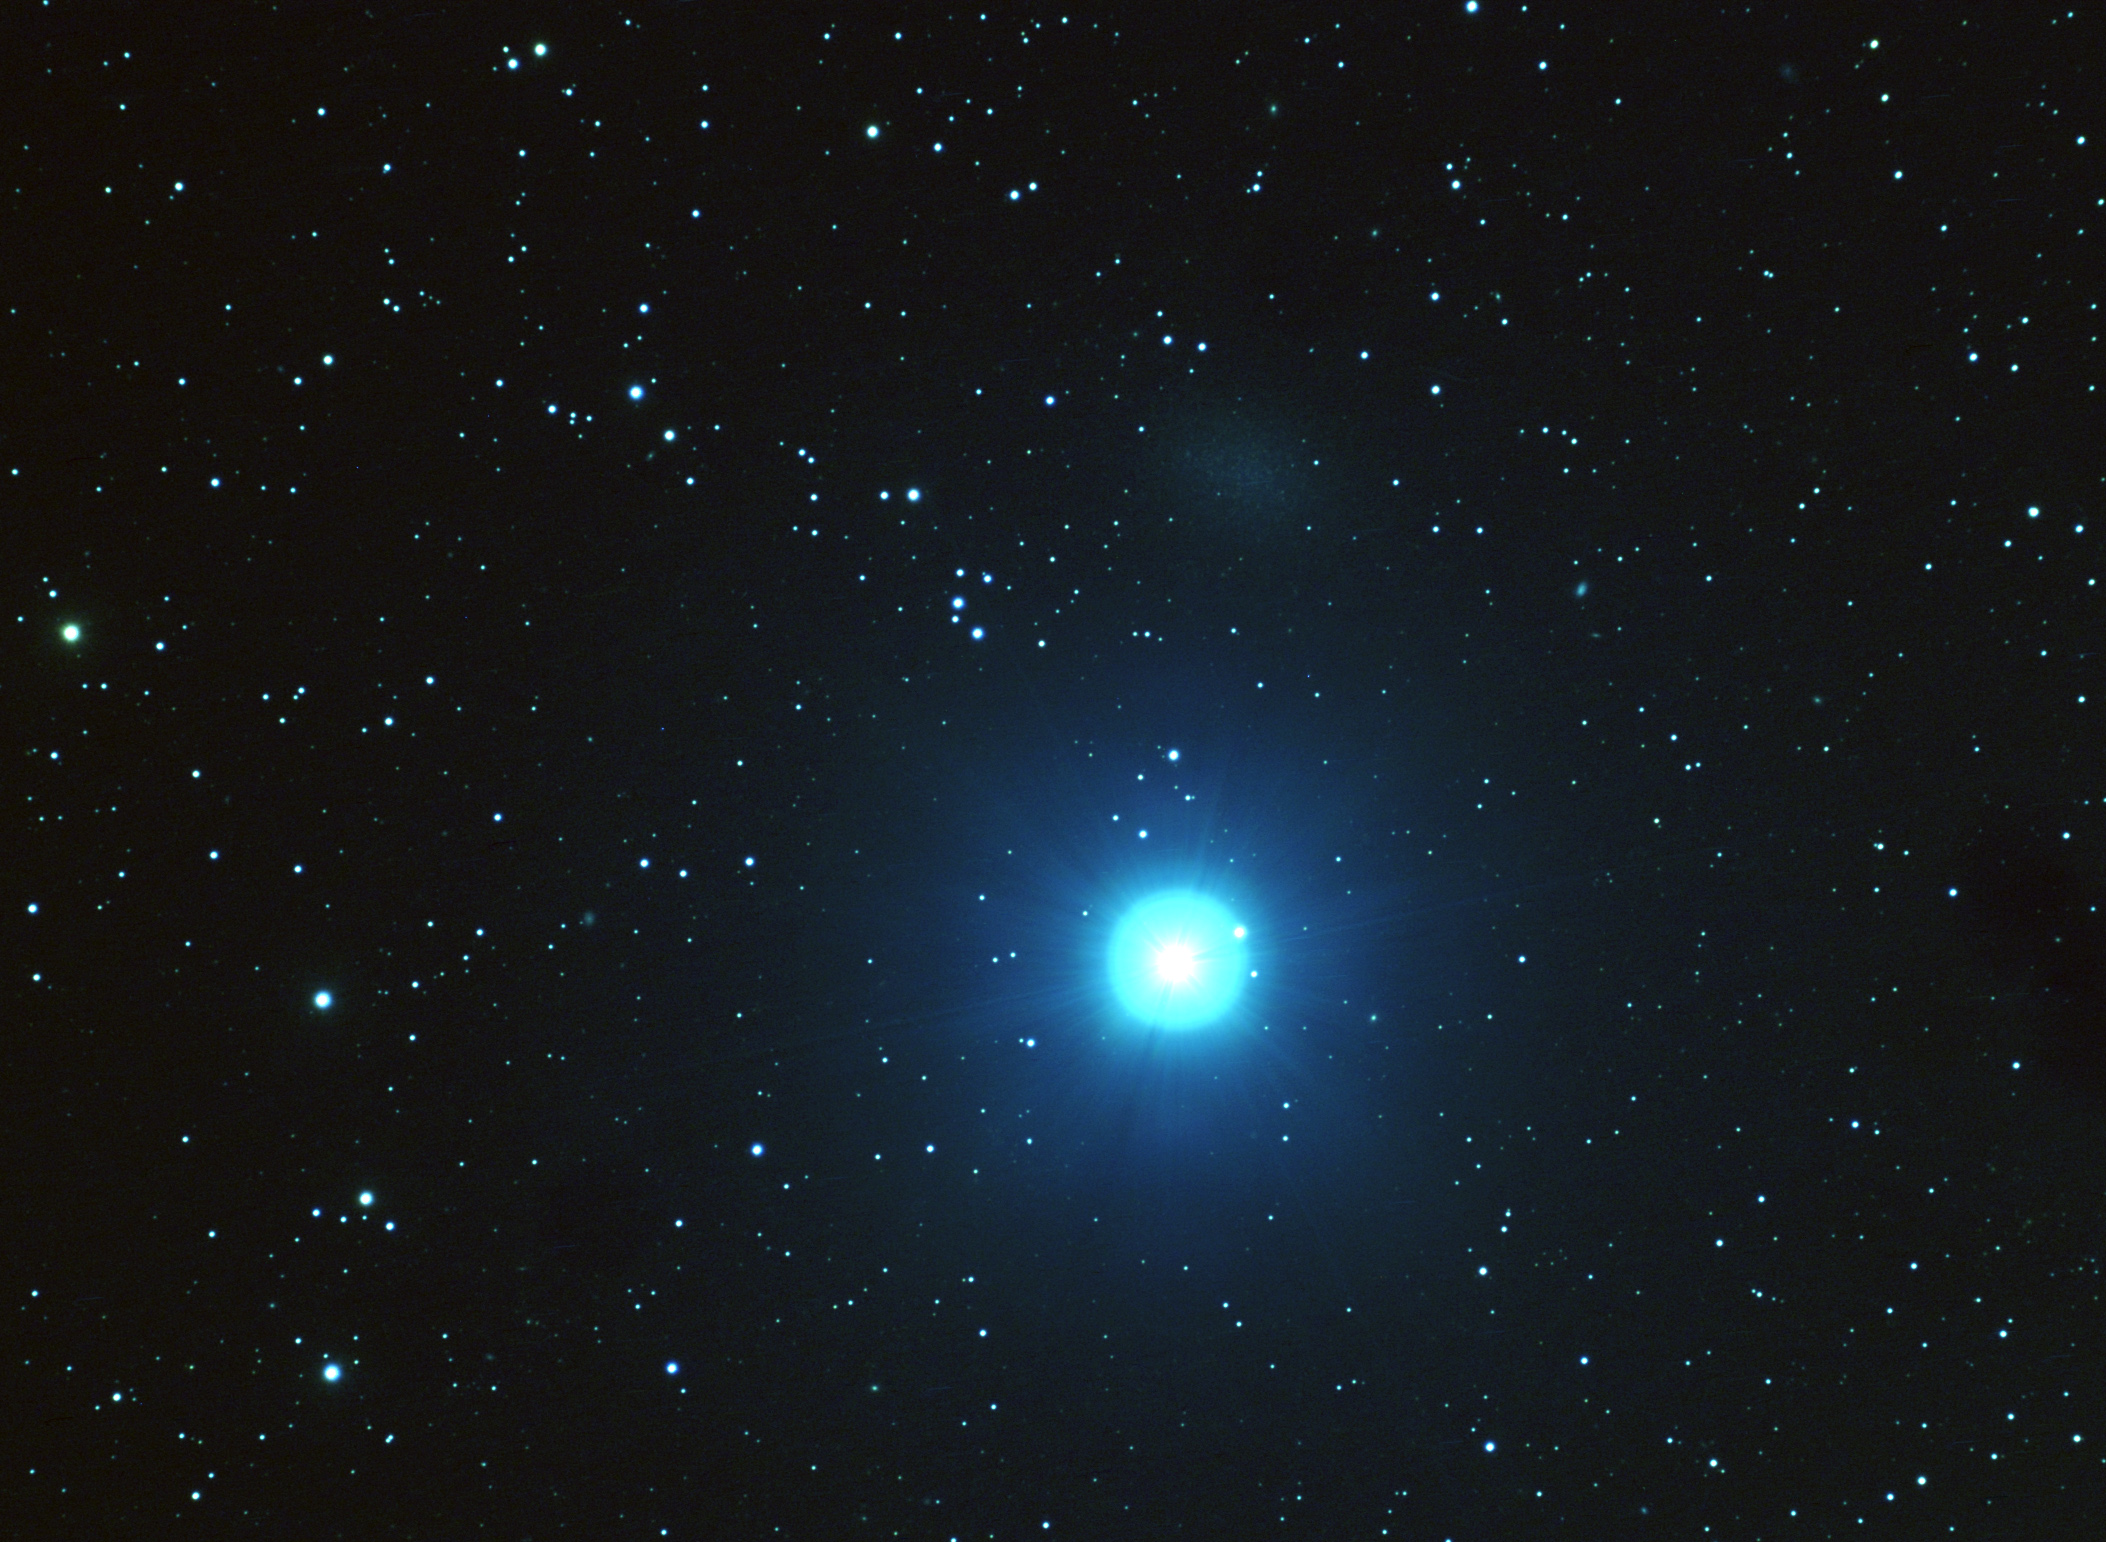 Leo 1 Here is a 172 minute (43x240) exposure of galaxy Leo 1 in Leo (the fuzzy object just above the extremely overexposed star Regulus). Taken with a 4" refractor, also an Astro-Tech field flatenner is in the optical path. This image is cropped significantly and is at the full resolution of the camera. Leo 1 is pretty cool in that it was only discovered in 1948. Here's the description of it from Wikipedia: "Leo I is a dwarf spheroidal galaxy in the constellation Leo. At about 820,000 light-years distant, it is a member of the Local Group of galaxies and is thought to be one of the most distant satellites of the Milky Way galaxy. It was discovered in 1950 by Albert George Wilson on photographic plates of the National Geographic Society - Palomar Observatory Sky Survey, which were taken with the 48-inch Schmidt camera at Palomar Observatory". Processed with darks and flats and darks for flats using Maxim DL. Final processing done in Photoshop. Celestron C-14 was used for guiding with an Orion Autoguider.
 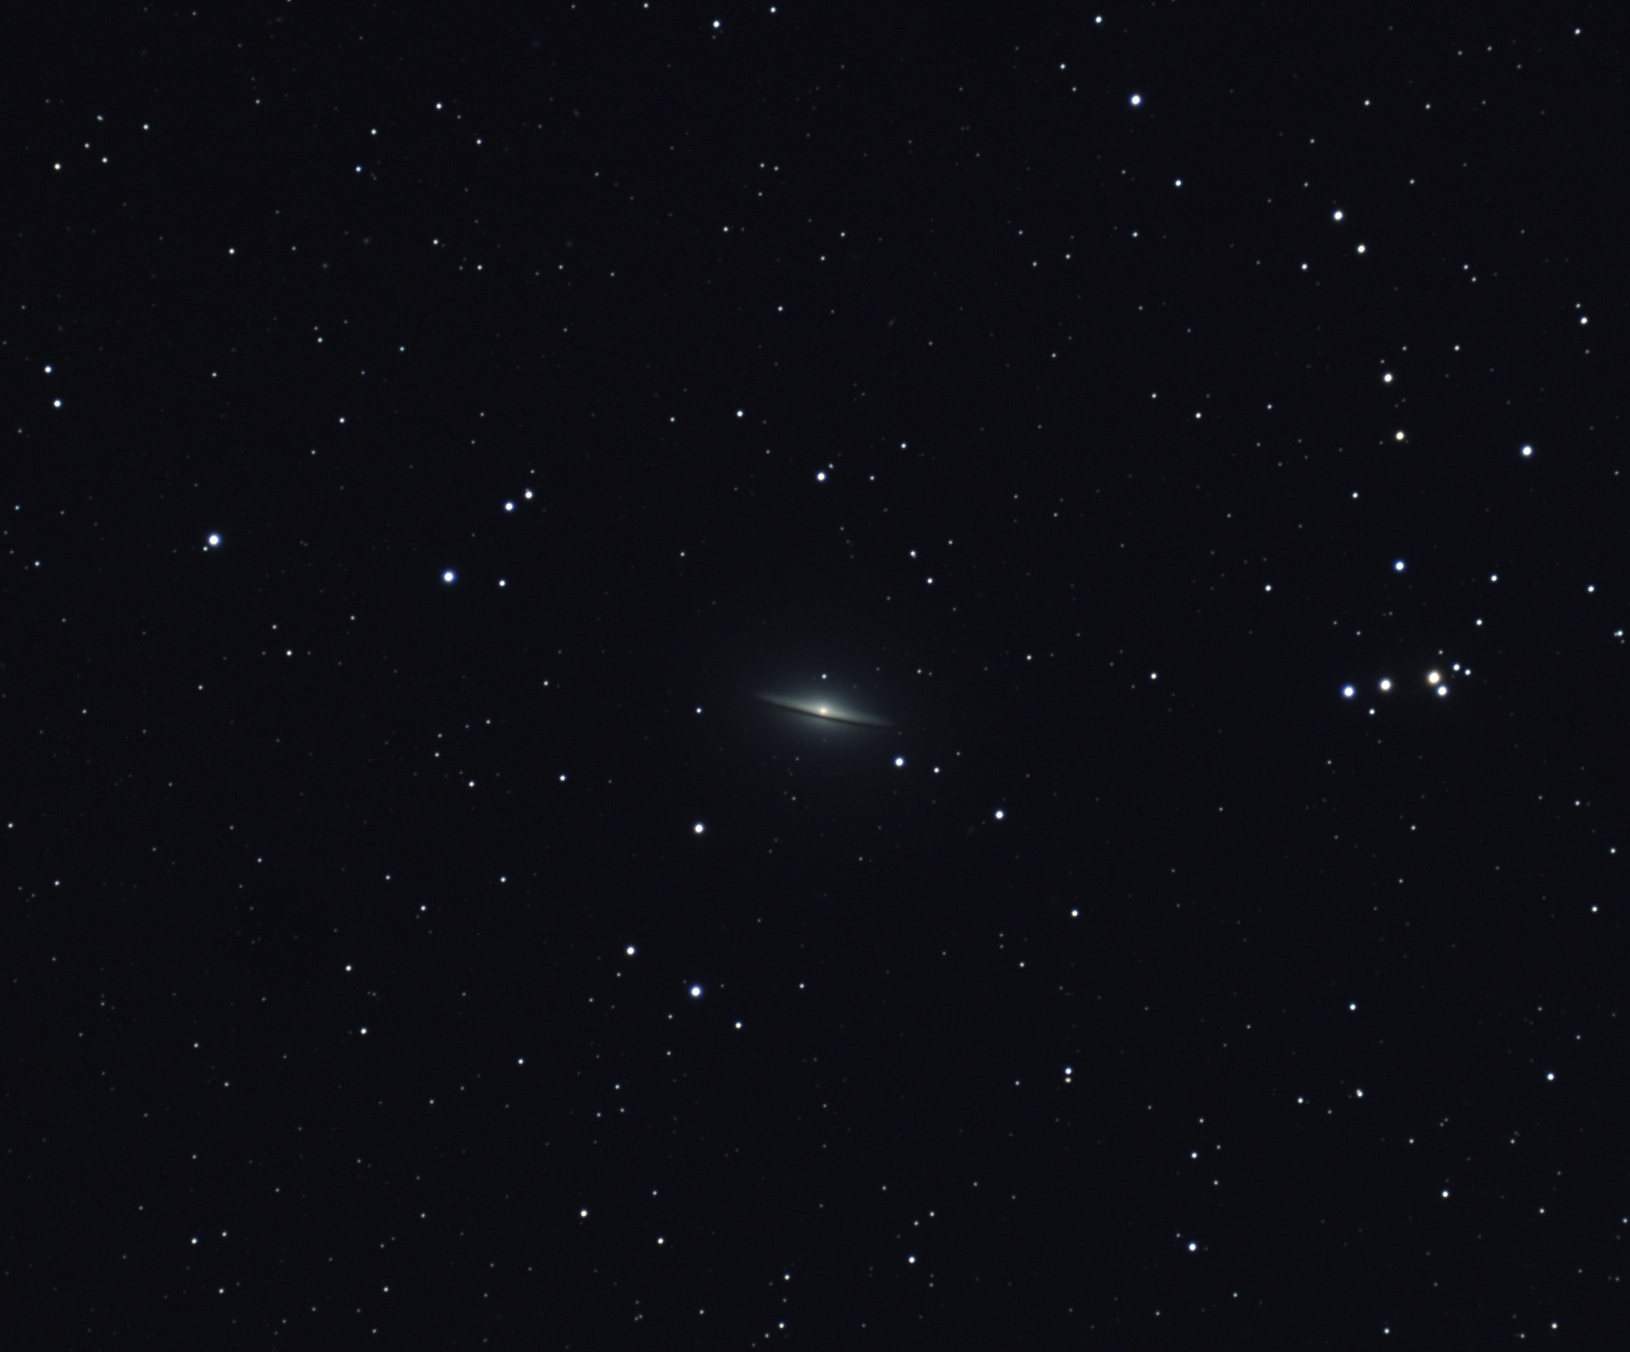 M104 Here is a 132 minute (33x240) exposure of galaxy M104 in Virgo (sometimes called the "Sombrero Galaxy"). Taken with a 4" refractor, also an Astro-Tech field flatenner is in the optical path. This image is cropped significantly and is at the full resolution of the camera. M104 is a bit small for this focal length (665mm), I really need to get something longer on it. Processed with darks and flats and darks for flats using Maxim DL. Final processing done in Photoshop. Celestron C-14 was used for guiding with an Orion Autoguider.
 Conditons were pretty decent tonight. It was a work night so I could not image all night. I got 2 objects in toight's session.
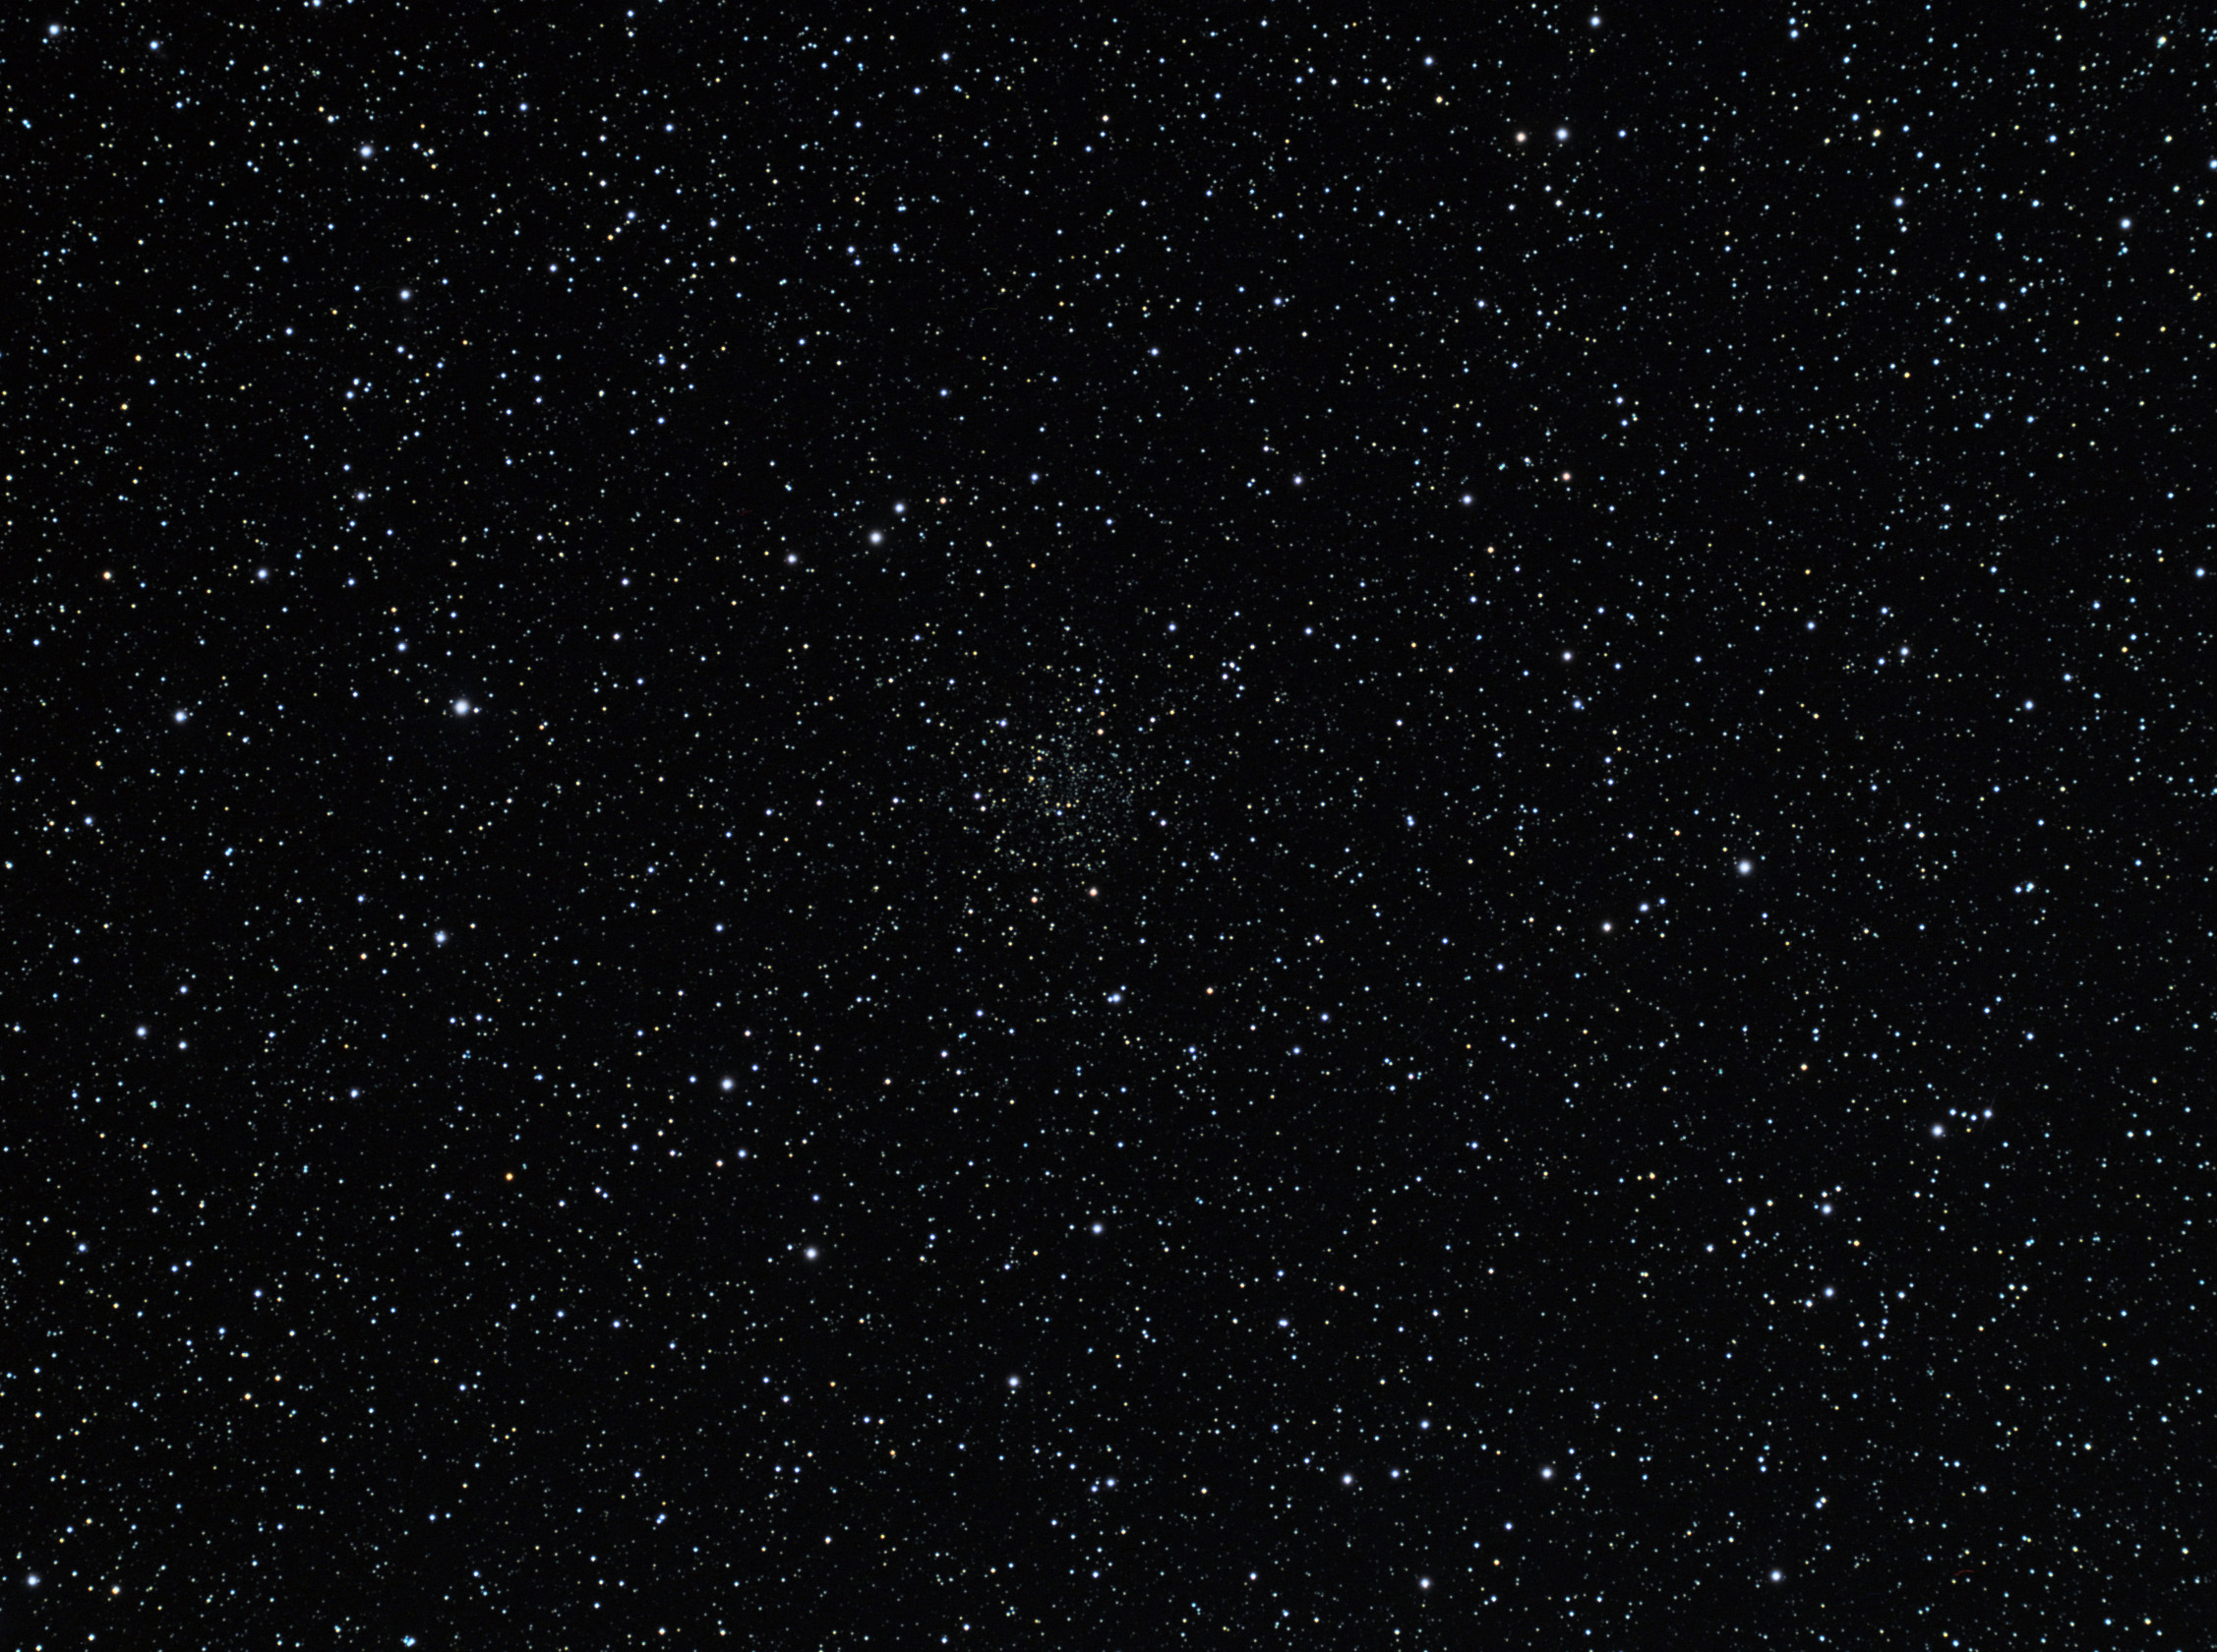 NGC 2141 This is a 108 minute (27x240) exposure of cluster NGC 2141 in Orion. Taken with a 4" refractor, also an Astro-Tech field flatenner is in the optical path. THis image is cropped slightly and it is at the full resolution of the camera. Temp was around 32 dergees when this was taken. Processed with darks and flats and darks for flats using Maxim DL. Final processing done in Photoshop. Celestron C-14 was used for guiding with an Orion Autoguider.
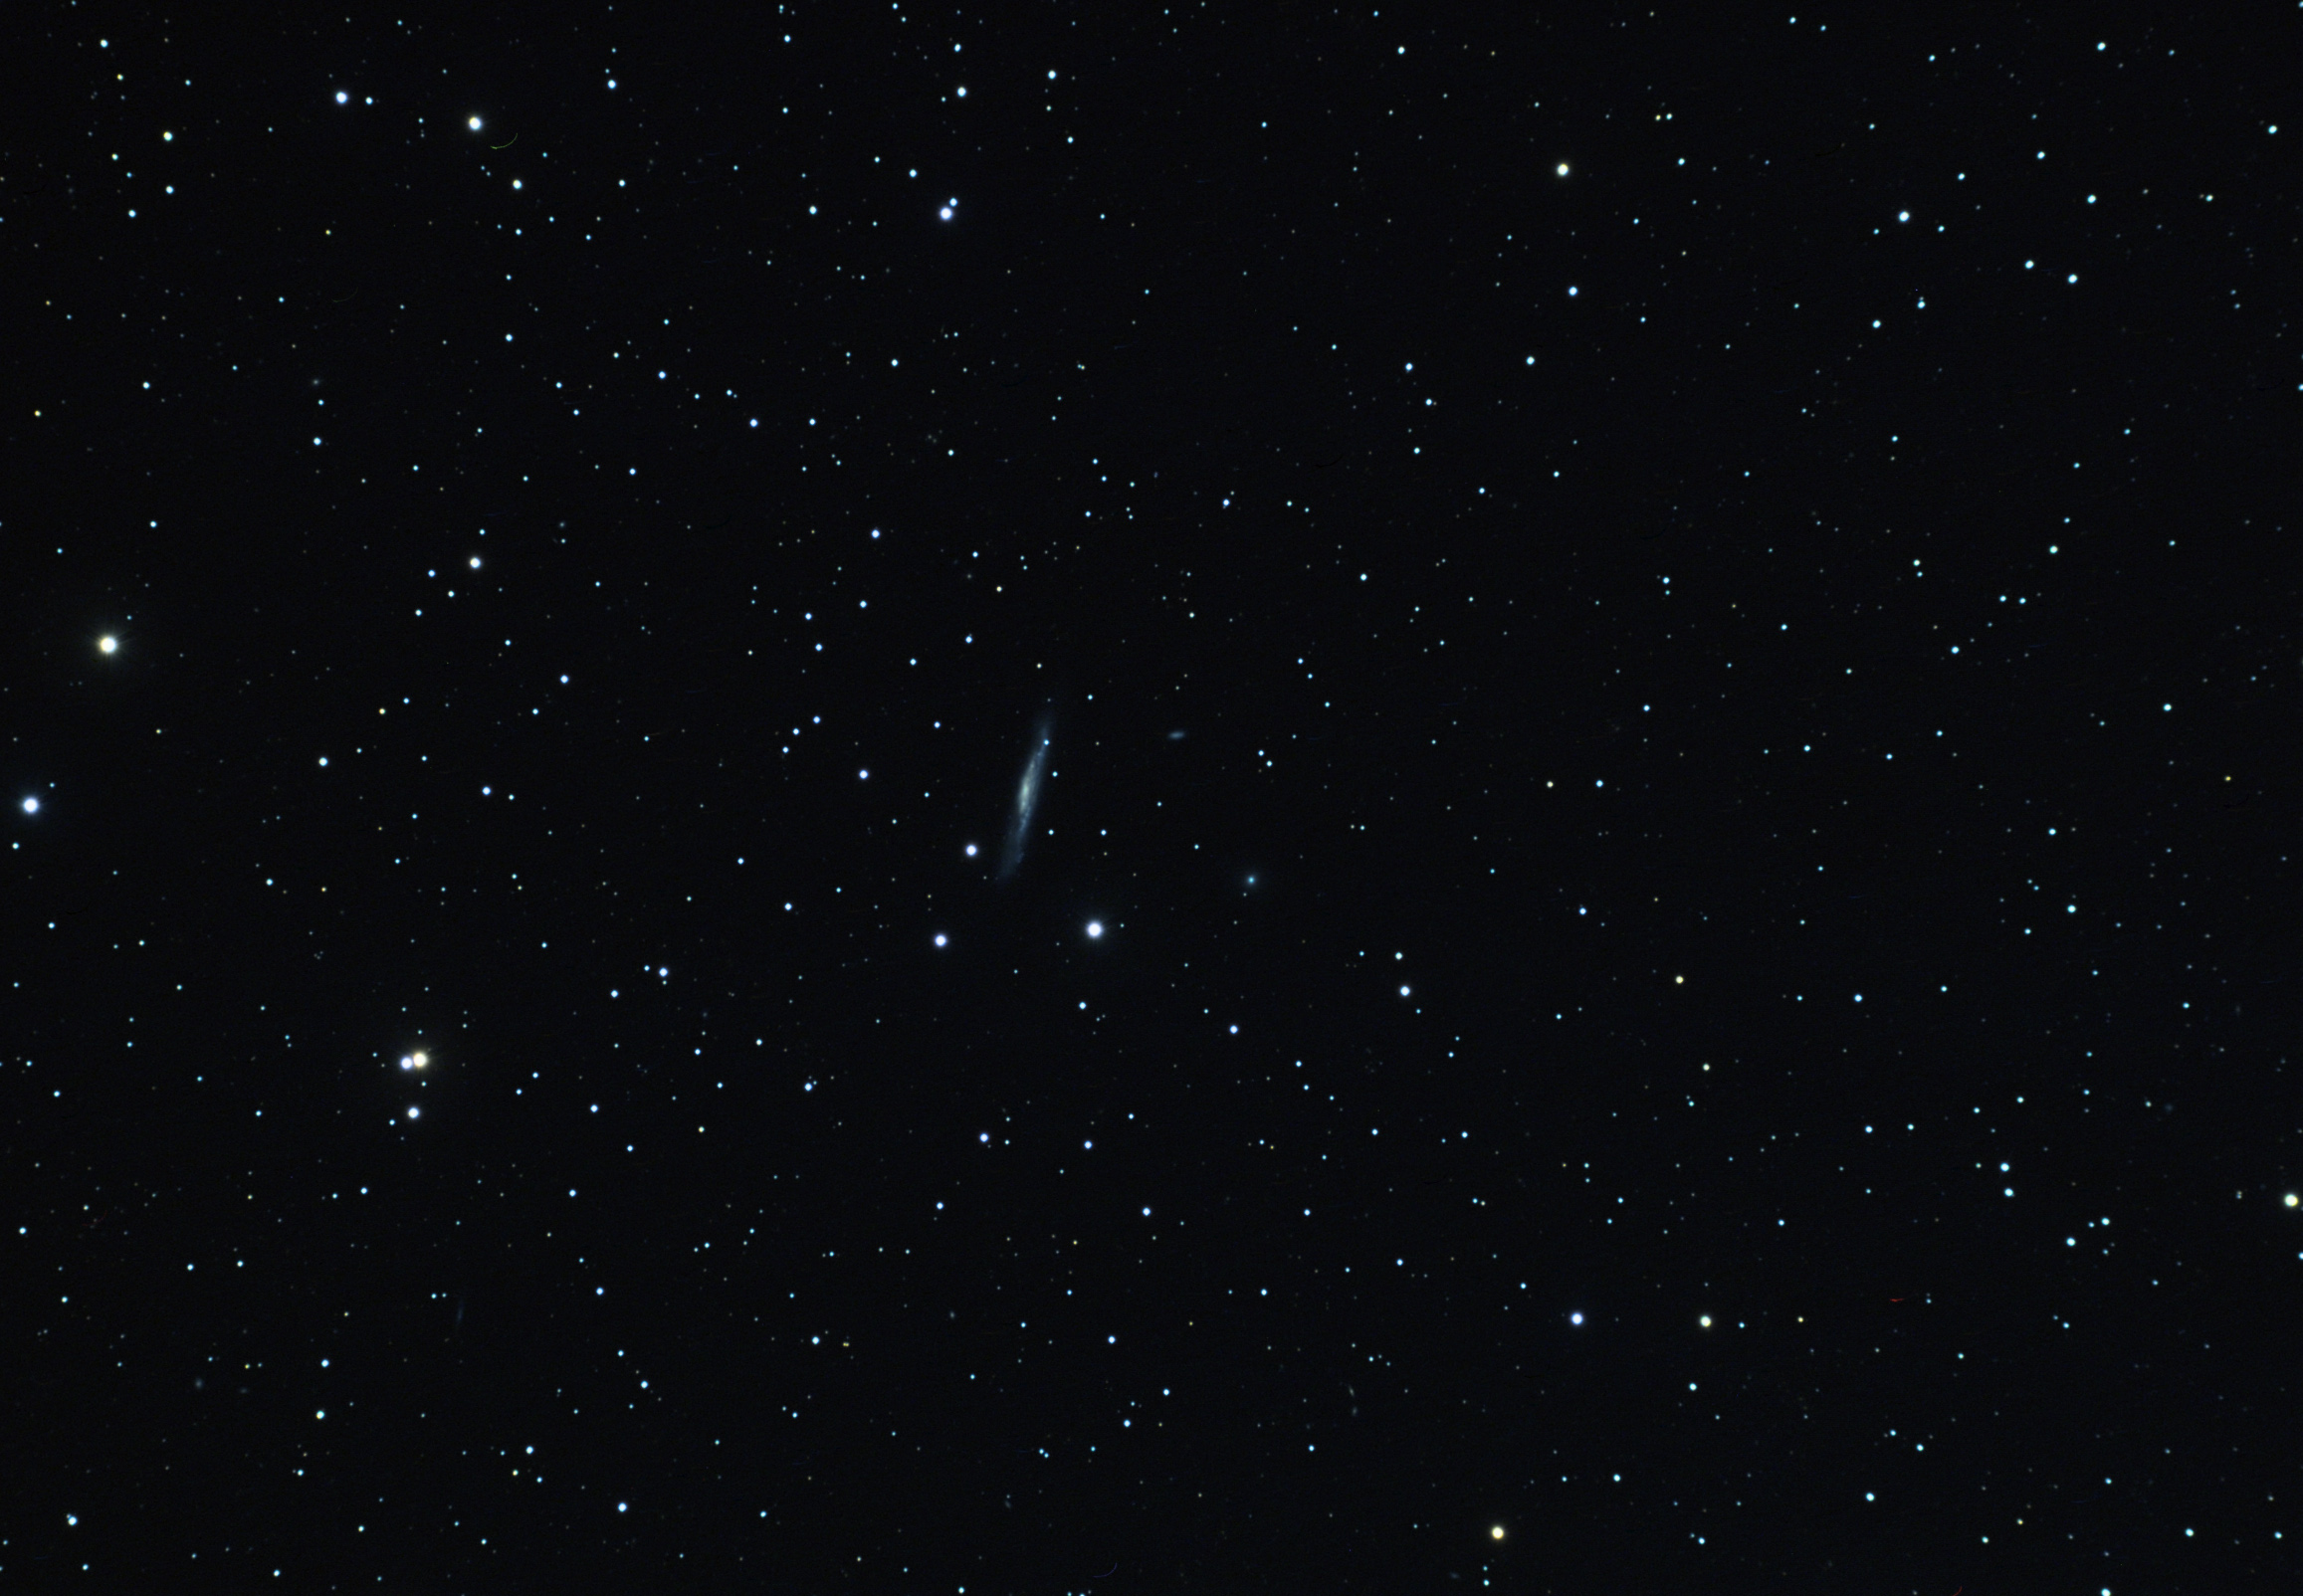 NGC 3079 This is a 208 minute (52x240) exposure of Galaxy NGC 3079 in Ursa Major. Taken with a 4" refractor, also an Astro-Tech field flatenner is in the optical path. THis image is cropped slightly and it is at the full resolution of the camera. Temp was around 25 dergees when this was taken. Processed with darks and flats and darks for flats using Maxim DL. Final processing done in Photoshop. Celestron C-14 was used for guiding with an Orion Autoguider.
A significangt hiatus in imaging due to crappy weather and work schedules. Tonight I switched up equipment and put the camera on the C-14 (with an F6.3 reducer) and the autoguider on the 4" refractor. I managed to get 4 images.
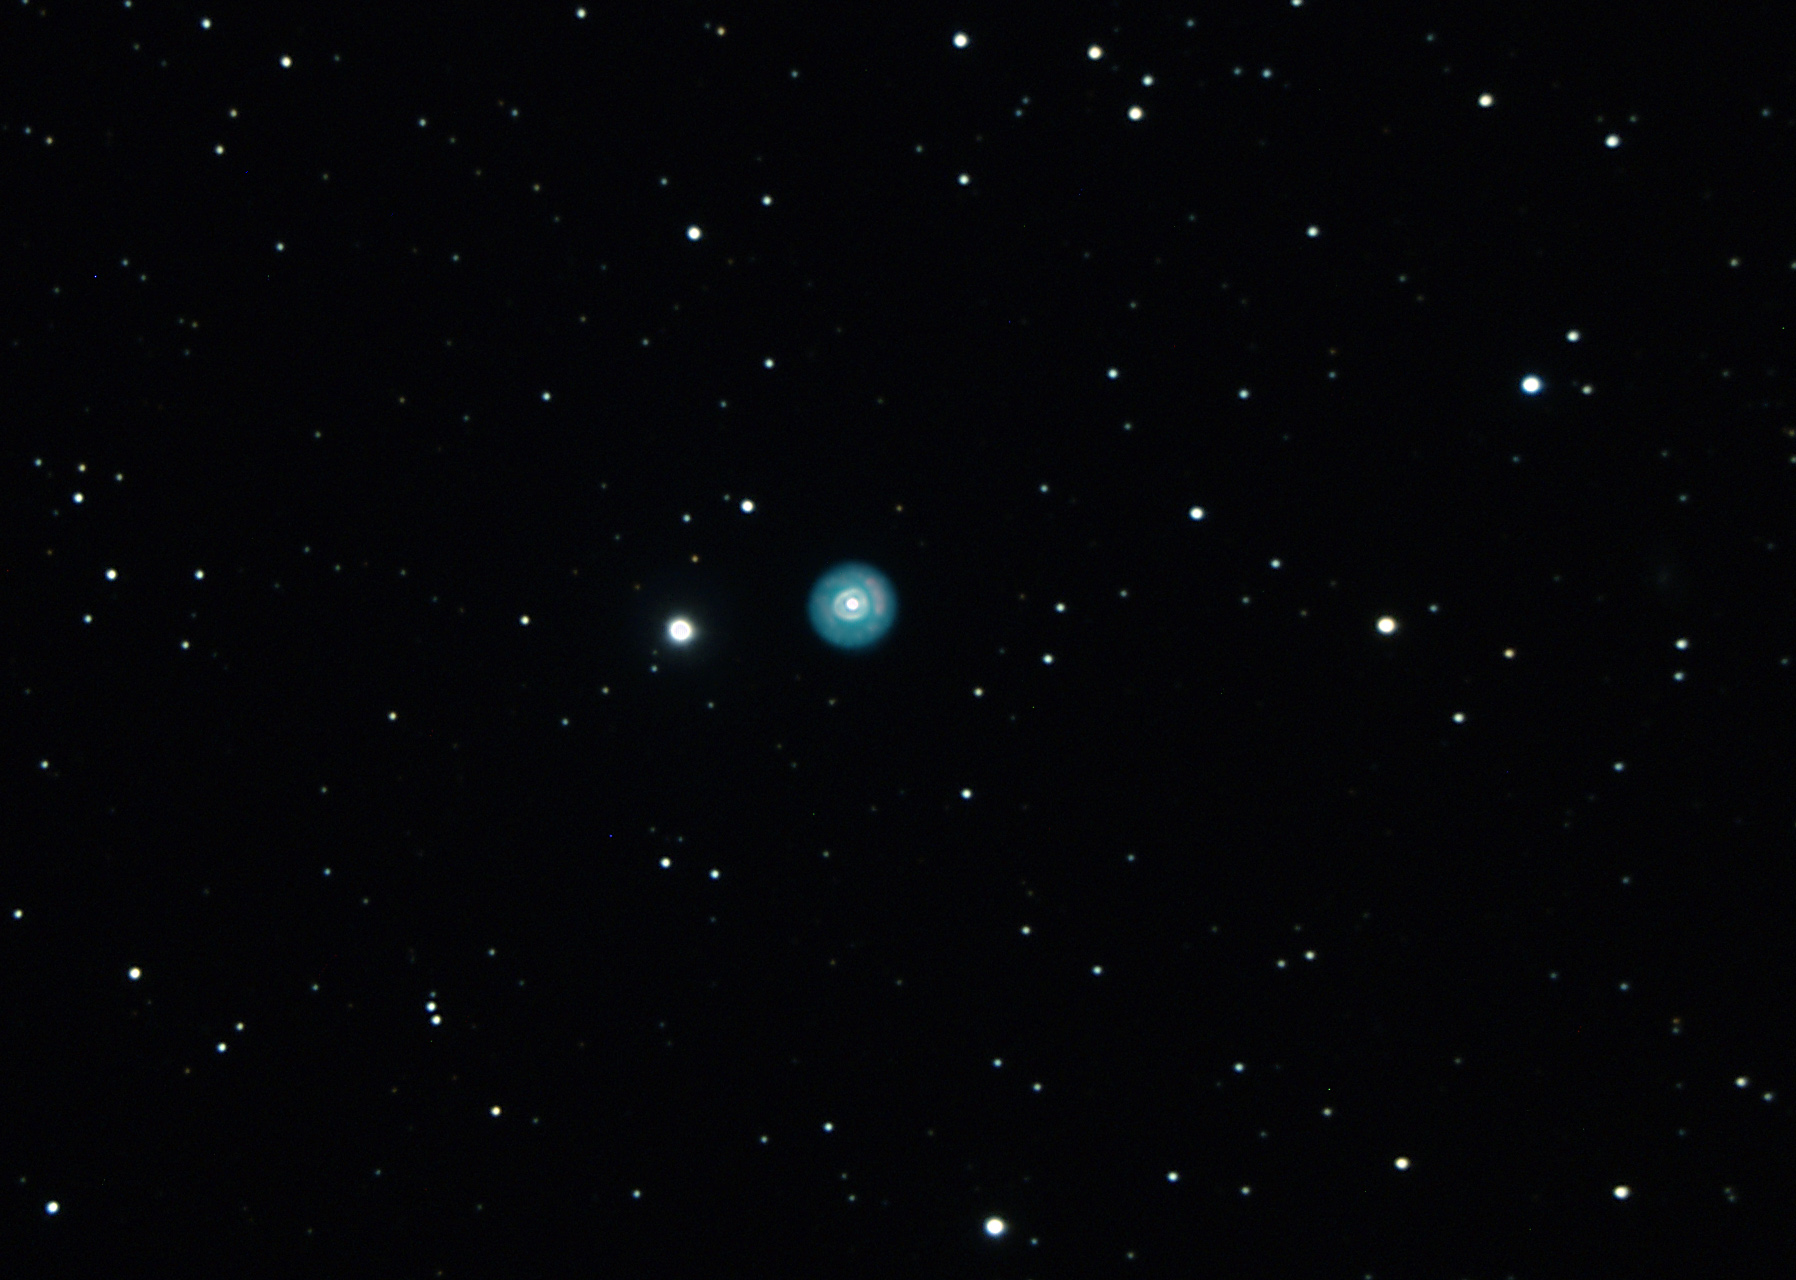 NGC 2392 Here is a 40 minute (10x240) exposure of the Eskimo Nebula in Gemini. I am reasonably satisfied with this image (planetary nebulae are often tough to image due to their small size). Galaxy UGC 3873 (magnitude 14.4) can be seen at the right side of the image. Temp was around 45 dergees when this was taken. The image is at the full resolution of the camera but it is significantly cropped. Taken with the C-14 (with a Celestron F6.3 field flattener/reducer). Processed with darks and flats and darks for flats using Maxim DL. Final processing done in Photoshop. A Vixen 102ED refractor was used for guiding with an Orion Autoguider.
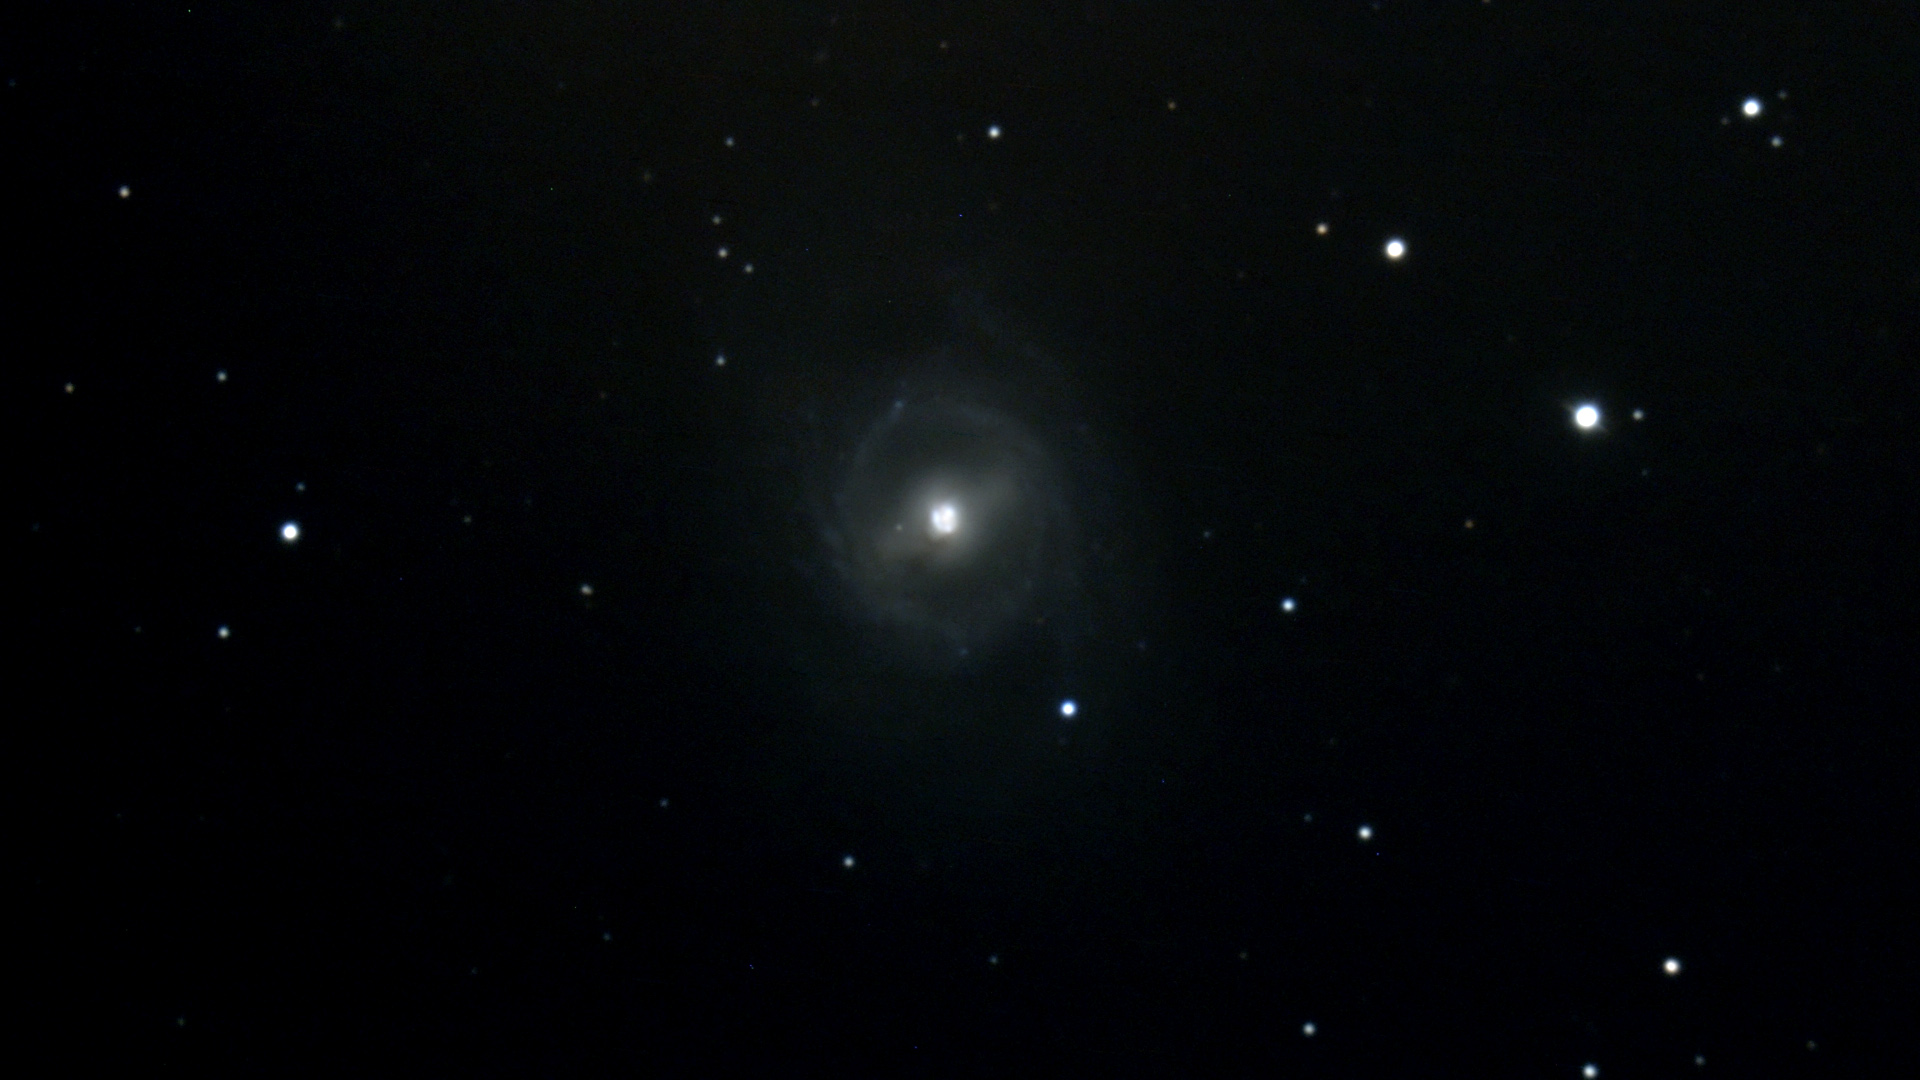 M95 Here is a 56 minute (14x240) exposure of the galaxy M95 in Leo (about 35 million light years away). Temp was around 42 dergees when this was taken. The image is at the full resolution of the camera but it is significantly cropped. Taken with the C-14 (with a Celestron F6.3 field flattener/reducer). Processed with darks and flats and darks for flats using Maxim DL. Final processing done in Photoshop. A Vixen 102ED refractor was used for guiding with an Orion Autoguider.
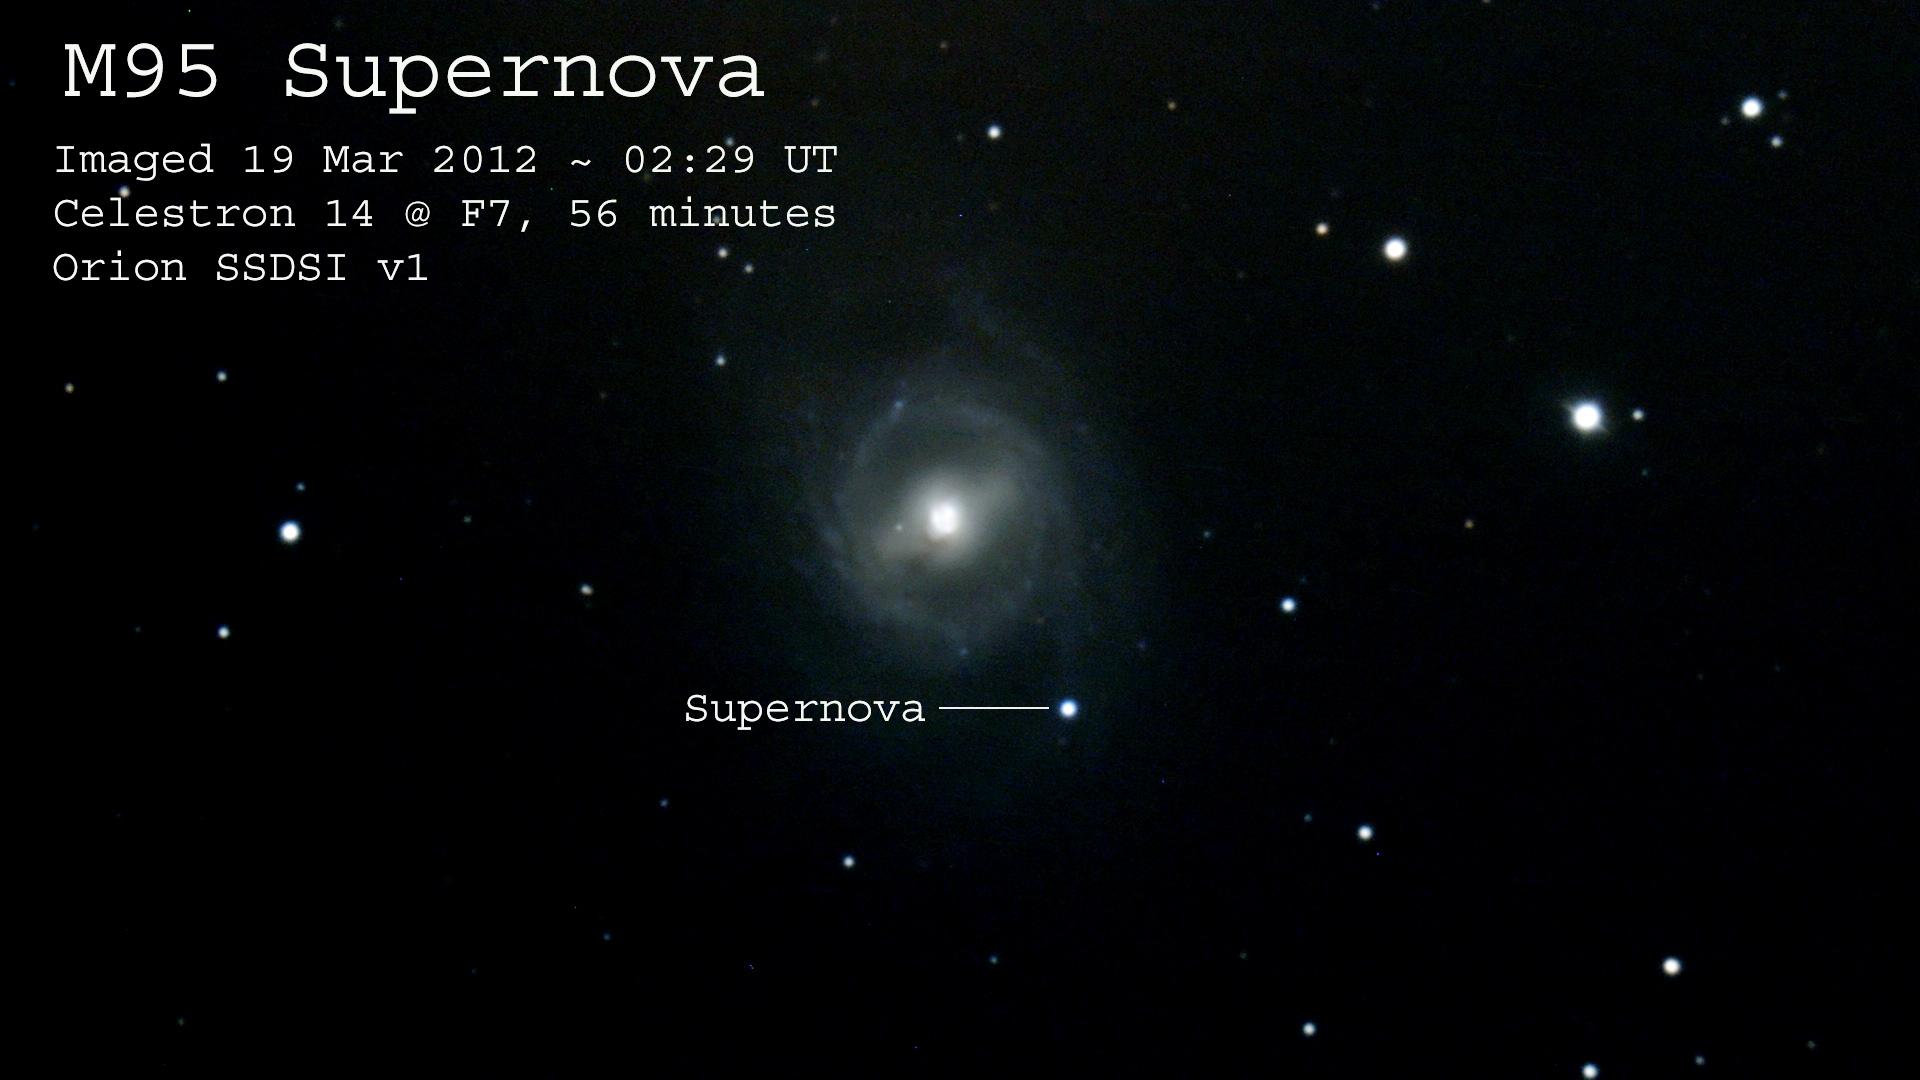 M95 with Supernova! Although I did not know it at the time the image above recorded the M95 supernova (discovered only about 36 hours previous to this image being taken)! This image points out where it is.
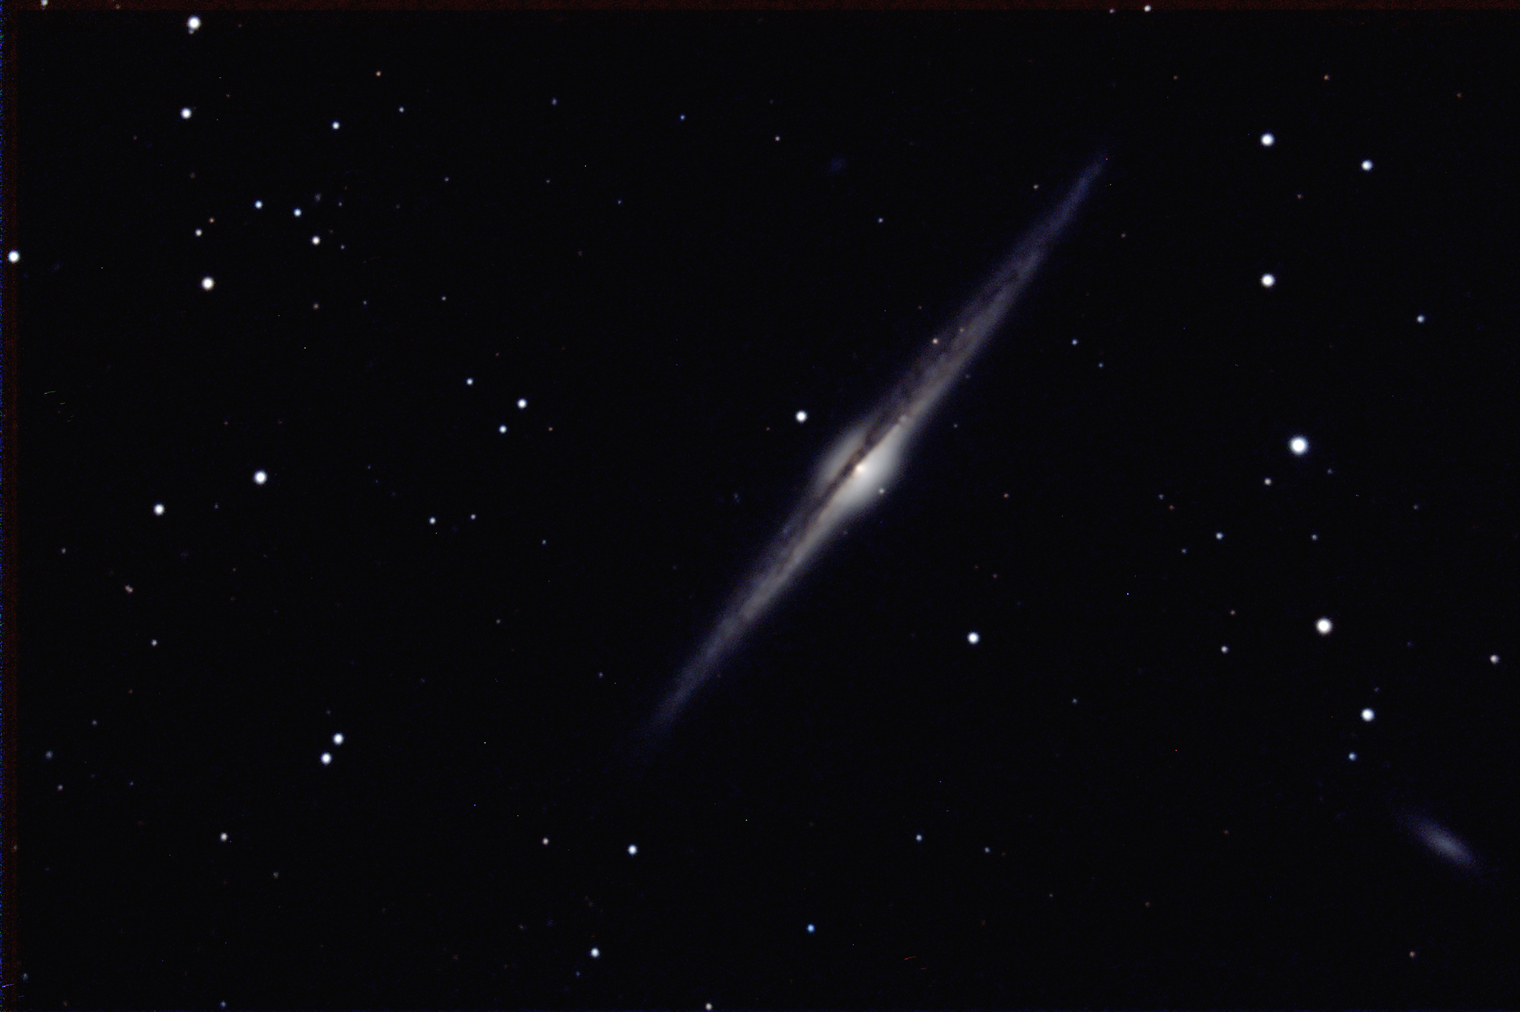 NGC 4565 Here is a 72 minute (18x240) exposure of the galaxy NGC 4565 in Coma Berenices (one of my favorite galaxies). At lower right is 14.5 magnitude NGC 4562. Also (faintly) visible is 16.9 magnitude galaxy IC 3571. Temp was around 40 dergees when this was taken. The image represents the full field of the camera but it is scaled to half resolution as the full size image was not sharp enough. Taken with the C-14 (with a Celestron F6.3 field flattener/reducer). Processed with darks and flats and darks for flats using Maxim DL. Final processing done in Photoshop. A Vixen 102ED refractor was used for guiding with an Orion Autoguider.
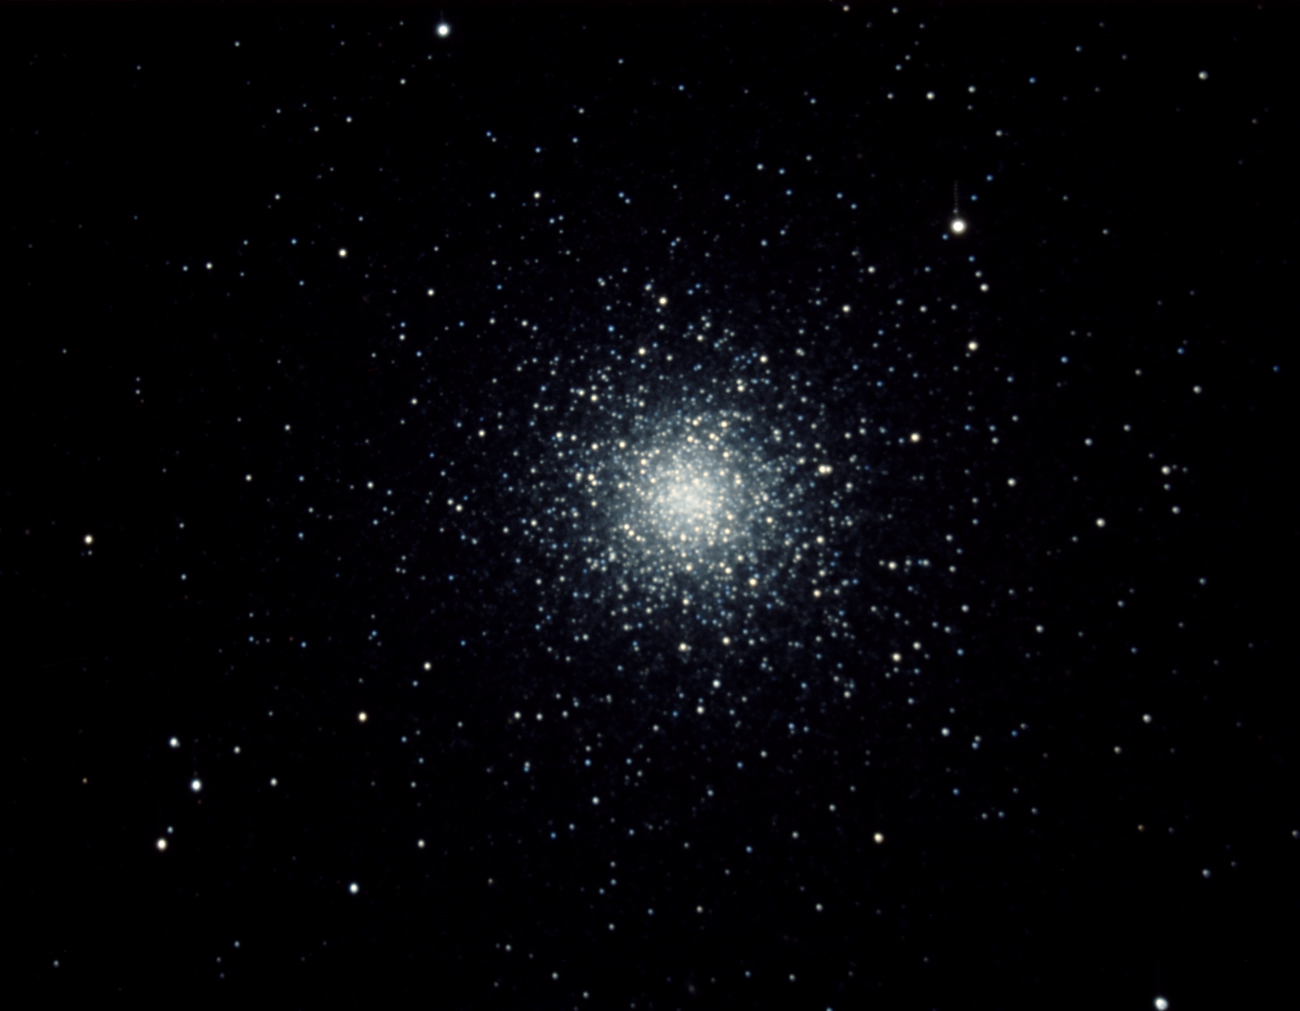 M3 Here is a 2 hour (30x240) exposure of the globular cluster M3 in Canes Venatici. Temp was around 38 dergees when this was taken. The image is scaled to half resolution as the full size image was not sharp enough, the image is also cropped slightly. Taken with the C-14 (with a Celestron F6.3 field flattener/reducer). Processed with darks and flats and darks for flats using Maxim DL. Final processing done in Photoshop. A Vixen 102ED refractor was used for guiding with an Orion Autoguider.
Got two images tonight... imaging got cut short when fog rolled in.
 NGC 3190 Group Here is a 70 minute (35x240) exposure of the NGC 3190 galaxy group in the sickle of Leo (NGC 3190 is the galaxy with the dark lane in it). The round galaxy to the upper left of NGC 3190 is NGC 3193. The galaxy to the upper right of NGC 3190 is NGC 3187. The galaxy to the lower left of NGC 3190 is NGC 3185. Also visible to the left of NGC 3185 is 16.3 magnitude PGC 2806871. Another faint galaxy is visible to the right of NGC 3190, this is 17.3 magnitude PGC 86788. Quite a few other faint galaxies are visible upon close inspection. I like this group as it contains a nice variety of galaxies in a small compact area. The image is at the full resolution of the camera but it is slightly cropped. Taken with a 4" refractor, also an Astro-Tech field flatenner is in the optical path. Processed with darks and flats and darks for flats using Maxim DL. Final processing done in Photoshop. A Celestron 14 was used for guiding with an Orion Autoguider.
 Virgo Galaxies Here is a 16 minute (4x240) exposure of the heart of the Virgo galaxy cluster. Unfortunately fog rolled in and I was only able to get 4 frames on this so the image is quite noisy. he image is at the full resolution of the camera but it is slightly cropped. Taken with a 4" refractor, also an Astro-Tech field flatenner is in the optical path. Processed with darks and flats and darks for flats using Maxim DL. Final processing done in Photoshop. A Celestron 14 was used for guiding with an Orion Autoguider.
Got two more images tonight, the fog held off until around 4am.
 NGC 3115 Here is a 176 minute (44x240) exposure of the "Spindle Galaxy" in Sextans. The galaxy below and to the left of NGC 3115 is PGC 29300 (magnitude 12.5). Upon close inspection a number of other galaxies as faint as magnitude 17 are vsible. The image is at the full resolution of the camera but it is slightly cropped. Taken with a 4" refractor, also an Astro-Tech field flatenner is in the optical path. Processed with darks and flats and darks for flats using Maxim DL. Final processing done in Photoshop. A Celestron 14 was used for guiding with an Orion Autoguider.
 M53 (and NGC 5053) Here is a 124 minute (31x240) exposure of the globular cluster M53 in Coma Berenices. Also visible to the lower left is globular cluster NGC 5053. I remember seeing this cluster in a 2.4" refractor back in the 1970s (when we had really dark skies). To the upper right of M53 is galaxy UGC 8248 (magnitude 14.77), and a a little below and to the right is 17.88 magnitude PGC 214079. These two clusters are interesting as they differ so much in appearance. The image is reduced slightly from the full resolution of the camera and it is slightly cropped. Taken with a 4" refractor, also an Astro-Tech field flatenner is in the optical path. Processed with darks and flats and darks for flats using Maxim DL. Final processing done in Photoshop. A Celestron 14 was used for guiding with an Orion Autoguider.
Got one image tonight before clouds rolled in.
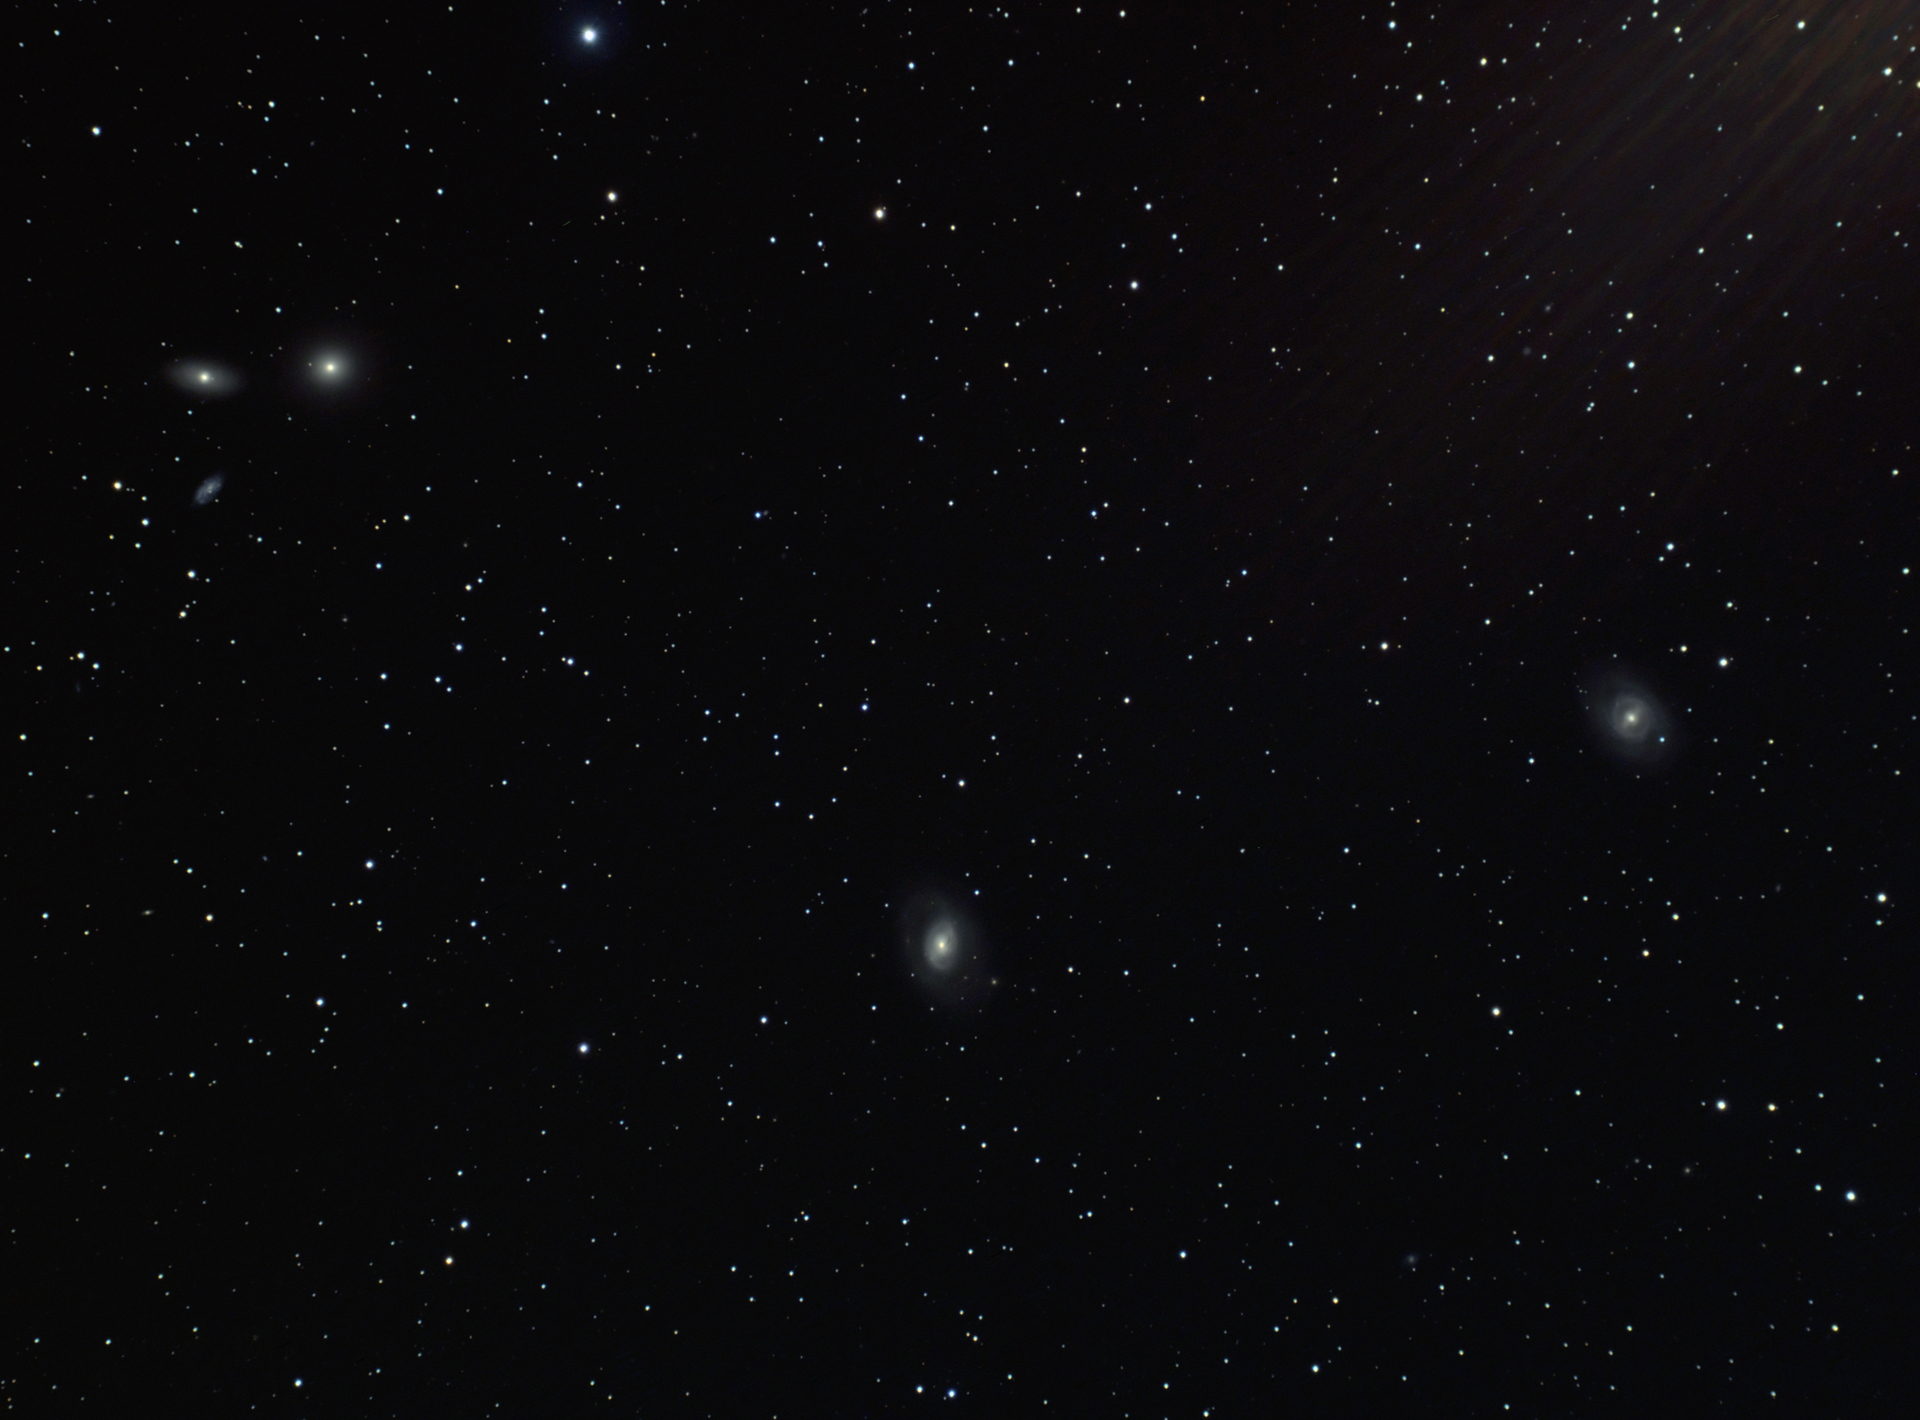 M96 Group Here is a 120 minute (30x240) exposure of the region centered on M96 in Leo. M96 is the galaxy a little below center, M95 is at right. The supernova is still shining very brightly (it's the star at about 4 o'clock from the M95 nucleus, right in the outer arms). At upper left is the M105 group (M105 is the bright round galaxy). To the left of that is NGC 3384, and a little below that is NGC 3373. There are a good number of other fainter galaxies visible also. One of them is 15.6 magnitude PGC 83335, this is at about 4 o'clock just outside the edge of the arms of M96. I checked Sky Safari Pro and galaxies as faint as 17.5 magnitude are detectable in this image. The rays coming fro the upper right are "splash" from the nearby brilliant Mars. This image reduced slightly from the full resolution of the camera but it is slightly cropped. A full resolution version is here: M96 Region. Taken with a 4" refractor, also an Astro-Tech field flatenner is in the optical path. Processed with darks and flats and darks for flats using Maxim DL. Final processing done in Photoshop. A Celestron 14 was used for guiding with an Orion Autoguider.
I have been on imaging hiatus for almost a month due to business travel. Nights are considerably shorter now (+41 degrees north) so I only had time to get data for 2 images...
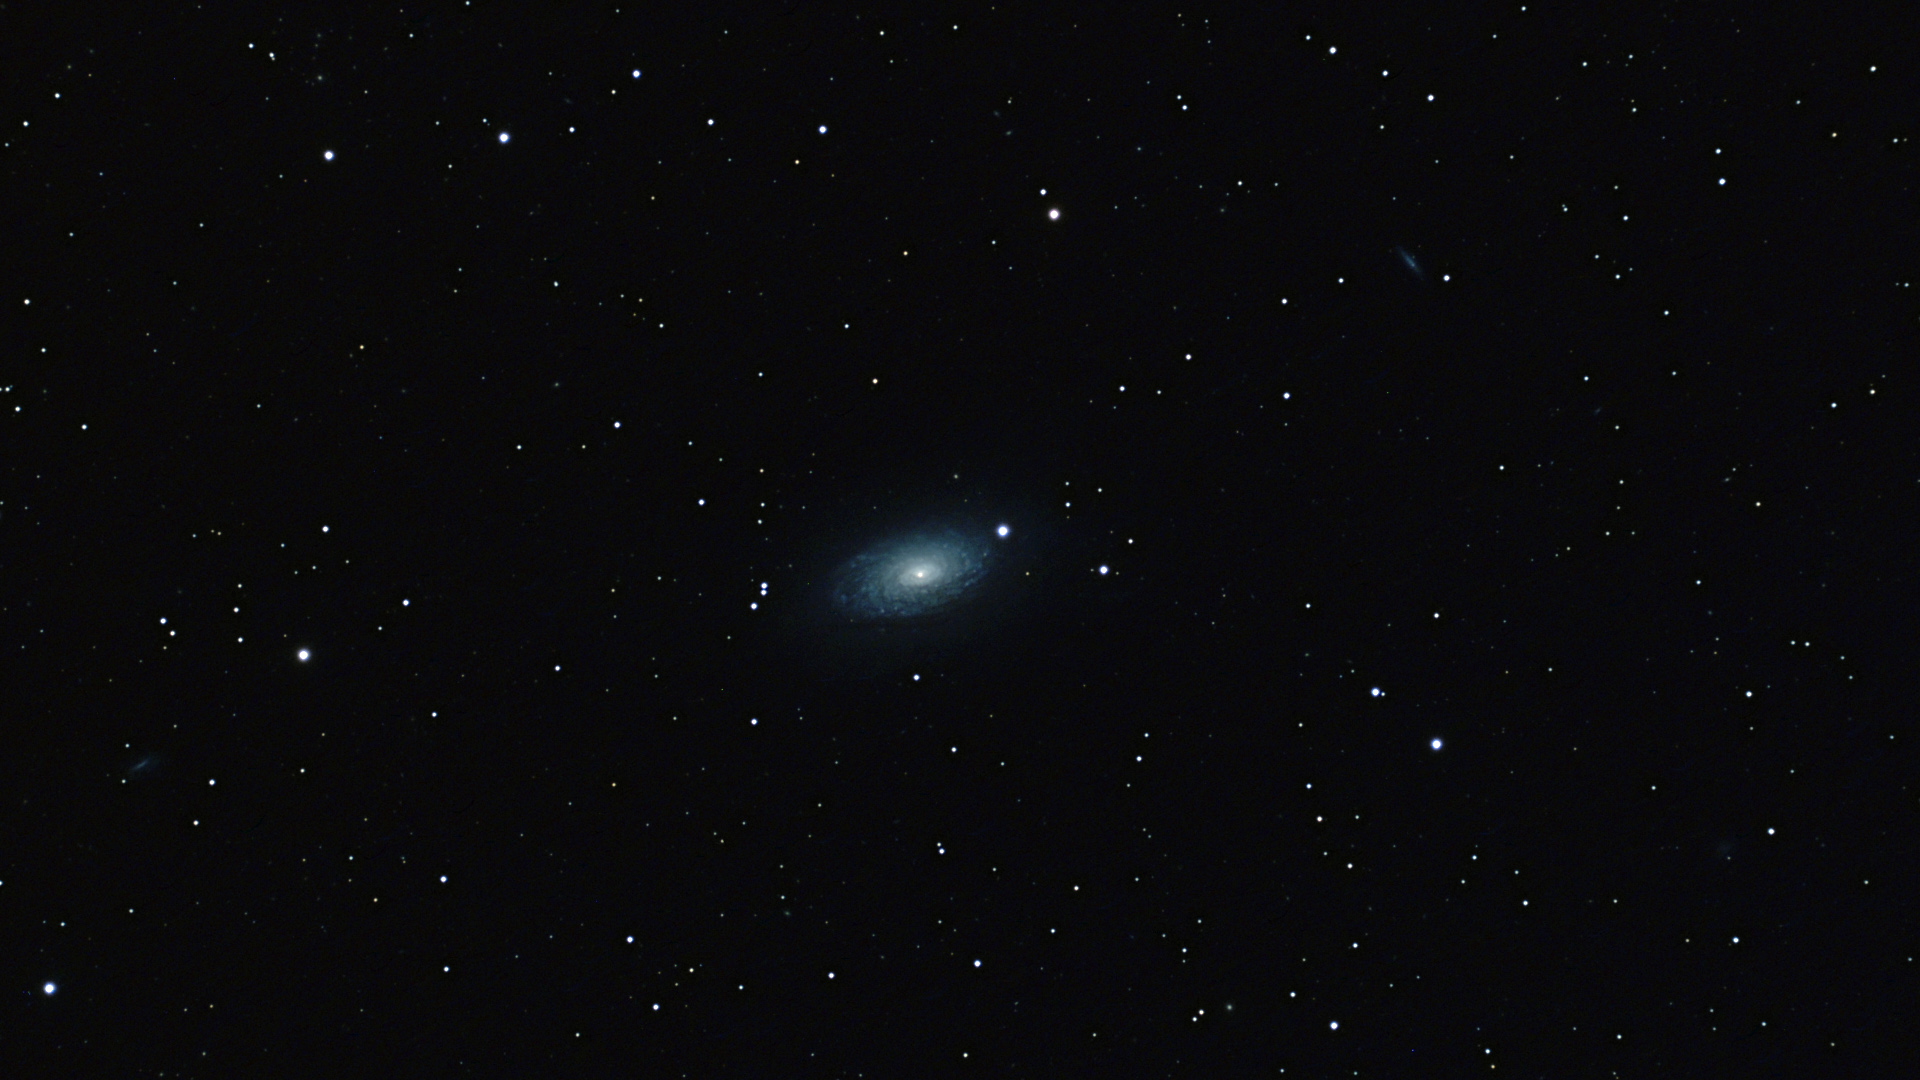 M63 Here is a 136 minute (34x240) exposure of galaxy M63 in Canes Venatici. I first saw this galaxy in the spring of 1975 when my friend Pete Chapin got a brand new 3" Unitron refractor. Several other galaxies are also visible in this image. Taken with a 4" refractor, also an Astro-Tech field flatenner is in the optical path. THe image is at the full resolution of the camera but it is cropped somewhat. Processed with darks and flats and darks for flats using Maxim DL. Final processing done in Photoshop. A Celestron 14 was used for guiding with an Orion Autoguider.
 M5 Here is a 148 minute (37x240) exposure of globular cluster M5 in Serpens Caput. This is one of my favorite gobular clusters. A number of (faint) background galaxies are also visible in this image. Taken with a 4" refractor, also an Astro-Tech field flatenner is in the optical path. The image is reduced slightly from full resolution (to 1920 pixels wide after cropping). Processed with darks and flats and darks for flats using Maxim DL. Final processing done in Photoshop (4 images were layered and tinkered with to get this final image). A Celestron 14 was used for guiding with an Orion Autoguider. This is probably my best image of M5 to date (compare this one to the one I took during the 25-26 May 2009 session)!
Crappy weather and business travel has kept me away from imaging for a while. I now have a Pro V2 version of the Orion Starshoot Deep Space camera (this one is less prone to fogging over as compared to the original version, which I still have). The data for the image below was gathered over two nights (nights are short here this time of year).
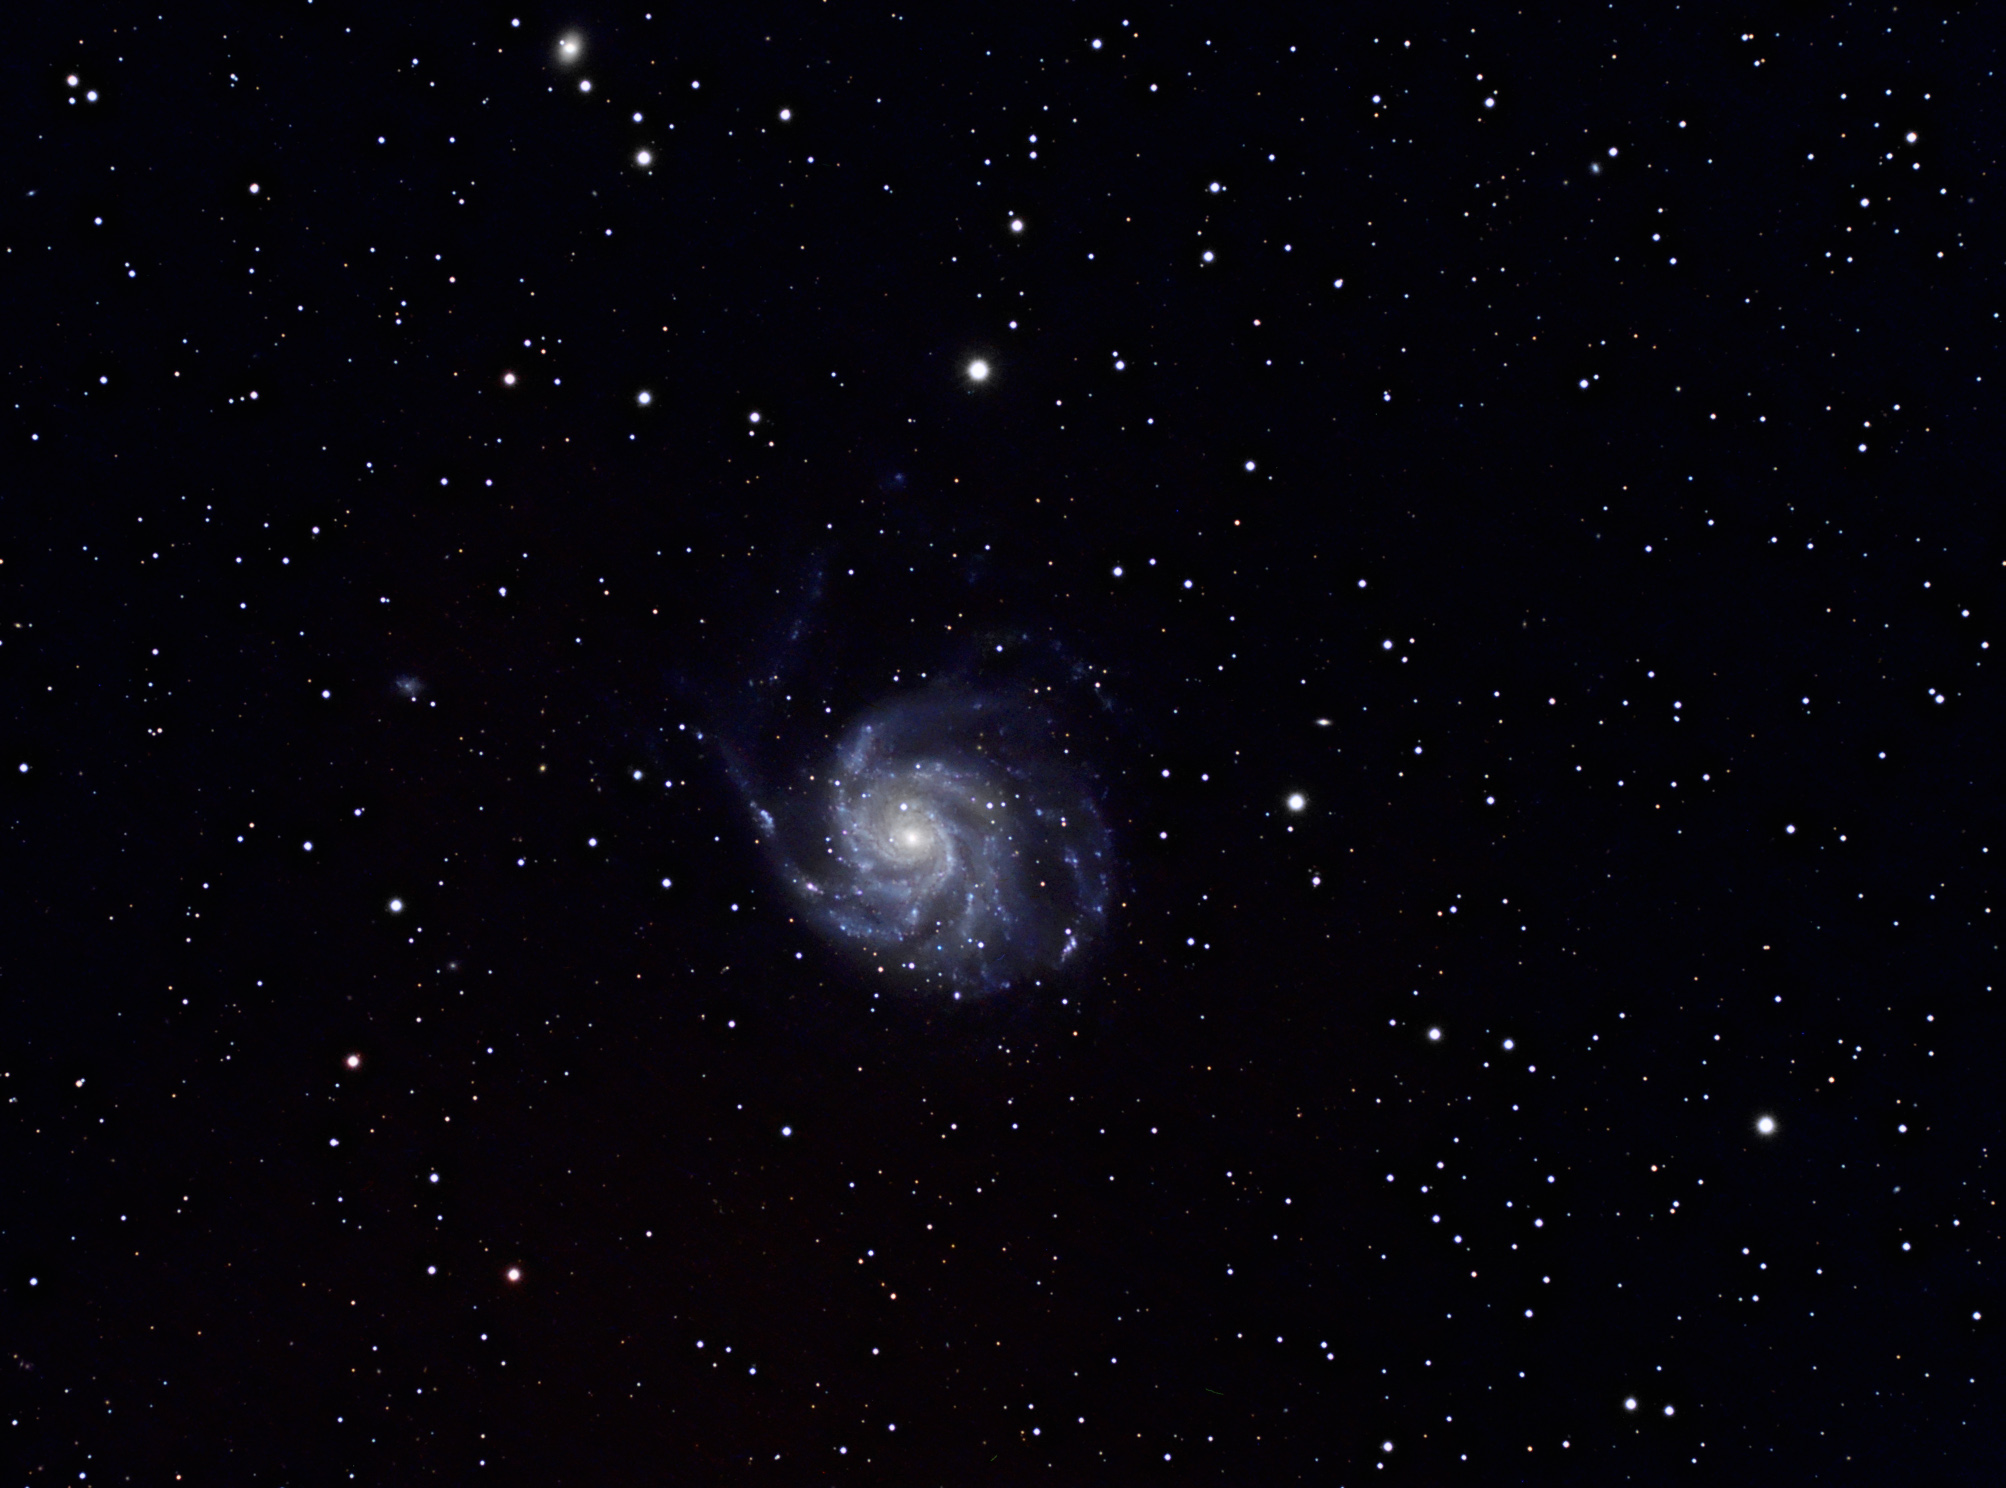 M101 Here is a 496 minute (124x240), or roughly 8.25 hour exposure of galaxy M101 in Ursa Major. Several other galaxies are also visible in this image. Taken with a 4" refractor, also an Astro-Tech field flatenner is in the optical path. The image is at the full resolution of the camera but it is cropped somewhat. Processed with darks and flats and darks for flats using Maxim DL. Final processing done in Photoshop. A Celestron 14 was used for guiding with an Orion Autoguider. This is the first image I've done where data was gathered over two different nights.
OK, some big changes in gear. I modified my C-11 with a Carbon Fiber tube. I also added to it a Starizona SCT Corrector; this items is supposed to make a standard SCT more like the new "flat field" SCTs that are avaialble today, it also changes the focal ration to F7.5 (2100mm for a C-11), I find it works pretty well. Tonight the Moon was very bright and conditions were pretty terrible all around (limiting magnitude maybe 4 or so). Due to the terrible run of weather (for astronomy anyway) we've had I figured I'd take what I can get. The two shots below are more like "test runs" of the new setup. I am still working kinks out of the system.
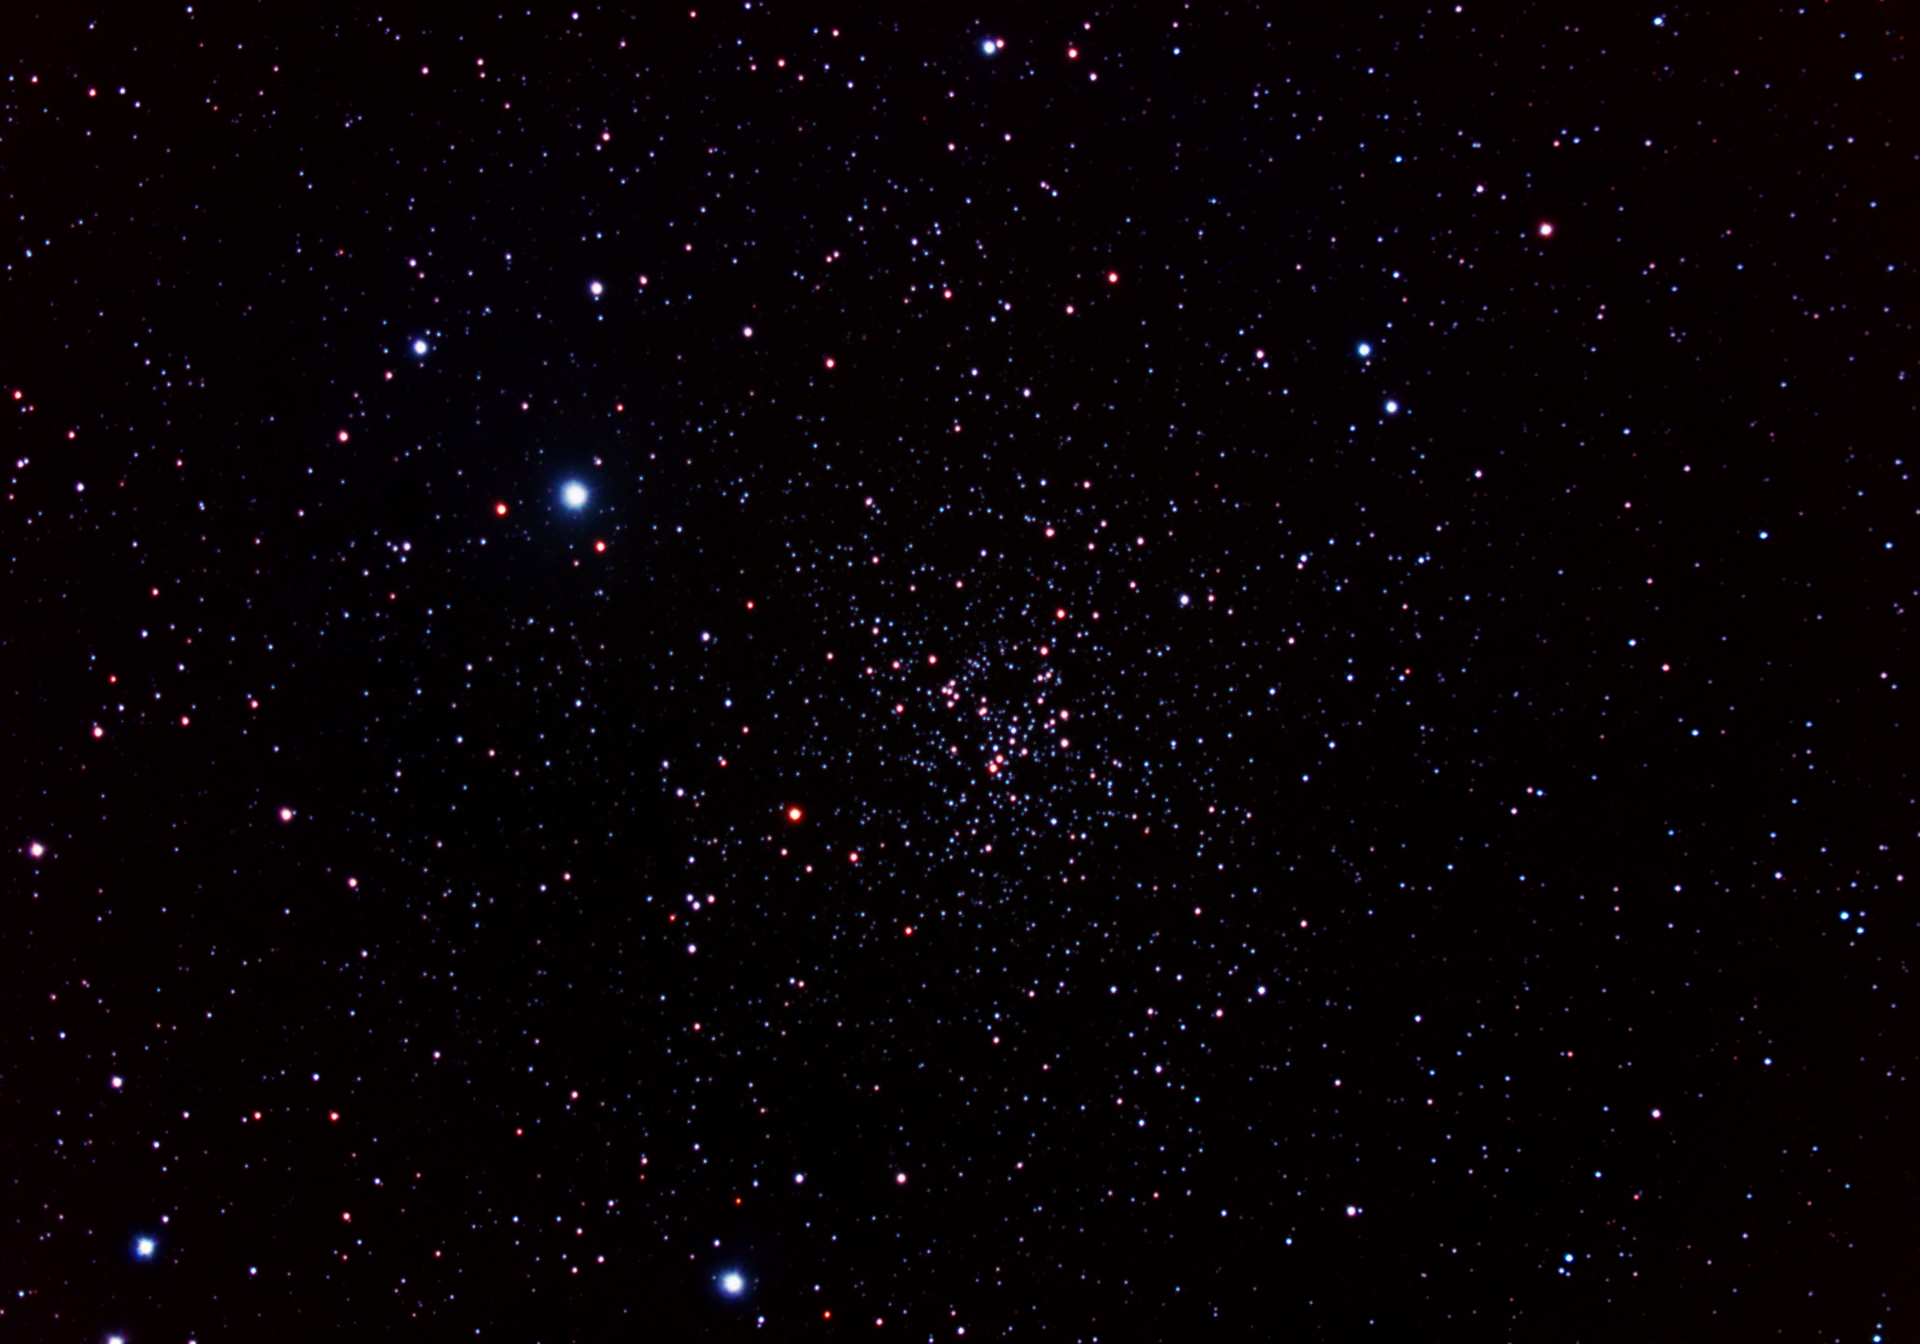 NGC 6819 in Cygnus Here is a 132 minute (32x240) exposure of NGC 6819 in Cygnus. The image is cropped slightly and is rescaled to be 1920 pixels wide (from the orriginal 3040). Taken with a C-11 (carbon fiber OTA modified), also a Starizona SCT corrector is in the optical path as is an Orion broadband light pollution filter. Processed with darks and flats and darks for flats using Maxim DL. Final processing done in Photoshop. A Vixen 102 ED refractor was used for guiding with an Orion Autoguider. Sky conditions were quite miserable tonight.
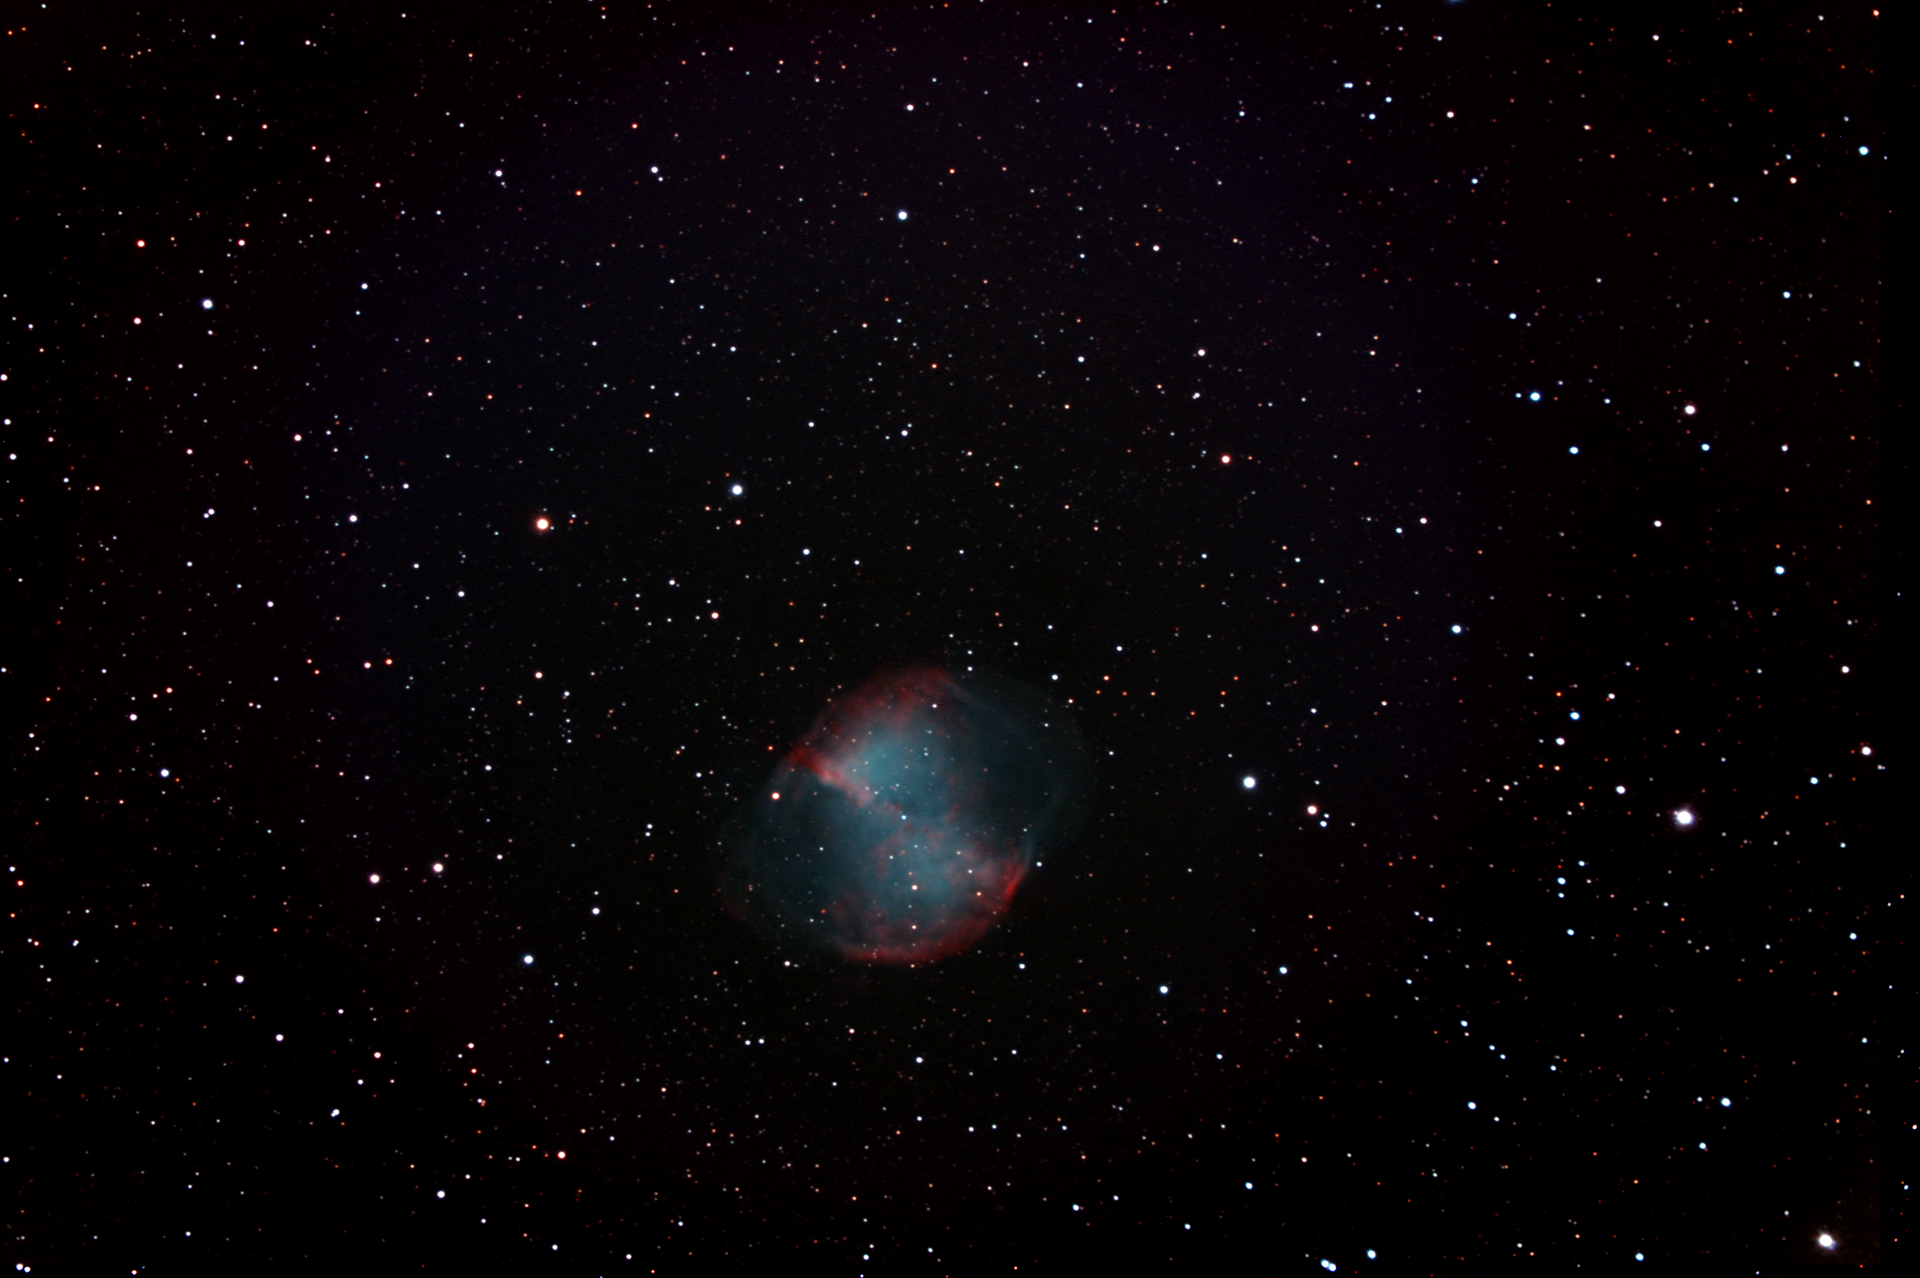 M27 Here is a 104 minute (26x240) exposure of planetary nebula M27. The image is uncropped but is rescaled to be 1920 pixels wide (from the orriginal 3040). Taken with a C-11 (carbon fiber OTA modified), also a Starizona SCT corrector is in the optical path as is an Orion broadband light pollution filter. Processed with darks and flats and darks for flats using Maxim DL. Final processing done in Photoshop. A Vixen 102 ED refractor was used for guiding with an Orion Autoguider. Sky conditions were quite miserable tonight. There is some "read" noise visible in this image.
Use your browser's "back" button, or use links below if you arrived here via some other path:
This page is part of the site Amateur Astronomer's Notebook.
The Joe Roberts Home Page: www.RocketRoberts.com/joe.htm.
E-mail to Joe
Roberts
Images and HTML text © Copyright 2008 - 2011 by Joe Roberts. Please request permission to use
photos for purposes other than "personal use".